Creative Cooking: Orange Chocolate Marble Bundt

“Baking grief….”

Last weekend, our family attended yet another funeral. In five years, we’ve been to over 20, a majority for friends who died too young from cancer. If you’ve been following my blog for any length of time, you can predict what I did with my grief. I went to the kitchen.

Our friend who had died had been a musician, full of fun, and who liked to laugh and keep people on their toes. So, as I thought about his personality, I wanted to create a dessert in his honor, something whimsical. Now, I know that sounds strange – how does one make a food whimsical, but I was determined.

I began by considering types of desserts, and since you all know how lazy I am, a cake was the default choice over cookies or pies or pastries. Also, because I consider Bundt cakes to be pretty and special, that also was an obvious choice.

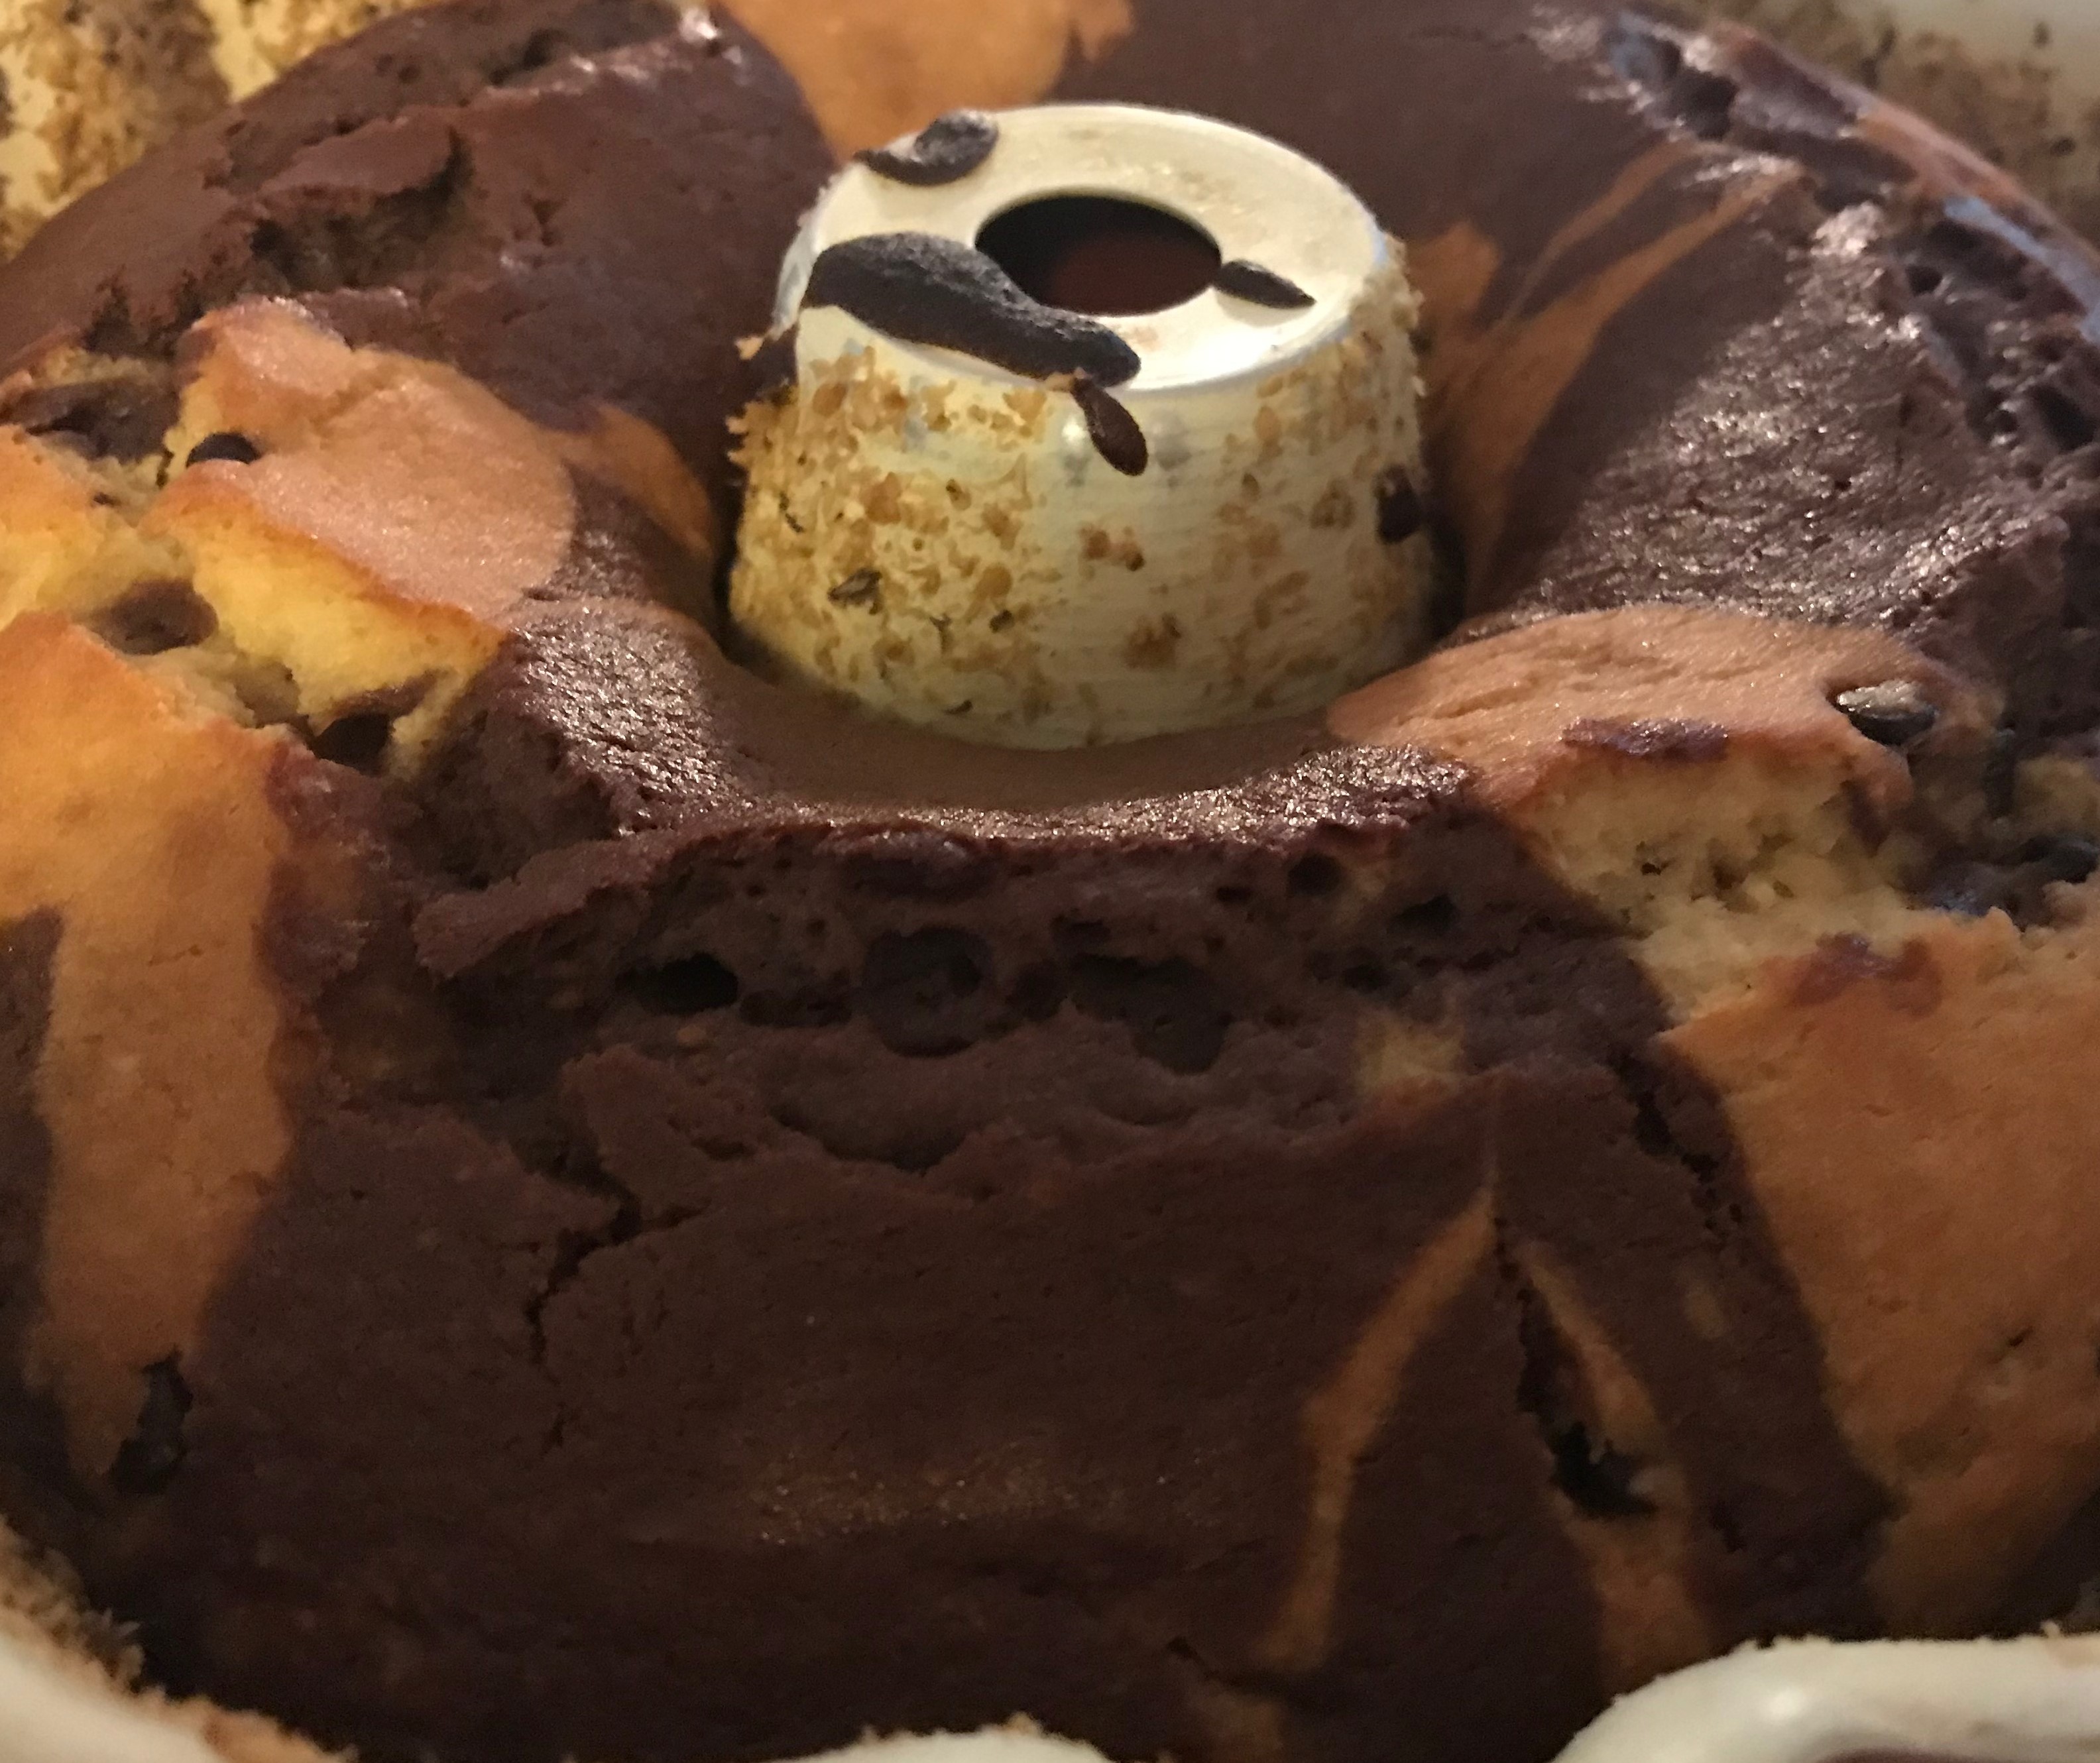
The question was what type of Bundt cake. I wanted something a bit unusual, and as I thought about foods which were a bit different, those chocolate oranges came to my mind. I would combine an orange flavored batter with a chocolate one to make a marble cake. I wanted it to have a bit more whimsy, though, so I also decided to add mini chocolate chips to the orange batter so half the batter would be orange-chocolate and the other orange-chocolate chip.

Since I knew there’d be so much sugar from the chocolate chips, I used agave and monk fruit sweetener and unsweetened orange juice and unsweetened oat milk to reduce the added sugars in the batter. I also wanted to reduce the fat somewhat so I opted to use mostly egg whites and a lower amount of olive oil than usually called for in a Bundt cake.

The result was a tasty cake which was also pretty, and to my mind, rather whimsical – a good tribute to our friend.

Orange-Pumpkin Marble Cake

Ingredients:

3/4 cup unsweetened oat milk

1/2 cup unsweetened orange juice

2 1/2 cup gluten free flour blend (I used a whole grain blend)

2 tsp baking powder

1/2 tsp baking soda

1/2 tsp salt

1 tbsp dried orange peel

1/2 cup extra light olive oil

1/2 cup agave

1/2 cup classic monk fruit sweetener

1/2 cup liquid egg whites

1 large egg

1/2 cup Enjoy Life mini chocolate chips

second 1/2 cup of mini chocolate chips

Baking Instructions:

  1. Preheat the oven to 350 degrees. Grease the Bundt pan. I used vegan soy free butter and then sprinkled ground flax seed to coat the pan.
  2. Combine the oat milk with the orange juice and let it sit to thicken.
  3. Mix together the flour, baking powder, baking soda, salt, and orange peel, and set aside.
  4. To the oat milk mixture, add the oil, agave, monk fruit sweetener, egg whites and egg. Mix well.
  5. Divide the batter so that 60% is in one bowl and 40% is in a second bowl.
  6. In the microwave, melt the mini chocolate chips by microwaving for 20 seconds, stirring, and then microwaving for an additional 10 seconds so that you can completely stir the chips to a smooth consistency. Let it cool for a minute.
  7. Add a spoonful of the 40% batter to the melted chocolate and stir well. Add a second spoonful and stir well. Then add all of the chocolate mixture to the 40% batter bowl and mix until well combined.
  8. To the remaining 60% of the orange batter, add the second 1/2 cup of mini chips and stir until combined.
  9. To make the Bundt cake, drop alternating spoonfuls of the two batters in a layer. Then continue to layer the batter with alternate spoonfuls of the batter which are opposite to the layer below. When all the batter has been used, gently tap the pan on the counter so the layers can settle.
  10. Bake in the preheated oven for 40 to 45 minutes until the cake has puffed, is golden, and a toothpick inserted into it comes out clean.
  11. Remove the pan to a cooling rack and allow the cake to cool a minimum of 25 minutes, but longer is better. Then remove the cake from the pan to a wire cooling rack to cool completely.
  12. You can enjoy the cake as is or if you want to make it a bit more special, drizzle melted chocolate over the top and sprinkle with finely chopped bits of candied orange peel and chocolate.


Creative Cooking: Vegan Chocolate Chip Muffins

“Yes, a pick me up….”

When I was a younger mom with younger children, no one told me that I should consider those the “easier” years of being a mom. Perpetually exhausted from lack of sleep, newly learning how to be a parent, mentally and emotionally perplexed by each new developmental-stage challenge, it can seem like those parenting years are the most difficult.

Today, as an older mom of both grown and teenage children, I sometimes yearn for those- what I know now to be – “easier” days of parenting. Back then, there were challenges but most everything was within our control as parents. We could enforce bed times, make rules for behavior, put the children in car seats and strollers to keep them safe, and find a myriad of books which told us how to toilet train, get them to sleep in their own beds, and encourage their emotional abilities to interact with the world around them.

With older children, the challenges are much more challenging and mostly out of our control to fix, the children are not bound by anything we say or offer, and the few books which are out there agree that all we can do is be there for our children and hope and pray for the best.

So, some days, I just need a little pick-me-up, a treat, to keep me going in the middle of a long day of driving between colleges and home or helping with a problem long-distance by phone. If you’ve followed my blog for a while, you already know that I fully believe in comfort eating now and then. Obviously, you don’t want to overindulge all the time in too many “not as good for you” foods, nor do you want to use food as a way of dealing with your problems, because it doesn’t work. At the same time, a well-timed small treat once in a while when you’re in need of something to give you a bit of energy – physically, mentally, and emotionally – is not necessarily a bad thing.

Hence, this week’s post on vegan, gluten free chocolate chip muffins. They hit the spot, as they say. I like to make them as mini muffins because just one mini muffin usually does the trick for me, but the children prefer them regular size because otherwise they’d be likely to eat three or four of the little ones.

Vegan Chocolate Chip Muffins

Ingredients

1 cup unsweetened vegan/plant based milk (we use soy or flax or oat)

1 tbsp vinegar (choose white, apple cider, or raspberry)

2 cups your favorite gluten free flour blend (I like King Arthur’s whole grain blend)

2 1/2 tsp baking powder

1/2 tsp baking soda

2 tsp ground cinnamon

1/2 tsp nutmeg

1/2 tsp salt

1 cup Enjoy Life mini chocolate chips

1/2 cup coconut sugar or monk fruit golden sweetener

6 tbsp plant oil (we use safflower or avocado or extra light olive oil)

2 tsp gluten free vanilla extract

Baking Instructions:
    1. Preheat the oven to 350 degrees. Line a 12 regular-sized muffin tin or 24 mini-muffin tin with appropriately sized cupcake liners or grease the tins with your preferred method, and set aside.
    2. Mix together the “milk” and vinegar to make a “buttermilk”. Allow it to thicken.
    3. Combine together the flour, baking powder, baking soda, cinnamon, nutmeg, salt and chocolate chips.
    4. Add to the “buttermilk”, the coconut sugar, oil, and vanilla extract.
    5. Add the dry ingredients to the wet and mix until all dry ingredients are moistened.
    6. Evenly divide the batter among the muffin tins of choice.
    7. Bake in the preheated oven until puffed, golden and a toothpick inserted in the center comes out clean. Larger muffins will take about 20-25 minutes. Mini muffins will take 10-15 minutes.
    8. Let the muffins cool in the tins for 5 minutes; then remove them to a wire cooling rack to cool completely.

Healthy Habits: Pumpkin Oat Bundt Cake

“Have you ever tried….?”

I am continually amazed by just how many items there are on the market these days for folks trying to eat healthier and/or allergy friendly. Just a decade ago, I was driving distances to little, out of the way, specialty stores to try to find this or that. Now, I walk into the grocery store, ten minutes down the road, and every week, something new is on the shelf.

Recently, a friend asked me if I had ever tried monk fruit sweeteners since she knew I didn’t bake with sugar. Since I had not actually tried it, I thought I’d research it and give it a try.

Some things for you to know about monk fruit sweeteners:

  1. Research seems to indicate that monk fruit as a fruit does not increase blood sugar levels in diabetics, but always check the sweetener blends to make sure there are not other added sugars which may increase blood sugar levels.
  2. As a substitute for sugar, monk fruit and monk fruit sweetener blends are more expensive than even other substitutes on the market (like agave or coconut sugar or truvia). So, if finances are tight, it may not be your first option.
  3. Also, as a substitute, monk fruit sugar blends are not as easy to find in your local supermarkets as other options. I could only find it at one grocery store a couple of towns over.
  4. Monk fruit sweeteners can have a bit of an after taste, which some folks may like but some really don’t.
  5. Monk fruit sweeteners come in “classic” and “golden”. Classic is supposed to be similar to white sugar. Golden mimics brown sugar.
  6. The monk fruit sweetener packages say, “1 to 1,” for use. I would strongly discourage folks from doing so. It is really, really sweet. In the recipes I tried, using half or less worked just fine.
  7. I also discovered that, despite instructions, the monk fruit sweetener blend tended to work better in baked goods if you mixed them with the wet ingredients instead of the dry. The monk fruit sweetener mixed with the dry ingredients in brownies rose to the top during cooking, mottling the appearance and affecting the brownie texture. Dissolving the sweetener with the wet ingredients, however, alleviated both issues.

In the midst of my experiments with the monk fruit sweeteners, I needed to make a cake for a friend with diabetes who also needs to add more fiber into his diet. I decided to create an oat-filled pumpkin bundt cake, using the monk fruit sweetener. The result was a moist, tasty cake.

Pumpkin Oat Bundt Cake

Ingredients:

For the pan and streusel:

vegan soy free butter

1/4 cup ground flax seed

1/4 cup quick cooking gluten free rolled oats

1 tsp cinnamon

1 tsp nutmeg

1 tsp golden monk fruit sweetener

1/4 cup quick cooking gluten free rolled oats

1/2 tsp cinnamon

1/2 tsp monk fruit sweetener

1 tbsp melted vegan soy free butter

For the batter:

2 cups cooked, pureed pumpkin

1 tbsp minced ginger/ginger paste

1 cup extra light olive oil

1 cup golden monk fruit sweetener

3/4 liquid egg whites

2 cups gluten free high fiber/high protein flour blend (I used Bob’s garbanzo bean blend)

1 cup gluten free brown rice flour blend

2 1/2 tsp baking soda

2 tsp cinnamon

1 tsp nutmeg

1/2 tsp ground ginger

1/4 tsp cloves

2 tbsp vinegar

Baking Instructions:

  1. Preheat the oven to 350 degrees.
  2. Prepare a bundt pan by greasing it with vegan soy free butter.
  3. Then, mix the ground flax seed, oats, cinnamon, nutmeg and monk fruit sweetener. Carefully coat the inside of the bundt pan with the mixture. At least a quarter of the mixture should be left over when you are done.
  4. To the leftover mixture add the additional oats, cinnamon, and monk fruit sweetener. Combine and then mix in the melted butter. Mix until all dry ingredients are moistened. Set aside.
  5. Combine together the pumpkin, ginger, oil oil, monk fruit sweetener, and egg whites. Set aside.
  6. Mix together the garbanzo bean flour blend, the brown rice flour blend, baking soda, cinnamon, nutmeg, ginger, and cloves.
  7. Add the dry ingredients to the wet and mix well, adding the vinegar.
  8. Carefully spoon about 1/3 of the batter into the bundt pan.
  9. Sprinkle the oat mixture over the batter.
  10. Then, carefully spoon the remaining 2/3 of the batter over the oat mixture.
  11. Bake in the preheated oven for 30 to 35 minutes until the cake is puffed, golden, and a toothpick inserted into it comes out clean.
  12. Allow the cake to cool in the pan for at a minimum of 15 to 25 minutes.
  13. Remove the cake from the pan and allow it to cool completely on a wire rack.
  14. Enjoy!