Trending Tries: Tofu Pumpkin “Cheesecake”

But why…?

Being Asian, I have always eaten tofu, or in my case, called “dubu”, pronounced do-boo. Now, however, tofu has become a worldly trend for more than just Asian meals.

Vegan and want an egg substitute? Scrambled tofu. Dairy allergy but love spanakopita and lasagna? Tofu “cheese”. Want to add protein to your morning smoothie? Throw in some tofu. Trying to eat less meat? Make a tofu chili.

And the trend does not limit itself to breakfast or entrees. Its versatility lends itself to dessert. Tofu mousse, crème brûlée, cream pies, blintzes, brownies and more.

Why? Because tofu is high in protein, low in calories and fat, full of nutrients, easy to find, and capable of taking on any flavor and any shape.

Recently I decided to try using tofu in a cheesecake. Usually I simply use a dairy free cream cheese since those are plentiful these days, but many are made with coconut or cashews, which is a problem if you are allergic. Others are not great if you prefer to steer clear of ingredients like maltodextrin.

When you look up tofu cheesecakes, you will see that most use silken tofu. Silken tofu has a higher moisture content and purees very nicely with its “silkier” texture. What I noticed, though, was that a lot of the recipes called for an ingredient like cornstarch and/or mixing with nuts, presumably because of the high moisture content of the silken tofu. So, if you have those particular allergies, they are not the best recipes.

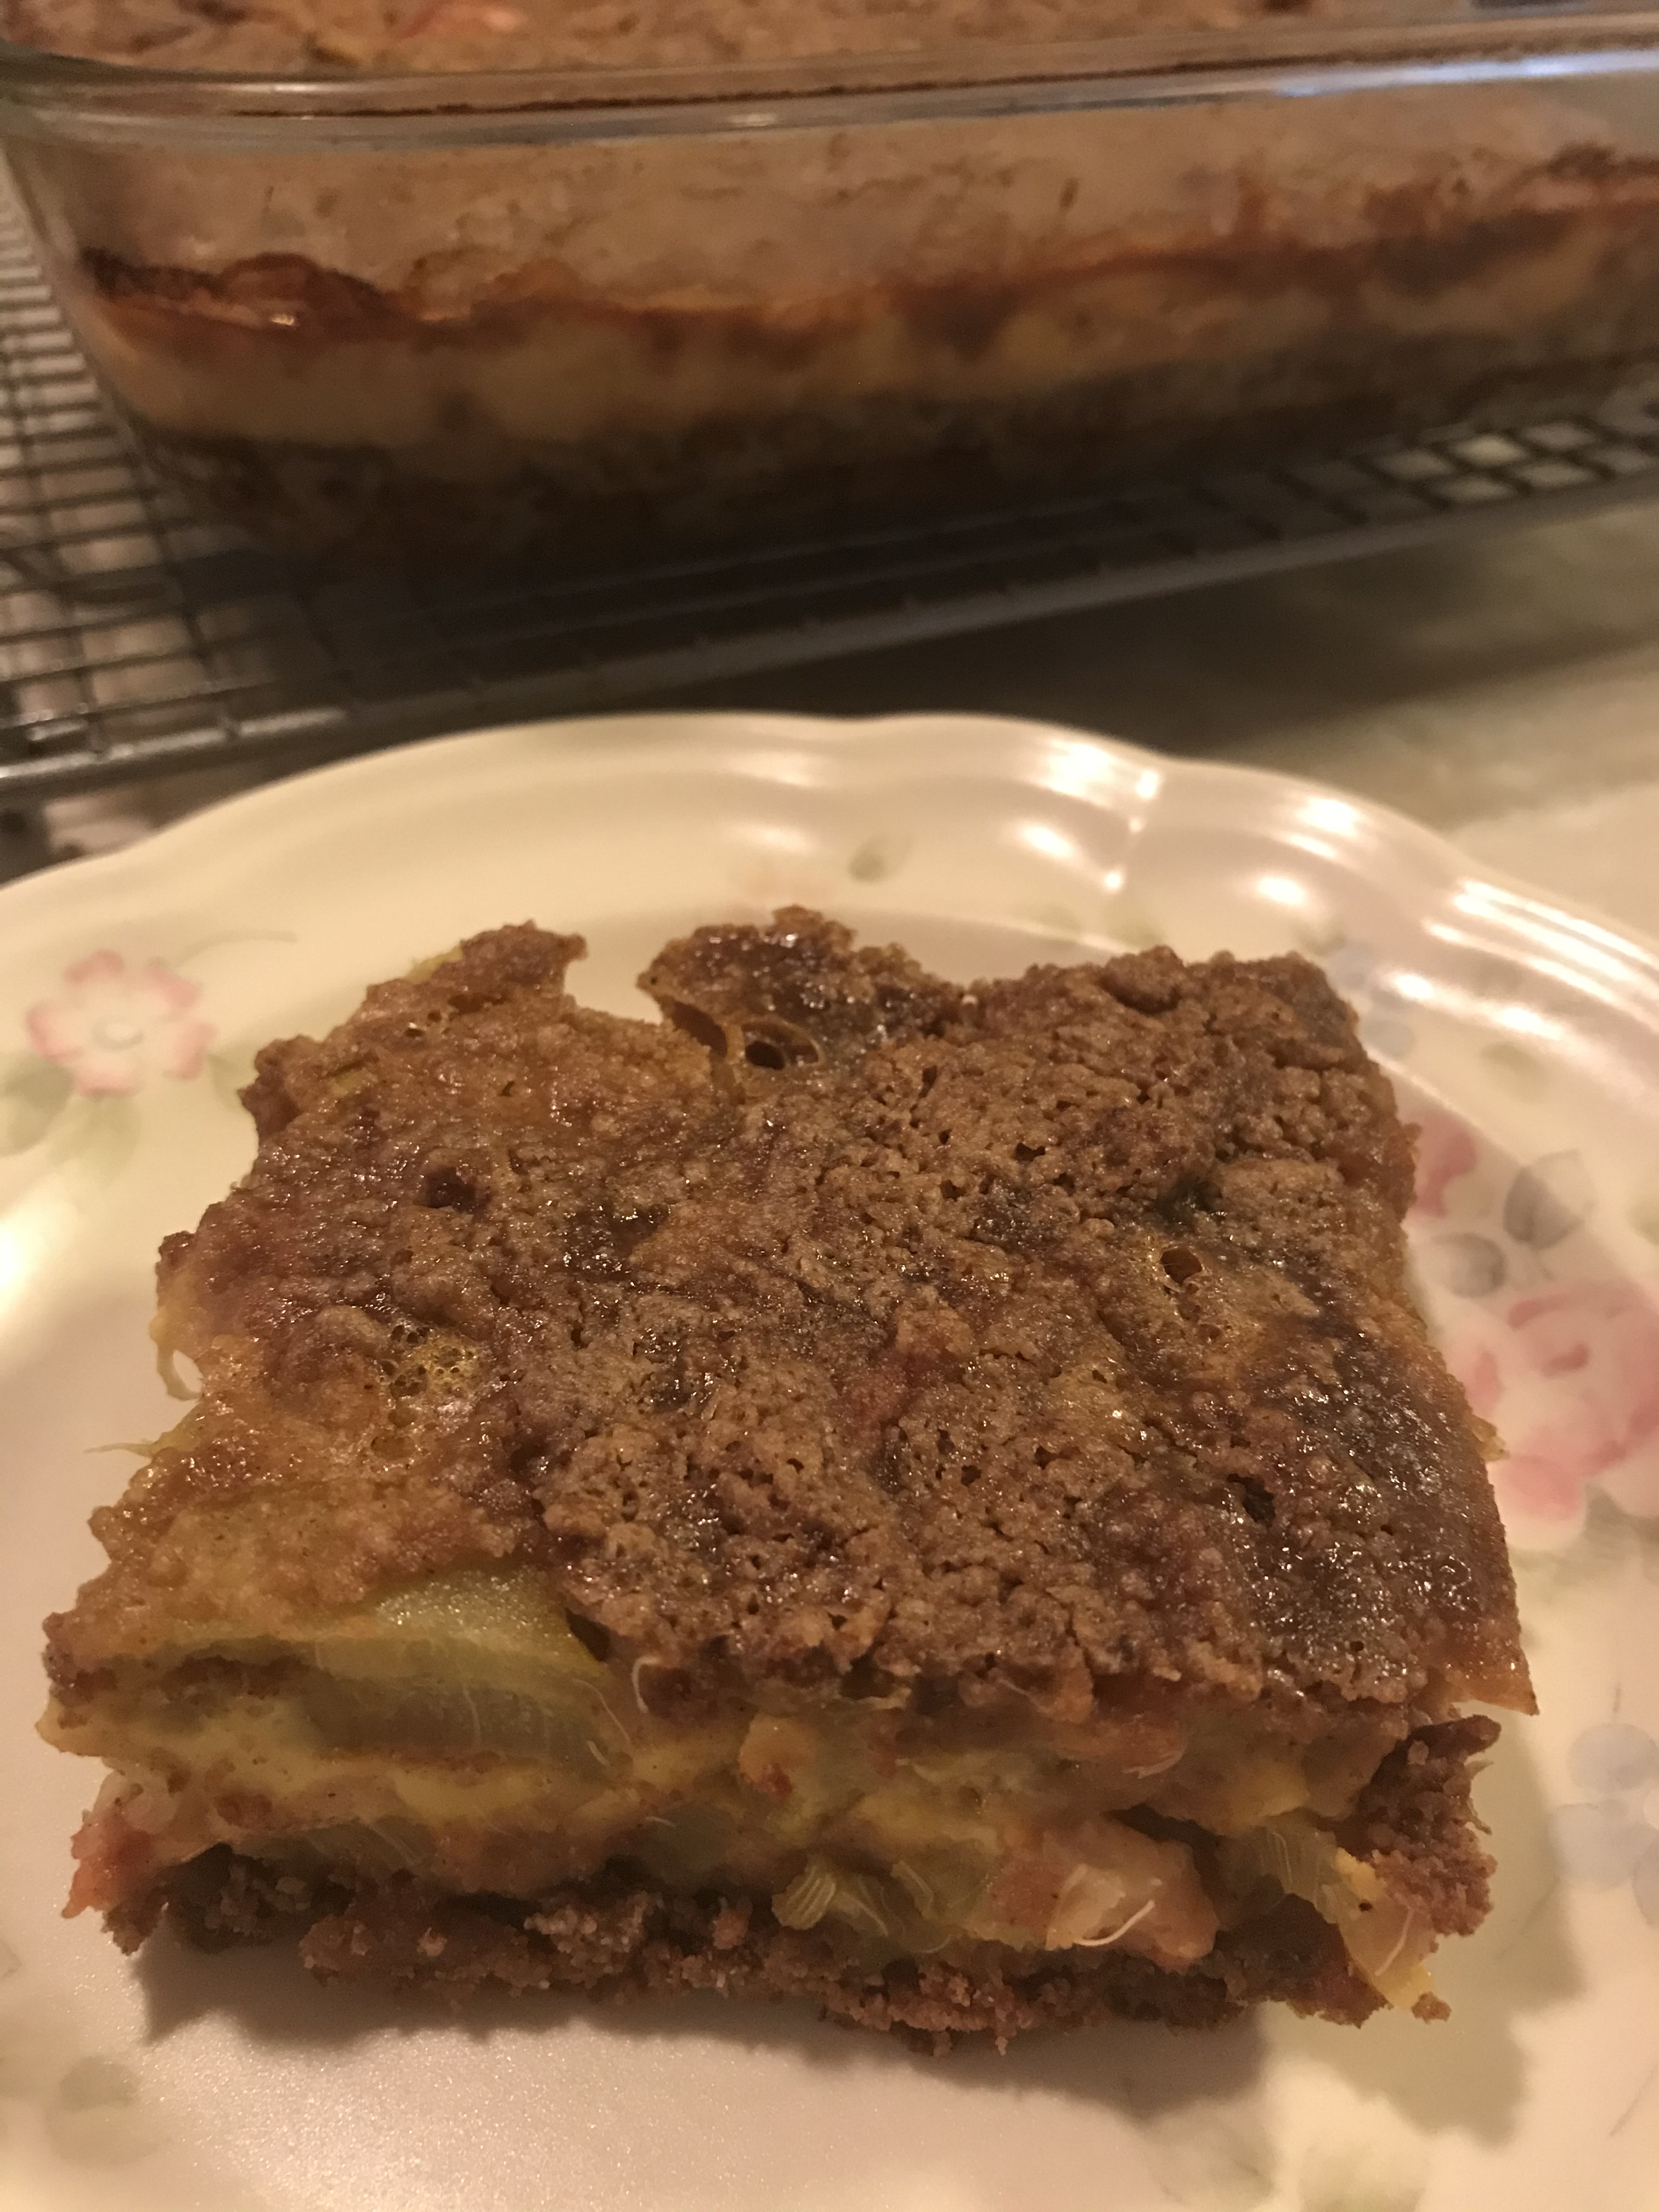
So, I decided to see what would happen if I just used regular firm tofu. The result was definitely not a “cheesecake” but it made a lovely, flavorful dessert which was not too sweet and high in protein and nutrients.

Tofu Pumpkin “Cheesecake”

Ingredients:

2 1/4 cup ginger cookie crumbs (I used a store-bought gluten, dairy, nut free ginger cookie which I processed into crumbs with my food processor.)

8 TBSP vegan butter

Two 14 oz containers of extra firm tofu

1 cup pureed cooked pumpkin

3/4 cup maple syrup

2 tsp cinnamon

1 tsp nutmeg

1/2 tsp ginger

12 oz container dairy free sour cream

1/4 cup maple syrup

cinnamon

Cooking Instructions:

  1. Preheat the oven to 325 degrees and bring water to boil.
  2. Wrap a couple of layers of aluminum foil around the outside of a 9 inch springform pan and place into a larger pan which fits the springform pan.
  3. In a food processor, pulse the vegan butter with the ginger cookie crumbs until the crumbs start to come together more like a “dough”.
  4. Evenly pat the crumb mixture into the bottom the springform pan to form the crust.
  5. In a blender puree the tofu with the pumpkin, maple syrup, cinnamon, nutmeg, and ginger.
  6. Pour the tofu mixture onto the ginger cookie crust and spread evenly.
  7. Place the pan with the springform pan into the oven and pour boiling water into the pan to fill about halfway up the springform pan.
  8. Bake for about 90 minutes until the “cheesecake” is mostly set and only a tiny bit jiggly in the center.
  9. Turn off the oven and with the door open, allow the “cheesecake” to slowly cool for an hour.
  10. Chill the cheesecake in the fridge at least several hours or overnight.
  11. After the cheesecake is cool, whisk the sour cream with the maple syrup and gently pour it over the cheesecake, spreading it to allow some to drip down the side.
  12. Sprinkle the top with a generous amount of cinnamon.

Trending Tries: Grain Free Pumpkin Pancakes

My kingdom for a pancake….

Often people will ask me why I create my own recipes, and the simple answer is, “Because I have to.”

This weekend is a perfect example. I wanted to make pumpkin pancakes but for a variety of reasons my oldest currently needs a diet free of grains and sugars. “Not a problem,” I thought because there would surely be a recipe online I could use.

I was mistaken. There are indeed recipes, but they were either crepe recipes masquerading as pancake recipes (FYI that pumpkin mixed with eggs and a tbsp of flour is a crepe, not a pancake); orange colored pancakes (FYI that taking your pancake recipe and just adding 1/4 to 1/2 cup of pumpkin only makes orange tinted pancakes); or pumpkin pancake recipes using nut flours and lots of sugar or maple syrup and/or fat to cook them.

So, in the end, I once again had to create my own recipe to accommodate my family’s dietary and allergy needs. The result is below, and they were quite tasty.

Grain Free Pumpkin Pancakes

Ingredients:

2 cups pureed pumpkin

4 eggs

2 tsp cinnamon

1 tsp nutmeg

1/2 tsp ginger

1/2 tsp salt

1 1/2 cup grain free chickpea flour

1/2 cup grain free cassava flour

2 cups unsweetened dairy free milk mixed with 2 tbsp lemon juice or vinegar

1/4 cup melted non-dairy butter

1 1/2 tsp baking powder

1/2 tsp baking soda

Cooking Instructions:

  1. Whisk together the pureed pumpkin with the eggs until smooth.
  2. Add the cinnamon, nutmeg, ginger, salt, chickpea flour and cassava flour, and blend well. Will be thick.
  3. Combine the milk with the lemon juice or vinegar and stir well, letting it sit for a minute, before adding to the pancake batter. Whisk until the batter is completely smooth.
  4. Slowly whisk in the melted butter.
  5. Add the baking powder and baking soda and blend well.
  6. Let the batter sit for 15 to 30 minutes while you heat the griddle.
  7. Heat a griddle at 325 to 350 degrees or a skillet on the stove on medium heat. If either is nonstick, no additional greasing is needed. If neither are nonstick, then you’ll need to grease your pan with your preferred method.
  8. Pour 1/4 cup of batter for each pancake and let it cook for a minute or two until the edges become dry. Flip and finish cooking on the other side for 30 seconds to a minute. Your pancake will rise and be golden on both side when they are done.
  9. To keep the pancakes warm, put them into a glass container with a lid and put them into a preheated oven on the lowest setting (mine is 170 degrees). To cool, put them on a wire rack, and then stack them in a container to keep in the fridge. To reheat, just popped them into the toaster or in the microwave. They freeze well, too.

Trending Tries: Vegan Lemon Cheesecake

“Going vegan….”

COVID has brought many changes to people’s lives, one of which is folks thinking more about their health. Over the past year and a half, a growing trend has been more people turning to veganism, for a variety of reasons.

As someone with a dairy allergy, often our family recipes end up being vegan anyway, but recipes like cheesecake use eggs. Because several extended family members are now vegan, I decided to experiment with making a vegan cheesecake.

Many recipes I found utilized nuts which we cannot have due to allergies, so I went to the very basics which is that a cheesecake is usually cream cheese, sugar, and eggs. So, the issues were twofold: how to bind the cheesecake without using eggs and how to add the liquid which came from eggs.

In the end I used a vegan condensed milk which added both the sweetener and the liquid, and I opted for cornstarch to help bind. The result was a creamy, delicious cheesecake which we all enjoyed.

Vegan Lemon Cheesecake

Ingredients:

2 1/4 cups gluten, dairy, nut free gingersnap cookie crumbs (an 8 oz bag of your favorite allergy friendly brand, pulsed into crumbs)

1/4 cup melted vegan butter (use your favorite brand)

Three 8 ounce containers of vegan cream cheese (use your favorite type), at room temperature

11 oz vegan sweetened coconut condensed milk (use your favorite brand)

1/2 cup lemon juice (fresh squeezed in best)

3 tbsp cornstarch

1/4 tsp lemon extract

Baking Instructions:

  1. Preheat the oven to 325 degrees. Wrap the outside of a 9 inch springform pan with a couple of layers of aluminum foil, and bring water to a boil for later use.
  2. Mix together the gingersnap cookie crumbs with the melted butter and evenly spread the crumbs into the springform pan, patting the crumbs into a solid crust.
  3. Bake for 10 minutes. Remove to a cooling rack and allow it to cool.
  4. Beat the cream cheese until smooth. Scrape down sides frequently.
  5. Add the sweetened condensed coconut milk, lemon juice, cornstarch and lemon extract, and blend until completely combined and smooth.
  6. Pour into the springform pan and spread evenly over the cookie crumb crust.
  7. Place the cheesecake into a pan larger than the springform pan and pour the boiling water into the pan until the water is about halfway up the springform pan.
  8. Bake the cheesecake for 60 to 65 minutes until the cheesecake is mostly firm and just slightly jiggly in the center. A knife inserted at the edge of the cheesecake will come out clean.
  9. Turn off the oven, and with the oven door open, let the cheesecake cool for 45 minutes to an hour inside the oven.
  10. Put the cheesecake in the fridge and allow it to cool for several hours or overnight.
  11. Once the cheesecake has solidified in the fridge, run a butter knife around the edge to loosen it from the springform pan, and remove the cheesecake.
  12. Serve plain, with vegan cream, and/or decorated with fruit.

Trending Tries: Rhubarb

“I don’t like change….”

When you are raising children on the autism spectrum, you spend a lot of time helping them to learn how to adapt to change, which is not an easy feat. As we are all aware, life is nothing but change. If we are lucky, the changes are gradual, giving us time to adjust, but many times the changes are unexpected and take us by surprise.

The last year and a half has brought many changes for the entire world, some of which we have all experienced together, while others have been unique to individual lives, families, countries.

I have noticed a trending change in how people are thinking about food. The pandemic has provided not just the time to consider eating habits but the thought that maybe our eating habits are not as they ought to be. As such, people I have known to always be staunch meat supporters are suddenly vegan. People who never cooked at all are now experts in homemade, whole grain bread baking. Others have realized that the cause of many of their health issues are due to the foods they have been eating and are adjusting their diets. Still more folks are trying foods they have never eaten before.

Recently, the conversations I have had with folks have centered around rhubarb. Rhubarb has been around for a long time but mostly ignored by people I know whose response to rhubarb is usually, “Oh, you mean the purply-green thing which looks like celery but isn’t?” If folks are familiar with rhubarb, it is only as part of a strawberry, rhubarb pie.

Rhubarb, however, is a good source for vitamin K, antioxidants and fiber. It is also extremely versatile, useful for more than just a strawberry, rhubarb pie. During the summer, it is plentiful in both markets and many people’s yards because it is so easy to grow.

This summer, our family has been making rhubarb, lentil soups and rhubarb cake, both of which I will share in this post.

Rhubarb, Lentil Soup

Ingredients:

1 lb dried lentils, rinsed and picked over

2 tbsp olive oil

1/2 cup finely chopped onions

2 tsp minced garlic

2 tsp minced ginger

1 tsp curry powder

1/2 cup thinly sliced petite carrots

1 cup quartered and diced zucchini

2 cups finely sliced rhubarb

½ tsp black pepper

½ tsp salt (if your broth is unsalted)

6 cups choice of broth (vegetable, chicken, etc.)

Cooking Instructions: 

  1. Rinse, check, and drain the lentils. Set aside.
  2. In a large pot (I use my Dutch oven), heat the olive oil, and saute the onions, garlic, ginger, and curry powder for a minute to release the flavors.
  3. Add the sliced carrots and zucchini and saute for 2 minutes.
  4. Add the rhubarb and saute for 5 minutes until they are soft.
  5. Add the lentils, black pepper, and salt. Stir well.
  6. Add the broth and bring to a boil.
  7. Lower the heat, cover the pot, and simmer for 45 minutes until the lentils have swelled and the soup has thickened.
  8. Serve with a garnish of chopped green onions.

Rhubarb Cake

Ingredients:

3 cups gluten free oat flour

¾ cup sweetener (I use coconut sugar or monkfruit sweetener blend)

2 tsp cinnamon

½ tsp nutmeg

1 cup vegan butter

4 eggs, beaten

¼ cup gluten free oat flour

1 tsp cinnamon

½ tsp nutmeg

½ tsp salt

1 cup dairy free milk (I use unsweetened soy or oat or flax)

¾ cup sweetener (I use coconut sugar or monkfruit sweetener blend)

4 cups thinly sliced rhubarb

¼ cup sweetener (I use coconut sugar or monkfruit sweetener blend)

1 tsp cinnamon

Optional: 1 cup finely diced strawberries

Baking Instructions:

  1. Preheat the oven to 350 degrees.
  2. Using a pastry blender or a food processor, blend the oat flour, sweetener, cinnamon, nutmeg and butter until you have coarse crumbs.
  3. Remove 1 ½ cup of the crumbly mixture, and set aside.
  4. Pat the remaining flour mixture into an ungreased 9 x 13 pan, and bake for 15 minutes.
  5. While the crust is baking, mix together the beaten eggs and oat flour until very smooth.
  6. Add the cinnamon, nutmeg, salt, milk, and sweetener. Set aside.
  7. Blend the rhubarb with the sweetener and cinnamon (and strawberries if using).
  8. When the crust is done, evenly spread the rhubarb over the crust, and pour the egg mixture over the rhubarb.
  9. Sprinkle the remaining crumb mixture evenly on top.
  10. Bake for 45 minutes until the topping is golden and the eggs have solidified.
  11. Eat warm or cooled as is or with dairy free frozen vanilla dessert.

Rockin’ Rolls: Gluten Free Garlic-Herb Rolls

“Try, try again….”

One of the hardest adjustments to having to be gluten free was the many disappointing gluten free roll recipes which did not live up to expectations. One of my daughters, though, was persistent, and many, many adjustsment later, we finally have a recipe which which has worked time and time again. So, I’m sharing it here with you for you to try.

Gluten Free Herbed Garlic Rolls

Ingredients:

2 tbsp white vinegar plus dairy free milk to equal 2 1/2 cups (We use soy or flax milk.)

1 1/2 cup liquid egg whites, at room temperature

6 tbsp safflower oil

1/2 cup gluten free flour (We like to use oat flour.)

2 tsp garlic powder

6 cups gluten free flour blend (We have been using the King Arthur’s whole grain blend.)

2 tbsp xanthan gum (This is in addition to what is in the flour blend.)

1 tbsp dried chopped chives

1 tsp dried thyme

1 tsp dried basil

1 tsp dried oregano

1 tsp dried rosemary

1 tsp garlic powder

1 tsp onion powder

1 tsp salt

1/4 cup sugar

9 tsp active dry yeast

melted vegan butter

Baking Instructions: (If your mixer can’t accommodate the 6 cups of flour plus additional ingredients, you will want to cut the ingredients in half and make two batches.)

  1. Line two cookie sheets which can fit twelve rolls each with parchment paper and sprinkle cornmeal on the parchment paper. Set aside.
  2. In a large measuring cup, pour 2 tbsp vinegar and add enough “milk” that you have 2 1/2 cups of liquid. Mix well, and set aside to thicken.
  3. In a bowl, whisk the egg whites until frothy. Then add the oil, and rewhisk until well combined. Set aside.
  4. Mix together – in a bowl large enough to roll dough balls in – the 1/2 cup flour and garlic powder, and set aside.
  5. In large mixing bowl, mix together the flour, xanthan gum, chives, thyme, basil, oregano, rosemary, garlic powder, and onion powder. Then add the yeast.
  6. Add the vinegar milk and egg whites with oil to the dry ingredients and mix on low speed until all ingredients are combined.
  7. Turn the mixer to medium-high speed and beat about 5 minutes. The batter should be smooth and shiny. (If the mixture is not smooth and shiny because it is too stiff and dry, add a tbsp of “milk” and remix. You may need to add a couple of additional tbsps of “milk”, depending on the flour blend you use. With the King Arthur, the 2 1/2 cup has always been just right.)
  8. Flour your hands, and roll 1/4 cup size dough balls in the prepared garlic-flour, shake off any excess flour, and place the rolls on the prepared cookie sheets.
  9. Once all the rolls have been floured and place on the pans, lightly bruth the tops of the rolls with melted butter. You can leave the rolls roundly topped, or as in the second picture, cut gently into the top with a knife to form a crease.
  10. Cover the rolls with plastic wrap and allow them to rise for 45 minutes. (A trick for the winter is to turn on the light in your oven while you’re preparing the rolls and put the pans into the oven to rise. The warmth from the light will help the rolls to rise better. If you don’t have an oven light, another trick which my mother-in-law taught me is that you can also preheat your oven to the lowest setting – mine is 170 degrees – then turn off the oven and let it cool while you are preparing the rolls. This should allow the temperature in the oven to go down to the 70-80 degrees which is ideal for rising dough.)
  11. After the rolls have risen, preheat the oven to 375 degrees.
  12. Place the two pans side by side in the oven and bake for 30 minutes until the rolls have risen, are golden, and sound hollow when you tap them. If you are a temperature-taker, the internal temperature of the rolls should be 200 degrees.
  13. Remove the rolls from the oven and put them onto a cooling rack to cool. They can be stored in a tupperware on the counter and rewarmed in the oven or in the microwave.


Holiday Happenings: New Year’s Log

“I want something special….”

Right before the holidays I heard a true story about a mom who got so upset about her young children’s whining that she cancelled Christmas for them. No presents. No special dinner. No celebration. Not just for that year but apparently for the next few years.

I was appalled. I can empathize with the mom’s frustration about the whining, but being whiny is a growth area which even many adults need to work on, and which requires training, patience, and modeling, not retaliation. What really struck at my heart, though, was her presumption that the holiday was a “right” which she could just take away as a punishment.

For me the holiday season as a whole (Hanukkah, Christmas, Kwanzaa, New Year’s) is a gift. We don’t like to admit it, but as individuals, we can be selfish. Celebrating holidays – whether it’s this time of the year, summer vacations, Halloween or someone else’s birthday – is a gift to a selfish race. We don’t earn it. We’re just given these opportunities to practice being with one another, to extend love to one another, to think beyond ourselves about others.

So, when one of my daughters said she wanted to make a yule log for New Year’s eve tonight, I welcomed it as an opportunity for us to spend time together doing something she had requested.

Since folks know I usually like things to be quick and easy, spending an afternoon cooking something with many steps to it is not usually my heart’s desire. In this case, though, it meant time with my daughter, as well as an opportunity to exercise creativity.

For folks who think a yule log is difficult, I can assure you, it actually is not. It’s really simple to make. It just requires time, and with our gluten and dairy allergies it also required a few substitutions. In the end, though, the time was well spent, and my daughter and I enjoyed creating something special together to celebrate the end of this year and the beginning of the next.

Our hope is that you will look forward to making it and enjoying it in the new year, too. Happy New Year!

Raspberry Chocolate Yule Log

Ingredients:

Sponge Cake Batter:

3/4 cup gluten free flour blend of choice, sifted* (I used King Arthur’s whole grain blend)

1/4 cup Hershey’s unsweetened special dark cocoa powder

1 tsp baking powder

1 tsp cinnamon

1/8 tsp salt

6 eggs, separated, at room temperature

2 tsp vanilla

2 tbsp plant based oil (I used safflower oil)

1/4 cup sweetener (I used the Truvia/sugar blend)

1/4 tsp cream of tartar

1/4 cup sweetener (I used the Truvia/sugar blend)

“Cream” Filling:

1/4 cup coconut cream (from the top of a can of coconut milk)

1 1/2 cups dairy free chocolate chips (I used Enjoy Life brand)

8 oz dairy free cream cheese (I used the Tofutti brand)

1/2 cup Polaner Raspberry All Fruit

Log Frosting:

favorite homemade chocolate frosting or ready-made dairy free frosting (I used Simple Mills dairy free brand)

Baking Instructions:

  1. Preheat the oven to 350 degrees. Spray or grease a 12 x 17 inch shallow, sided cookie sheet and line it with parchment paper. Then grease the parchment paper with vegan butter.
  2. Whisk together the flour, cocoa powder, baking powder, cinnamon, and salt. Set aside.
  3. Whisk the six egg yolks until they are a light, yellow color. Add the vanilla, oil, and sweetener and blend well. Use a large bowl because you’ll be adding the dry ingredients plus the egg whites.
  4. Add the dry ingredients to the egg yolks mixture and blend well.
  5. In a mixer, add the cream of tartar to the egg whites and begin to mix on low. Slowly add the sweetener while it is mixing. Then increase the speed and continue to mix the egg whites until they become snowy white and stiff (when you pull up the whisk, the egg whites will form triangles.)
  6. Fold the egg whites into the chocolate batter, slowly and deliberately. You add small amounts of the egg white and using a scooped spatula, hug the curve of the bowl to scoop batter up and over into the center of the egg whites, over and over again until all the egg whites are incorporated into the batter. The batter will lighten in color and expand.
  7. Spread the batter into the prepared pan and baked in the preheated oven for 15 minutes. When done, the sponge cake will be puffed and firm to the touch.
  8. While the cake is in the oven, cut a piece of parchment paper which is larger than 12 x 17 inches. Sprinkle it with unsweetened cocoa powder.
  9. When the cake is done, immediately turn the cake over onto the prepared parchment paper and remove the parchment paper sticking to the cake from cooking in the oven. Sprinkle with unsweetened cocoa powder and carefully roll the cake into a circle. Put the cake into the fridge to cool. Will need at least an hour.
  10. While the cake is cooling, take the top cream from a can of coconut milk and put it into a microwaveable bowl with the chocolate chips. Microwave for one minute and then stir until all the chips are melted.
  11. In a mixer, beat the cream cheese until smooth. Add the chocolate mixture and blend well.
  12. Add the Polaner raspberry, and mix until well incorporated. The consistency will be like a thick pudding. Set aside.
  13. When the cake is cooled, carefully unroll it and place it onto a serving platter. Spread the raspberry chocolate cream so that you leave an inch around the edges. Re-roll and place the log back into the fridge.
  14. Either make homemade chocolate frosting or whip up ready-made chocolate frosting.
  15. Frost the outside of the log with the frosting and use a fork to create “bark-like” lines.
  16. To decorate, squish marshmallows to look like mushroom caps and dip them into cocoa powder and place them, along with red hots into the chocolate frosting. To make snow, crumble coconut flakes with powder sugar and sprinkle on top.

* When “sifted” comes after the ingredient, it means to measure first.

Holiday Happenings: Chocolate Bread


“I want chocolate bread….”

Happy Holidays! The world may be topsy-turvy these days due to the pandemic, but some things never change. Pictures of tantalizing food make our mouths drool.

A co-worker posted on our Slack channel a picture of chocolate bread he had made using sourdough starter. It was gorgeous, and I immediately wanted it. Folks who have been reading my posts for a while, though, know that I am lazy so sourdough starter is not my cup of tea. You have to constantly “feed” the dough, and every week, you need to make bread, which I may or may not have the inclination to do. So, I wanted to come up with a quick bread which would satisfy my craving for a chocolate bread.

Folks who cook with chocolate already know that the biggest issue with making a chocolate bread or cookie is that they can be dry. And gluten free flours can also make breads dry. So, I had to think about the best way to keep the bread moist. Since I happened to have a bunch of ripe bananas handy, I opted to use those. I also used Hershey’s special dark unsweetened cocoa powder instead of the natural cocoa powder because it is less drying. And I opted to use a plant based oil, a dairy free milk, and eggs to add liquids to the recipe. To keep the sugar calories lower, I used dairy free mini chips so I could use less, and I opted for coconut sugar in place of white sugar. And because I didn’t want the bread to be gummy, which can happen with gluten free breads, I added some ground golden flaxseed.

The result was a delicious, moist chocolate bread which had the shape and ease of a bread but the fudginess of a chocolate cake. We have been enjoying the loaves this week with raspberry jam, tofu cream cheese, and on its own. Hope you enjoy it, too.

Chocolate Bread

(This recipe makes two loaves.)

Ingredients:

2 cups of gluten free flour, sifted* (I used King Arthur’s whole grain blend.)

1 cup Hershey’s special dark unsweetened cocoa powder

1/2 cup ground golden flaxseed

4 tsp baking powder

1 1/2 tsp baking soda

1/2 tsp salt

1 cup dairy free mini chocolate chips (I used Enjoy Life mini chocolate chips.)

Six 6-inch medium ripe bananas (will puree)

1 tsp cinnamon

3/4 cup sweetener (I used coconut sugar.)

1 cup plant based oil (I used avocado oil.)

1/2 cup dairy free milk (I used an unsweetened soy milk.)

2 eggs, beaten

2 tsp vanilla

1 cup dairy free mini chocolate chips (This is a second one cup of chips.)

Baking Instructions:

  1. Preheat the oven to 350 degrees, and line two 9 x 5 loaf pans with parchment paper.
  2. Mix together the flour, cocoa powder, flaxseed, baking powder, baking soda, and salt. Stir in the chocolate chips, and set the dry ingredients aside.
  3. Puree the bananas using a food processor or blender. (You don’t want to mash them because they are adding liquid, not texture.)
  4. To the bananas, add cinnamon, sweetener, oil, milk, eggs and vanilla. Mix well.
  5. Add the dry ingredients to the wet and blend until well incorporated.
  6. Evenly divide the batter between the two prepared loaf pans.
  7. Sprinkle the tops of the batter with the second cup of mini chocolate chips, evenly dividing them between the two loaves.
  8. Bake in the preheated oven for 50-60 minutes until the loaves are puffed, dry on top, firm to the touch, and a toothpick inserted in the center comes out clean. (Mine took 55 minutes.)
  9. Put the pans on a wire cooling rack and let them sit for 10-15 minutes.
  10. Remove the loaves from the pan to the cooling rack and allow the breads to cool.

*When “sifted” comes after the ingredient, it means to measure first and then sift.

Creative Cooking: Cranberry Orange Chocolate Chip Bread

“I like repurposing….”

At Thanksgiving, my children wanted to know why I had made so much cranberry-orange relish and cranberry sauce. I explained that it was because I was planning ahead.

The fact is that I love to repurpose leftovers into other culinary delights. The leftover homemade cranberry sauce was used for one of my favorite recipes, cranberry cheesecake, and today, I decided to work on a new recipe to use up the cranberry-orange relish.

Folks who have been reading my posts for a while know that I like to make things healthier if at all possible, so I decided I wanted to create a bread which not only had the vitamins from the fresh cranberry and orange in the relish but fiber and protein from oats, probiotics from yogurt, and the omega-3’s from flaxseed. And of course, I wanted to minimize the amount of sugar used and also make it gluten and dairy free.

A tall order, but I went to work, and the recipe came out great on the first try. I made two loaves, and the children have already eaten their way through 3/4 of one! Good thing it’s “healthy”!

Cranberry-Orange-Chocolate Chip Bread

(This makes two loaves.)

Ingredients:

2 cups fresh cranberry-orange relish*

2/3 cup unsweetened dairy free milk (I used soy.)

1/2 cup plant based oil (I used safflower.)

Two 5.3 oz unsweetened plain dairy free yogurt (I used So Delicious.)

4 eggs, beaten

1 1/2 cup gluten free whole rolled oats**

2 1/2 cup gluten free flour blend, sifted*** (I used King Arthur’s whole grain blend.)

1/2 cup sweetener (Options: coconut sugar, monk fruit sweetener, truvia, agave; I used a Truvia blend.)

2/3 cup ground flaxseed

4 tsp baking powder

1/2 tsp baking soda

2 tsp cinnamon

1 tsp nutmeg

1 cup dairy free mini chocolate chips (I used Endangered Species dark chocolate oatmilk mini buttons.)

Baking Instructions:

  1. Preheat the oven to 350 degrees and line two 9 x 5 in loaf pans with parchment paper.
  2. Mix together the cranberry-orange relish, milk, oil, yogurt, and eggs. Set aside.
  3. In a food processor, process the oats until crumbly and fine, but not a powder. Add to the oats, the flour, sweetener, flaxseed, baking powder, baking soda, cinnamon, and nutmeg. Whisk well.
  4. Add the chocolate chips to the dry ingredients and mix.
  5. Add the wet ingredients to the dry ingredients and blend well.
  6. Evenly divide the batter between the two prepared loaf pans.
  7. Bake for 60-70 minutes until the loaves are puffed and golden and firm to the touch. (I recommend turning the loaves around halfway through the cooking time and putting a piece of parchment over the top of the loaves at the half way mark to prevent over browning. Mine took a full 70 minutes)
  8. Remove to a cooling rack when done. Allow the loaves to cook in the pans for 10-15 minutes. Then remove to the cooling racks and take off the parchment paper so the loaves can cool completely.
  9. Enjoy! (Because it is not overly sweet, we found it to be delicious toasted with vegan butter.)

*If you have not made any cranberry-orange relish before, you simply process a 12 oz bag of fresh cranberries with a peeled, large orange. You can then add cinnamon, nutmeg, ginger and/or cloves to taste, and one to two tablespoons of a sweetener if desired. I like it tart but some folks prefer it sweeter.

**If you don’t have whole oats but have oat flour, you can substitute, but use only one cup of the flour since it is finer. The bread will just lose the “nutty” texture it receives from the whole oats.

*** A note: When “sifted” comes after the ingredient, it means to measure the flour first and then sift.


Thanksgiving Thoughts: Roasted Brussel Sprouts

“But it’s not the same….”

For many of us, the holidays ahead are fraught with mixed feelings. Usually, the anticipation of celebrating with family and friends adds to our excitement and joy, but this year, all around the world, people are being told not to do that one thing which makes the holidays the holidays – gathering with one another.

And that’s hard.

For me and my children, though, we have been having discussions about how we can still celebrate as a nuclear family, and of course, many of those conversations revolve around food.

Those conversations caused us to think about the pluses of not cooking for extended family members this year: you do not have to make that one dish that only one person eats but you “must” have; you can release the “perfectionistic” stress of making the pies and desserts look beautiful for the guests; you will be able to eat when the food is done and not when the last late member of the extended family decides to show up; and you get to keep all the leftovers for yourself instead of sharing with the extended members of the family.

How exciting is that?

To help you menu plan, I’m pointing you to previous years’ posts and adding a recipe for roasted Brussel sprouts below. I know many folks are not fond of them, but I have discovered that many folks have also not had them roasted, which makes all the difference.

I hope this Thanksgiving season will bring you much to be thankful for, despite the global and personal situations we find ourselves in this year.

Turkey Talk

Roasted Vegetable Medley

Winter Squash Soup

Vegetable Souffle

Vegan Spanakopita

Apple Pie

Apple Crisp

Vegan Pumpkin Pies

Grain Free Pumpkin Pie

Vegan, Gluten Free Cornbread for Stuffing

Thanksgiving Muffins

Orange Cranberry Muffins

Gluten Free Popovers

Dairy Free Cranberry Cheesecake

Dairy and Gluten Free Tiramisu

Pie Tips

Roasted Brussel Sprouts

Ingredients:

3 lbs fresh Brussel sprouts (off the stalk)

4 tbsp olive oil

1/2 tsp salt

1/4 tsp black pepper

1 tsp ground onion powder

1/2 tsp ground garlic powder

Roasting Instructions:

  1. Preheat the oven to 425 degrees and line your largest shallow sheet pan with parchment paper. (Depending you may need to roast your spouts in two batches, if you can’t fit them all at one time on the pan.)
  2. Prepare your Brussel Sprouts by slicing off the hard, knobby ends, peeling off any outer leaves which are falling off, and cutting the sprouts in half.
  3. Place the prepared sprouts in a large bowl and toss with the olive oil.
  4. Season with the salt, pepper, onion powder and garlic powder.
  5. Place the sprouts cut side down onto the prepared sheet pan, leaving some space around each sprout for air circulation.
  6. Roast for 30 minutes without opening the oven to check on them. When they are done, they will be crispy, blackish-brown.
  7. You can eat as is or if you want, toss them with thin slices of turkey bacon and/or drizzle with your favorite balsamic vinegar and/or a bit of maple syrup.
  8. You can make these ahead of time for Thanksgiving and then pop them into the oven at 300 degrees to rewarm and re-crisp them on Thanksgiving day.


Autumn Appetites: Vegetable Frittata

“Finding the beauty….”

The other day I drove up a hill toward my mother-in-law’s and was surprised by the colors suddenly surrounding me. Red, purple, orange and yellow – the leaves of the trees closest to the highway had already begun to change, and set against the backdrop of a clear blue sky, the beauty of it all made me stop – literally, since I pulled over to be able to better drink in the scene.

For many of us, these many months of the pandemic have thrown a wrench into our normal routines, and slowly we have had to build new routines and wrap our minds around new ways of doing and being. But nature has continued its usual paths. The leaves are changing (for those of us in the part of the US where that happens). Temperatures are cooling. Frost warnings compel us to close up the garden.

This latter life cycle event has meant bowls of tomatoes, peppers, kale and onions adorning my kitchen counter. (Fortunately the carrots and potatoes can remain in the ground still for now.) And what to do with the abundance has been a daily question. Like the leaves, there’s a beauty in the deep colors of the vegetables and the fact that we grew these and are reaping from our hard work. So, they should not be wasted.

This is where frittatas are useful. Quick and easy, they are also nutritious, especially when loaded with onions, kale and tomatoes. There’s also the ‘beauty” of a frittata, which are its versatility and indestructibility. You can add whatever you want to a frittata, and you really cannot mess it up. Plus it’s a great way to use up leftover cooked vegetables and meats, which makes for a fast meal on those busy nights.

The Basic Recipe:

2 tsp olive oil (or other preferred plant based oil)

1/2 cup onions (any type: red, white, yellow, green)

1 tsp minced garlic

1 1/2 tsp seasonings (your choice: oregano, thyme, basil, marjoram, rosemary, cumin, turmeric, etc….)

3 cups of chopped cooked vegetables and/or meats (If you don’t have leftovers, dice and cook vegetables and/or meats until cooked through: Be creative with kale, spinach, collards, broccoli, peppers, drained tomatoes, zucchini, squash, bacon, ham, chicken, sausage, etc….)*

9 large eggs

1/2 cup unsweetened “milk” (your choice: regular, soy, coconut, oat, etc….)

1/2 tsp salt

1/4 tsp black pepper

*NOTE: If you want to add cheese (whether regular or dairy free) you can do that, too.

Basic Cooking Instructions:

  1. Preheat the oven to 400 degrees
  2. In a 14 inch cast iron pan, add the olive oil with the onions and minced garlic. Cook over medium low heat until the onions begin to soften.
  3. Add seasonings and cook for a minute to release the flavors.
  4. Add the cooked vegetables and mix well with the onions and garlic and seasonings. *Note: If you are adding cheese, sprinkle it over the top of the filling before adding the eggs.
  5. Whisk the eggs with the milk, salt and pepper, and pour over the filling in the pan. Shake the pan as needed to evenly cover the filling and the pan.
  6. Cook for a couple of minutes until the bottom of the egg mixture begins to set.
  7. Pop the cast iron pan into the preheated oven and cook for 10 minutes. When done, the frittata will be puffed and firm to the touch with no runny egg.
  8. Enjoy!


Sweet Treats: Egg Yolk Chocolate Chip Cookies

“But what will you do with these….?”

I love making flour-less chocolate cake but if I don’t have egg whites and use whole eggs, I’m left with yolks which I don’t want to waste. So, I started looking around and discovered a nifty little recipe for egg yolk chocolate chip cookies. Of course, the recipe called for butter, sugar and all purpose flour, so a little revamping was required.

Here’s the recipe the kids and I reworked. Great little dessert bites for when you need just a little lift.

Gluten, Dairy Free Egg Yolk Chocolate Chip Cookies

Ingredients:

6 egg yolks

1 tsp gluten free vanilla

1/2 cup soy free vegan butter

1/2 cup Truvia stevia-sugar blend

2 1/2 cup King Arthur whole grain gluten free flour blend

1 1/2 tsp baking soda

1 tsp cream of tartar

1 tsp ground cinnamon

1/2 tsp ground nutmeg

1 cup Enjoy Life mini chocolate chips

Baking Instructions:

  1. Preheat the oven to 350 degrees.
  2. Whisk together the egg yolks with the vanilla. Set aside.
  3. In a mixer, beat the vegan butter until smooth. Add the Truvia blend and mix well.
  4. Add the egg yolks to the butter mixture and combine until smooth.
  5. Blend together the flour, baking soda, cream of tartar, cinnamon and nutmeg. Add to the wet ingredients and blend well until combined.
  6. Add the mini chocolate chips.
  7. Line cookie sheets with parchment paper. Form batter into balls using level tablespoons of batter.
  8. Place formed cookie batter balls one inch apart on the cookie sheet and flatten each ball.
  9. Bake for about eight minutes, turning the cookie sheet halfway through the cooking time, until cookies are puffed and golden and firm to the touch.
  10. Let the cookies sit on the pan for two minutes before removing to a wire cooling rack to cool.


Summer Harvests: Tomato, Zucchini, and Kale Flatbread

“It’s what I want….”

Summer is a special time for our family because we celebrate two of our three children’s birthdays, one in July and one in August. The pandemic, though, put a bit of a damper on our usual festivities, so more emphasis was put on making something special and different for the birthday meals.

One of my daughters wanted to make flatbreads which is not as easy to do gluten free. However, I discovered that Schar makes a thin gluten free pizza crust which I could adapt, and with the garden providing an abundance of fresh tomatoes, zucchini, and kale, we could create our own gluten free flatbreads for my daughter’s birthday meal.

There are no measurements for the ingredients because it really depends on how many flatbreads you are going to make, but I suggest cooking up a lot of the ingredients because once you’ve made a couple of these, you are going to want to make more in just a couple of days!

Tomato, Zucchini, and Kale Flatbread

Ingredients:

garlic cloves (I roasted about 40 cloves)

fresh basil (at least a cup to two cups worth of leaves)

black pepper and salt (to taste)

olive oil (for both the garlic and for the basil-garlic sauce)

onions, thinly sliced (at least a couple of cups worth)

olive oil (for caramelizing the onions)

kale, thinly sliced (at least a couple of cups worth; remember that you double the amount of fresh to get what you need cooked)

zucchini(thinly sliced into half moons; about a couple of cups worth)

minced garlic, olive oil, dried oregano, salt and black pepper (for both the kale and zucchini)

tomatoes (thinly sliced and drained of the seeds; two to four tomatoes at least)

Schar gluten free thin pizza crusts (as many as you think you’ll make; each package has two crusts; we made four but then made another two a day later!)

Cooking Instructions:

  1. Preheat the oven to 500 degrees.
  2. In an ovenproof pan, coat the garlic cloves with just enough olive oil to keep the cloves from sticking. Roast in the oven for 15 to 20 minutes, stirring every five minutes until they are browned and shriveling and the aroma fills your kitchen. Remove from the oven and let them cool.
  3. Add the garlic cloves to a food processor with the basil leaves and begin to food process both, adding just enough olive oil to make a paste. Add black pepper and salt to taste. Set aside.
  4. In a pan on the stovetop, coat the sliced onions with just enough olive oil to coat and cook the onions over low heat for 20 to 25 minutes, stirring once or twice until the onions are golden and caramelized. Remove from the heat and let them cool.
  5. In a pan on the stovetop, separately saute both the kale and zucchini with olive oil, minced garlic, salt and pepper until they are tender. Remove and allow them to cool.
  6. Slice the tomatoes and drain them in a colander, removing the seeds. Set aside.
  7. Preheat the oven to 410 degrees. Place the pizza crusts on a cookie sheet and bake for 3 minutes. Then flip the crusts and bake for another 3 minutes.
  8. Spread some of the basil-garlic paste thinly over the crust. Layer with caramelized onions, then tomatoes, then zucchini, then kale.
  9. Bake in the oven for 6 to 8 minutes until the crust is crispy and browned.
  10. Remove to wire cooling racks for five to ten minutes. Enjoy!