Holiday Happenings: New Year’s Log

“I want something special….”

Right before the holidays I heard a true story about a mom who got so upset about her young children’s whining that she cancelled Christmas for them. No presents. No special dinner. No celebration. Not just for that year but apparently for the next few years.

I was appalled. I can empathize with the mom’s frustration about the whining, but being whiny is a growth area which even many adults need to work on, and which requires training, patience, and modeling, not retaliation. What really struck at my heart, though, was her presumption that the holiday was a “right” which she could just take away as a punishment.

For me the holiday season as a whole (Hanukkah, Christmas, Kwanzaa, New Year’s) is a gift. We don’t like to admit it, but as individuals, we can be selfish. Celebrating holidays – whether it’s this time of the year, summer vacations, Halloween or someone else’s birthday – is a gift to a selfish race. We don’t earn it. We’re just given these opportunities to practice being with one another, to extend love to one another, to think beyond ourselves about others.

So, when one of my daughters said she wanted to make a yule log for New Year’s eve tonight, I welcomed it as an opportunity for us to spend time together doing something she had requested.

Since folks know I usually like things to be quick and easy, spending an afternoon cooking something with many steps to it is not usually my heart’s desire. In this case, though, it meant time with my daughter, as well as an opportunity to exercise creativity.

For folks who think a yule log is difficult, I can assure you, it actually is not. It’s really simple to make. It just requires time, and with our gluten and dairy allergies it also required a few substitutions. In the end, though, the time was well spent, and my daughter and I enjoyed creating something special together to celebrate the end of this year and the beginning of the next.

Our hope is that you will look forward to making it and enjoying it in the new year, too. Happy New Year!

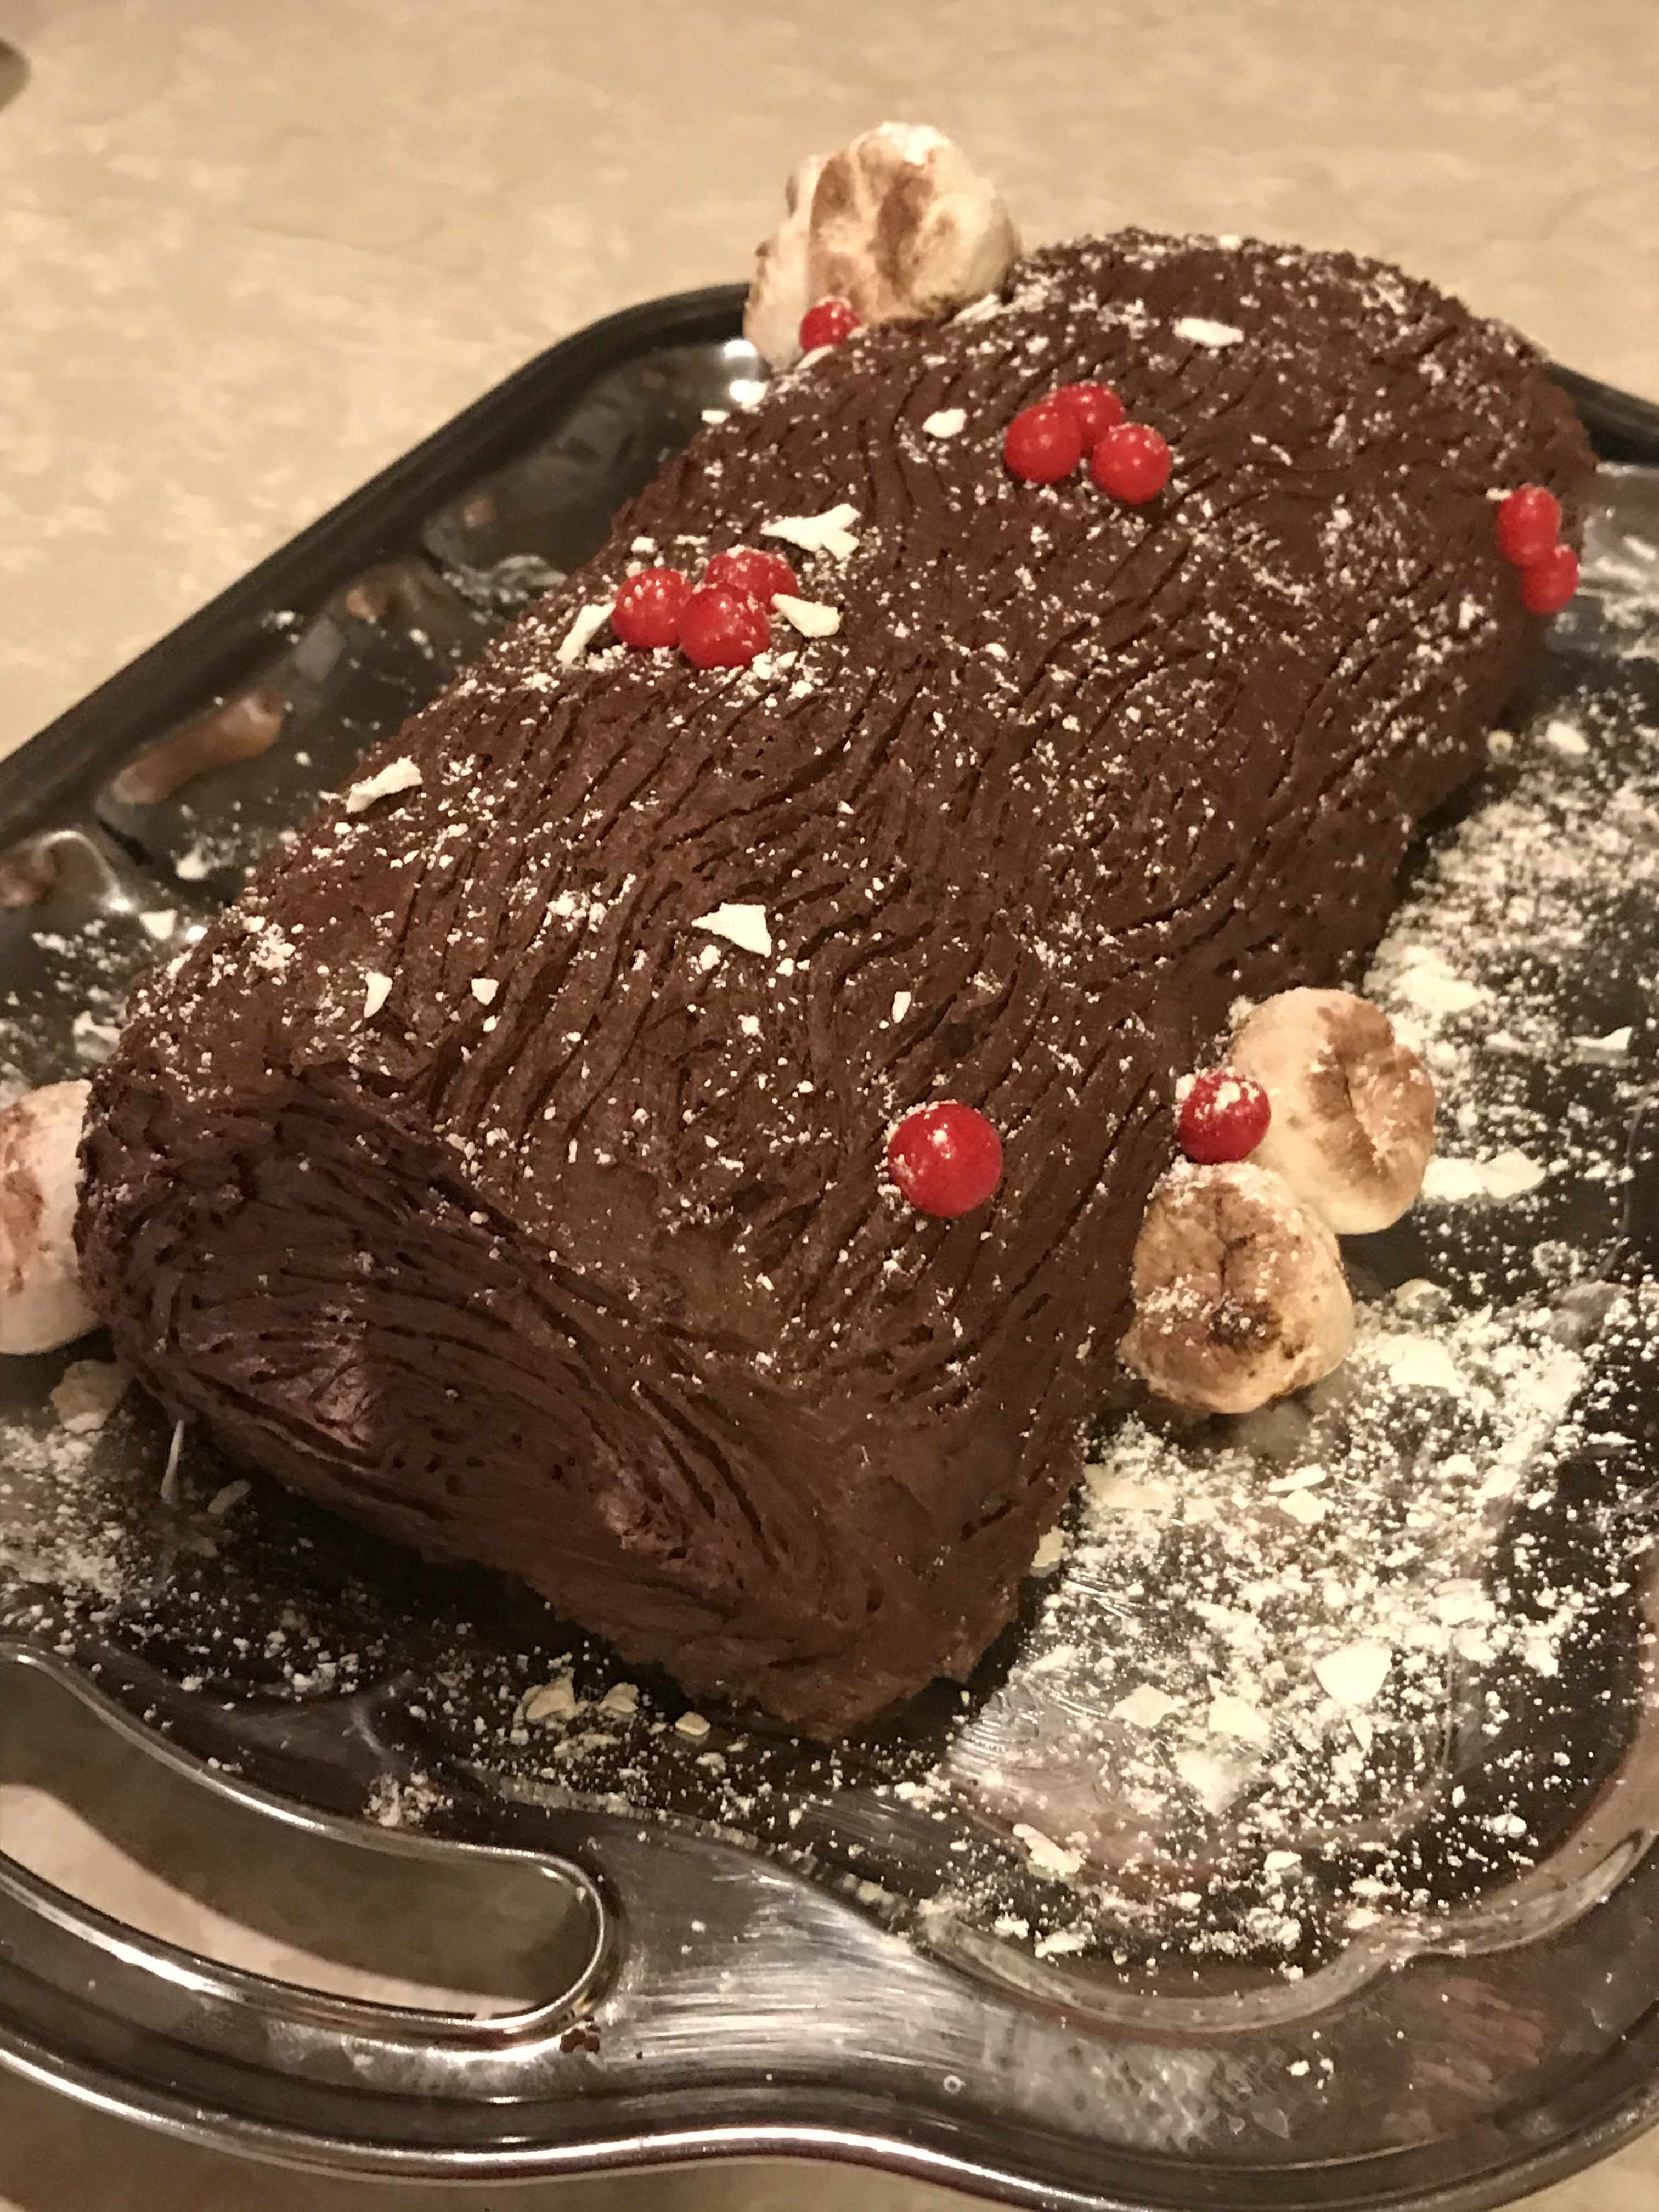
Raspberry Chocolate Yule Log

Ingredients:

Sponge Cake Batter:

3/4 cup gluten free flour blend of choice, sifted* (I used King Arthur’s whole grain blend)

1/4 cup Hershey’s unsweetened special dark cocoa powder

1 tsp baking powder

1 tsp cinnamon

1/8 tsp salt

6 eggs, separated, at room temperature

2 tsp vanilla

2 tbsp plant based oil (I used safflower oil)

1/4 cup sweetener (I used the Truvia/sugar blend)

1/4 tsp cream of tartar

1/4 cup sweetener (I used the Truvia/sugar blend)

“Cream” Filling:

1/4 cup coconut cream (from the top of a can of coconut milk)

1 1/2 cups dairy free chocolate chips (I used Enjoy Life brand)

8 oz dairy free cream cheese (I used the Tofutti brand)

1/2 cup Polaner Raspberry All Fruit

Log Frosting:

favorite homemade chocolate frosting or ready-made dairy free frosting (I used Simple Mills dairy free brand)

Baking Instructions:

  1. Preheat the oven to 350 degrees. Spray or grease a 12 x 17 inch shallow, sided cookie sheet and line it with parchment paper. Then grease the parchment paper with vegan butter.
  2. Whisk together the flour, cocoa powder, baking powder, cinnamon, and salt. Set aside.
  3. Whisk the six egg yolks until they are a light, yellow color. Add the vanilla, oil, and sweetener and blend well. Use a large bowl because you’ll be adding the dry ingredients plus the egg whites.
  4. Add the dry ingredients to the egg yolks mixture and blend well.
  5. In a mixer, add the cream of tartar to the egg whites and begin to mix on low. Slowly add the sweetener while it is mixing. Then increase the speed and continue to mix the egg whites until they become snowy white and stiff (when you pull up the whisk, the egg whites will form triangles.)
  6. Fold the egg whites into the chocolate batter, slowly and deliberately. You add small amounts of the egg white and using a scooped spatula, hug the curve of the bowl to scoop batter up and over into the center of the egg whites, over and over again until all the egg whites are incorporated into the batter. The batter will lighten in color and expand.
  7. Spread the batter into the prepared pan and baked in the preheated oven for 15 minutes. When done, the sponge cake will be puffed and firm to the touch.
  8. While the cake is in the oven, cut a piece of parchment paper which is larger than 12 x 17 inches. Sprinkle it with unsweetened cocoa powder.
  9. When the cake is done, immediately turn the cake over onto the prepared parchment paper and remove the parchment paper sticking to the cake from cooking in the oven. Sprinkle with unsweetened cocoa powder and carefully roll the cake into a circle. Put the cake into the fridge to cool. Will need at least an hour.
  10. While the cake is cooling, take the top cream from a can of coconut milk and put it into a microwaveable bowl with the chocolate chips. Microwave for one minute and then stir until all the chips are melted.
  11. In a mixer, beat the cream cheese until smooth. Add the chocolate mixture and blend well.
  12. Add the Polaner raspberry, and mix until well incorporated. The consistency will be like a thick pudding. Set aside.
  13. When the cake is cooled, carefully unroll it and place it onto a serving platter. Spread the raspberry chocolate cream so that you leave an inch around the edges. Re-roll and place the log back into the fridge.
  14. Either make homemade chocolate frosting or whip up ready-made chocolate frosting.
  15. Frost the outside of the log with the frosting and use a fork to create “bark-like” lines.
  16. To decorate, squish marshmallows to look like mushroom caps and dip them into cocoa powder and place them, along with red hots into the chocolate frosting. To make snow, crumble coconut flakes with powder sugar and sprinkle on top.

* When “sifted” comes after the ingredient, it means to measure first.

Advertisement

Holiday Happenings: Chocolate Bread


“I want chocolate bread….”

Happy Holidays! The world may be topsy-turvy these days due to the pandemic, but some things never change. Pictures of tantalizing food make our mouths drool.

A co-worker posted on our Slack channel a picture of chocolate bread he had made using sourdough starter. It was gorgeous, and I immediately wanted it. Folks who have been reading my posts for a while, though, know that I am lazy so sourdough starter is not my cup of tea. You have to constantly “feed” the dough, and every week, you need to make bread, which I may or may not have the inclination to do. So, I wanted to come up with a quick bread which would satisfy my craving for a chocolate bread.

Folks who cook with chocolate already know that the biggest issue with making a chocolate bread or cookie is that they can be dry. And gluten free flours can also make breads dry. So, I had to think about the best way to keep the bread moist. Since I happened to have a bunch of ripe bananas handy, I opted to use those. I also used Hershey’s special dark unsweetened cocoa powder instead of the natural cocoa powder because it is less drying. And I opted to use a plant based oil, a dairy free milk, and eggs to add liquids to the recipe. To keep the sugar calories lower, I used dairy free mini chips so I could use less, and I opted for coconut sugar in place of white sugar. And because I didn’t want the bread to be gummy, which can happen with gluten free breads, I added some ground golden flaxseed.

The result was a delicious, moist chocolate bread which had the shape and ease of a bread but the fudginess of a chocolate cake. We have been enjoying the loaves this week with raspberry jam, tofu cream cheese, and on its own. Hope you enjoy it, too.

Chocolate Bread

(This recipe makes two loaves.)

Ingredients:

2 cups of gluten free flour, sifted* (I used King Arthur’s whole grain blend.)

1 cup Hershey’s special dark unsweetened cocoa powder

1/2 cup ground golden flaxseed

4 tsp baking powder

1 1/2 tsp baking soda

1/2 tsp salt

1 cup dairy free mini chocolate chips (I used Enjoy Life mini chocolate chips.)

Six 6-inch medium ripe bananas (will puree)

1 tsp cinnamon

3/4 cup sweetener (I used coconut sugar.)

1 cup plant based oil (I used avocado oil.)

1/2 cup dairy free milk (I used an unsweetened soy milk.)

2 eggs, beaten

2 tsp vanilla

1 cup dairy free mini chocolate chips (This is a second one cup of chips.)

Baking Instructions:

  1. Preheat the oven to 350 degrees, and line two 9 x 5 loaf pans with parchment paper.
  2. Mix together the flour, cocoa powder, flaxseed, baking powder, baking soda, and salt. Stir in the chocolate chips, and set the dry ingredients aside.
  3. Puree the bananas using a food processor or blender. (You don’t want to mash them because they are adding liquid, not texture.)
  4. To the bananas, add cinnamon, sweetener, oil, milk, eggs and vanilla. Mix well.
  5. Add the dry ingredients to the wet and blend until well incorporated.
  6. Evenly divide the batter between the two prepared loaf pans.
  7. Sprinkle the tops of the batter with the second cup of mini chocolate chips, evenly dividing them between the two loaves.
  8. Bake in the preheated oven for 50-60 minutes until the loaves are puffed, dry on top, firm to the touch, and a toothpick inserted in the center comes out clean. (Mine took 55 minutes.)
  9. Put the pans on a wire cooling rack and let them sit for 10-15 minutes.
  10. Remove the loaves from the pan to the cooling rack and allow the breads to cool.

*When “sifted” comes after the ingredient, it means to measure first and then sift.

Creative Cooking: Cranberry Orange Chocolate Chip Bread

“I like repurposing….”

At Thanksgiving, my children wanted to know why I had made so much cranberry-orange relish and cranberry sauce. I explained that it was because I was planning ahead.

The fact is that I love to repurpose leftovers into other culinary delights. The leftover homemade cranberry sauce was used for one of my favorite recipes, cranberry cheesecake, and today, I decided to work on a new recipe to use up the cranberry-orange relish.

Folks who have been reading my posts for a while know that I like to make things healthier if at all possible, so I decided I wanted to create a bread which not only had the vitamins from the fresh cranberry and orange in the relish but fiber and protein from oats, probiotics from yogurt, and the omega-3’s from flaxseed. And of course, I wanted to minimize the amount of sugar used and also make it gluten and dairy free.

A tall order, but I went to work, and the recipe came out great on the first try. I made two loaves, and the children have already eaten their way through 3/4 of one! Good thing it’s “healthy”!

Cranberry-Orange-Chocolate Chip Bread

(This makes two loaves.)

Ingredients:

2 cups fresh cranberry-orange relish*

2/3 cup unsweetened dairy free milk (I used soy.)

1/2 cup plant based oil (I used safflower.)

Two 5.3 oz unsweetened plain dairy free yogurt (I used So Delicious.)

4 eggs, beaten

1 1/2 cup gluten free whole rolled oats**

2 1/2 cup gluten free flour blend, sifted*** (I used King Arthur’s whole grain blend.)

1/2 cup sweetener (Options: coconut sugar, monk fruit sweetener, truvia, agave; I used a Truvia blend.)

2/3 cup ground flaxseed

4 tsp baking powder

1/2 tsp baking soda

2 tsp cinnamon

1 tsp nutmeg

1 cup dairy free mini chocolate chips (I used Endangered Species dark chocolate oatmilk mini buttons.)

Baking Instructions:

  1. Preheat the oven to 350 degrees and line two 9 x 5 in loaf pans with parchment paper.
  2. Mix together the cranberry-orange relish, milk, oil, yogurt, and eggs. Set aside.
  3. In a food processor, process the oats until crumbly and fine, but not a powder. Add to the oats, the flour, sweetener, flaxseed, baking powder, baking soda, cinnamon, and nutmeg. Whisk well.
  4. Add the chocolate chips to the dry ingredients and mix.
  5. Add the wet ingredients to the dry ingredients and blend well.
  6. Evenly divide the batter between the two prepared loaf pans.
  7. Bake for 60-70 minutes until the loaves are puffed and golden and firm to the touch. (I recommend turning the loaves around halfway through the cooking time and putting a piece of parchment over the top of the loaves at the half way mark to prevent over browning. Mine took a full 70 minutes)
  8. Remove to a cooling rack when done. Allow the loaves to cook in the pans for 10-15 minutes. Then remove to the cooling racks and take off the parchment paper so the loaves can cool completely.
  9. Enjoy! (Because it is not overly sweet, we found it to be delicious toasted with vegan butter.)

*If you have not made any cranberry-orange relish before, you simply process a 12 oz bag of fresh cranberries with a peeled, large orange. You can then add cinnamon, nutmeg, ginger and/or cloves to taste, and one to two tablespoons of a sweetener if desired. I like it tart but some folks prefer it sweeter.

**If you don’t have whole oats but have oat flour, you can substitute, but use only one cup of the flour since it is finer. The bread will just lose the “nutty” texture it receives from the whole oats.

*** A note: When “sifted” comes after the ingredient, it means to measure the flour first and then sift.


Thanksgiving Thoughts: Roasted Brussel Sprouts

“But it’s not the same….”

For many of us, the holidays ahead are fraught with mixed feelings. Usually, the anticipation of celebrating with family and friends adds to our excitement and joy, but this year, all around the world, people are being told not to do that one thing which makes the holidays the holidays – gathering with one another.

And that’s hard.

For me and my children, though, we have been having discussions about how we can still celebrate as a nuclear family, and of course, many of those conversations revolve around food.

Those conversations caused us to think about the pluses of not cooking for extended family members this year: you do not have to make that one dish that only one person eats but you “must” have; you can release the “perfectionistic” stress of making the pies and desserts look beautiful for the guests; you will be able to eat when the food is done and not when the last late member of the extended family decides to show up; and you get to keep all the leftovers for yourself instead of sharing with the extended members of the family.

How exciting is that?

To help you menu plan, I’m pointing you to previous years’ posts and adding a recipe for roasted Brussel sprouts below. I know many folks are not fond of them, but I have discovered that many folks have also not had them roasted, which makes all the difference.

I hope this Thanksgiving season will bring you much to be thankful for, despite the global and personal situations we find ourselves in this year.

Turkey Talk

Roasted Vegetable Medley

Winter Squash Soup

Vegetable Souffle

Vegan Spanakopita

Apple Pie

Apple Crisp

Vegan Pumpkin Pies

Grain Free Pumpkin Pie

Vegan, Gluten Free Cornbread for Stuffing

Thanksgiving Muffins

Orange Cranberry Muffins

Gluten Free Popovers

Dairy Free Cranberry Cheesecake

Dairy and Gluten Free Tiramisu

Pie Tips

Roasted Brussel Sprouts

Ingredients:

3 lbs fresh Brussel sprouts (off the stalk)

4 tbsp olive oil

1/2 tsp salt

1/4 tsp black pepper

1 tsp ground onion powder

1/2 tsp ground garlic powder

Roasting Instructions:

  1. Preheat the oven to 425 degrees and line your largest shallow sheet pan with parchment paper. (Depending you may need to roast your spouts in two batches, if you can’t fit them all at one time on the pan.)
  2. Prepare your Brussel Sprouts by slicing off the hard, knobby ends, peeling off any outer leaves which are falling off, and cutting the sprouts in half.
  3. Place the prepared sprouts in a large bowl and toss with the olive oil.
  4. Season with the salt, pepper, onion powder and garlic powder.
  5. Place the sprouts cut side down onto the prepared sheet pan, leaving some space around each sprout for air circulation.
  6. Roast for 30 minutes without opening the oven to check on them. When they are done, they will be crispy, blackish-brown.
  7. You can eat as is or if you want, toss them with thin slices of turkey bacon and/or drizzle with your favorite balsamic vinegar and/or a bit of maple syrup.
  8. You can make these ahead of time for Thanksgiving and then pop them into the oven at 300 degrees to rewarm and re-crisp them on Thanksgiving day.


Happy Mothers’ Day: Layered Eggplant and Tomatoes


“It’s snowing…?”

Today is Mother’s Day, the second Sunday in May, and yet yesterday, it snowed on and off all day. When I spoke with my father about it on the phone, he said, “Maybe Mother Nature has the corona virus, and it’s affected her seasons.”

As we are all too aware, the pandemic has definitely affected our lives over the past many months, and I know that one of the ways I have been impacted is that for the first time in a long time, I find myself tired of trying to come up with dinner plans each and every day. With the virus impacting my ability to shop for groceries, our menus have been more limited, and thus has become rather boring.

However, since this is Mother’s Day weekend, the family decided to rise to the occasion. One of my daughters and my son made chocolate covered strawberries, and I decided I really wanted something summery since the weather was not cooperating on that front. Fortunately, I was able to get some eggplant and a variety pack of heirloom tomatoes. Using fresh basil and a vegan parmesan, I created a layered entree which was quite tasty and well worth the work.

I share it with you in case, you too, are looking for inspiration to liven up meal-time during the pandemic.

Layered Eggplant and Tomatoes

Ingredients: Amounts will depend on how much you are making and the size pan you are using.

eggplant

olive oil

oregano

basil

salt

pepper

pear tomatoes

grape tomatoes

cherry tomatoes

fresh basil leaves

minced garlic

vegan parmesan

Cooking Instructions:

  1. Slice washed and dried eggplant into 1/4 circles.
  2. Lay out eggplant circles on a large pan.
  3. Brush both sides of the eggplant circles with olive oil and sprinkle each side with oregano, basil, salt and pepper.
  4. Either grill or broil the eggplant a couple of minutes on both sides until browned.
  5. Preheat the oven to 350 degrees.
  6. In an oven safe dish, lay out cooked eggplant circles to cover the bottom.
  7. Slice tomatoes into halves and layer on top of the eggplant.
  8. Slice the fresh basil leaves and sprinkle on top of the tomatoes.
  9. Sprinkle minced garlic on top of the basil.
  10. Sprinkle the vegan parmesan on top of the basil.
  11. Repeat layers until you reach the top of your dish.
  12. Bake in the preheated oven for 30 minutes.
  13. Enjoy!


Holiday Happenings: Chocolate Peppermint Drops

“It’s how you look at it….”

I am always amazed by the zeal with which folks I know begin the new year. For them, January is a time for resolutions, and if not resolutions, at least new opportunities. Since I have operated on a school year schedule for so many years, that energy tends to come to me in September. By January, I am usually tired, and after putting things on hold for the holidays in December, January is fraught with playing “catch-up” to everything I am behind with.

This year, I am so behind due to health issues my husband has been having that the Christmas gifts I received are still sitting underneath my sideboard in the dining room, waiting to be put away, along with random other Christmas items which did not get put away with the Christmas decorations.

The positive to this problem is that one of the items which my daughter found was leftover candies from the gingerbread house decorating the children did in December – peppermint candies to be specific – and the lovely thing about peppermint candies is that their red and white coloring perfectly matches a Valentine’s theme.

So, my daughter decided to use those peppermint candies to make chocolate peppermint drops which added a special treat to this new month of February and provided just enough energy that two of my Christmas presents got put away!

Chocolate Peppermint Drops

Ingredients:

1 3/4 cups gluten free flour (we used King Arthur’s whole grain blend)

1/4 cup Hershey’s unsweetened special dark cocoa powder

1 1/2 tsp baking powder

1/4 tsp salt

1/2 cup vegan butter

1 cup coconut sugar

1 tsp vanilla

1 egg (a large egg equal to 1/4 cup)

2 oz dark chocolate, melted and cooled

crushed peppermint candies

Baking Instructions:

  1. Preheat the oven to 350 degrees and line cookie sheets with parchment paper.
  2. Mix together the flour, cocoa powder, baking powder and salt, and set aside.
  3. Cream the vegan butter in a mixer and add the coconut sugar, blending well, scraping down sides as needed, until the mixture is light and fluffy.
  4. Add the vanilla, egg and cooled, melted chocolate. Blend well.
  5. Add the dry ingredients and mix on low until all the dry ingredients are incorporated into the wet.
  6. Roll level tablespoons of cookie batter in the crushed peppermints and place them on the prepared cookie sheet, about one inch apart.
  7. Bake for 8 to 10 minutes until the cookies have puffed slightly and begin to look drier and cooked.
  8. Remove the cookies to a wire cooling rack and allow them to cool.
  9. Enjoy when they are done cooling.
  10. To keep them fresh, put them in a sealed tupper ware to store.

Happy New Year: Dark Chocolate Cheesecake

“It has to be special….”

The ending of a year can generate different emotions. Sadness if the year was especially good. Relief if the year was especially difficult. Anticipation for the possibilities of a new year. Frustration about unfinished items. Guilt about lost opportunities. Joy for upcoming planned opportunities.

When the ending is also the ending of a decade (depending on how you count, that is), those emotions can sometimes be compounded because now we may be looking back at ten years instead of one and experiencing all the same emotions. For me, my husband and I celebrated a milestone this month – 25 years of marriage – so, for me, I find today holding all the joy, sadness, frustration, guilt and anticipation of and for two and a half decades.

As such, when the family talked about what food to have to celebrate tonight’s festivities, the word “special” kept coming up. A special dinner, a special dessert, special treats and snacks. The family wanted something we do not usually have and which would make tonight feel different and festive.

So, to celebrate, I made a dark chocolate cheesecake which is dairy and gluten free, and in case anyone decides they want something “special” in 2020, I am sharing it below. Happy New Year!

Dark Chocolate Cheesecake

Ingredients:

2 cups Enjoy Life dark chocolate chips

3 pkgs dairy free 8 oz cream cheese, at room temperature

3/4 cup coconut sugar or monk fruit sweetener blend

1/2 cup dairy free sour cream, at room temperature

2 tbsp unsweetened Hershey special dark cocoa powder

1 tsp vanilla

4 eggs, at room temperature

1/2 cup coconut milk

1 cup Enjoy Life dark chocolate chips

chopped Enjoy Life chocolate

Baking Instructions:

  1. Preheat oven to 350 degrees. Grease a 9 inch spring form pan with your preferred method and cover the bottom of the pan with two layers of aluminum foil. Boil water, and get out a pan large enough to fit the spring form pan inside.
  2. In a microwave safe container, melt the chocolate chips for a minute and stir until the chips are completely melted and smooth. If you need more time, microwave 15 seconds at a time until you can stir the chocolate to smoothness. Then set aside to cool.
  3. In a mixer, blend together the cream cheese until smooth.
  4. Add the coconut sugar and blend well, scraping the bowl as needed.
  5. Temper the chocolate mixture by stirring in a spoonful of the cream cheese mixture. Then add all of the chocolate into the cream cheese mixture and blend well.
  6. Mix the sour cream with the cocoa powder until completely blended. Then add the chocolate sour cream to the cream cheese batter and mix well.
  7. Add the vanilla and blend.
  8. Add the eggs, one at a time, mixing well after each addition, scraping the bowl as needed.
  9. Pour the chocolate cream cheese batter into the prepared pan and spread evenly.
  10. Place the pan into the larger pan and place into the oven, pouring the boiling water into the larger pan to cover up to at least the halfway point of the spring form pan.
  11. Reduce the heat to 325 degrees and bake the cheesecake for 50 to 65 minutes until the cheesecake is mostly firm with the center being still a bit jiggly.
  12. Turn off the heat and allow the cheesecake to finish cooking and cooling in the oven with the heat off and the door open for about an hour.
  13. Remove the spring form pan from the oven and remove the aluminum foil and put the cheesecake into the fridge to completely cool, at least four hours, preferably overnight.
  14. Put the dark chocolate chips into a microwave safe bowl with the coconut milk and microwave for a minute. Stir until the chips are completely melted and chocolate begins to glisten and become smooth.
  15. Remove the cheesecake from the spring form pan and carefully pour the chocolate ganache over the cheesecake to your liking.
  16. Sprinkle the top of the ganache with chopped chocolate and enjoy!


Recipe Revamping: Peppermint Brownies

“Holiday indulgences….”

So often, people will tell me that they’re fine with the “regular, other time of the year” desserts they eat having no sugar and being low fat and healthy but that when the holidays roll around, that seems somehow “wrong”.

I hear you.

Holidays seem like the one time when you’re allowed to indulge, and when you look at the calender, there are no less than half a dozen events in two weeks, all of which expect you to bring something holiday-ish and decadent to share.

My thoughts are that, yes, it is okay to loosen up a bit on the “health” of your holiday desserts, but at the same time, I will argue that you don’t have to necessarily add back all the sugar and fat for something to be indulgent.

Recently, someone share a recipe for peppermint brownies with me. It called for 1 1/2 cups of butter, 1 1/2 pound of chocolate, 5 eggs, 2 cups of sugar, 1 cup all purpose flour, 2 tsp peppermint extract, and six candy canes.

As you an imagine, I immediately tried to figure out if there was a way to revamp this recipe so that it would be at least a smidgeon less unhealthy and still decadently delicious. To do so, I reduced the butter by a third and replaced it with vegan butter. I reduced the chocolate to 20 oz and substituted Enjoy Life’s allergy friendly dark chocolate chips. I removed one egg, and since there was sugar in the chocolate, I reduced the sugar by three-quarters and swapped out monk fruit sweetener for the sugar. I reduced the flour by 1/4 cup and substituted a combination of cassava and garbanzo bean flours which are grain free flours. I then reduced the candy canes to four and used special brown rice syrup peppermint candy sticks instead of candy canes.

The result was a very tasty brownie which folks can feel comfortable sharing for the holidays.

Peppermint Brownies:

Ingredients:

1 cup vegan soy free butter

Two 10 oz packages Enjoy Life dark chocolate chips (divided: one pkg plus one cup; remaining chips)

4 eggs

1/2 cup golden monk fruit sweetener or coconut sugar

1/2 cup cassava flour

1/4 cup garbanzo bean flour

1/2 tsp salt

2 tsp pure peppermint extract

4 peppermint sticks (you can use regular if you can’t find the brown syrup version)

Baking Instructions:

  1. Preheat the oven to 350 degrees and line a 9 x 13 pan with parchment paper.
  2. In a microwave or over a double boiler, melt one 10 oz bag plus one cup of chocolate chips from the second bag with the vegan butter. Stir until smooth and let it sit to cool while doing the next step.
  3. In a large bowl, whisk together the eggs with the monk fruit sugar until thick and blended.
  4. Slowly whisk in the chocolate mixture into the egg mixture and blend well.
  5. Stir together the flours and salt and then stir the flour mixture into the wet ingredients until all the flour mixture is well mixed into the chocolate mixture.
  6. Melt the remaining chips, mix until smooth and add the peppermint extract.
  7. Spread the chocolate batter evenly into the prepared pan. Drop spoonfuls of the peppermint chocolate onto the batter and swirl the drops into the batter.
  8. Bake for 15 minutes. While the brownies are doing their initial bake, crush the peppermint sticks. I just put them into a heavy bag and whack them with my rolling pin. Works very well. You can find a more refined approach if you prefer.
  9. Remove the brownies from the oven, sprinkle the crushed peppermint pieces evenly over the top, and bake for an additional 10 minutes.
  10. Remove brownies from the oven and allow them to cool completely before cutting them into bite size pieces and enjoying.

Handling Holidays: Grain Free, Vegan Pumpkin Pie

“It’s just one more thing….”

The song tells us that “it is the most wonderful time of the year,” but all too often it is also the most stressful time of the year. On top of the usual routines and busyness, we add having to prepare for festive dinners and company, present shopping, holiday recitals and business gatherings, and a myriad of other events and preparations which are squashed into a six week period of time.

If you add on top of all that having to make sure that the food you prepare can accommodate Uncle Bob’s dietary restrictions and little Susan’s food allergies, it can become overwhelming – as one mom mentioned to me this week. She needed to know how to make a pumpkin pie which was grain free, vegan, and nut free. She figured the nut free part she could do, but she didn’t know what to do about the grain free and vegan parts.

So, I went to work. Instead of wheat flour and butter for the crust, I used Cassava flour and vegan butter which are grain free and vegan, but decreased the butter from 16 tbsp to 10, which was more than enough. For the pumpkin filling, I used flax milk and arrow root flour to substitute for the evaporated milk and egg, both of which are grain free and vegan. Because this would affect the silky, custardy texture, though, of the pie, I added a small amount of oil to the filling to increase the fat content but which added good fats instead of bad. For both the crust and the pie, I omitted sugar, using only a small amount of agave and some monk fruit sweetener for the filling so folks could really taste the pumpkin. For added flavor for both the crust and filling, I used spices and orange peel. The result was a tasty pie which the whole family could enjoy.

Vegan, Grain Free Pumpkin Pie

Ingredients for the crust: (will make two crusts)

2 1/2 cups cassava flour

1/8 tsp salt

1 tsp cinnamon

1/2 tsp nutmeg

1/2 tsp grated, dried orange peel

1 cup plus 2 tbsp vegan butter

1 tbsp vinegar

6 to 10 tbsp cold water

Ingredients for filling: (filling is for one pie; double for two)

2 3/4 cup cooked, pureed pumpkin

1 1/2 cup unsweetened flax milk (can use soy or almond milk if you prefer; just make sure it has no grain starches added)

1 tsp cinnamon

1/2 tsp nutmeg

1/4 tsp ginger

1/4 tsp cloves

1/4 tsp salt

1/2 tsp grated, dried orange peel

1/4 cup plus 1 tbsp agave

1/4 golden monk fruit sweetener blend

1 tbsp arrow root flour

1 tbsp extra light olive oil

Baking Instructions:

  1. Preheat the oven to 425 degrees.
  2. Combine the dry ingredients for the crust: the flour, salt, cinnamon, nutmeg and orange peel.
  3. Cut in the butter with a pastry knife or grate cold butter squares with a grater into the dry ingredients and mix well.
  4. Add the vinegar and cold water, beginning with 6 tbsp and adding one tablespoon at a time as needed until the doug is moistened and holds together well for rolling.
  5. Form the dough into two balls and then pat into disc shape. Roll one of the balls between two pieces of wax or parchment paper dusted with flour to fit 9 or 9.5 inch pie pans. (If making two pies, do the same with the other ball. If only making one pie, wrap the disc tightly in plastic wrap twice and put into the fridge. Will last for a couple of weeks. Just be sure to let it sit at room temperature before rolling for use.)
  6. Shape the crust in the pie pan and set aside.
  7. Combine the pumpkin, flax milk, cinnamon, nutmeg, ginger, cloves, orange peel, salt, agave, and monk fruit sweetener until well blended.
  8. Add the arrow root flour and olive oil. Mix well.
  9. Pour into the prepared crust.
  10. Bake in the preheated oven for 15 minutes. Then cover the edges of the crust with aluminum foil, reduce the heat to 350 and bake for another 40 minutes until the filling has puffed a bit and only jiggles in the center.
  11. Allow the pie to cool on a wire rack for 15 to 30 minutes, before placing in the fridge to cool and set completely.
  12. Enjoy!


Holiday Hints: Allergy Friendly Ice Cream Cake

“Don’t be people who destroy hearts….”

I watch as Yoko Kawashima Watkins, author of So Far from the Bamboo Grove, explains to a group of 7th graders that the Japanese Kanji for “busy” is a combination of the characters for “heart” and “destroy”. At 83, her body is frail but her voice is strong as she leans in closer to the children.

“Never have I told anyone that I am ‘busy’,” she says to them. “I don’t want to destroy anyone’s heart, and neither do you, right?”

Her gaze takes in each individual child as they vigorously nod their heads. They’ve already promised to thank their “honorable” parents for all that they do to take care of them (without letting their parents know that Yoko told them to do so, of course), so what could it hurt to agree with Yoko on this, too?

Later after I drive Yoko home, I think about the Japanese Kanji for “busy” and how interesting it is to me that being busy is seen as something that destroys one’s heart. Here in the States, being busy means you’re being productive, getting things done, not slacking off. When we’re “too busy”, then maybe it is something which can destroy one’s heart, but being just plain busy?

The holidays are probably a good example of what Yoko meant, though. Often the busyness of preparing for the holidays eclipses the amount of time actually spent just being with family members. For this reason, I’ve always tried to keep food prep to a minimum in favor of more time with my family, and as we think about yet another “special” dessert for New Year’s, I thought I’d share the fastest dessert recipe I have – allergy friendly ice cream cake.

You simply buy two flavors of your favorite pint size ice creams, a package or two of your favorite cookies, and a container of a chocolate frosting – all of which can be found in allergy friendly options- and within ten minutes you can assemble a dessert which will be both pretty and delicious. Below I will post the version which is pictured above.

Ice Cream Cake

Ingredients:

2 pint size containers of allergy friendly vanilla ice cream (I used So Delicious coconut milk version)

8 to 10 oz package of allergy friendly chocolate sandwich cookies (I used KinniToos)

2 cups of allergy friendly chocolate animal crackers (I used K-Kritters)

2 pint size containers of allergy friendly chocolate ice cream (I used Cados avocado version)

one cup chocolate frosting (I used Simple Mills)

Sprinkles (optional)

Assembling Instructions:

  1. Take out the four pints of ice cream and let them sit on the counter while you crush the cookies.
  2. Crush the chocolate sandwich cookies into bit size chunks and set aside.
  3. Crush the chocolate animal crackers into medium-sized crumbs.
  4. In a large bowl, scoop out the vanilla ice cream, and using a rubber spatula or wide wooden spoon, mix the chocolate sandwich cookie chunks into the ice cream until well mixed.
  5. Spread the ice cream evenly into a 10 inch spring form pan, making sure to level the ice cream flat.
  6. Sprinkle the chocolate animal cracker crumbs evenly over the layer of ice cream.
  7. Scoop out the chocolate ice cream into the large bowl and mix until the ice cream is soft and spreadable.
  8. Drop the ice cream gently in scoops to evenly cover the animal crackers. Then carefully spread the ice cream evenly over the chocolate crumbs and level the ice cream flat.
  9. Put the ice cream cake into the freezer for a few minutes while you’re working on the frosting.
  10. In a small bowl, stir the chocolate frosting until it is soft and spreadable. Spread it evenly over the ice cream cake.
  11. If desired, decorate the top of the ice cream cake with sprinkles.
  12. Put the cake back into the freezer and freeze until ready to eat.
  13. To cut the cake, run a butter knife around the edge of the pan and remove the side of the spring form pan. Run a large knife under hot water and cut the cake into wedges to serve.


Holiday Hints: Finger Treats

“Mercury is in retrograde….”

It began shortly before Thanksgiving. One of my daughters started having mysterious hives. My other daughter needed to come home for health reasons. The microwave wouldn’t work. The blender broke. My back went out. The drama scripts didn’t arrive as they were supposed to have. The Christmas cards fell into the mud. One of the ears of my glasses fell off. The printer went on the fritz. A gift disappeared. My mother lost a long time friend unexpectedly to undiagnosed cancer. The rice cooker became temperamental. My husband’s sleep apnea increased. BJ’s called to say my newly ordered glasses’ frames were no longer in stock.

Within the past couple of weeks, the universe seemed to be sending me a message, and when I told a friend about my experiences, she said, “Well, you know mercury has been in retrograde.” I laughed because that certainly explained it!

None of the experiences above are unusual. They are a part of life, and they happen all throughout the year, but at the holiday time, they can feel extra overwhelming because we have so many other things we are trying to do… buying presents, attending holiday parties, going to the children’s winter concerts and recitals, planning for family gatherings. And when we have food allergies and need to bring goodies to share, the pressure can sometimes feel like it’s too much.

That’s why I have some easy finger treats which I fall back upon for holiday treating of folks, and when I received an email yesterday asking about what someone could easily make for a party, I decided I’d post some ideas for anyone else who might be wondering the same thing.

One of my favorite easy treats is Chocolate Truffles because they only require two ingredients, are quick to make, and if you put them into little cupcake liners and put them on a plate, folks think you’ve worked hard when you haven’t.

Another simple treat is what I have pictured above which are cheesecake bites. When I make cheesecake and have leftovers, I turn those leftovers into the bites to bring to parties by scooping out tablespoons of the cheesecake and rolling them in gluten free graham cracker crumbs. For the holidays, using Cranberry Cheesecake or Ginger Spice Cheesecake are always good choices. If you haven’t made any cheesecake recently, you can use store bought cheesecake (Daiya makes an allergy friendly version which you can often find in the freezer section of grocery stores) which you bring to room temperature and then roll into the bites. What’s great is you can vary the crumb coating by also using your favorite cookies which you crush. Then, when you put the bites into muffin liners with the different types of coating, they look pretty.

A treat I just made last week are what I call “butter melts”. You take your favorite “butter” as in peanut butter or almond butter or sunbutter or cashew butter… whichever you prefer and fits your allergy needs, mix it with some vegan butter and a little bit of powdered sugar, and roll them into balls and put them into the freezer on wax or parchment paper for about ten to 15 minutes until they’ve hardened and you can coat them with chocolate. The recipes you will find online use crazy amounts of real butter and powdered sugar. I cut the amounts considerably, and for 1 cup of sunbutter, I use a tablespoon of vegan butter and just enough powdered sugar to make the “butter” rollable, which is always less than the cup to two cups called for in regular recipes. I also don’t dip the balls into the chocolate. I simply drizzle chocolate over the top, put them into the freezer for a few minutes, flip and drizzle the other side and put them back into the freezer for another couple of minutes. Much easier, neater, and quicker than dipping! For the chocolate coating, just melt allergy friendly chocolate chips with a tsp or two of a fat like coconut oil or avocado oil or vegan butter or shortening until the chips melt when you stir them. I usually do this in 20 second intervals.

A final finger treat idea I offer is making your own chocolate bark. This is fun as well as quick. Simply put 10 to 12 ounces of your favorite allergy friendly chocolate chips into a large microwavable bowl with 2 to 3 tsp of your favorite fat (coconut oil, vegan shortening, vegan butter, a plant based oil) and melt in the microwave in 20 seconds intervals until stirring the chips completely dissolves them. Put wax paper or parchment paper in a 10 x 15 pan and spread the chocolate mixture to cover the pan. Sprinkle the chocolate with whatever you want (peppermint candies, nuts, chocolates, pretzels, m & m’s, cookie chunks, etc…) and put the pan into the fridge until the chocolate hardens. Then you break them up into bite size pieces and arrange them in muffin liners to look pretty.


Thanksgiving Thoughts: Easy Roasted Vegetable Medley

“Do you have a go-to recipe..?”

For the past couple of weeks I have been posting some thoughts for different dishes folks could consider making for Thanksgiving, and this week someone wrote in, asking whether there was anything “easy” I tended to always make.

The answer is, “Yes.” My go-to for any occasion, not just Thanksgiving, is a medley of roasted vegetables. It’s easy to do, looks pretty, and can be “jazzed” up. I use frozen, chopped vegetables, which cuts both the roasting and prep times, and once the vegetables are roasted, it takes just minutes to “adorn” them. Once that’s completed, the vegetables can sit in your fridge until about thirty minutes before you’re ready to eat them, at which point, you simply warm them at 300 degrees for about 20 to 25 minutes.

If I am making the medley for Thanksgiving, I try to make them a bit more “special” by caramelizing onions and adding it to the vegetables or roasting garlic and adding slivers with freshly chopped herbs. Sometimes I make a gluten free bread crumb topping and top the vegetables with it. Other times, I make it “au gratin” and add vegan parmesan. Any of these options makes for a delicious side dish.

For folks who are wondering about the turkey which may go with the roasted veggies, I did a post a couple of years ago which you can find at Turkey Talk and which provides some tips for tackling turkey.

Roasted Vegetable Medley

Ingredients:

olive oil

frozen vegetables of choice (baby carrots, butternut squash, baby brussel sprouts, cauliflower, etc…)

Cooking Instructions:

  1. Preheat the oven to 500 degrees.
  2. Arrange vegetables of the same size in an ovenproof pan and drizzled with a tiny bit of olive oil. Mix and roast in the oven for about 10 to 15 minutes, turning every four to five minutes, until the vegetables are to the desired tenderness.
  3. If you have vegetables of different sizes, you may need to do a couple of rounds of roasting, by size, until all your vegetables are done.
  4. Arrange all the vegetables in a pan that fits them well. Top with your desired method of flavoring: mixing with freshly chopped herbs and black pepper; caramelizing onions and mixing them in; roasting garlic and mixing in slivers; making a bread crumb topping and sprinkling it on top; shaking parmesan on top.
  5. If serving immediately, you’re good to go. If serving at a later time or day, simply allow the vegetables to cool, cover well, and then thirty minutes before meal time, heat the dish at 300 degrees for 20 to 25 minutes until warm.