Menu Suggestion: Quiche

website quiche

“Okay, it needs to be something filling but it can’t have any nuts, dairy, soy, wheat, oats, or coconut in it. Also, it shouldn’t be too complicated, something easy for me to make, and quick, too, because I won’t have a lot of time; but it needs to look like it took some time, because, well, you know, I don’t want them to say anything snide. And it would be great if it could look pretty and elegant. Oh, and it should taste good, of course.”

I couldn’t help myself. As my friend’s rambling came to a halt, I laughed at her. “Well, I’m glad you’re not asking me for much,” I said.

My friend had just learned that she was expected to host her in-laws (parents-in-law and sister-in-law and her husband) for Mother’s Day, and unfortunately while my friend has many wonderful skills, she really does not like to cook – at all! Hence, the frantic SOS phone call to me.

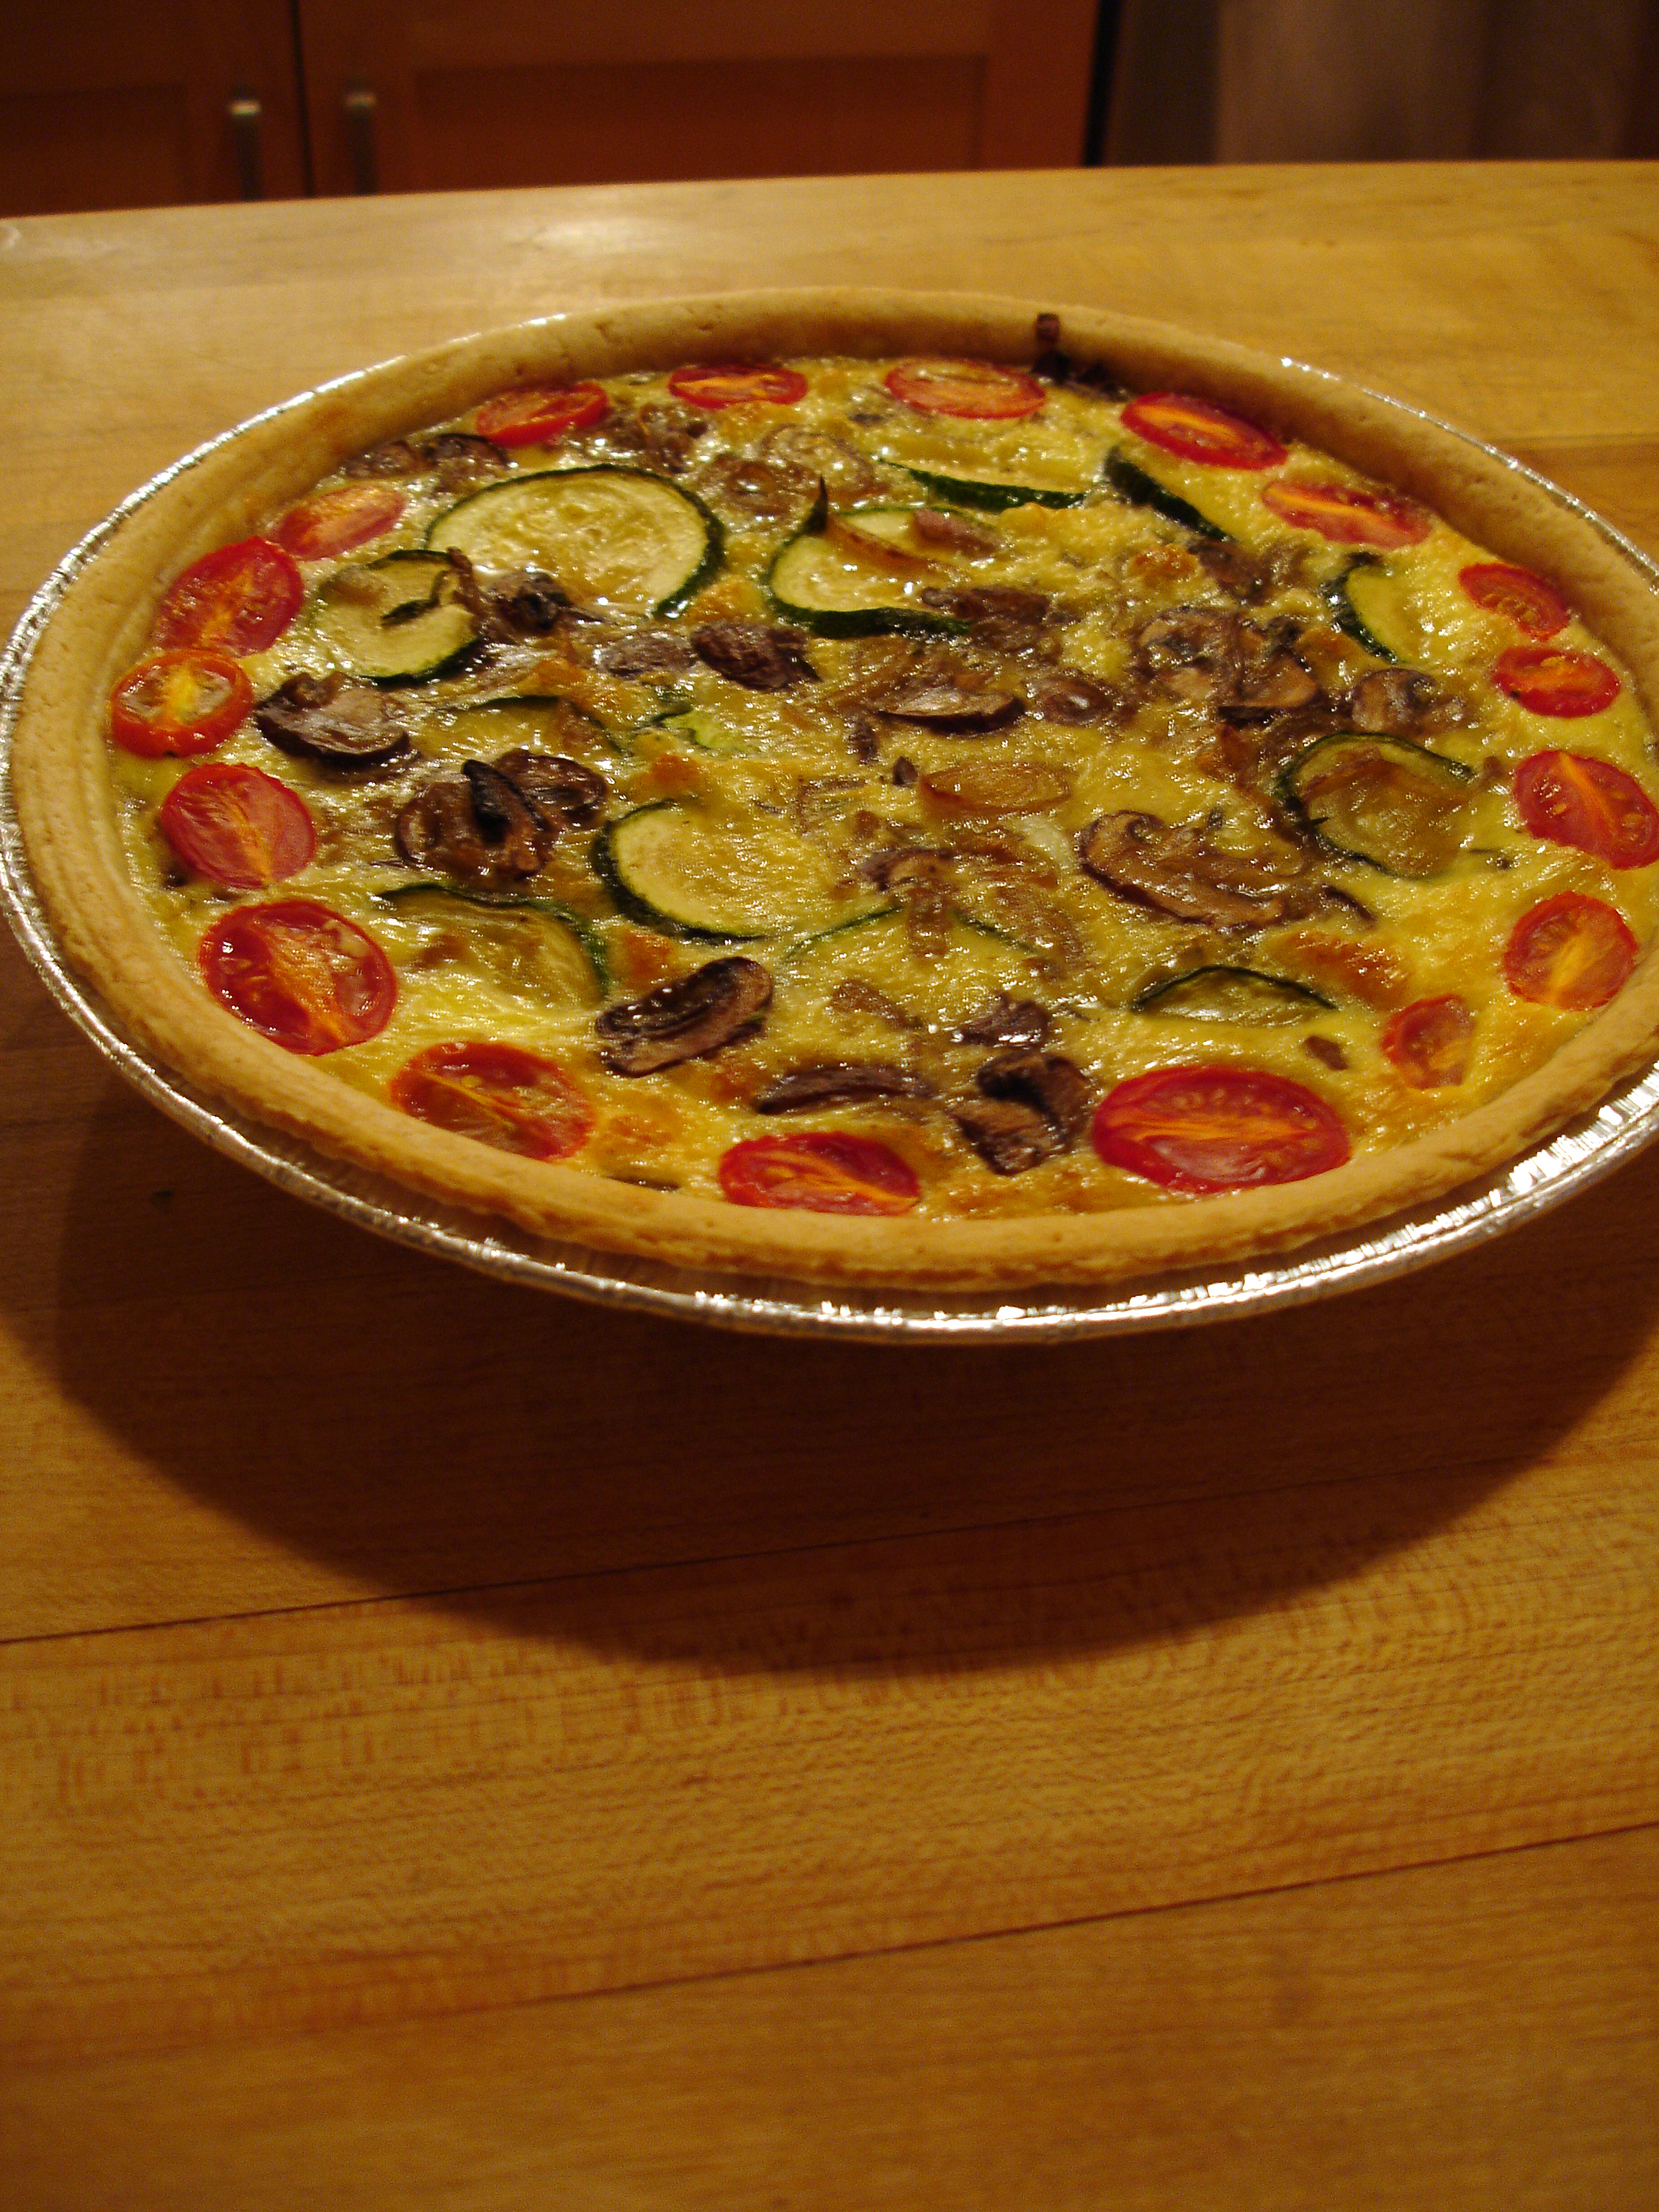
Fortunately, I had a perfect solution to offer my friend: Quiche.

Quiche is a wonderful dish for company. It’s quick and easy to make, but looks elegant and is wonderfully tasty. You can also use up leftovers from your fridge to make it, and it’s incredibly versatile. You can adapt it for many food allergies, and you can even make it for folks who have egg allergies or are vegan, provided they have no soy allergies. As well, you can make up two, three or four different types in your oven at the same time, depending on the size of your oven.

Quiche Making Tips:

1. The crust: What’s lovely about quiche is that you can make a pie crust recipe of your own, you can purchase a ready-made crust, you can use a pre-made crust mix, or you can use the recipe I will provide below which doesn’t require any rolling at all and is adaptable to fit your allergy needs. I’ve even seen people use tortillas as the crust.

Crusts can be traditional with wheat, or they can be gluten free. Obviously, a ready-made crust is fastest, but even making one home-made doesn’t take very long at all. Like with pie-making, though, sometimes you will find that you need to cover the edges if you don’t want them to be too browned.

2. The filling: Quiche is lovely because you can put in whatever you want. Any type of meats, cheeses, and vegetables you have on hand will work in a quiche. What you should keep in mind, though, is that small, chopped up cooked pieces are best. Leftovers work well, because it’s already cooked, and you can just chop them up into bite size pieces.

If you’re starting from scratch, though, you can quickly saute chopped vegetables or meats in a few minutes. Make sure you cool them slightly, though, before adding the egg mixture. My favorite combination is spinach, mushrooms, broccoli, and chicken sausage, but you can make up any combination you can imagine.

You only need a cup or so of the filling to fit into your pie crust. How much filling to egg ratio you have, though, depends on what you like. The more filling, the less egg you’ll taste; the less filling, the more egg part you’ll taste.

3. The egg mixture: Quiche is essentially eggs mixed with cream or milk. The ratio between the eggs and the milk determines the texture of your quiche. For a 9 to 9.5 inch pie pan, you want to use the equivalent of three to four eggs. If you want a solid, sturdy, eggy quiche, you would use less milk, maybe about 1/2 cup. If you want a creamier, airier quiche, you would use more milk, like 1 cup.

Using cream versus milk makes for a richer quiche. Just about any type of milk or cream will work in quiche. I’ve used soy, flax and rice milk without any problems. I’ve also used soy and rice creamers.

You can also use egg whites to cut back on the cholesterol. Half liquid egg whites and half whole eggs works the best, but you can also use 3/4 cup liquid egg whites with just one whole egg.

If you can’t have eggs at all, tofu works wonders. Just blend up a block of tofu (I like the silken tofu) with the type of milk you prefer (2 tbsp to 1/4 cup) and mix your cooked filling ingredients and seasonings into it before pouring it into your crust.

How you make up your quiche with the egg mixture is versatile, too. You can put your cooked ingredients into the center of your crust and pour your egg mixture over the filling. Or you can mix your filling into the egg mixture and pour the entire thing into your crust. It depends on the texture and taste you want. For example, if I caramelize onions for a quiche, I like to layer that on the bottom of the crust and then add more layers of mushrooms or spinach or meat and pour my egg mixture over it, because then when I cut a bite of my quiche, I have the lovely layers to look at and the tastes to hit my tongue one at a time. However, if I’m using a chicken sausage and spinach, I prefer those tastes to be throughout my quiche, so I’ll mix them into the egg mixture before pouring the whole thing into the crust.

4. The seasonings: Quiche can be seasoned however you like. Italians herbs, Mexican spices, different types of cheeses, caramelized onions, minced garlic – whatever you want to experiment with works. I never use salt but I always use fresh ground black pepper and some combination of the afore- mentioned herbs and spices. What’s great is if you saute your vegetables or meats with your choice of herbs and spices and then adding some more to the egg mixture. The more flavor you can infuse into your quiche, the better. When I make my crust, I will often add crushed herbs and onion powder to it, as well. However, if you prefer things more on the mild side, simply using a little salt (if you aren’t going to use any other herbs and spices, you should use a pinch) and pepper is fine, too.

5. The baking: Cooking up a quiche is rather simple. Once your quiche is assembled, it’s like baking a pie. You choose what you want to do: Bake the entire thing at 350-375 for about 30-45 minutes (will vary, depending on our oven heat and the thickness of your filling and whether it’s a 9 in pan or a 9.5 or 10 in). Or you can first heat your oven to 425 degrees, cook the quiche for 10-15 minutes, and then turn the heat down to 325 for 15-30 minutes.

Easy Gluten Free, Dairy Free Vegetable Quiche Recipe

(This recipe can be adapted to use wheat and dairy if desired.)

(You can also use whatever filling you prefer instead of the option below.)

Ingredients:

1 1/2 cup Garbanzo Bean flour

1/4 tsp ground onion powder

1/4 tsp salt

1/2 tsp crushed dried rosemary

1/4 tsp crushed dried thyme

1/4 tsp dried oregano

1/8 tsp black pepper

1/3 cup safflower oil

3 tbsp flax or soy milk

4 eggs (or 1/2 cup liquid egg whites mixed with 2 whole eggs)

1 cup flax or soy milk

1/4 tsp black pepper

1/2 tsp dried oregano

10 oz thawed, chopped spinach

1/4 cup sauteed chopped mushrooms

1/4 cup chopped cooked broccoli

1/8 cup chopped caramelized onions

Cooking Instructions:

1. Preheat the oven to 425 degrees.

2. Mix the flour with the onion powder, salt, rosemary, thyme, oregano and pepper.

3. Whisk the safflower oil with the milk until it’s creamy. Pour into the flour mixture and stir with a fork until a dough ball forms.

4. Press the crust into a 9 or 9.5 inch pie pan, using your clean hands to form an even crust along the bottom and sides of the pan. Set aside.

5. Whisk the eggs with the milk, pepper and oregano. Set aside.

6. Combine the spinach, mushroom, broccoli and onions and arrange on the bottom of the crust.

7. Pour the egg mixture carefully over the filling and put the quiche into the center on the center rack.

8. Bake for 15  minutes. Reduce the heat to 325 degrees.  Bake for another 15-25 minutes. The quiche will be done when the center is slightly puffed and the egg is no longer runny. NOTE: When you reduce the heat, you may want to put aluminum foil around the edges of your crust to prevent too much browning. (My children like it toasty, so we dispense with that particular step, though.)


Advertisement

Going Uphill: The Possible Obstacles

website obstacles

“I’m sorry but I can’t make it up the hill.”

One cold, crisp December morning a professional hairdresser and make-up artist turned my everyday cute self into a beautiful cover bride.  Snow had swept in the evening before, leaving the countryside picture perfect white.  Unfortunately, the snowplows, dirt and salt had left the parking lots and roads grimy and filthy.

Residual light snow fell onto the umbrella my maid of honor carried over my head while faithful bridesmaids valiantly tried to hold up my dress above the filth and grime as we slowly and carefully stepped to the limousine.   The driver assured me that the roads were clear, and we were on our way to the moment I had been planning for the past six months.

My husband-to-be was waiting at the church with the family and friends who represented the first twenty-two years and twenty-three years of both our lives. In less than an hour our new lives together would begin.  Or so I thought.

“Ma’am, I’m sorry but the main road up to the church is closed because of ice.  I’ll have to go around.”  The road “around” unfortunately was closed as well.  As was the third route option.  We could see the church sitting at the top of the hill, its steeple standing tall in the middle of the swirling snow, but we could not get to it.

Would my wedding be thwarted by the mercilessness of nature?  Would I break my leg if I got out and walked up the icy road?  Maybe getting married in December wasn’t such a great idea after all.

In the end, we made it to the church half an hour later as the sun broke through the clouds and melted away some of the offending ice, but for a moment, it had seemed as if the obstacle might be too great to overcome.

We can have the same overwhelming feeling when it comes to changing our eating habits to fit a food allergy or a healthier diet as obstacles we hadn’t anticipated loom before us.

The Obstacles

For most folks the biggest obstacle is price.  Allergen free foods are more expensive than regularly processed items.  Fruits, vegetables, whole grains, and other fresh produce cost more than white flour goods and boxed and canned foods.  As well, some people find it difficult to find resources which might help them with their new lifestyle while others discover that it’s not easy to create or revamp their own recipes for healthier or allergen free cooking.  Add on that suddenly folks have to “educate” their friends and family about their allergies or dietary restrictions with not always the best responses, and it can seem like one might not be able to make the changes after all.

The Helps

Cost:  When everything you make has to be gluten, dairy, nut, sugar and occasionally egg free at the same time, cooking can become a bit expensive. There are ways to cut back on costs, though.

1.  Many “regular” foods ARE gluten, dairy, nut, egg, etc… free.  Sometimes we get caught in the mindset that everything we buy has to be “special”, but that’s not the case.  You just need to read the labels, but you’ll be surprised by the number of items you find you can still eat.

2.  Whole is better than parts.  If you’re eating healthier and purchasing more fruits and vegetables, don’t buy the separately packaged, pre-washed, cut up varieties.  They always cost more.  Purchase the whole lettuce head.  Buy the loose vegetables and not the ones already on the foam trays.  Get a whole melon and not the halves.

3.  Buy when there are sales.  Most of the grocery stores in my area will have a sale on different allergen free items at least weekly, so I stock up when the prices are good.  You can also find sales online.  Comparison shop between the brand companies and Amazon.

4.  Frozen is good.  Fruits and vegetables which are frozen are cheaper than fresh.  While you definitely want to get fresh when it’s in season, you don’t want to when it’s not.  It’s too expensive.  Go with the frozen and read my post on the “frozen chosen” to learn all you can do with them.

5.  Buy in bulk.  Places like BJ’s and Costco’s now have many allergen free items in stock for purchase at better prices.  At the supermarket, an 11.5 oz of Agave costs me between $4 and $5.  At BJ’s I can buy a 48 oz container for $6.99.  Also, online, if you purchase more, often the price is less per unit and you ultimately save on shipping and handling, too.  For veggies and fruit:  If there’s a good price on something you regularly eat, you can purchase it and freeze them for later use.

6.  Shop at discount places.  In my area Ocean State Job Lot is a wonderful place for picking up gluten free items with good expiration dates for a cheaper price than I’d find it at the store or online.  I don’t make a special trip to the Job Lot but if I’m passing by, I stop in and stock up.  Look around for stores in your area that provide the same option.

7.  Shop with friends.  If you have friends who have similar allergy or health issues, purchase even larger quantities of needed items, together and split the costs.  I’ve found this helpful, because sometimes a friend wants a little of something while I want a lot or vice versa, and we can take the proportional amounts that we each want while saving some money.

Resources:  The biggest question I always get is “Where do I start?”  The nice thing about today’s age is that resources abound online so you don’t even have to spend money purchasing books.  You can get help for free.  Google any food allergy and numerous sites will pop up.  Type in “healthy” before whatever recipe you want, and you’ll get a “bazillion” hits.  Because it is “numerous”, though, ask around.  Friends can tell you what sites have been helpful to them.  Once you are at a site, see what other sites are linked to that one.  People are very open about sharing site they “like”.  If you do want a book, Google your particular allergy and see what pops up.  Read the reviews, and you’ll find that people are very vocal about whether a book works or not.

Recipes:  If you find that you’re simply are not cut out for revamping or creating your own recipes, don’t worry.  There are plenty of people out there who have recipes you can simply follow.  Those sites and books you found will always have recipes you can use, and you’ll find allergen free recipes for just about anything under the sun you want to create.  And if following recipes isn’t your thing, either, you still don’t need to stress, because there are many, many products on the market, both online and in stores.  I personally don’t make my own pie crusts from complete scratch.  Bob’s Red Mill has a wonderful gluten free baking and biscuit mix which makes a great pie crust, so I use it.  I add my own little touches, a little cinnamon and spice added, a bit of vegan butter brushed on the top, etc…, but I’m using a store bought product.  No one says you have to do it all yourself, especially when there are plenty of options out there for you to use.

Education:  This is usually the most difficult obstacle, more than even the cost. Too often the obstacle are well-meaning friends and family who simply don’t understand.

1.  “But I only used a little.”  Sometimes folks don’t seem to understand that “a little bit” can be deadly for someone with a food allergy.  In these cases, it’s important to be patient and to take the time to gently explain that a little bit can trigger a reaction which could lead to death.  Don’t be dramatic, but matter of fact.  In time, people usually begin to get it.  If you’re eating healthier for a health issue, simply explain that you really can’t eat certain foods because of your health.

2.  “But I can cook for you.”  Sometimes folks turn down your offer to bring something you know you can eat.  They’ve invited you and don’t want you to have to go through any effort.  Occasionally, they’re actually hurt that you want to bring something, as if there won’t be anything they’ve made you can eat.  In these cases, you need to be honest and simply explain that it’s no reflection upon them, but you’ve learned to be careful because you’ve had bad experiences in the past.  Usually people understand when you explain it that way.

3. “But I’ve read that you can be misdiagnosed with an allergy.”  Sometimes people don’t believe you have an allergy.  With all the information out there about “sensitivities” verses “intolerances” verse “allergies”, it’s easy to be confused.  People aren’t trying to call you a liar.  They’re genuinely concerned that your whole life may be changing when it doesn’t need to be.  Simply tell folks that you’re aware of the differences and can assure them that you do indeed have a confirmed allergy.  If you’re firm, in time people accept the truth.

4.  “But don’t you want to eat it.”  Sometimes people just can’t understand how you can resist eating foods which are so tempting.  They’re not intentionally trying to make you feel badly.  They just think they’d have less self-control if they were in your place.  This is another time when you can simply be honest.  Yes, you’re tempted, but you know it could have terrible consequences – anaphylactic shock, another heart attack, whatever….  People usually do get it eventually.

5.  “But what’s left for you to eat.”  This one may only apply to folks like myself who are allergic to multiple foods, but sometimes people just can’t take it in.  They think you’re somehow going to be deprived.  If this is the case, you simply need to tell them all the wonderful foods you’re still able to eat, or better yet show them.  Below is a recipe for a chicken piccata that I serve to guests which is not only delicious but easy to make.

Chicken Piccata

Ingredients:

1/2 cup Gluten Free Flour*

1 tsp dried oregano

1/2 tsp black pepper

1/2 tsp dried thyme leaves

1/2 tsp dried basil

1/4 tsp ground onion powder

1/4 tsp ground garlic powder

10 chicken cutlets**

2 tsp olive oil

1/2 cup vegan friendly white wine***

1 cup low sodium, fat free gluten free chicken broth

1/4 cup lemon juice

2 tsp minced garlic

2 tbsp vegan soy free “butter”

Cooking Instructions:

1.  Mix the flour with the oregano, pepper, thyme, basil, onion powder and garlic powder.

2.  Coat both sides of the chicken cutlets with the flour, making sure to shake off any excess and stack them on a plate.

3.  Heat 2 tsp of olive oil in a large skillet over medium heat and add the chicken cutlets.

4.  Brown the cutlets one minute on each side and place back onto your plate.

5.  Deglaze your pan with the white wine and cook until the wine is almost gone.

6.  Mix the chicken broth with the lemon juice and garlic.  Add to the wine in the pan.

7.  Add the cutlets back into the pan and cook for one to two minutes on each side until the chicken is cooked through.

8.  Remove the cutlets to a warming dish, and add the “butter” to the sauce left in the pan.

9.  Cook the sauce until it’s reduced a bit and thicker.  Pour over the chicken.

* I like to use a garbanzo bean flour, but you can use whatever type you prefer.  If you have no wheat or gluten issues, use 100% whole wheat flour.

** I rarely actually buy cutlets because they’re more expensive.  I keep frozen chicken breast in the freezer which I defrost only partially, then cut into half both lengthwise and widthwise so I have cutlet sized chicken.  (Because the chicken breasts they sell these days are so large, you can do this.  If you buy normal sized chicken breasts, you should only cut them widthwise so you don’t have tiny portions.)

*** If you go to vegnews.com or barnivore.com, you can find lists of wines not contaminated with casein.

Birthdays and Food: When you have allergies

OLYMPUS DIGITAL CAMERA

“I’m sorry, but I can’t come.”

The general consensus is that December 25th is  the worst date for a child to have as his or her birthday.  I disagree.

Adults have sympathy for children who have to share their limelight with Jesus. While it’s true that the child’s birthday and Christmas present will most likely be rolled into one, the adults in his or her life usually try in some way to make the birthday special to compensate for having to share their special day.  And because the birthday is a traditionally celebrated family holiday, the child is usually surrounded by relatives, wishing him or her a “Happy Birthday!” in addition to “Merry Christmas!”

The worst dates to have as a birthday are January 1st and around Memorial Day weekend.  No one is available at either of these times to celebrate a child’s birthday.  After the craziness of the holidays, most folks are looking for a quiet respite on January 1st, and Memorial Day weekend is traditionally the start of summer and when folks are opening up summer places or having family gatherings.

I know because my brother and I have those birthdays, and time after time our birthday parties were cancelled because the responses were “So sorry, but we have . . . already scheduled for that day.”

My parents were great about compensating, though, and we had the family tradition of going to a movie (which was a treat for us) and having pizza and ice cream cake (also a treat) on our birthdays instead.

As a child, though, whenever I was at someone else’s birthday party, I felt a little left out, because I was like that bridesmaid adage – always celebrating another child’s birthday, but never knowing the thrill of having my own birthday party celebration.

When you’re a child with food allergies, you can feel the same way.  It’s awkward to be the person who can’t eat the birthday cake and ice cream with everyone else.

So what can parents do to help their children?

1.  Take initiative on your child’s behalf:  If the party is hosted by a relative, ask them if they’d like your help with the birthday cake.  My relatives are always willing to let me bake an allergy friendly cake, because it’s one less thing for them to do for the party!  If the party is given by a friend, ask if they’d mind if you baked some cupcakes to add to the cake choice.  I’ve never had a friend say, “No.”  And if the party is being hosted by someone you really don’t know, simply explain to them that your child has severe allergies and ask if they’re fine with you contributing some allergy friendly “ice cream” to the celebration.  Once again, I have never had anyone refuse my request or not understand.

2.  Educate people:  I realized early on that most people simply are not aware of the types of food allergies children can have, and once they know, they are quite happy to do what they can to help a child feel included.  Early on, as we were invited to other people’s homes, I would talk with them about my children’s food allergies and how difficult it can be at parties, and it wasn’t long before the invitations began to change.  Included on them most often now is a little question about whether anyone has any food allergies that the host should be aware of, and when my children arrive at these parties, the host has made sure to provide food for all the food restricted children.

3.  Start a new trend:  The highlight of birthday parties always seems to be the cake, but it doesn’t have to be.  Because of my own history, I’ve always tried to make my children’s birthday parties memorable, but we’ve always hosted parties where the children are busy creating their own pizzas (allergy friendly, of course!) or making crafts or doing a science experiment or playing creative games.  And what I’ve found is that the children don’t really have an interest in the cake and ice cream part anymore.  And what’s happened is that some of my friends have begun to do the same thing.  So now, more often than not, even though cake and ice cream are served, once the “Happy Birthday!” has been sung, the children haven’t even stuck around to eat the cake but have gone back to the fun!

4.  Be prepared:  Sometimes “it’s just what it is”, and your child needs to be prepared for that reality.  If it seems like he or she will be the odd man out, unable to partake of the food at the festivities.  In that case, I simply make a special cupcake that I send with my child in a container, so he or she can enjoy eating with the rest of the children.  Have your child help you make and decorate the “special” cupcake, and he or she will most likely be even more thrilled with his or her cupcake than what is being served — or at least my children were always boasting about the cupcakes they got to make themselves!

5.  Talk with your child positively:  It’s easy to feel upset ourselves that our children are being “left out”, so we need to remember to share with our children all of the reasons to be happy about attending another child’s party.  Good feelings are contagious, and they’ll pick up on our positive attitude.

6.  Educate your child:  Children are bright.  They understand a lot at even a young age.  Make sure your children understands why they can’t eat foods at parties, and help them to think about their food allergies as just another part of what makes them the special people that they are.  My children don’t see their food allergies as handicaps.  They actually view it as an opportunity for mommy to continue to work on revamping even more recipes for them to taste test!

As I’ve become an adult, I’ve begun my own tradition of throwing myself a birthday brunch the week before Memorial Day weekend.  I invite local friends and give myself the gift of some time off from the hectic busyness of life with three children. To make my cakes special, I use the following frosting which is enough to frost a three layer cake.  It’s very tasty and not extremely sweet which is the way I like it.  It’s a slightly revamped version of a couple of frosting recipes you can find at http://www.elanaspantry.com

Chocolate Frosting

Ingredients:

2 cups Enjoy Life allergen free mini chocolate chips

2/3 cup safflower oil

2 tablespoons Agave

1 tablespoon gluten free vanilla

Cooking Instructions:

1. Put all ingredients into a microwave safe measuring cup and stir.

2.  Microwave for one minute, and quickly and vigorously stir until the chocolate chips are completely melted and the mixture is starting to be a little thick.

3.  Scrape the chocolate mixture into your mixing bowl (a metal bowl is best), and put into the freezer for about 15 minutes.  (You want the mixture to be hardening almost the whole way through with only the middle being slightly runny still.)

4.  Take out the mixing bowl and with a mixer, mix the frosting on a medium to high speed, occasionally scraping down the sides of the bowl, until the frosting is completely whipped and creamy.  (The mixture taken from the freezer will be a dark brown with a glossy texture.  When it’s been whipped, it’ll be a lighter brown and a thicker, creamier, frosting-like texture.)

5.  Use the frosting to frost cooled cake layers.  Unused frosting will keep in the fridge.