Creative Cooking: Brussel Sprout Chocolate Chip Cake

brussel-sprout-cake

“The secret ingredient is what?”

After one day of Thanksgiving leftovers, my husband is usually ready for something different. So, over the past few days we’ve had a turkey shepherds’ pie (using leftover turkey, some of the roasted carrots and cauliflower, and the mashed potato timbale), turkey-vegetable soup (using leftover turkey, the rest of the roasted carrots and cauliflower, and the leek gravy), stuffing muffins (using leftover stuffing and some of the leftover turkey sausage stuffed mushrooms), cranberry waffles (using leftover whole berry cranberry sauce), cranberry muffins (using leftover cranberry-orange relish), and quiche (using the rest of the leftover turkey sausage stuffed mushrooms).

Yesterday as I was rummaging through the fridge to see what we still had leftover, I found the roasted brussel sprouts which I hadn’t used in any of the above meals. While searching online to see if there might be anything interesting I could use them for, I found a recipe for brussel sprout cake. I was intrigued but a closer look at the multitude of recipes — which I discovered to actually be the same two recipes just remade by many, many people — revealed a lot which I didn’t like about the cake.

One was simply that the cake seemed to be a variation of a fruit cake recipe, only with vegetables added, so the bake time was lengthy and the cake, more dense than I’d like. Two, the recipes called for two cups of sugar and two cups of oil.  Third, all the extras which make the cake more like a fruit cake — the raisins, walnuts or pecans, shredded coconut, etc… — were not ingredients my children would like in a cake. Four, the recipes, were of course, not allergy friendly for wheat, dairy and nuts.

So, I decided I’d create my own brussel sprout cake which used gluten free flour in place of the wheat, agave instead of sugar and in half the amount, applesauce for some of the oil, and a small amount of mini chocolate chips in place of the original “extras”. When the cake was done, we topped it with a dark chocolate frosting, and the result was an extremely tasty cake which now contained the health benefits of brussel sprouts which includes being high in protein and vitamins C and K.

Brussel Sprout Chocolate Chip Cake

Ingredients:

2 cups roasted brussel sprouts

1/2 cup safflower oil

1/2 cup unsweetened applesauce

1 cup agave

1 tbsp vanilla

4 eggs (if you are watching cholesterol, use 1 cup liquid egg whites instead)

2 cups gluten free flour blend (I used Pillsbury brand for this cake)

1 cup gluten free oat flour

2 tsp baking powder

1 1/2 tsp baking soda

1 tsp salt (you can reduce this if you are watching sodium intake)

2 tsp ground cinnamon

1 tsp ground nutmeg

1/2 tsp ground ginger

1/2 tsp ground cloves

1 cup Enjoy Life allergen free mini chocolate chips

2 tbsp apple cider vinegar

Baking Instructions:

  1. Preheat the oven to 350 degrees and line an 11 x 15 pan with parchment paper.
  2. Coarsely chop up the brussel sprouts in a food processor for a few seconds or with a knife on a cutting board.
  3. In a large bowl, combine the brussel sprouts with the oil, applesauce, agave and vanilla.
  4. Beat the eggs and add them to the brussel sprout bowl. Set aside.
  5. Combine the gluten free flour with the oat flour, baking powder, baking soda, salt, cinnamon, nutmeg, ginger and cloves.
  6. Stir in the mini chocolate chips.
  7. Add the dry ingredients to the wet ingredients, along with the cider vinegar, and mix just until the dry ingredients are moistened.
  8. Pour into the prepared pan and bake for 30 to 35 minutes until the cake has puffed, is golden, and a toothpick inserted in the center comes out clean.
  9. Cool on a wire rack.
  10. Frost with favorite frosting recipe. (We made dark chocolate but I think a cream cheese frosting or vanilla or cinnamon frosting would be equally tasty.)


Advertisement

Appealing Appetites: Just the Same Chocolate Cake

chocolate-cake

“There can’t be any difference.”

One of the many heartbreaking moments for me as a mother of children on the autism spectrum was when my oldest started kindergarten. Several weeks into the year, I found my daughter in a corner crying. Apparently every day at recess since school had started, she sat alone on a swing because no one would play with her. As I gathered her into my lap, my own tears ran at her heartache. The autism meant she lacked the social skills needed to make friends, but it didn’t mean that she didn’t want or need friends nor that she couldn’t feel the hurt of not having any.

I arranged a meeting with the kindergarten teacher because I was a little surprised that at the age of five, students were already alienating other students. Isn’t everyone friends at the age of five? (Yes, I was naive. I was a young parent and didn’t know better yet!) When we met, I asked why no one was playing with my daughter, and the teacher said, “Well, Mrs. Castner, your daughter is a little… different.”

Different. If you look up the definition, you’ll see wonderful phrases like “not ordinary” and “distinct in nature” which appear to be good traits, but then you’ll continue reading to find “dissimilar”, “not identical”, “unusual”, “separate”. We live in a world where tension exists between sameness and difference. We encourage children to be themselves, to embrace what makes them unique… different… from everyone else while simultaneously wanting them to “fit in” and be like others around them… to be the same.

Too often the push toward sameness wins out over the desire to encourage individuality, and for my daughter, her difference meant children as young as five didn’t want to be her friend. She was too different, and therefore, they didn’t understand her. Without understanding, it can be difficult to draw into another’s experience.

Because I do understand, my heart ached again this past week when I received an email from a mother whose daughter is feeling “different” from her classmates because she has food allergies and can’t eat what others eat. We can ask as I did all those years ago, “What’s the big deal about being different?” The answer is that it IS a big deal because children at a young age don’t understand the difference and can react in negative ways. For this daughter, she felt she “wasn’t normal” because the other children wanted to know why she never ate cake at the birthday parties they attended and why her bread looked different at lunch.

The mother was reaching out because the girl was inviting classmates to her house for a birthday party, and she was anxious about the birthday cake. She didn’t want her birthday cake to be “different” because apparently children were asking her if there would be cake and whether it would taste the “same” as other birthday cakes.

I confess. I cried reading the email because it broke my heart to think of that much anxiety in a seven year old… all because of cake. I understood what was happening, though, because the fact is that many cakes which are gluten free and dairy free do have a different texture and different taste from “normal” cakes, and children know what they like and are often very picky about trying something “different”.

Fortunately, while the young girl in question couldn’t have gluten or dairy, she had no other food issues, so it was easy for me to create a chocolate cake “just like real chocolate cake” for her. The mother wanted it to be an “easy” cake which she could make with flour blends from her grocery store, so I used Bob’s Red Mill and Krusteaz blends which she could find at her store. I combined the two because, despite what you’ll read on the packages, a “simple substitution” of  just one of the blends makes for either a crumbly or a fallen cake. To achieve the “same” texture as regular cake, I needed to combine the two different types of flour blends. For the dairy, I used vanilla soy milk because it’s consistency matches milk in most cake recipes and the vanilla enhances the chocolate flavor. Instead of refined white sugar, I used coconut sugar which adds a subtle undertone to the chocolate as opposed to a sickening sweetness. Instead of butter, I added safflower oil which has a neutral taste but adds the fat needed to retain moisture in the cake. Instead of regular unsweetened cocoa powder, I used the Special Dark because it has a deeper chocolate flavor, and I added a cup of mini chocolate chips (allergy friendly) to give another level of chocolate taste.

We made the below cake for the French exchange student we had staying with us, and she never knew the “difference”. It was just as chocolately, just as fluffy, just as moist, just as tasty. I was confident that the little girl’s schoolmates would never suspect that it was actually “different”. *grin*

Just the Same Chocolate Cake

Ingredients:

2 cups coconut sugar

1 cup Krusteaz gluten free all purpose flour

1 cup Bob’s Red Mill all purpose baking flour (the one in the red package made from bean flours; not the rice blend)

1 cup Hershey’s Special Dark unsweetened cocoa powder (the one with the red lining; not the regular unsweetened cocoa powder)

2 tsp baking powder

1 1/2 tsp baking soda

1 tsp salt

2 eggs

1 1/2 cup vanilla soy milk

1/2 cup safflower oil

2 tsp gluten free vanilla

1 cup Enjoy Life mini chocolate chips

1 cup boiling water

2 tbsp apple cider vinegar

Baking Instructions:

  1. Preheat the oven to 350 degrees. Line three 9 inch cake pans with parchment paper.
  2. In a large bowl, combine the coconut sugar, the two flour blends, the cocoa powder, the baking powder, baking soda, and salt. Set aside.
  3. Mix together in another bowl, the eggs, soy milk, safflower oil and vanilla.
  4. Stir the chocolate chips into the dry ingredients. Pour the bowling water on top, and add the wet ingredients along with the vinegar. Whisk everything together until it’s well combined.
  5. Divide the batter evenly among the three cake pans.
  6. Bake in the oven for 20 minutes until the cakes are puffed and pulling away from the sides and toothpick inserted in the center comes out clean. (I had set the timer for 15 minutes, checked, and put them on for another 5.)
  7. Cool the cake layers in their pans for at least 10 to 15 minutes before removing them to a wire rack to cool completely. (I actually stacked them one on top of the other with the parchment paper in between the layers and put them onto a plate in the freezer for about 10 to 15 minutes to cool them faster!)
  8. Frost the layers and then the whole cake with your favorite frosting. (What is pictured above is a cinnamon frosting made with vegan butter, powdered sugar, cinnamon and soy milk.)


Recipe Makeover: Banana Sheet Cake

OLYMPUS DIGITAL CAMERA

“I need it to taste good.”

For the beginning cook, the most nerve-wracking part of experimenting with a recipe is that niggling thought which you can’t banish, no matter how hard you try:  “What if it doesn’t taste good?”

When I received an email a few days ago with a request for help in making over a family favorite recipe, the plea was “I need it to taste good.” As I finished reading the email, I thought about the number of times I’ve made something that “didn’t taste good”.

Once.

Really. I know it’s hard to believe, but in all my years experimenting, only once has something come out so badly that I couldn’t eat it. All the other times, the texture and/or taste may not have been exactly as I wanted, but it’s always been edible and/or fixable to be edible.

I share this, because worrying about how something will taste can be paralyzing. The only thing we can do is to simply forge ahead and see what happens. Might it be less than perfect? Sure, but will it be such a disaster that you can’t serve it? Most likely not.

The request received was about a banana sheet cake which the family has always enjoyed. Unfortunately new food allergies have hindered the mom’s ability to make the cake anymore, and she was wondering whether it was possible to recreated it.

The answer, of course, is “yes”, but the caveat is that the cake will obviously be different once you make the adjustments. I took a stab at making over the recipe over the weekend, and the result was something that my family liked very much. Below I’ll explain what I did and other possible ways for recreating the recipe.

The recipe for the original banana sheet cake is:

2 1/2 cups sugar, 1 1/2 cup vegetable oil, 2 tsp vanilla, 4 eggs, 5 cups flour, 2 tsp baking soda, 1 tsp salt, 1 1/3 cup buttermilk, and 2 to 3 mashed bananas — all of which combines to make an 11 x 15 sheet cake.

Makeover:

1. The Flour: This mom needed the recipe to be gluten free. Here’s the tip: Banana cake can be dense, so if you’re going to use a gluten free flour blend, you should opt for something that is lighter like a brown rice flour blend as opposed to a heavier flour like a garbanzo bean flour blend. For this makeover, I used Authentic Foods Gluten Free Multi-Flour blend because it’s a lighter flour and already has the xanthan gum mixed in.  If you use a blend that doesn’t have the xanthan gum, be sure to add it in: 1/2 tsp per cup of flour.

If you don’t need your cake to be gluten free but you’d like to make it a bit healthier, opting for a white whole wheat flour will make for a more fibrous but still light cake. Otherwise, you can use a whole wheat flour which works well but will give the cake a slightly denser texture and a nuttier taste.

2. The Sugar: This mom didn’t care about replacing the sugar, but since I try to avoid as much refined sugar as I can, I’m letting you know that you can replace the sugar in a one to one ratio with coconut sugar or use half as much of the called for sugar by replacing it with Agave or Stevia.

If you use the dry options (coconut sugar or Stevia), you don’t need to adjust any of your other ingredients. If you use Agave, though, you should either increase your flour by 1/2 cup or decrease your liquids by 1/2 cup.

I chose to use Agave and decreased the oil which decreased the overall fat for the recipe.

3. The Vegetable Oil: I always suggest replacing vegetable oils with an oil like olive oil or safflower or grapeseed or a blend like Smart Balance because the fats are considered good fats. I also like to reduce the fat if at all possible. For this recipe I used a Mediterranean blend of olive, grapeseed, and canola oils, and I reduced the oil from 1 1/2 cups down to 1/2 cup since I was increasing the liquids with the use of Agave.

4. The Eggs: This mom didn’t have any egg allergies, so I kept the eggs, but to decrease the fat and cholesterol, I opted to use liquid egg whites instead of whole eggs.

If you have an egg allergy, though, I’d recommend using ground flaxseed meal mixed with water. You use 1 tbsp of flaxseed meal mixed with 3 tbsp of water for every egg you replace. Let the mixture sit for at least five minutes so it can thicken.

Because this cake calls for buttermilk, omitting the eggs and replacing it with the flaxseed mixture will actually work quite well since the acid in the buttermilk will help with the leavening you lose from the eggs.

5. The Buttermilk:  This mom needed to avoid dairy so I chose to make a nondairy buttermilk. I used flax milk but you can use any type you prefer like soy or rice or almond or coconut milk.

To make your own buttermilk, simply mix your “milk” with one tablespoon of an acid per cup of milk. For the acid I prefer to use either lemon juice or white or apple cider vinegar. Mix the lemon juice or vinegar with the milk and let it sit for about five minutes to thicken before using it in your recipe.

6. The Sodium:  Since I always try to reduce salt use, I cut the salt in half and decided to add some other spices instead like cinnamon, nutmeg and ginger; and because I added the spices, I decreased the vanilla to 1 teaspoon, but you can even omit it altogether if you like.

7. The Bananas: Since the recipe called for bananas by amount, I decided to change it to a measurement. If you simply say 2 to 3 bananas, the question becomes, “What size banana?” and the size is important because your entire recipe can be messed up if they meant two to three small bananas versus the larger sized ones you normally find at the store.

Working off my knowledge of most banana recipes, I figured about two cups of ripe mashed bananas would be good for the recipe. This worked out to 5 5 inch in length bananas.

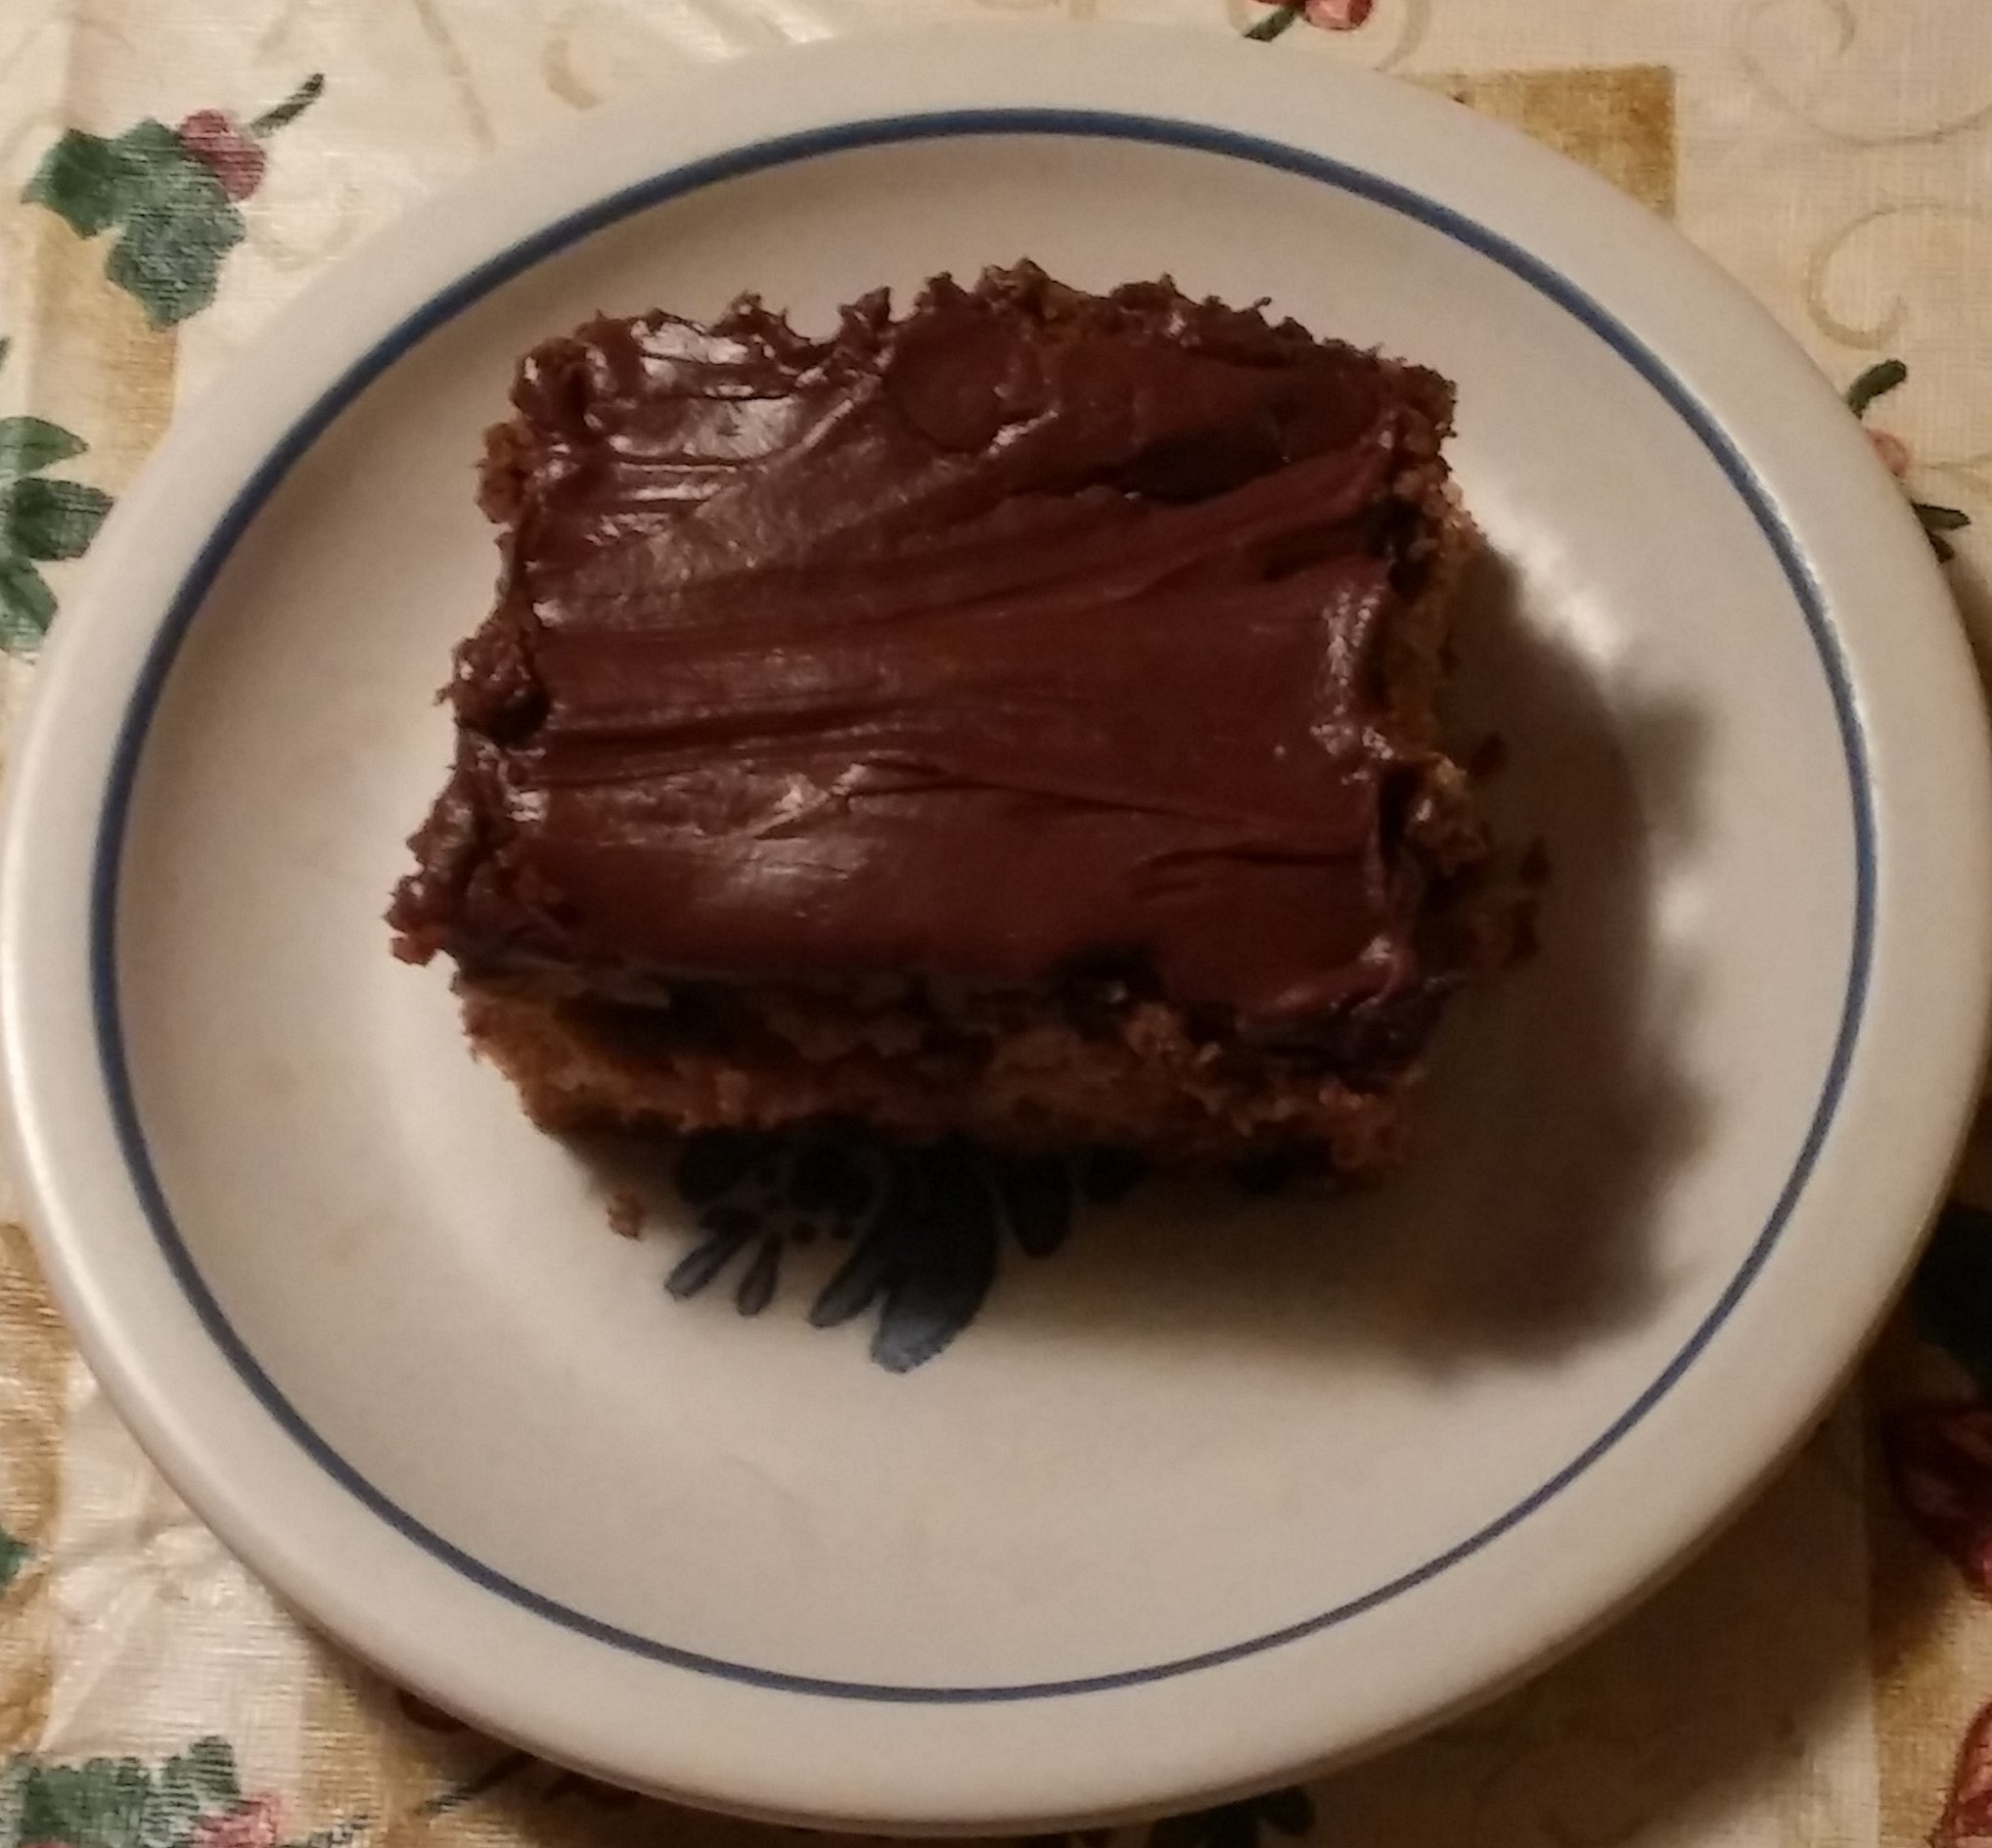
8. The Additions:  Banana cake is not actually a favorite for two of my three children, so I decided that if I was going to make this, I would need to liven it up a bit. To do so, I chose to add some allergy friendly chocolate chips, but I didn’t want to have actual chips affecting the texture of the banana cake. So, I put the chocolate chunks into my food processor and processed them into pieces smaller than mini chips but not quite ground up, which I mixed into the flour mixture. The result was quite tasty.

9. The Topping: The original recipe simply said to frost with a cream cheese frosting, but my children aren’t fond of cream cheese frosting. Instead, I used a chocolate frosting recipe from Elana’s Pantry (www.elanaspantry.com) to top the cake instead. Since I had put the chocolate pieces into the cake, I figured chocolate frosting would top the cake well.

10. The Final Recipe:  Banana Sheet Cake

Ingredients:

5 cups Authentic Food Multi-Flour Gluten Free Blend (whisked well)

2 1/4 tsp baking soda

1/2 tsp salt

2 tsp ground cinnamon

1 tsp ground ginger

1/2 tsp ground nutmeg

10 oz Enjoy Life chocolate chunks, processed smaller in food processor

2 cups ripe, mashed bananas (about 5 five inch bananas)

1 1/3 cup flax milk mixed with 1 tbsp plus 1 tsp lemon juice

1/2 cup Mediterranean Oil Blend (olive, grapeseed and canola)

1 cup liquid egg whites

1 1/4 cup Agave

1 tsp gluten free vanilla

Baking Instructions:

1. Preheat the oven to 350 degrees. Line a 11 x 15 pan with parchment paper. Set aside.

2. Mix the flour, baking soda, salt, cinnamon, ginger and nutmeg well. Combine the processed chocolate pieces with the flour mixture.

3. Mix the mashed bananas, flax milk, oil, egg whites, Agave, and vanilla together.

4. Mix the dry ingredients slowly into the wet ingredients until they’re combined. Give the batter a quick stirring for about 30 seconds to make sure everything is well mixed.

5. Carefully spread the batter into the pan and bake for about 35-40 minutes. The cake will be puffed and golden when it’s done and a toothpick inserted in the center will come out clean.

NOTE: Because of the Agave, the cake may brown more quickly than you’d like. About halfway through the cooking time, you can always place a piece of foil or parchment paper lightly across the top to prevent darkening of the cake.

6. Cool the cake completely in the pan on a wire cooling rack. When cooled frost with your favorite frosting.


To Grease or Not to Grease: Thinking about the Question

website grease

The forest floor was a mess!

Broken branches littered the ground.  Sapling undergrowth surrounded mossy stumps.  Trees leaned against one another, their branches fighting for the sun’s rays.  Vines encircled tree trunks and ran away onto the ground below.  Tiny wildflowers grew in, under, and around whatever it could, and years of layered dead leaves blanketed everything.

Being a city gal, when my husband told me were going to visit the family forest, I pictured straight trees standing tall in neat rows with large spaces of manicured grass in between.  Imagine my surprise to discover, instead, nature’s version of an unkempt house.

Current Thinking about Trees

Few folks these days think much about forestry.  If we think about trees, we think about wasting trees by using too much paper.  Air dryers in the bathrooms proclaim that we’re protecting trees if we use them.  Schools and businesses send everything electronically so we can save trees.  Children are taught to recycle paper to prevent the killing of trees.

Misperceptions about Using Trees

Protecting trees is a good thing.  Misunderstanding what actually helps trees, though, can pose a problem.  There’s an island in the middle of a lake in a state where the trees are “protected” by a law stating no trees can ever be cut.  As such, it’s so overgrown that all the animals for whom that island used to be a natural habitat have left because there is no longer room for them to live.  In what way does this make sense?  Nature itself knows the dangers of overcrowding.   Natural fires are forests way of clearing themselves of standing dead trees.

In similar thinking, we’re told that using paper products when we cook and bake is bad because it hurts the environment, but we freely and willing use propellant sprays which contain nitrous oxide, an ozone depleting gas, and whose containers add substantially to the problems we have with overflowing landfills.  Again, where is the sense in that?

Advantages of If You Care Products

Personally, I’ve chosen to use many of the If You Care products for my cooking and baking.  I like that the company is committed to creating environmentally friendly products and to using trees, which are both sustainable and renewable, as opposed to fossil fuels which currently are not sustainable and are definitely not quickly renewable.

As well, if you have food allergies as I do, using products like parchment paper and baking cups helps prevent contamination when you are using a cookie pan or muffin tin, because your food doesn’t touch the baking implement.  Additionally, if you are trying to eat healthier and don’t want to grease with butter or oil, parchment paper provides a fat-free alternative which isn’t Pam spray.

Disclaimer

Now, about this point, some folks are wondering what sort of kick-back I’m getting, whether it’s from the forestry industry or the If You Care company.  I can tell you that small family-owned forestry companies rarely make a profit.  The owners are foresters usually because they love trees, and they care about the land.  As for the If You Care company, they have no idea that I use their products or that I recommend their products, but if anyone happens to knows the owners and want to let them know that I’m a big advocate, I’d be quite happy to entertain any thoughts of a kick-back!  (We have 12 straight years of college tuition stretching before us!  We can use all the monetary help we can get!)

Upside Down Pumpkin Pear Cake

Ingredients:

2 tbsp vegan butter, melted (or whatever type you prefer)

1 tbsp Agave

1/2 tsp cinnamon

Two 15 oz cans of pears, drained (best to get the ones in 100% juice, not syrup)*

2 1/2 cups 100% whole wheat flour or 2 cups Authentic Foods Multi-Blend Gluten free flour

2 tsp gluten free baking powder

1 tsp baking soda

1/2 tsp salt

2 tsp cinnamon

1/2 tsp nutmeg

1/2 tsp ground ginger

1/4 tsp cloves

2 cups cooked pureed pumpkin (can use one 15/16 oz can)

1/2 cup grapeseed oil (or another type you prefer)

1/2 cup unsweetened applesauce (you can use another 1/2 cup of oil if you prefer)

1 cup Agave

1 cup liquid egg whites or 4 tbsp ground flaxseed mixed with 12 tbsp water (can use 4 whole eggs if you want)

Baking Instructions:

1.  Preheat oven to 350 degrees.  Prepare a 9 x 13 pan.  (I would use “If You Care” parchment paper, but you can use Pam spray or oil or butter.)

2.  Mix the melted butter with the Agave and cinnamon and spread over the bottom of the cake pan.

3.  Cut the pears into fans and arrange over the bottom of the cake pan.  (To make fans, simply put three to four cuts into the pear which only go about 2/3 down the pear.  Hold the uncut portion and “fan” the cut pieces away from one another.)

4.  Mix the flour, baking powder, baking soda, salt, cinnamon, nutmeg, ginger, and cloves.  Set aside.

5.  Blend the pumpkin, oil, Agave, and eggs.

6.  Quickly mix the dry ingredients into the wet and mix just until the dry ingredients are moistened.  Spread the batter carefully over the pears.

7.  Bake for 30 minutes until a toothpick inserted in the center comes out clean.

8.  Cool the cake in the pan on a wire cooling rack.  Carefully flip the cake over onto a platter and remove the parchment paper.  (You can also simply serve the cake from the pan and invert the slices onto a plate with your spatula.)

*  If you do not want to use canned pears, you can use two ripe fresh pears.  Wash and slice the pears into eight long slices.  Coat a pan with 2 tsp grapeseed (or another type) oil.  Mix 1 tbsp water with 1 tsp Agave or Truvia.  Saute the pears in the Agave mixture until they’re softened.   Arrange the pears on the bottom of the cake pan and proceed as instructed.