Recipe Revamping: Flourless Chocolate Torte

“That’s a lot of butter and chocolate….”

We had company the other night, and I wanted to make a more “special” gluten and dairy free dessert. My oldest was home for Spring break from college, and as we bounced ideas around, we thought about a flourless chocolate torte. Immediately we looked up a recipe from a well-known chef. We both had a heart attack just reading the recipe.

The recipe? 16 oz semi sweet chocolate; 2 1/2 sticks of butter; 7 eggs, separated, 1 1/2 cups sugar; 2 T. rum; 1 tsp vanilla; 1 tsp salt.

I did some research and discovered that the majority of recipes by other folks called for crazy amounts as well, but I did find that a couple of folks did use smaller amounts of chocolate, sugar and butter… not greatly decreased but less. It seemed that the difference affected the density of the torte, exactly how torte-like versus cake-like versus mousse-like one wanted the dessert to be.

In the end I decided I’d make a lot of changes, and tried two different versions. Both were delicious, but one was a more dark chocolate, cakey variety, and the other more sweet and velvety. Below are both versions.

For both, I decreased the butter as well as substituted for it, and substituted alternatives for refined white sugar (0ne recipe uses coconut sugar; the other agave and truvia). I also decreased the chocolate amounts and swapped a raspberry liquor for the rum. In neither, though, did I decrease or play with the eggs because without the flour, the eggs are essentially what makes the cake! So, my apologies for folks with egg allergies. Will work at another time on creating something similar without eggs!

Flourless Chocolate Torte

Version One: Dark Chocolate Raspberry Torte (Dark Chocolate-y and More Cake-like)

Ingredients:

8 tbsp vegan soy free butter

7 ounces dairy free bittersweet chocolate

7 eggs, separated, with yolks in a large bowl and whites in a mixer

3/4 cup coconut sugar

2 tbsp raspberry liquor (optional)

1 tsp vanilla

1/4 tsp cream of tartar

1/4 cup coconut sugar

Version Two Ingredients: Semi-Sweet Chocolate Raspberry Torte (Sweeter and More Mousse-like)

Ingredients:

8 tbsp vegan soy free butter

10 ounces dairy free semi-sweet chocolate

7 eggs, separated, with yolks in a large bowl and whites in a mixer

1/2 cup Agave

2 tbsp raspberry liquor

1 tsp vanilla

1/4 tsp cream of tartar

2 tbsp truvia

Baking Instructions:

  1. Preheat the oven to 325 degrees and take out a 10 inch springform pan. Do NOT grease the pan.
  2. Chop the chocolate into smaller pieces and put into a microwave safe bowl with the vegan butter. Microwave the butter and chips 20 seconds at a time, until the act of stirring completely melts the chips. Set aside.
  3. In the large bowl with the eggs yolks, add either the coconut sugar or the agave and beat the eggs with a wire whisk for about 5 minutes until the eggs increase in volume and are light and frothy.
  4. Slowly add the chocolate/butter mixture, stirring continually as you gradually add all of the chocolate mixture.
  5. Mix in the vanilla and raspberry liquor and set aside.
  6. Add the cream of tartar to the egg whites and begin to blend on low speed.
  7. Gradually begin to increase the speed and slowly pour in either the coconut sugar or the truvia.
  8. Beat until the egg whites increase in volume, are no longer clear but white, and when you pull the mixing paddle up, the whites make peaks.
  9.  Using a rounded spatula, gently fold the egg whites into the chocolate mixture, a little at a time, until all the egg whites are completely incorporated into the mixture.
  10. Pour the batter into springform pan and bake in the preheated oven for 35 to 40 minutes. (The second version took closer to 45-50 minutes.) The cake will have puffed and the top will look dry and no longer glossy.
  11. Remove to a wire cooling rack and allow the cake to cool.
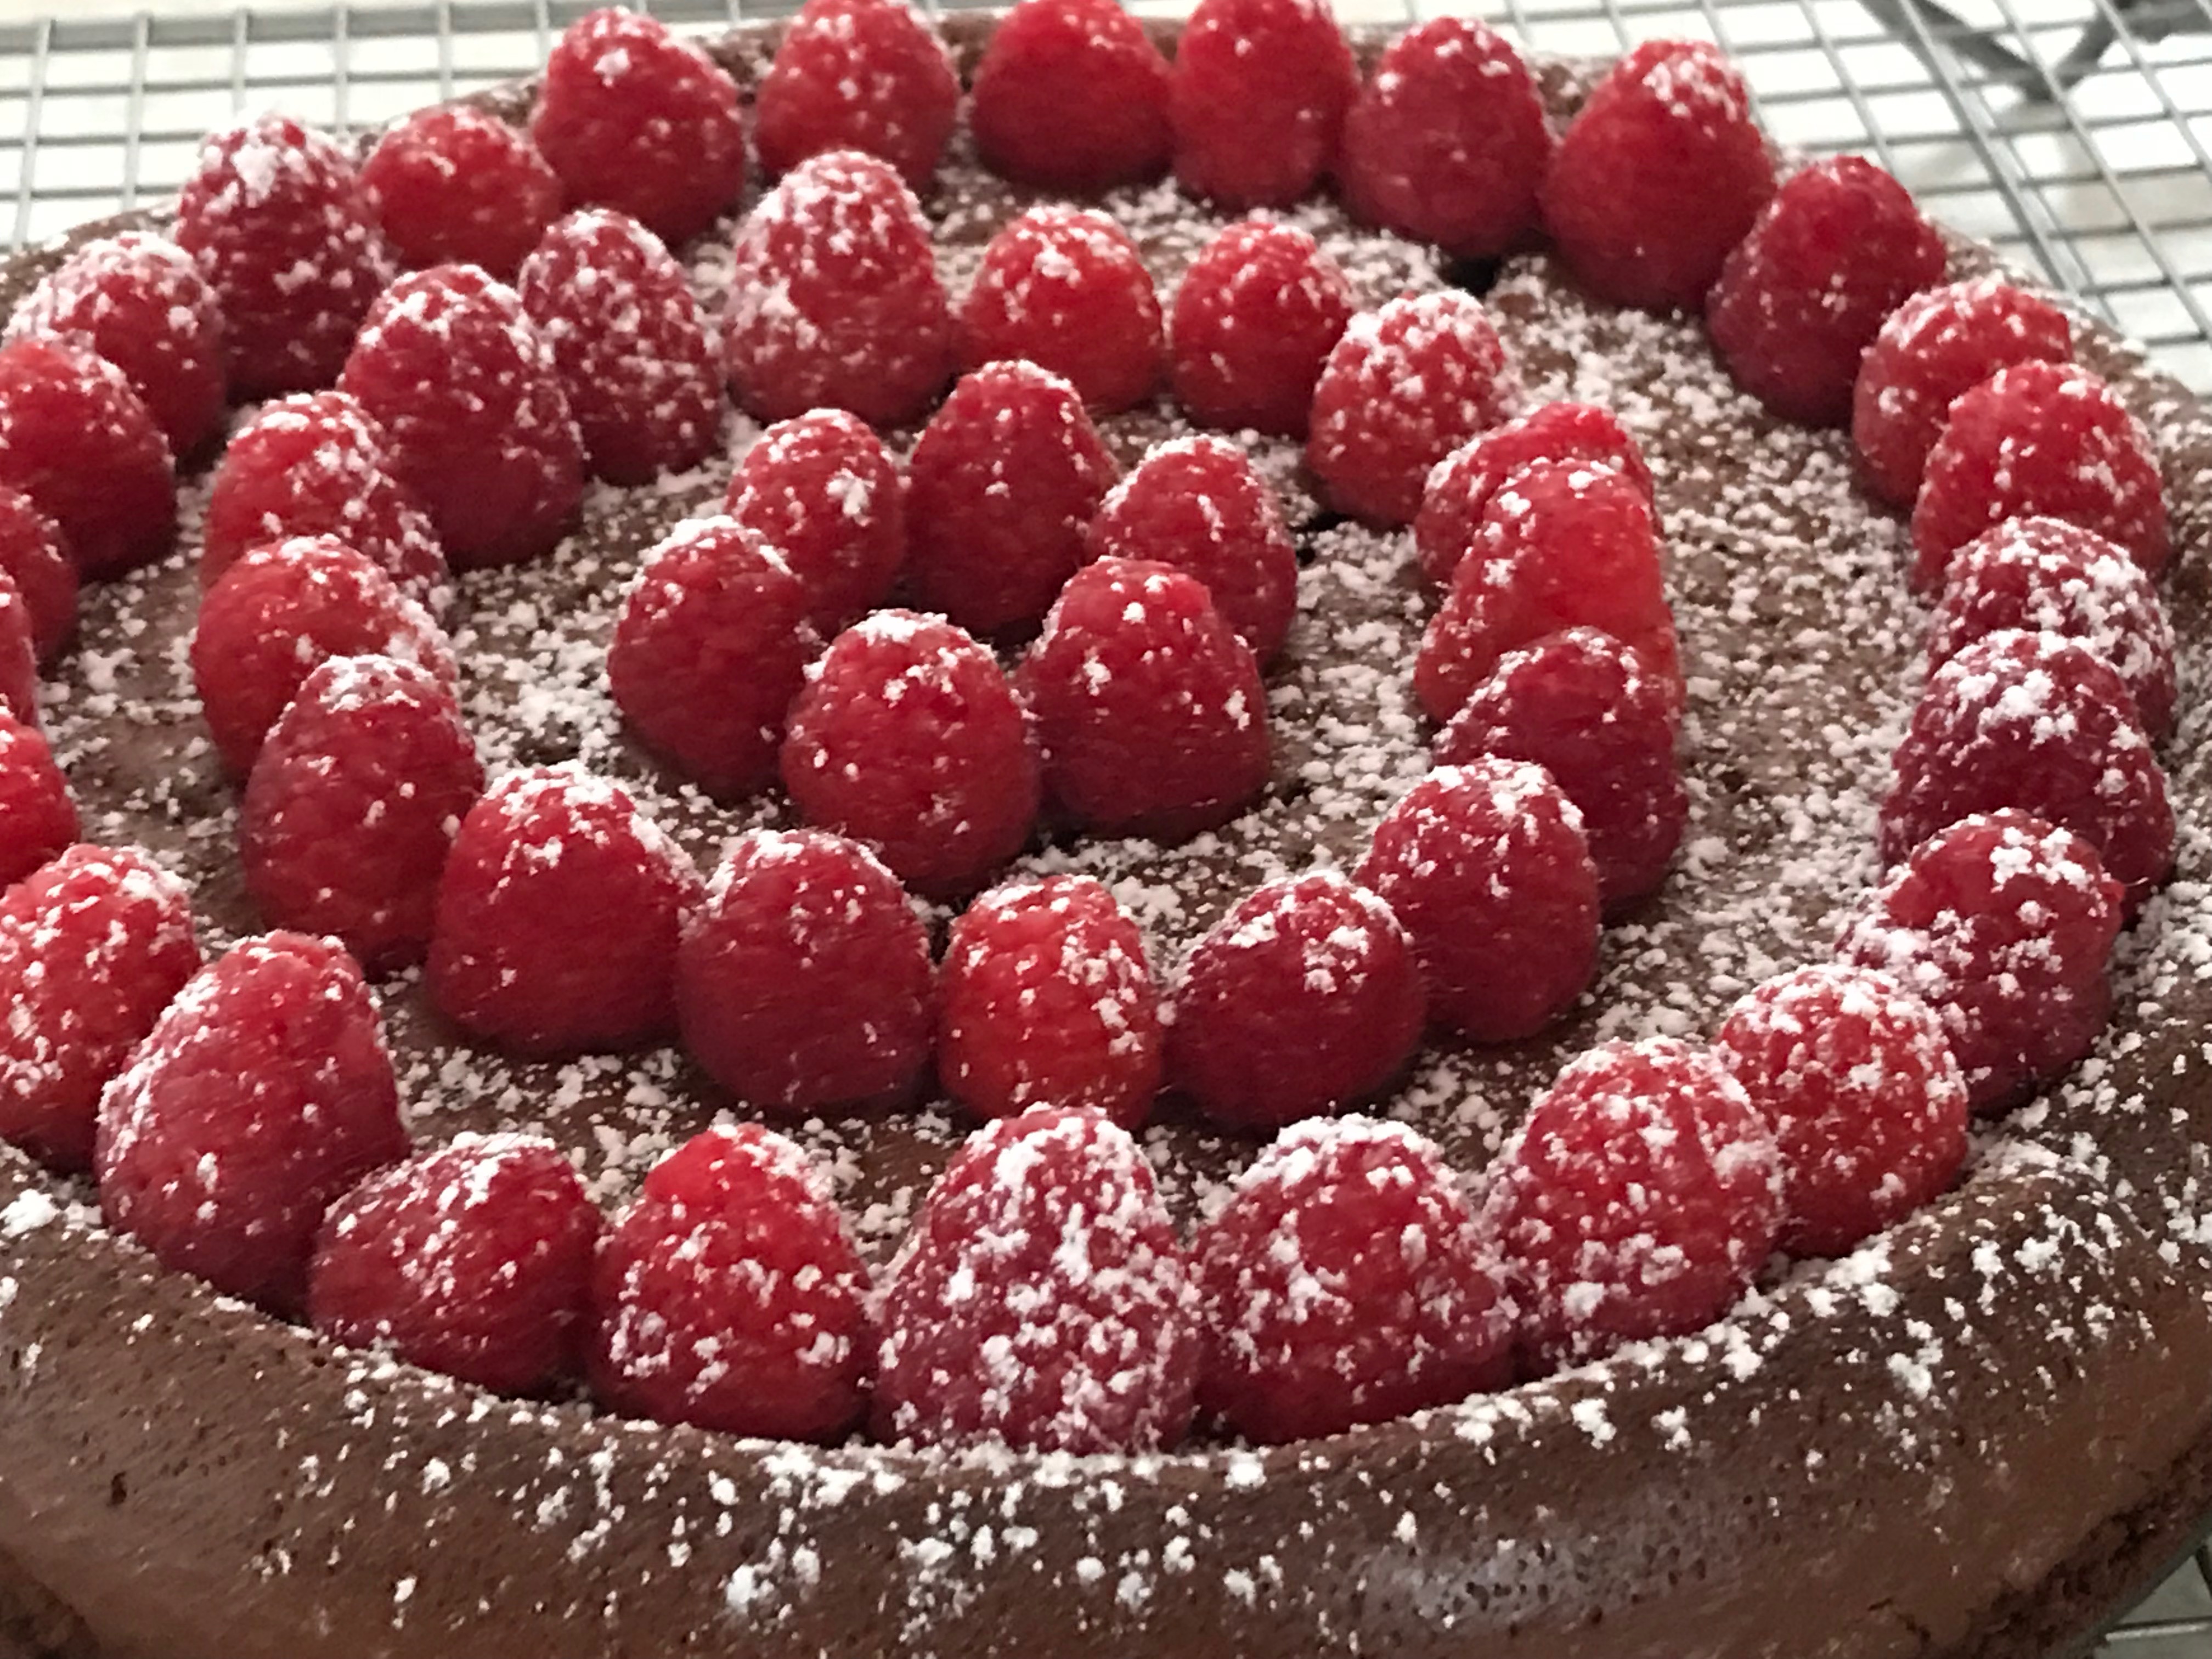
  12. If you are eating it soon, you can run a knife around the pan and release the bottom from the springform and decorate the cake with fresh raspberries and a small sprinkling of powdered sugar.
  13. If you are not going to eat the cake within a few hours, put the cake in the refrigerator and decorate the cake with fresh raspberries before you’re ready to actually eat it.


Advertisement

Valentine Greetings: Chocolate Surprise Cupcakes

choc-surprise-cupcakes

“Yay! Another snow day!”

After a winter of warm days and relatively little snow, Mother Nature decided that we needed three feet to fall within a week and a half. My middle child is vexed that the three tests she was supposed to have had a week ago still have not been administered due to two snow days and three start of school delays. My oldest and youngest, however, have been thrilled for the extra time to hang out in dorms with no classes (my oldest at college) and to play at home with the family (my youngest in middle school).

As a family, we’ve made use of the snowbound time to catch up on the never-ending t0-do list and to spend time together since the youngest really wanted us to play with him. Many hours sledding in our backyard, playing board games, competing on the Wii, and watching reruns of old shows left the family in the mood for something “special” to eat.

Since Valentine’s Day is tomorrow, we decided to make some Chocolate Surprise Cupcakes, one of the family’s favorites. You make a chocolate raspberry center which you tuck into the cupcake batter so when you eat it, you enjoy a nice creamy flavor surprise.  What’s nice about this recipe is that it’s free of most foods folks tend to be allergic to, so just about anyone can enjoy them.

Chocolate Surprise Cupcakes

Filling Ingredients:

1 cup Enjoy Life mini chocolate chips

2 tbsp Polaner’s seedless raspberry All-Fruit

2 tbsp Earth Balance vegan, soy free butter

Cooking Instructions:

  1. In a microwave safe large glass container, place all three ingredients and microwave for 1 minute. Stir until the mixture is completely smooth.
  2. Place the container in the refrigerator and let the mixture cool and begin to thicken. It can take anywhere from 10-30 minutes, depending on how hot your microwave makes the chocolate, how exact your measuring is, etc…. What you want is for the mixture to be thick enough when you spoon it that you can mound the chocolate onto a cookie sheet.
  3. When the chocolate has thickened enough to form little mounds, place a piece of wax paper on a cookie sheet and create 24 chocolate mounds using a teaspoon to scoop out the chocolate mixture. You essentially are making a little “hershey kiss” of your own.
  4. Once you have 24 more or less equally sized chocolate mounds, put them into the fridge to harden while you make the cupcake batter.

Cupcake Ingredients:

3 cups favorite gluten free flour blend

1/2 cup unsweetened Hershey’s Special Dark cocoa powder

3 tsp baking soda

1 tsp salt

1 cup agave

3/4 cup safflower oil

2 cups water

2 tsp vanilla

3 tbsp vinegar

Baking Instructions:

  1. Preheat oven to 350 degrees and line 24 cupcake tins with cupcake liners.
  2. Mix the flour, cocoa powder, baking soda and salt well and set aside.
  3. Mix the agave, oil, water, and vanilla and add to the dry ingredients with the vinegar. Mix well until the dry ingredients are moistened.
  4. Put 1 1/2 tbsp of batter into each of the 24 cupcake tins.
  5. Carefully peel and place one of the chocolate raspberry mounds into the center of each of the cupcake tins.
  6. Divide the remaining batter evenly among the cupcake tins (about 1 1/12 tbsp) to cover the chocolate mounds.
  7. Bake in the preheated oven for 15 to 20 minutes. The cupcakes will be rounded, firm to the touch, and a toothpick inserted into the center will come out clean. My oven always bakes them in 15 minutes but a friend said hers took 20.
  8. Let the cupcakes sit in the tins for 5 minutes. Then remove them to a wire cooling rack to cool completely.
  9. Frost with your favorite frosting recipe or use the one below is one I’ve adapted from Elana’s Pantry.

Frosting Ingredients:

1 cup Enjoy Life mini chocolate chips

1/2 cup avocado oil

2 tbsp agave

2 tsp vanilla

your preference of “milk”

Cooking Instructions:

  1. Mix the chips, oil, and agave together in a microwave safe glass container.
  2. Heat the chips for 1 minute. Stir. If it needs to be heated more, do so 20 seconds at a time until you can stir the chips smooth.
  3. Add the vanilla and stir well.
  4. Transfer the mixture to your mixer bowl.
  5. Put into the freezer until the mixture begins to hard around the edges but is still softer in the center.  This can take between 15 to 30 minutes.
  6. Using your mixer, blend the chocolate mixture on high speed until the mixture becomes thick and smooth. You may need to scrape down the sides a couple of times.
  7. Add “milk”, a teaspoon at a time until the mixture is to the creamy consistency you prefer for frosting your cupcakes.


Appealing Appetites: Just the Same Chocolate Cake

chocolate-cake

“There can’t be any difference.”

One of the many heartbreaking moments for me as a mother of children on the autism spectrum was when my oldest started kindergarten. Several weeks into the year, I found my daughter in a corner crying. Apparently every day at recess since school had started, she sat alone on a swing because no one would play with her. As I gathered her into my lap, my own tears ran at her heartache. The autism meant she lacked the social skills needed to make friends, but it didn’t mean that she didn’t want or need friends nor that she couldn’t feel the hurt of not having any.

I arranged a meeting with the kindergarten teacher because I was a little surprised that at the age of five, students were already alienating other students. Isn’t everyone friends at the age of five? (Yes, I was naive. I was a young parent and didn’t know better yet!) When we met, I asked why no one was playing with my daughter, and the teacher said, “Well, Mrs. Castner, your daughter is a little… different.”

Different. If you look up the definition, you’ll see wonderful phrases like “not ordinary” and “distinct in nature” which appear to be good traits, but then you’ll continue reading to find “dissimilar”, “not identical”, “unusual”, “separate”. We live in a world where tension exists between sameness and difference. We encourage children to be themselves, to embrace what makes them unique… different… from everyone else while simultaneously wanting them to “fit in” and be like others around them… to be the same.

Too often the push toward sameness wins out over the desire to encourage individuality, and for my daughter, her difference meant children as young as five didn’t want to be her friend. She was too different, and therefore, they didn’t understand her. Without understanding, it can be difficult to draw into another’s experience.

Because I do understand, my heart ached again this past week when I received an email from a mother whose daughter is feeling “different” from her classmates because she has food allergies and can’t eat what others eat. We can ask as I did all those years ago, “What’s the big deal about being different?” The answer is that it IS a big deal because children at a young age don’t understand the difference and can react in negative ways. For this daughter, she felt she “wasn’t normal” because the other children wanted to know why she never ate cake at the birthday parties they attended and why her bread looked different at lunch.

The mother was reaching out because the girl was inviting classmates to her house for a birthday party, and she was anxious about the birthday cake. She didn’t want her birthday cake to be “different” because apparently children were asking her if there would be cake and whether it would taste the “same” as other birthday cakes.

I confess. I cried reading the email because it broke my heart to think of that much anxiety in a seven year old… all because of cake. I understood what was happening, though, because the fact is that many cakes which are gluten free and dairy free do have a different texture and different taste from “normal” cakes, and children know what they like and are often very picky about trying something “different”.

Fortunately, while the young girl in question couldn’t have gluten or dairy, she had no other food issues, so it was easy for me to create a chocolate cake “just like real chocolate cake” for her. The mother wanted it to be an “easy” cake which she could make with flour blends from her grocery store, so I used Bob’s Red Mill and Krusteaz blends which she could find at her store. I combined the two because, despite what you’ll read on the packages, a “simple substitution” of  just one of the blends makes for either a crumbly or a fallen cake. To achieve the “same” texture as regular cake, I needed to combine the two different types of flour blends. For the dairy, I used vanilla soy milk because it’s consistency matches milk in most cake recipes and the vanilla enhances the chocolate flavor. Instead of refined white sugar, I used coconut sugar which adds a subtle undertone to the chocolate as opposed to a sickening sweetness. Instead of butter, I added safflower oil which has a neutral taste but adds the fat needed to retain moisture in the cake. Instead of regular unsweetened cocoa powder, I used the Special Dark because it has a deeper chocolate flavor, and I added a cup of mini chocolate chips (allergy friendly) to give another level of chocolate taste.

We made the below cake for the French exchange student we had staying with us, and she never knew the “difference”. It was just as chocolately, just as fluffy, just as moist, just as tasty. I was confident that the little girl’s schoolmates would never suspect that it was actually “different”. *grin*

Just the Same Chocolate Cake

Ingredients:

2 cups coconut sugar

1 cup Krusteaz gluten free all purpose flour

1 cup Bob’s Red Mill all purpose baking flour (the one in the red package made from bean flours; not the rice blend)

1 cup Hershey’s Special Dark unsweetened cocoa powder (the one with the red lining; not the regular unsweetened cocoa powder)

2 tsp baking powder

1 1/2 tsp baking soda

1 tsp salt

2 eggs

1 1/2 cup vanilla soy milk

1/2 cup safflower oil

2 tsp gluten free vanilla

1 cup Enjoy Life mini chocolate chips

1 cup boiling water

2 tbsp apple cider vinegar

Baking Instructions:

  1. Preheat the oven to 350 degrees. Line three 9 inch cake pans with parchment paper.
  2. In a large bowl, combine the coconut sugar, the two flour blends, the cocoa powder, the baking powder, baking soda, and salt. Set aside.
  3. Mix together in another bowl, the eggs, soy milk, safflower oil and vanilla.
  4. Stir the chocolate chips into the dry ingredients. Pour the bowling water on top, and add the wet ingredients along with the vinegar. Whisk everything together until it’s well combined.
  5. Divide the batter evenly among the three cake pans.
  6. Bake in the oven for 20 minutes until the cakes are puffed and pulling away from the sides and toothpick inserted in the center comes out clean. (I had set the timer for 15 minutes, checked, and put them on for another 5.)
  7. Cool the cake layers in their pans for at least 10 to 15 minutes before removing them to a wire rack to cool completely. (I actually stacked them one on top of the other with the parchment paper in between the layers and put them onto a plate in the freezer for about 10 to 15 minutes to cool them faster!)
  8. Frost the layers and then the whole cake with your favorite frosting. (What is pictured above is a cinnamon frosting made with vegan butter, powdered sugar, cinnamon and soy milk.)


Creative Cooking: Crepes

“Sorry we tried to kill you and your students. Do you want a job with us?”

Several weeks ago I had a terrible experience at a banquet I helped to host for the music students of our high school. Several conversations and in-person meetings with the chef and the functions manager of the facility to ensure that the students from our high school would have no worries regarding their food allergies didn’t yield the expected results . Despite having put together a completely allergy friendly menu ahead of time, on the day of the banquet, the chef cooked the food with all the ingredients he was supposed to leave out which caused no end of stress as we learned that fact literally minutes before several students put the food into their mouths! Fortunately, we did get to the students before their forks touched their lips, and new meals were made, but as you can imagine, I was not at all pleased.

Laughably, all my mother’s etiquette training must have worked, because at the end of the event, the onsite coordinator actually took the time to thank me for being the most polite angry person he’d ever had the pleasure of working with to deal with an issue. More incredibly, he also told me that he and the chef had taken a liberty in having a piece of the gluten, dairy, soy, nut free chocolate mousse cake I had brought for the students with allergies and that it was the best cake either of them had ever eaten. Most unbelievable, though, was the next day when the manager, who had called to see what she could do to keep our school’s business after the unfortunate event, asked me if I wanted to work for them, making cakes for their weddings!

As a writing facilitator, I always tell the folks who attend my writing groups that truth is stranger than fiction and that they only have to look at life for creative writing ideas. My experience above bears out the truth of what I’ve been telling them!

The fact is that while there’s more recognition around gluten and nut sensitivities, there’s still a long way to go for the world to think proactively about accommodating people with food allergies in general. Our allergy friendly menu fell off the radar for the chef and the manager because they simply don’t think about it regularly. Fortunately, now the manager has revamped all of their forms so that allergies are actually the first item on the form — and in bright red now! So, hopefully no other folks will have to deal with the issues we went through on that day.

As for the job offer, the chef was surprised that my cake was actually good! The site coordinator went on and on about how the chef couldn’t believe how much the texture and the taste was like a “real” cake. As he spoke, I kept thinking that my cake WAS a REAL cake. It wasn’t “fake”. It wasn’t made of air. All the ingredients were ingredients you can buy at the store, made from real, natural foods like tofu and garbanzo beans and oats and flaxseed.

I was thinking about all this the other day as I made crepes….

Like the cake I made, crepes are misunderstood to be something they are not. Most folks I’ve spoken to seem to believe crepes are complicated to make. Crepes are actually wonderfully easy to make and are very versatile. They are basically just flour, eggs, and milk — all of which people can be allergic to. This, however, isn’t a problem, because it’s so easy to substitute ingredients for crepes. And it’s worth doing, because you can make crepes for breakfast, lunch, dinner and dessert in just a matter of minutes. And if you have guests, they’ll be highly impressed because they’ll think you did a lot of work when you didn’t!

What you need to know about crepes:

  1. Ratios: Google crepes recipes, and you’ll discover that the only consistency lies in the three basic ingredients: eggs, milk, and flour. The ratio of the three to one another varies from recipe to recipe. For every one cup of flour, some will call for 1 cup of milk; others 2 cups. For that same cup of flour, some recipes will call for two eggs; another four. What you need to know is this: crepes are supposed to be thin, so your liquid ingredients combined – the milk and eggs – should be more than the flour, unlike in pancakes where the dry to liquid ingredients are usually one to one. How much milk versus eggs you add is really all about your preferences. More eggs makes slightly thicker, custardy crepes. More milk creates lacier, more delicate crepes. If you are making crepes for the first time, I’d suggest using one cup of flour, one cup of milk and two eggs as a basic recipe and then experiment from there to see which texture you prefer.
  2. The Flour: You are not limited to white flour for crepes. You can use wheat; you can use gluten free; you can even use nut flours. What’s important to know is that because you want your crepes to be light, if you are going to use a heavier flour like garbanzo bean or whole wheat or sorghum, you should opt to use less than you might with typical white flour – more like 1/2 cup. If you want to use the same one cup amount, opt for a lighter flours like rice or tapioca or arrowroot.
  3. The Milk: Once again, your options are unlimited. You can use other types of milk for crepes besides cow milk. Almond milk, coconut milk, rice milk, quinoa milk, etc… they all work! And unlike the flour substitutions, these can all be substituted one to one for the regular milk.
  4. The Eggs: If you are watching your cholesterol, you can opt to use only egg whites. Just remember that you need two whites to replace one whole egg, or if you’re using liquid egg whites, that about 1/4 cup is equivalent to a large egg. If you are allergic to eggs, you can also simply leave the eggs out. You can simply increase the milk amount to replace the liquid you’re losing from the eggs — again about 1/4 cup of milk for each egg you omit. You can also mix one tablespoon of ground golden flaxseed with three tablespoons of water to replace one egg.
  5. The Fat: Crepes usually have one other important ingredient: a fat. Usually one tablespoon of butter or olive oil or melted coconut oil or almond butter or whatever you decide is enough, but it’s good to choose a fat because it helps the crepes to stick less to your pan, as well as adds some flavor.
  6. The Flavor: Crepes are usually made so that you can fill them with savory or sweet fillings so you don’t really need to add anything other than a pinch of salt, but as always, tailor the crepes to your taste. If you want something sweet, add a bit of honey or agave to the batter. If you want something savory, add some herbs. Want something distinctive? Substitute orange juice for part of the milk. Experiment and see what you like.
  7. The Batter: Okay, I promised you that making crepes was easy, and it is. Whatever you’ve decided to use for your crepes, you simply mix all the ingredients together. You can whisk them, blend them, shake them, food process them, and in a matter of minutes you have a nice batter. What’s key is that you want your batter to be very smooth. The smoother, the better. If you are making crepes with flour, you should let the batter rest because this relaxes the gluten in the batter. If you’re making gluten free crepes, then you have no such worries.
  8. The Cooking: People think making crepes is difficult and takes time, but I make enough crepes for a family of five in less than ten minutes. Crepes cook very quickly. You simply grease your pan, pour a scant amount to just cover the bottom, let the crepes begin to solidify (usually only about a minute), flip, let the crepes finish cooking on the other side (usually about thirty seconds), transfer to a plate, and you’re done with a stack in just mere minutes. You simply need to follow a couple of easy steps:
    1. Don’t use a large pan. A pan sized for an omelet is the perfect size. It allows you to easily flip the crepes without worrying about tearing them.
    2. Cook over medium heat. Too low and the crepes won’t cook quickly enough. Too high and the crepes will burn.
    3. Don’t use a large scoop. You only want enough batter to just cover the bottom of your pan. Usually a quarter cup works just fine.
    4. Invest in a wide spatula. A spatula which allows you to get completely under the crepe to flip it quickly is best.
    5. Make sure your crepes won’t stick to your pan. Use your favorite spray or oil in between each crepe if you don’t have a nonstick pan. You don’t need a lot – a quarter tsp will work – but you do need something to make sure the crepes don’t stick because otherwise they’ll tear or burn.
  9. The Filling: Crepes are great because you can fill them however you want. You can keep them simple and spread jam on the crepes and roll or fold them over. You can put fresh fruit on top. You can make a creamy vegetable filling (I like to make a white sauce with spinach and mushrooms which I roll the crepes around). You can fill the crepes with ice cream or a vanilla custard. You can spread cheeses like ricotta or marscarpone and fold the crepes. You can fill them with pureed pumpkin or squash. You can use a lemon curd. You can roll chicken salad inside crepes. The list is endless. Experiment and see what you like!


Holiday Traditions: Allergy Friendly “Fruitcake”

“How many fruitcakes does it take to hammer in a nail?”

You’ve probably heard all the fruitcake jokes which tend to make their round this time of year…. I personally think we should be applauding the folks who invented fruitcake, because it’s a rather ingenious cake. In a time when there is no refrigeration, people figured out how to use dried and candied fruits and nuts and alcohol to create a longer-lasting festive dessert.

While there does seem to be a lot of folks who won’t even try fruitcake, a substantial number of people do actually enjoy and make fruitcakes as part of their holiday tradition. An older gentleman emailed me a couple of weeks ago because he’s now gluten sensitive, and his wife told him he couldn’t have fruitcake anymore. He wanted to know if I could help….

Fortunately for him, I like fruitcake. I even like the versions with the traditional candied lemon and orange peels, cherries and citron. Fruitcake, however, doesn’t have to include these. I often make a fruitcake with just dried fruit like apricots, prunes, dates, and currants. What’s lovely about fruitcake is that you can do just about anything you want.

Some things to keep in mind:

The Batter:

Traditional fruitcake is basically a butter cake recipe. You can choose between a light cake recipe or a dark cake. Light means you’re using “light” sweeteners like white sugar, honey and/or corn syrup and usually lighter dried fruits and nuts (macadamia nuts, apricots, etc…); dark usually uses sweeteners like brown sugar and molasses and darker dried fruit and nuts (walnuts, pecans, currants, etc…).

Since I try to avoid refined sugars a much as possible, I tend to use a combination of coconut sugar, Agave, and date molasses because I can use much less than the sugar amounts normally called for in fruitcake. This means my fruitcake tends to be a “darker” recipe. I also cut the quantity of butter because traditional butter cake recipes use a lot of butter. And of course, because of my dairy allergies I’m really using a vegan “butter” instead of cow’s milk butter.

Fruitcake recipes also call for a lot of eggs. One, because fruitcake is really a lot of fruit and nuts with just enough batter to hold it together, so eggs are very necessary to the binding and baking process. Two, fruitcake is normally made in large quantities which requires a lot of eggs. To minimize the cholesterol, I use half egg whites and half whole eggs. You can use all egg whites but it will make for a drier fruitcake.

Whatever you decide to do for a batter, make it to your liking. Since I like spice cakes, I make my fruitcakes with spices like cardamom, cinnamon and nutmeg. If you like more of a yellow cake, use vanilla. If you like fruit, use orange or lemon peel.

The Dried Fruit and Nuts:

Traditional fruitcake has candied peels, cherries, and citron with nuts like walnuts and pecans. If you don’t like those, you don’t have to use them. You can use any type of dried fruit you prefer and any type of nuts you prefer. I omit nuts because I’m allergic to them. For the fruits I use a combination of the traditional and the non-traditional. Dates, dried plums, apricots, and currants are my favorite dried fruits to mix with the candied peels, cherries and citron.

A tip: I have found that what most people don’t like about fruitcake is that the fruit and nuts are too large. I use a food processor to chop everything into tiny pieces so they’re evenly distributed throughout the cake to give flavor without the chunkiness. Paradise also makes an Old English Fruit and Peel mix which has everything already chopped into tiny pieces.

The Alcohol:

Alcohol was traditionally used in fruitcake to keep the cake from getting moldy and stale in addition to adding flavor and moistness. The most common alcohol for fruitcake is either rum or brandy. Recipes vary as to how the alcohol is used. Some will tell you to soak the dried fruits and nuts in alcohol. Most, however, soak the cake in alcohol after it’s been baked. Many recipes do a combination of the two. Others simply put alcohol in the cake batter.

The main difference between which versions you choose is exactly how much of the “boozy” taste you want. Alcohol cooked into the batter will not be as strong as if you soak the fruits and nuts and/or the entire cake in alcohol. Another difference is time. Soaking fruits and nuts usually takes some hours before you can make up the fruitcake. Soaking the entire cake usually requires days.

I don’t use alcohol in my fruitcake recipes. One, I don’t particularly care for rum or brandy. Two, I don’t have the patience to wait for anything to soak. Three, we have refrigeration which keeps my fruitcake from getting moldy and stale. Instead I like to use unsweetened orange use or apple cider. Makes for tasty cakes without the alcohol.

The Baking:

Fruitcake needs to cook at a lower temperature to prevent the cake from becoming too dry, so usually it requires several hours to bake. I cut the time by baking my fruitcake in smaller mini-loaf pans or only filling regular size pans half full. Then instead of a couple of hours, the cakes cook in about one hour which fits with my schedule much better.

Cooking in the mini pans also means they’re a good size for gifting. I make a lovely chocolate fruitcake which I have given to neighbors for the holidays for years and which they actually really enjoy and look forward to each year. What’s nice about fruitcakes is that they store well if you wrap them well in plastic wrap and then aluminum foil.

Many recipes will tell you to cook the fruitcake at 250 or 275 degrees. I find that 300 degrees work just as well, allowing the cook time to be slightly less. If, however, you do choose to make a large fruitcake in a bundt or tube pan, you should opt for the lower temperatures to ensure even cooking throughout.

A Recipe:

My favorite fruitcake recipe is the chocolate fruitcake I mentioned above. I use a combination of two gluten free flour blends – one which is a lighter brown rice flour blend like King Arthur’s; the other a more high fiber/high protein blend like Bob Red Mill’s garbanzo bean blend. I use unsweetened cocoa powder and add allergy friendly chocolate chips to the dried fruit blend. If I use the candied peels and citron, I usually just add dried dates and plums. If I opt to use only dried fruit, I like to combine dried dates, plums, apricots, currants, and unsweetened coconut. Both versions make for tasty fruitcakes.

Allergy Friendly Chocolate Fruit Cake

(This recipe makes 12 mini 4 x 8 loaves)

Ingredients:

7 cups favorite dried fruits, nuts, and/or candied peels, cherries and/or citron, chopped into tiny pieces

1 cup Enjoy Life miniature chocolate chips

1 1/2 cup vegan olive oil “butter”, melted

2 cups coconut sugar

1/4 cup date molasses

3/4 cup Agave

1 cup unsweetened orange juice

1 cup liquid egg whites

4 eggs

2 cups high protein/high fiber gluten free flour blend (like Bob Red Mill’s garbanzo bean flour)

2 cups brown rice flour blend (like King Arthur)

1 cup gluten free oat flour

1 tsp cardamom

1 tsp cinnamon

1/2 tsp nutmeg

1/2 cup unsweetened cocoa powder

2 tsp baking powder

2 tsp baking soda

1 tsp salt

2 tbsp apple cider vinegar

Baking Instructions:

  1. Preheat the oven to 300 degrees. Arrange your oven racks so they are evenly spaced so you can cook on both racks at teh same time. Line 12 mini loaf pans with parchment paper so the paper hangs over the side like wings. This will make it easier to pull the cake out of the pans. Arrange the pans on two cookie sheets so they have some space around each pan for air to circulate.
  2. Mix the dried fruit, nuts, and/or candied peels and fruit with the chocolate chips. Set aside
  3. Mix the melted butter with the coconut sugar, date molasses, agave, orange juice, egg whites, and eggs. Set aside.
  4. Combine the two gluten free flour blends with the oat flour, cardamom, cinnamon, nutmeg, cocoa powder, baking powder, baking soda, and salt.
  5. Stir the wet ingredients well before adding the dried fruit mixture to it. Carefully add the dry ingredients, along with the apple cider vinegar.
  6. Mix the batter well until all the dry ingredients are thoroughly moistened.
  7. Divide the batter evenly among the 12 loaf pans. The pans will be only 2/3 full. (If you’d like to make these in larger 9 x 5 pans, fill the loaf pans only half full.)
  8. Bake the loaves for about 30 minutes and then switch the cookie sheets between the two racks for even cooking of both trays of mini-loaves. Bake for another 20-30 minutes until the fruitcakes are puffed, pulling from the sides, and a toothpick inserted into the center comes out clean.
  9. Remove the cookie sheets from the oven and put the mini loaf pans onto a wire cooling rack. Cool for 10 minutes, and then carefully remove the cakes by lifting the parchment paper wings. Cool the cakes completely on the wire racks.
  10. To store the cakes, wrap them tightly in plastic wrap and then in foil. They store in the fridge for about a week or you can double wrap them with foil and freeze them for a couple of months.


Creative Cooking: Chocolate Zucchini Cupcakes

“They do look older!”

In our school district the fifth graders spend a week away from home, experiencing nature and science with their teachers. Having been through this before, when my youngest left for his trip, I wasn’t overly concerned. Some of the other parents, however, were anxious because this was their first time sending off a child, and they didn’t know what to expect.

I found, though, that sharing simple reassures from my own experience helped – the 1 to 8 teacher to student ratio, the highly competent and skilled onsite staff, being with friends and teachers whom they’re already comfortable with….

And I promised them that when their children returned, that not only would they have survived but that they’d come back having grown from their experiences. In fact, I told them that, even physically, their children would look older when they step off the bus. So, I had to chuckle when we picked up our children, and sure enough, several parents said to me, “They do look older!”

When I received an email this week, asking how in the world someone could create their own allergy-friendly recipe, it occurred to me that my response would be the same as it was to the parents….

Reassurances: Once you begin experimenting, the knack will come to you. As with everything, practice is the key, and you already have what you need. Refer to the early posts on this site about the standard ratios and patterns which exist for all baked goods. Re-read the information about individual ingredient substitutions. When you know that a cake always takes about 2 cups of flour and that you can substitute a ready-made gluten free flour blend in a certain ratio, experimenting does not need to be scary.

Promises: You will grow in your ability to create your own recipes simply by experimenting. The practice itself will give you a feel for what does and doesn’t work. Might a recipe fail? Maybe… but as Thomas Edison said about the light bulb, “I have not failed. I just found 1,000 ways that didn’t work.” Culinary mishaps are simply learning lessons.

I know, though, from many, many conversations, that folks will still be apprehensive about “experimenting” despite reassurances and promises, so I thought I’d walk folks through a recent experiment of mine.

Over the summer, I thought I had a coup because an online site was selling the allergy friendly chocolate chips I like for a ridiculously low price. I ordered several bags but was dismayed when they arrived because the company had simply shipped them in a plain box despite the 90 degree weather. The chips had completely melted and then re-solidified in square lumps. The company credited my money back to me, but I was still left with chocolate chunks instead of tiny individual chips.

Last week, my husband asked me if I could bake something for a colleague at work. I decided cupcakes would be good because they’re portable, and I could give some to the colleague and still have some for the children at home. I looked in the fridge and the pantry to see what I had on hand. Several zucchini were beginning to look a little sad, so I figured I should use them, but I wanted to jazz them up a bit. Mini chocolate chips would do the trick, but of course, when I went to the pantry, I only found my solid chocolate blocks.

Thinking I could break it, I started whacking at the block with a hammer, only to discover that the solid chocolate was stronger than me and the hammer. The few chunks I managed to break apart told me that I’d be there forever trying to created little chips. So, I pulled out my food processor. Obviously that would do the trick. I popped the chunks in and whizzed the blade.

Well, let me tell you now: When chocolate has been melted and re-solidified, and you pop it into the food processor with the hopes of creating little chips… you won’t get chocolate chips. You’ll make your very own sweetened chocolate powder. A 10 oz block will make 1 1/2 cups of chocolate powder, in fact. 1 1/2 cups of chocolate powder which I didn’t want to waste but wasn’t quite sure what to do with.

Not to be deterred, though, I plowed on. An average cupcake recipe usually takes about 2 to 2 1/2 cups of flour. I knew that if I swapped out 1 1/2 cups of that for the chocolate powder, my recipe simply wouldn’t work, because the chocolate powder wasn’t dense enough and lacked leavening, so I decided I’d just have to add it to the flour and then increase my liquid ingredients, because I knew that in cake recipes, the dry and liquid ingredients are always equal.

The chocolate powder plus the flour (I used a homemade mix of garbanzo bean, sorghum, potato and tapioca flours) came to 3 1/2 cups so I opted to use 1 cup of a homemade soy buttermilk (to add protein and help with leavening), 1/2 cup of unsweetened orange juice (to complement and bring out the zucchini and chocolate flavors), 1/2 cup safflower oil, 3 eggs (increased them from the usual 2 to 3 because the eggs and flour ratio are usually the same and whole eggs because I wanted a moist, dense cupcake), and 1/3 cup of agave (wanted a little sweetener but didn’t need a whole lot because the chocolate powder was sweetened).

My next consideration was the leavening powders. I knew that one needs about 1 tsp of baking powder and/or 1/4 tsp of baking powder per cup of flour, so I’d need something equivalent for the 3 1/2 cups of flour/chocolate powder. I decided to use a mixture of 2 tsp of baking powder with 1 tsp of baking soda (because I wanted my cupcakes to rise but not rise so high that it would sink, and a mixture does that best). I opted to add some spices – cinnamon, allspice and clovers – as well because they’d complement the chocolate and orange flavors nicely.

The final step was to think about the “sugar”. Most cake recipes call for two cups of sugar. I had already added 1/3 cup of Agave, so I knew I could cut back on the sugar to about 1 cup, but I didn’t want to use sugar because I never bake with it. Increasing the Agave at this point, though, would mess up the ratio of dry to liquid ingredients, plus make for a denser cupcake than I wanted; so I decided to use coconut sugar (which would help brown the cupcake nicely).

My experimental recipe was done, and I could only pop it into the oven and hope for the best.

They came out delicious. The chocolate powder made for a milder chocolate taste and for a lighter cupcake than if I had used melted chocolate.  My kids want me to make them again and sooner as opposed to later.

Yes, they could have flopped because it was an experiment, but using the knowledge I had about recipe patterns and ratios, I could methodically work my way through the changes, and the results were worth it.

If you begin experimenting, I both reassure you and promise you that you will find the same results.

Chocolate Zucchini Cupcakes

Ingredients:

1 1/2 cup chocolate powder*

2 1/2 cups gluten free flour blend**

1 cup coconut sugar

2 tsp cinnamon

1 tsp allspice

1/2 tsp ground cloves

2 tsp baking powder

1 tsp baking soda

1 tsp salt

3 eggs

1/2 cup safflower oil

1/3 cup agave

1/2 cup unsweetened orange juice

1 cup soy milk mixed with 1 tbsp lemon juice***

2 cups loosely packed shredded zucchini

Baking Instructions:

  1. Preheat the oven to 350 degrees and line 24 muffin cups with liners.
  2. Mix the chocolate powder, flour blend, coconut sugar, cinnamon, allspice, cloves, baking powder, baking soda, and salt and set aside.
  3. Blend the eggs, oil, agave, orange juice and buttermilk well and the zucchini to the wet mixture.
  4. Combine the dry and wet ingredients until the dry ingredients are fully moistened.
  5. Evenly divide the batter among the muffin cups. They will be quite full.
  6. Bake until the cupcakes are puffed and a toothpick inserted into the center comes out clean. Check at 15 minutes and adjust the time accordingly. Mine took about 25 minutes.

* A 10 oz solid chocolate bar processed in the food processor will yield the desired amount of chocolate powder.

** I made a homemade blend of garbanzo bean, sorghum, potato and tapioca flour, but you can use what you’d prefer.

*** It doesn’t have to be soy milk; you can use whatever type you’d prefer. Just be sure to add the lemon juice to make it a buttermilk.


Creative Cooking: Chocolate Raspberry Cupcakes

“Can we make something chocolate?”

My few weeks have been beyond crazy.  On top of our usual busyness of school, work, and activities, we’ve continued to deal with my oldest’s recovery from being hit by a car, we’ve grieved the death of a friend’s daughter, we’ve agonized over a loved one being in the hospital in an induced coma, and we added rehearsals for my son to be in “It’s A Wonderful Life” and auditions for a play I’m directing.

So, it’s now just a few days before Thanksgiving, and I’m finally turning my attention to the menu for that day and returning to this blog which I have ignored for these past three weeks. When I asked my children what we should have my middle child responded with the question:  “Can we make something chocolate?”

Now, two of my three children are well-rounded dessert lovers. When presented with choices, they may choose a slice of apple pie or a piece of zucchini cake or a ginger cookie or a slice of pumpkin cheesecake. My middle child, however, when given options to choose from, will opt for the chocolate cream pie or the chocolate fudge cake or the double chocolate cookie or the chocolate cheesecake.

So, I wasn’t surprised when she asked if we could make something chocolatey. She always does, and I always suggest that we stick to the traditional pies for Thanksgiving and make something chocolate for another time. I surprised myself yesterday, though, by actually contemplating the idea of making chocolate cupcakes.

Why? Three reasons: One, I just had a really, really long week and the thought of something comforting like chocolate cupcakes was enticing; two, with the death of my friend’s daughter at such a young age (20’s) and my own daughter being alive after being hit by a car, I’m realizing that life’s too short to NOT have chocolate, no matter the season; and three, we just watched my son’s performance in “It’s A Wonderful Life” where I was reminded that it’s all really about family and friends and time together and not the menu.

So, if you need assistance in revamping your holiday menu to fit allergy or health needs, please read my posts from last year (Nov and Dec 2013) where you’ll learn all sorts of lessons for how to do so; but for this Thanksgiving, I’m offering a creative addition to the Thanksgiving menu:  Chocolate Raspberry Cupcakes which are gluten, dairy, nut, soy, peanut, and egg free. Enjoy and have a most Happy Thanksgiving!

Chocolate Raspberry Cupcakes

Ingredients:

3 1/2 cups gluten free flour (I used Authentic Foods Multi-Blend)

1/2 tsp salt

2 tsp baking soda

1 cup Enjoy Life allergen free mini chocolate chips

1/2 cup Hershey’s dark unsweetened cocoa powder

3/4 cup oil (I used safflower)

1 cup Agave

2 tsp vanilla

2 cups water

2 tbsp vinegar (I used raspberry but apple cider or white will do)

Polaner’s Raspberry All-Fruit

Baking Instructions:

1. Preheat the oven to 350 degrees and line 24 muffin cups with cupcake liners.

2. Whisk together the flour, salt, baking soda and cocoa powder. Add the chocolate chips and set aside.

3. Whisk together the oil, agave, vanilla, and water.

4. Mix the dry ingredients into the wet, adding the vinegar.

5. Divide half of the batter evenly among the muffin cups. I usually put about 1 1/2 tbsp of batter into each.

6. Carefully put one teaspoon of raspberry all fruit into the center of the batter.

7. Evenly distribute the remaining batter among the muffin tins, carefully putting the batter over the raspberry all fruit.  Again, this is usually about another 1 1/2 tbsp.

8. Bake the cupcakes until a toothpick inserted in the center comes out clean, about 15 to 20 minutes.

9. Cool in the muffin tins on a wire rack for about five minutes before removing them from the tins and completely cooling them on a wire rack.

10. For a festive touch, put the cupcake into a bowl with a scoop of vanilla ice cream or nondairy frozen dessert next to it with a raspberry and mint leaf on top.


Cooking Techniques: Puddings

website pudding

Diaper boxes.

When my oldest was a toddler, she loved to play with other people’s toy kitchen sets. I wanted her to have one of her own, but all our money was going toward our first home and diapers.

One day I looked at the number of Costco diaper boxes piling up in the basement and realized just how sturdy those boxes actually were. I had a brainstorm. Maybe I could make a kitchen set using those boxes.

If you had asked me before that day whether I was capable of even thinking up such an idea, let alone following through with it, I would have said, “No way!” Growing up, my best friend was the artsy, creative one. I was the math and science nerd. I didn’t “do” crafts.

As life often proves, though, necessity can breed skill. My daughter loved to play “cook”, and I was going to make it happen for her. Using the diaper boxes, duct tape, and contact paper, I created a complete kitchen for her which included a stove, a fridge, and cabinets. I even added a diner style counter with a cash register to go with it.

That kitchen set lasted us for years, and my daughter loved it. And other people loved it, too. I got so many compliments on that set that, to this day, I am still amazed by what I accomplished.

I share this because recently folks have been telling me that they’re not capable of revamping their recipes like I do; but if I can create a kitchen set out of diaper boxes, folks can most definitely learn how to accommodate their food needs. And I’m going to help folks do it!

For the next several posts, I’m going to focus on technique, specifically the “how-to’s” of certain dishes with special reference to making them healthier and allergy friendly. For today’s post, we’ll look at puddings, because someone recently wanted to know how to make it.

Puddings are ridiculously simple, but people rarely make it homemade. They think it’ll take too much time or that they’ll mess it up. Neither is true. There are, however, some tips to keep in mind.

1. Make sure your recipe is a good one. Don’t just presume that because it is online or in a recipe book that it actually is correct. For some reason there are a lot online and in books that tell you to do things incorrectly like add the cornstarch by itself to the mixture, which leads me to point two.

2. Cornstarch (or another thickener like arrowroot or tapioca starch):  The key to pudding is how you thicken it. Cornstarch is the traditional thickener used, but it should never, ever be added to pudding by itself. Doing so will simply “gummy up” your pudding. Cornstarch is always to be mixed with your sugar (if you’re using it) and salt before adding it to your liquid or it needs to be mixed with liquid before adding it to the rest of your pudding mixture. The same should be kept in mind if you use arrowroot or tapioca starch.

Cornstarch also thickens best when your cooking temperature is even, so a stainless steel pan or enamel covered is best which leads us to point three.

3. Cooking Method: The best way to make pudding is to use a double boiler. I don’t own one so I simply put one pan on top of another. There are two ways of doing so: put a smaller pot filled halfway with water on the bottom and a slightly larger one on top or put water halfway in a pot that another pot will fit snugly into without touching the water below.

Whichever method you use, you want to bring your water to a boil before you begin making your pudding, because the heat from the boiled water is necessary for thickening your pudding.

When you do begin making your pudding, it’s important to stir the mixture well in the beginning so all ingredients are evenly mixed and there are no lumps.  Then, after your mixture has come to a boil, when you’ve added your thickener, it’s important to continually stir the mixture so it doesn’t burn on the bottom, which brings us to point four.

4. Patience: Pudding doesn’t actually take all that long, maybe fifteen minutes or so to completely cook, but when you’re standing over it, stirring constantly, fifteen minutes begins to feel like a long time. When it does, do not be tempted to try to speed things up or to stop stirring. Use the time to relax. Allow yourself the luxury of not being rushed and being able to reflect. Before you know it, the pudding will have thickened, and you’ll have a nice treat.

Okay, for a recipe: I have a chocolate recipe that is simple to make. If you are simply trying to lower your fat intake, use skim milk. The pudding won’t be as rich and thick, but it’ll still be delicious. If you have food allergies, I’ve successfully made this with flax milk, soy milk, almond milk, coconut milk, and rice milk. If you actually use sugar, then use 1/2 cup of sugar instead of the 1/4 Agave. You can also use 1/4 cup Stevia instead or 1/2 cup coconut sugar instead. If you want a really rich pudding, use soy or coconut creamer (or heavy cream if you don’t need to worry about milk allergies or fat intake.)

Chocolate Pudding

Ingredients:

1/4 cup Agave

1 3/4 cup “milk” (whichever type you want to use)

1/8 tsp salt

3 tbsp cornstarch

1/4 cup “milk”

1 oz unsweetened chocolate*

1 tsp vanilla

Cooking Instructions:

1. Bring water to a boil in a double boiler or makeshift boiler.

2. Mix together the agave, 1 3/4 cup milk, and salt. Set aside.

3.  Mix together the cornstarch and the remaining 1/4 cup milk. Set aside.

4. Stirring continually, melt the unsweetened chocolate.

5. Slowly, while continuing to stir, add the agave-milk mixture.

6. Bring the mixture to a boiling point. (Little bubbles will begin to appear at the top. You don’t need to continually stir here, but you’ll want to occasionally stir it until it begins to boil. Usually it’s less than five minutes to bring the chocolate liquid to a boil.)

7. When the mixture begins to boil, re-stir the cornstarch mixture and slowly pour it into the hot chocolate liquid, stirring continually.

8. Continue to stir the pudding until it begins to thicken.  (It’s okay to stop stirring for a few seconds at a time, but not for minutes, because once the pudding begins to thicken, it’ll thicken quickly. Usually it takes less than ten minutes for the cornstarch to thicken the pudding. You’ll know when it’s thickening because it’ll go from its liquid state to more of a solid.)

9. When the pudding thickens, remove it from the heat and stir in the vanilla until well blended.

10. Scrape the pudding into a shallow bowl and press a piece of plastic wrap directly against the top of the pudding. (This keeps that “skin” from “growing” on top of your pudding as it cools.)

11. Cool the pudding completely in the fridge before eating. If you put it into a shallow dish, you can usually eat the pudding within half an hour.

*Chocolate Note: If you don’t have unsweetened chocolate on hand, you can make your own.  Three tablespoons of unsweetened cocoa powder mixed with one tablespoon of shortening or oil is equivalent to one ounce of unsweetened chocolate.

You can also substitute an ounce of chocolate chips which is one tablespoon of chips. This will make for a sweeter pudding so if you don’t want it that sweet, simply reduce the agave by half.

If you like to use carob powder instead, 3 tablespoons of carob powder mixed with 2 tablespoons of water is equivalent to one ounce of unsweetened chocolate.

Also, if you don’t have allergies to it, you can use one of those pre-melted chocolate packages they make these days.

Finally, if you want, you can also just use chocolate flavored soy or rice or almond or coconut milk and skip the chocolate step and leave out the Agave.  I often use unsweetened chocolate soy milk with the Agave so I can control the amount of sweetener.

“Eggs”cellent News: Substituting for Eggs

website eggs three

Eggs.

How in the world could my nine month old son be allergic to eggs, when he’d never eaten one before?  I would never receive an answer to that question, but I would learn how devastating it can be to watch your child stop breathing.

My son developed eczema as a baby, and given our family history of food allergies and intolerances, our pediatrician suggested I have him tested for food allergies.  She said many babies with eczema are allergic to milk, and I’d be better off knowing if he was sooner as opposed to later.

So, we had a blood test done, and the good news was that he was NOT allergic to milk.  The bad news was that he was somehow allergic to eggs and peanuts.  The pediatrician wanted me to bring him into the office so she could test exactly how allergic he was to eggs and peanuts.

On our appointment day, she carefully injected my son with eggs first, and to my horror, my sweet baby boy’s face and throat began to swell as he started to gasp for air.  Being a good doctor, our pediatrician immediately administered an antidote, and both my son and I began to breathe again.  She turned to me and announced, “Anaphylaxis.  He’ll need an epi-pen.  Ready to try the peanuts?”

What I thought:  “Are you insane?”  What I replied:  “Well, since we already know he needs the epi-pen for the eggs, can’t I just work on the assumption that he does for the peanuts as well?”

To my relief, she agreed.

What do eggs do?

So, what are cakes like without eggs?  Dry, dense, and without structure!  Doesn’t sound very appetizing, does it?  Eggs act as both leaveners and emulsifiers, which essentially means they help our baked goods to be light and fluffy.  They increase the amount of air we can incorporate into our batters which increases the volume, tenderness and appearance of the final baked product.  Eggs are also, if you remember our “chemistry” of baking, part of the liquid equation in cakes, which means they keep our cakes moist.

As a general rule, eggs are considered a good food. They’re an excellent source of protein and contain a lot of nutrients the body needs.  Unfortunately, whole eggs also have fat and cholesterol in the yolks which many folks need to avoid for a variety of health reasons.  Other people like my son are allergic to and cannot eat the whites of the egg.

Given what eggs do for baking, many are hesitant to substitute other ingredients for them, but it is quite possible to bake without them and to also bake with just the whites of eggs.

How to substitute egg whites

If you simply want to eat healthier (i.e. without the yolks), the simplest approach is to use egg whites only.  One large whole egg is about ¼ cup of egg whites, so I usually use liquid egg whites and substitute accordingly for the whole eggs.  If you want to separate egg whites from the yolks, usually two egg whites is equivalent to one whole egg.

How to substitute for eggs altogether

If you need to avoid eggs altogether, I recommend four best approaches.  Substituting 1 tablespoon of ground flaxseed mixed with 3 tablespoons of water for every egg in a recipe; adding 1 tsp of baking soda with 1 tablespoon of vinegar (or other acid like lemon juice) to the recipe after you’ve substituted 1/4 cup of pureed fruit or vegetable or yogurt or sour cream per egg as the binder; using 1/4 cup of aquafaba which is the liquid generated when cooking chickpeas; or making or buying an egg replacer.

If you utilize the flaxseed substitution, you should mix the flaxseed and water in a mixing bowl, and let it sit to thicken.  Once it thickens, it looks a bit like beaten eggs and acts like eggs in a baked good.

If you’re making cookies or brownies instead of a cake, where the eggs act mostly as a binder, simply substituting pureed fruit or cooked vegetables in place of the eggs works very well.  My favorites to use are applesauce, bananas, pumpkin, and squash.  About 1/4 cup of pureed fruit or cooked vegetable equals one whole egg. As well, if you don’t have any dairy allergies, yogurt works nicely, especially if it’s a thick yogurt like Greek yogurt.

If, however, you need the baked good to rise, then after substituting a binder for the egg, you need to use the baking soda plus vinegar option to leaven the baked good. If you try the baking soda and vinegar approach, you mix the baking soda with the dry ingredients and add the vinegar (or other acid like lemon juice) at the very end, just as you’re mixing the dry ingredients with the moist.

A third option for replacing eggs is to use aquafaba. You can make your own by cooking dried chickpeas or you can purchase canned chickpeas and use the liquid. You’ll want no salt, no sugar added versions of store-bought chickpeas. 1/4 cup of the liquid equals to one egg. Simply whisk the liquid with a fork until frothy. You can also whip aquafaba like regular eggs into a meringue by adding cream of tartar and whisking in a mixer until white and fluffy.

A fourth way to substitute for eggs is to use the egg replacers you can purchase at the store or to make your own. Egg replacers are simply a version of the baking soda plus vinegar trick. It basically just adds a starch and a gum to a powder leavener and acid (i.e. baking powder, which is baking soda plus cream of tartar). To make your own, you can mix 1/2 tsp of baking powder (which already has the baking soda and acid mixed together in powder form) with 1 tsp of a starch like tapioca or arrowroot or cornstarch and 1/8 tsp of a gum like xanthan or guar. Add 2 tbsp of warm water and whisk. Let it sit and then rewhisk right before adding to your wet ingredients as an egg.  Simply multiply the amounts per number of eggs needed for the recipe.

Eggless Chocolate Cheesecake

Ingredients:

3 pkgs Tofutti Better Than Cream Cheese, at room temperature (or real cream cheese, if you prefer)

1/2 cup unsweetened baking cocoa

6 oz Greek plain dairy free yogurt mixed with 1/2 cup Agave , at room temperature

1/2 cup Agave 

1/4 tsp baking soda

2 tsp gluten free baking powder

1/2 cup cornstarch

1 tbsp raspberry liquor*

2 tsp gluten free vanilla

12 oz Tofutti Better Than Sour Cream, at room temperature (or real sour cream, if you prefer)

Baking Instructions:

1.  Preheat oven to 300 degrees, and prepare a 9 to 10 inch springform pan by securely wrapping aluminum foil around the outside of the pan.  Grease the bottom of the pan, but do not grease the sides of the pan to ensure proper rising of the cheesecake.  (I would use “If You Care” parchment paper, but you can Pam spray the bottom or use butter or oil to grease it.)

2.  In a large mixer, beat cream cheese just until it’s smooth, using a rubber spatula to scrape the sides down when done.

3.  Mix in cocoa and yogurt mixed with Agave, just until it’s blended.

4.  On low speed, very slowly drizzle in Agave.  You want to take your time so the cream cheese mixture can slowly absorb the Agave and retain its creaminess.

5.  Mix the baking soda, baking powder, and cornstarch together and mix into the cream cheese with the raspberry liquor and vanilla just until they’re mixed in.

6.  Add the sour cream and mix just until it’s incorporated.

7.  Pour the cheesecake batter into the prepared pan and bake for 1 1/2 hours.  A knife inserted into the outer edge should come out clean.  The center will still be creamy.  Another test is:  If you gently shake the cheesecake, only the center should slightly jiggle.

8. Turn off the oven and open the door.  Leave the cake in the center of the oven for 2 hours so it can slowly begin to cool.

9.  Remove the cheesecake from the oven, and loosen and remove the sides of the pan.  Put the cheesecake into the refrigerator to cool completely, at least four hours, but overnight is best.

* The raspberry liquor can be left out entirely.  You can also substitute other flavored liquor or 1 tsp of another extract like mint.