Breakfast Buffet: Spinach Strata

It’s already out of print….”

Last Saturday the writing collaborative I helped to found brought in an illustrator who gave me a wonderful book she had illustrated for an author who wrote about a girl who was gluten-sensitive, celebrating her birthday. The illustrator knew I did workshops for allergy-friendly baking and thought I’d enjoy the book. When I mentioned that it would be nice to purchase a few, she told me that the book had already gone out of print. (It was published in 2013.)

I was bummed. Not only because I wouldn’t be able to purchase more copies of the book but because there had been such a lack of interest in such a great book.

I should not have been surprised, though. My own experience has taught me that unless it affects folks personally, the impetus to consider other people’s plight and show consideration seems to be non-existent at times, and such a book would not need to be purchased by those of us who already know but by those who need to learn.

That does not mean that we stop trying to teach, though. Recently I met with the principal of our high school about a staff appreciation luncheon, and he, too, surprised me.  He asked me if I was considering staff with food allergies in my planning. Since this was the same principal who had held a breakfast for the senior students without any food that students with food allergies could eat, my astonishment must have shown on my face. He was quick to explain that he’d “learned his lesson” about food allergies, which I took to mean that a whole lot of parents must have called him about that breakfast!

Only when we continue to share will people start to come around. I have spoken so many times to the local PTO and my church that, though it has taken several years (years!), people finally have started to make changes. Not at every event, which they still need to consider, but at least at events where they know for sure that people with food allergies will attend.

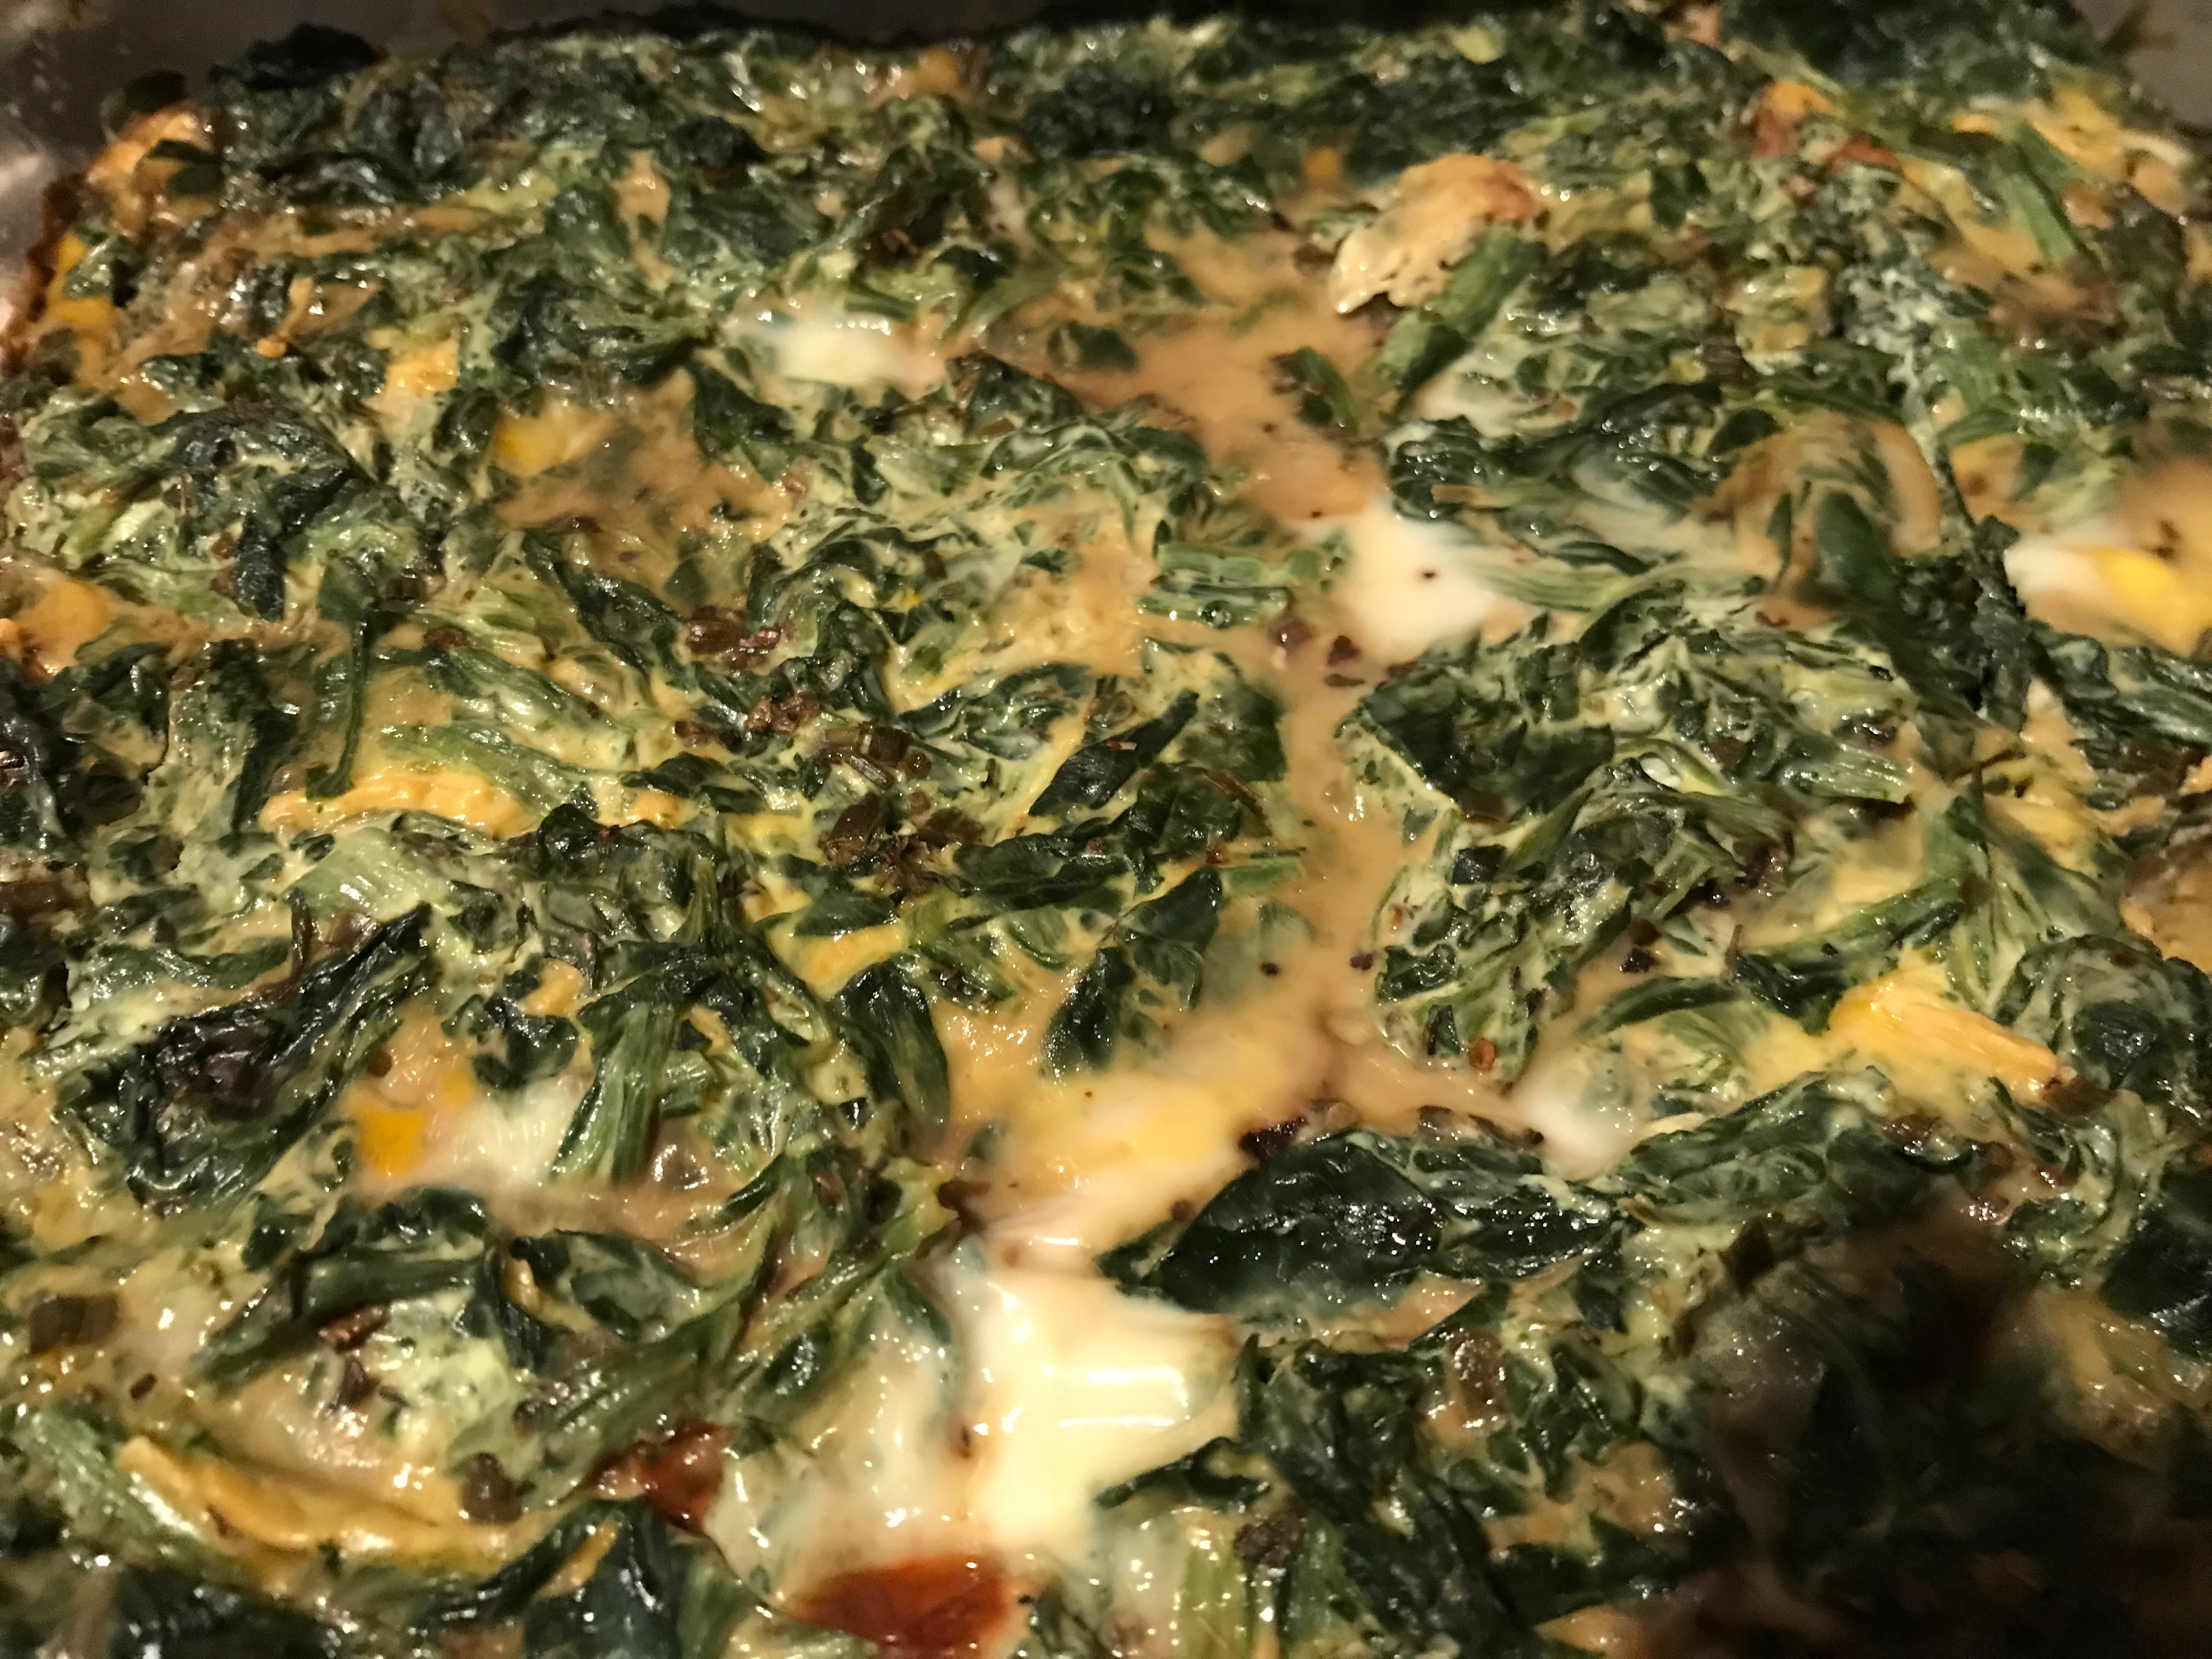
Recently a local group called me to ask if I could make a breakfast dish for some folks with dairy and gluten allergies. I had the perfect hot dish which I had made over Christmas, a Spinach Strata. Made with gluten free bread, eggs, soy milk, and spinach sautéed with tofu cream cheese, it is cheesy and gooey and yummy. We had enjoyed it at Christmas, and the folks at the breakfast buffet the other day apparently enjoyed it as well.

The recipe is below so you can, too!

Spinach Strata

Best if prepared the night before and cooked in the morning.

Ingredients:

six slices favorite gluten free bread (I used Ancient Grains whole grain millet-chai bread; I used an 8 x 11 pan; if you use a larger pan or smaller pan, you may need to adjust the slices of bread you need to cover the bottom of the pan)

dairy free mozzarella (I used about a cup of the Daiya brand but how much will depend on what size strata you may be making; you want to cover the top of the bread cubes)

fresh spinach (I used a 16 oz package of washed baby spinach; a smaller strata may need a less; a larger strata may need more, depending on how much spinach you like)

one container tofu cream cheese (I used an 8 oz container of Tofutti brand cream cheese; unless you aer halving the recipe, slight decreases or increases in spinach does not warrant changing the amount of cream cheese used)

eggs (I was making the dish in an 8 x 11 pan and ended up using six whole eggs, but the amount will vary depending on the size pan you use; you want the egg/milk mixture to cover come to the top of the spinach mixture)

“milk” (I used soy milk but you can use whatever you like; I also used a cup and a half for the six eggs because I was making the dish in an 8 x 11 pan, but the amount will vary depending on the size pan you use and how many eggs; you want the egg/milk mixture to cover come to the top of the spinach mixture; ratio is usually about 1/2 cup of milk per egg)

herbs and spices (I used black pepper, a little bit of red pepper flakes, onion powder, oregano and thyme, but you can use what suits your tastes)

Cooking Instructions:

  1. Grease a pan of your choosing.
  2. Cut the slices of bread into small cubes and spread the bread over the bottom of your pan.
  3. Sprinkle the bread cubes with the dairy free mozarella.
  4. In a pan saute the spinach with a little bit of water just until the spinach begins to wilt. Add the tofu cream cheese and stir well until the cheese has melted into the spinach.
  5. Carefully dollop the spinach mixture over the top of the bread and mozzarella cheese.
  6. Whisk together the eggs, dairy free milk, and herbs until well blended.
  7. Carefully pour the egg mixture over the bread and spinach. You want the egg mixture to reach the top of the spinach. If you need a little bit more, simply whisk up an additional egg or two and add it to the pan.
  8. Wrap the dish well in plastic wrap or foil and let it sit overnight in the fridge. If making the same day, let it sit at least an hour in the fridge so the bread can soak up the egg mixture.
  9. Bake in a preheated 350 degree oven until the strata is puffed and golden. Time will depend on the size and shallowness of your pan. My 8 x 11 pan took about 45 minutes.
  10. Leftover strata stores well in the fridge and tastes just as good when microwaved the next day.


Advertisement

Summer Loving: Tomato Tarts

“It’s the best time of the year!”

If you have children, had children, or simply remember being a child, you know that this time of the year is filled with the rush of buying needed school supplies, the excitement (for the children) and exasperation (for the parents) of replacing worn or outgrown clothing and shoes, and either the sadness or the joy, depending on the type of children and parents, of going back to school.

I’m one of those parents who is always sad when the new school year begins because I prefer the lazy days of summer when the children and I don’t need to rush anywhere, can play games, and no one is stressed by homework and relational angst. So, when school resumes I need to find ways to cheer myself up, and fortunately for me, this is also the time of year when some of nature’s best gifts present themselves.

I’m talking about tomatoes. Large, fresh, sweet, home or local farm grown, deep red, yellow and even purple organic tomatoes. True fact about me: I only eat large tomatoes in August and September when I can get them fresh from the garden. I will not purchase store tomatoes which have yet to fully turn their color and have very little taste. Life’s too short to insult my taste buds.

So, when tomatoes are in season, I make as many different types of dishes as I can because I know it’ll be another year before I can enjoy their taste again. One of my family’s favorite dishes is tomato tarts. A simple crust, layers of lovely, tasty fresh tomatoes, and an egg custard. I recently made some tomato tarts using fresh tomatoes to serve at a brunch for my husband’s family forest, and they were an absolutely hit. Fortunately, I had made several of them so that when people went back for even thirds, we had enough!

Now, a warning: Yes, you can make these tarts with any tomatoes, but you have to trust me when I tell you that there’s nothing like the sweet taste of a freshly picked tomato to enhance these tarts. So, if you can, swing by your local farm and get a basket full. Your taste buds will thank you!

Tomato Tart

Ingredients:

1 1/2 cup your favorite flour (I use gluten free flours like garbanzo or fava bean or oat or sorghum but whole wheat works, too)

1/2 tsp ground onion powder

1/4 to 1/2 tsp salt (your taste preference)

1/2 tsp dried oregano

1/8 tsp black pepper

1/3 cup safflower oil

3 tbsp your favorite milk (cow, soy, flax, quinoa, rice, etc…)

3 eggs

1/2 cup your favorite milk (cow, soy, flax, quinoa, rice, etc…)

1/4 tsp black pepper

1/2 tsp dried oregano

Fresh tomatoes

salt, pepper and oregano

Cooking Instructions:

  1. Preheat the oven to 350 degrees.
  2. Mix the flour with the onion powder, salt, oregano and pepper.
  3. Whisk the safflower oil with the milk until it’s creamy. Pour into the flour mixture and stir with a fork until a dough ball forms.
  4. Press the crust into a 8 or 9 inch pie pan, using your clean hands to form an even crust along the bottom and sides of the pan. Set aside.
  5. Whisk the eggs with the milk, pepper and oregano. Set aside.
  6. Thinly slice the tomatoes, allowing some of the juices to drain out in a colander. Then layer the tomato slices in the prepared crust, sprinkling some salt, pepper and oregano on each layer before putting on the next.  How much you put in is up to you, but I like to layer them up to the top of the crust.
  7. Carefully pour the egg custard over the tomato layers. If you find that you’ve layered so many tomatoes that your egg custard doesn’t cover the tomatoes as you’d like, whisk another egg with a tablespoon of milk and add it.
  8. Bake in the preheated oven until the eggs are set. How long will vary on how thick your tomato layers are as well as which type of milk you ended up using.  I suggest you set the timer for 15 minutes and go from there. The longest it’s ever taken for me is 30 minutes.


Cooking Techniques: Popovers

“But that’s not appropriate.”

A friend from the city was visiting and heard my son hysterically laughing while reading our local newspaper. She commented that he must really enjoy the comics.

“Oh, he’s not laughing over the funnies,” I said. “He’s reading the police log.”

The look on my friend’s face was priceless! She clearly was wondering whether she had misjudged me as being a sound parent and how best to tell me that my son was going to grow up to be a psychopath if he found the police log funny!

So, I showed her the paper. Examples of true police log reports from papers in my local area:

“Goat running loose ate a pair of pants. Owner of pants declined pressing charges against goat.”

“Man waiting in line for Cabela’s to open cut in line. He was spoken to. All was well.”

“Report of annoying phone call. Mother-in-law was calling. Police explained they could do nothing about it.”

“Road blocked by 14 chickens. Traffic was backed up for 20 minutes until chickens finished sunbathing.”

“Unsecured trash barrel taken. Discovered in back yard of a neighbor. Child using it as a horse.”

“Back porch light went out. Al Qaeda suspected.”

Once my friend read that week’s police log, she understood why my son was laughing, and we had an interesting discussion afterwards about the difference between “crime” in the city and where I live.

I was reminded of this conversation recently as my son and I made popovers this weekend. Popovers are a wonderful addition to meals which people don’t often think about, because their perceptions of them aren’t always in line with reality.

There’s a myth out there that popovers are difficult to make, and if you google popovers, many sites talk about the “secrets” to making perfect popovers. This, I believe, feeds into the perceptions that people hold, so then folks opt to make muffins instead or to purchase bread from the store.

The truth is that popovers are ridiculously simple to make, and you can adapt them to make a variety of popovers for any occasion. Plus they’re fun. Children love them because they literally pop-over from the pan.

What’s important to know about popovers:

1. Cooking: You want a hot oven temperature so I always preheat the oven to 450 degrees. Once you put the popovers into the oven, you don’t want to open the oven until they are done which is always 30 minutes in a regular sized muffin tin. When they’re done, just remove the popovers from the tin and if not eating immediately put them onto a cooling rack so moisture won’t condense on them. If eating immediately, you can put them into a nice bowl lined with a pretty towel.

2. Mixing: You want to mix the eggs together before adding the other ingredients, but you simply blend them with a fork for a minute or less until the eggs are mixed. No need to make them fluffy or frothy or airy. Just a nice uniform color to the eggs, and then you add the rest of the ingredients.

3. Measuring: I find the best way  to make popovers is to transfer the batter into a large spouted measuring cup so I can easily pour the batter equally among the muffin tins.

4.  Ingredients: A popover is just eggs, milk and flour. For a muffin tin that makes 12 popovers, you’ll always use an equivalent to one cup of eggs, 2 cups of milk, and 2 cups of flour. Since I like to be a bit healthier, instead of 4 large eggs (which should yield a cup) I opt to use half whole eggs and then add enough liquid egg whites to make a full cup. For the milk I’ve used soy, flax, and rice milk without any issues. For the flour, to be gluten free, I either use sorghum flour, arrowroot flour, or a mixture of both. For seasoning, I use 1/2 tsp of salt and then depending on the type of popover, an additional herb or spice.

5. Pan: A simple muffin tin is all you need whether it’s a 12 muffin one or two six muffin ones. It’s important to grease the muffin tins. You can use butter, oil, spray, shortening – it doesn’t matter what, but you must grease the pan so the popovers can rise and pop without sticking to the pan.

6. Variety: Popovers can be adapted. You can add any herb or spice. You can add cheese. You can add finely grated vegetables. My kids really like it when I make the popovers with pureed vegetables or fruit. I used puree squash or pumpkin or applesauce or bananas in place of some of the milk, and they come out quite delicious.

For eating, you can top the popovers with butter or jam or fruit butters. You can also cut them open and fill them with food like chicken salad which is incredibly tasty in a popover!

Below I’ll include two recipes I make often for the family. Enjoy!

Squash Popovers

Instructions:

1. Preheat the oven to 450 degrees and grease either a 12 muffin tin or two six muffin tins.

2. Whisk 2 cups of flour of choice (I like 1 cup of sorghum flour with 1 cup of arrowroot flour) with 1/2 tsp salt and 1/2 tsp cardamom. Set aside.

3. Using a fork mix the equivalent of 1 cup of eggs (4 large whole eggs, 1, 2, or 3 whole eggs plus enough liquid egg whites to make 1 cup) just until the eggs are light and uniform in color.

4. Add 1 1/4 cup milk (I prefer flax or soy milk) and 3/4 cup cooked, pureed squash to the eggs. Whisk just until blended. There will be lumps, and that is how you want it.

5. Transfer the batter (which will be thin and runny) to a spouted measuring cup large enough to hold all the batter. Evenly divide the batter among 12 muffin tins.

6. Put the muffin tin into the oven and bake for 30 minutes. Do not open the oven door at any time during the 30 minutes. After 30 minutes, you can pierce the popovers to release the steam and then remove the popovers to a wire cooling rack or towel-lined bowl or directly to the plates.

Tarragon Popovers

Instructions:

1. Preheat the oven to 450 degrees and grease either a 12 muffin tin or two six muffin tins.

2. Whisk 2 cups of flour of choice (I like to use 2 cups of sorghum flour for this recipe, but mixing half sorghum and half arrowroot or using all arrowroot is fine, too) with 1/2 tsp salt and 1 tsp dried tarragon. Set aside.

3. Using a fork mix the equivalent of 1 cup of eggs (4 large whole eggs, 1, 2, or 3 whole eggs plus enough liquid egg whites to make 1 cup) just until the eggs are light and uniform in color.

4. Add 2 cups milk (I prefer flax or soy milk) to the eggs. Whisk just until blended. There will be lumps, and that is how you want it.

5. Transfer the batter (which will be thin and runny) to a spouted measuring cup large enough to hold all the batter. Evenly divide the batter among 12 muffin tins.

6. Put the muffin tin into the oven and bake for 30 minutes. Do not open the oven door at any time during the 30 minutes. After 30 minutes, you can pierce the popovers to release steam and then remove the popovers to a wire cooling rack or towel-lined bowl or directly to the plates.


Cooking Techniques: French Toast

“Can you make special breakfast today?”

My children love a “special breakfast” morning. That’s when we have the time to make food like pancakes or French toast or waffles, homemade from scratch, instead of having quicker options like cereal, eggs or frozen toaster waffles. Even within the “special breakfast” options, though, a hierarchy exists for how time-consuming a particular food is.

For mornings when we have more time for a special breakfast, but not quite as much time as I might like, French toast is a wonderful option. It’s a treat but also surprisingly quick to make and cook. What’s lovely for folks with food allergies and dietary restrictions is that French toast is also extremely versatile.

French Toast Information

1. The bread: At its inception, French toast was a wonderful way for folks to make use of stale bread instead of letting it go to waste. Today, we rarely let our bread go stale before making French toast, though some say day or two day old bread is the best. Other folks say that drying out your bread in the oven helps the bread to better soak up the egg batter.  I’ve found that whether it’s fresh, day old or dried doesn’t make too much of a difference and that just about any type of bread can make a good French toast, but there are a couple of tips to keep in mind:

Firs, what type of French toast you prefer? Do you like it to be creamy and eggy on the inside? Or do you prefer a sturdier French toast? Do you like a softer style French toast? Or do you prefer a chewier style? Do you like a crispy crust or your French toast to be similar in texture all the way around? What bread you want to use is dependent on the texture and taste you prefer.

Softer breads like challah and most regular store bought butter loaf breads make for a creamier, eggy French toast. Hardier 100% whole grain breads, whether wheat or gluten free, give you a sturdier French toast. Most freshly made crusty loaf breads provide a chewier texture. Breads with thicker crusts will have a crispier outer edge while softer, thinner crusts make for a more evenly textured French toast.

Secondly, how much egg/milk mixture do you like your bread to absorb? If you prefer simply a coating on the outside of your French toast and not for it to soak through to the center, then you should opt for a hardier, tightly woven bread. If you like your French toast to be more eggy in the center, then you should choose a more porous bread.

Thirdly, how thick do you want your French toast to be? If you like a thinner French toast, softer breads which are more porous, are difficult to cut and are better for thicker slices of French toast. Hardier whole grain breads usually are better for thinner slices of French toast.

2.  The dipping batter:  People differ on what compromises the best French toast mixture. In many parts of the world, bread is only dipped into milk. Other places dip only into beaten eggs. In the U.S. we tend to use a mixture of eggs and milk.

What you want to use depends on your tastes and your diet. Richer French toasts use cream or whole milk mixed with eggs. Most homes use lowfat or skim milk mixed with eggs. We use soy or flax milk because of our allergies, and because I like to eat a bit healthier, I use half whole eggs and half egg whites.

The ratio of milk to eggs can affect the taste and texture of French toast, too. For folks who like their French toast softer and yielding, you want a higher milk to egg ratio (1/2 cup of milk for every egg). If you prefer your French toast to be more eggy you want a lower milk to egg ratio (1/4 cup of milk for every egg). And if you like your French toast to be more custardy, that ratio changes again (1/3 cup of milk for every egg). If you don’t care, simply beat some eggs and add whatever a dollop of milk looks like for you!

What’s important to keep in mind is that you should blend your batter well, whether you’re using a hand whisk, a blender or a fork, because if the eggs aren’t beaten well with the milk, there tends to be a separation and you’ll get clumps of egg on your bread.

3.  The flavoring:  Recipes vary and abound. Many just call for cinnamon. Some add nutmeg and/or vanilla, too. Others suggest changing it up and using a spice like cardamom and/or orange peel. It really depends on your tastes. I personally use a lot more cinnamon than most recipes call for. Recipes tend to call for 1/2 to 1 tsp of most any of the above spices. I suggest experimenting with the varieties and with amounts to see what you prefer taste-wise.

4.  Sweeteners:  I don’t add anything sweet to my French toast batter, but an American palate seems to like sweeter French toast, so you’ll see recipes which add honey or sugar or Agave. It’s not just for taste reasons, though. These sweeteners will help your French toast brown better, too, so if you like a crispier French toast in addition to a sweeter one, feel free to add the sugar — preferably, though, no more than a tablespoon or two.

5. Cooking:  The most conventional method for cooking French toast is to simply cook both sides in a pan or on a griddle.  If you prefer a more custardy center, you should have a hot pan where the outside of your bread will brown quickly while the center heats but remains softer. If you like a drier French toast, then use a more medium heat so the outside of your bread and the inside can both cook at a similar pace.

For what to cook your French toast in, that depends on your tastes and diet. Most folks use butter which browns your French toast more than oil will, but obviously, there are issues with having too much butter, as well as many folks have dairy allergies these days. If you use a plant based oil, opt for one with a more neutral flavor like a regular olive oil or a safflower oil or canola oil.

Another method for cooking French toast is to put it into the oven. You soak the bread in the egg mixture in a pan and bake the bread in the oven. A single layer of French toast will bake in about 20 minutes in a 350 degree oven.

6.  Mixing it up:  The wonderful thing about French toast is that you can also jazz it up. One way is to make a fruit topping to have with your French toast. I simply put frozen fruit like strawberries or blueberries or sliced peaches into a pan and let it cook down with a little bit of sweetener like Agave.

Another way we make the French toast more special is to make a special French toast casserole where we put chopped fruit in between pairs of bread slices, put them into a large pan, pour the egg batter over all the pairs, let is soak overnight and bake the entire casserole in the morning for about 45 minutes at 350 degrees.

My children also like Monte Cristo French toast sandwiches which is where you put ham and cheese in between two slices of bread, dip the entire sandwich into your egg batter and cook the French toast sandwich. This was one of their favorites as little children.

A final way we jazz up our French toast is to put tofu cream cheese mixed with Polaner All-Fruit in between slices of bread, dip them into the egg batter and cook. Then we sprinkle the cooked French toast surprise with maple syrup or powdered sugar or flavored Agave.

Cooking Techniques: Omelets

OLYMPUS DIGITAL CAMERA

“Do I look like a ma’am to you?”

I was 15 and working at a military base Burger King.  I asked a woman, “Ma’am, would you like cream and sugar in your coffee?”

“Ma’am?” she asked. “Ma’am? Do I look like a ma’am to you?”

At 15 I didn’t understand what I had said to make her so upset, but fast forward fifteen years later….

I had been out shopping, using the gift cards I had received for my 30th birthday.  Arriving home, I dropped my bags on the floor and slumped into the nearest kitchen chair.

“What’s wrong?” asked my husband.

“What’s wrong? I’ll tell you what’s wrong.  Pimply-faced teenage clerks kept calling me ma’am.  Do I look like a ma’am to you?”

As the words slipped from my mouth, that woman’s face from fifteen years earlier swam before my face. I had one of those “ah-ha” moments where everything is so clear that you wonder how you hadn’t realized it before.

Those ah-ha moments come in all sorts of situations. I still remember my first cooking “ah-ha” moment. I had taught myself at a young age to make omelettes. I had the basic principles down – mixed eggs; setting the eggs to form a base for the meat and/or cheese and/or vegetables; and folding. My omelets, however, lacked a certain something. They were flat, and quite often they broke when I folded them over. I wanted thick, fluffy omelettes which would hold the filling and provide a good  egg to filling ratio.

One weekend, as a teenager, my parents took me to a conference where the breakfast buffet included the chef making fresh omelettes for the guests right at the table. As I watched him, everything I had been doing wrong became clear.

I was reminded of this particular ah-ha moment this past week when my middle child wanted me to teach her how to make omelettes, so for this post, we’ll look at omelette technique.

Figuring Out Omelettes:

1. Eggs alone verses eggs and liquid: My grandmother always told me that she put water into her eggs because they made them fluffier than putting milk, and if you google omelettes and scrambled eggs, you’ll find “advice” on all sides of the issue. After experimenting, I have not found that adding milk or water affects the fluffy factor at all. Adding any type of liquid simply makes your eggs more “liquidy” and less “eggy”. Whether you add liquid or not is really a taste preference: Eggs blended on their own will be a little dryer. Water added will make for thinner but slightly moister eggs. Milk adds some flavor as well as moisture. Cream makes for a richer omelette. If you do add water or milk or cream, though, don’t add more than 1 tbsp per egg, because too much liquid will only cause liquid to separate out from your eggs.

2. Low heat heat verse higher heat: I always cooked my omelettes over low heat because I feared burning them while I was waiting for them to set, but the chef I watched made his omelettes over a medium-high heat. If you google the subject, you’ll once again find many differing opinions. The one consensus among the opinions and my own experience is that you shouldn’t ever cook eggs over high heat. It doesn’t give the eggs time to set properly, and if you’re not watching like a hawk, they will burn. After experimenting, I’ve found that starting the omelettes on a medium-low heat and turning down the heat to low actually works best for cooking an omelette more quickly while also setting it without burning it.

3. Setting the eggs: I had always set my omelettes by cooking the blended eggs over low heat with a lid on top. This worked well, but it made for a very flat omelette which wasn’t very solid nor was it fluffy. Watching the chef that day, however I realized that he knew the secret. You have to create layers to your egg. To do so, you bring the liquid egg sitting on the top to the more solid bottom part of your egg.

How do you do this? When you pour your egg mixture into your pan, within a minute, it will start to set around the edges. Just it begins to set, you gently lift a sold edge of the omelette and tilt your pan so that the egg that hasn’t solidified can run underneath your omelette. You keep doing this around different parts of your edge until no more eggs will run down underneath. What this does is to create depth to your omelette which makes the omelette thicker and fluffier and more stable for your filling.

4. Pan size and type: Once again, people have a lot of opinions about what you should use for cooking omelettes. The only two things you really need to know are: 1) No matter what type of pan you use, it should be one that your eggs won’t stick to. That doesn’t necessarily mean a nonstick pan. It just means that you need to grease your pan well. I normally put a tsp of olive oil into my pan and make sure I spread it all around the pan, including up the sides. 2) Your pan should be properly sized. A omelette made with two eggs or equivalent should not be cooked in a pan larger than 6 to 8 inches wide. The larger the pan, the more your eggs will spread, and the thinner the omelette will be. Similarly, if you’re making an omelette to share and are using four eggs, you want your pan to be 9 to 10 inches wide so you’ll have proper heat distribution and enough egg space for your filling.

5. Fillings: Few people make omelettes plain with nothing in them. If they want their eggs plain, they simply scramble them. Omelettes are specifically designed for filling, even if it’s simply with cheese. A couple of tips for really good omelettes: 1) Since an omelette usually cooks in about 3 to 5 minutes, if you want your filling to be warm, you should saute them first. I like to saute chopped mushrooms, broccoli, peppers and spinach. My husband likes to saute chopped ham. Whatever you prefer, if you saute the meat or veggies for a minute or two, they’ll be warm and you can season them with the spices and herbs you like for added flavor. 2) If using cheese, shredded is always best. You want something that will melt quickly just from the heat of the folded over egg. About a tablespoon of shredded cheese or cheese substitute for a two egg or equivalent omelette is good.

6. Flavoring: Most recipes for omelettes simply use salt and pepper, but for really good omelettes you should always consider adding herbs or spices, and for health reasons, omit the salt. I make my omelettes with black pepper, chopped chives and paprika. My oldest likes to make hers with cumin. One friend of mine swears by thyme. Another believes only oregano and basil should allowed in an omelette. Experiment and see what flavors you prefer.

Okay, for a recipe. Here’s how I make my omelettes these days:

Omelette

Ingredients:

olive oil (2 tsp, divided)

fillings (meats and/or veggies), about 1/4 to 1/2 cup worth, chopped

seasonings for the filling (pepper, herbs, spices)

two egg whites or 1/4 cup liquid egg whites

one whole egg

1 tbsp flax milk (or whatever you prefer)

ground black pepper (a pinch, about 1/8 tsp)

chopped chives (a good sprinkle, about 1 tsp)

paprika (a dash, about 1/4 tsp)

1 tbsp of shredded Daiya cheddar “cheese”

Cooking Instructions:

1. Spread 1 tsp olive oil in a pan and heat on medium-low.

2. Chop vegetables and meat into small pieces and saute in the pan with seasonings like pepper, oregano, basil, onion powder, whatever, just until the vegetables begin to soften and meats are warm.  Remove from the pan and set aside.

3. Re-coat the pan with another 1 tsp olive oil and warm over medium-low heat.

4. Whisk with a fork: the egg whites, whole egg, flax milk, pepper, chives, and paprika until well blended.

5. Pour the eggs onto the hot pan and let the edges begin to set. Should do so pretty quickly. Once setting begins, lower the heat to low.

6. Using your spatula, gently lift a solidified edge and tilt your pan so some of the liquid egg runs down underneath. Do the same with an edge side opposite the one you just did and continue until your liquid eggs are gone. This will only take a minute.

7. Add your filling to one side of the omelette, and add the shredded cheese on top.  Using a spatula fold the empty side of the egg on top of the filling. Turn the heat off and cover the omelette with a lid for about 30 to 60 seconds.

8. Remove the lid and slide the omelette onto a plate to enjoy.

*NOTE:  If I’m serving omelettes for company, I make three to four, but instead of putting all the cheese and meats into the omelettes, I keep some back for the top. I make the omelettes and then lay them side by side in an ovenproof dish. Then, I sprinkle the remaining cheese and meat on top of the omelettes, sometimes adding thinly sliced tomatoes and spinach leaves on top as well. After I put the dish into the oven at 170 degrees which not only melts the cheese but keeps the omelettes warm until we’re ready to eat.

“Eggs”cellent News: Substituting for Eggs

website eggs three

Eggs.

How in the world could my nine month old son be allergic to eggs, when he’d never eaten one before?  I would never receive an answer to that question, but I would learn how devastating it can be to watch your child stop breathing.

My son developed eczema as a baby, and given our family history of food allergies and intolerances, our pediatrician suggested I have him tested for food allergies.  She said many babies with eczema are allergic to milk, and I’d be better off knowing if he was sooner as opposed to later.

So, we had a blood test done, and the good news was that he was NOT allergic to milk.  The bad news was that he was somehow allergic to eggs and peanuts.  The pediatrician wanted me to bring him into the office so she could test exactly how allergic he was to eggs and peanuts.

On our appointment day, she carefully injected my son with eggs first, and to my horror, my sweet baby boy’s face and throat began to swell as he started to gasp for air.  Being a good doctor, our pediatrician immediately administered an antidote, and both my son and I began to breathe again.  She turned to me and announced, “Anaphylaxis.  He’ll need an epi-pen.  Ready to try the peanuts?”

What I thought:  “Are you insane?”  What I replied:  “Well, since we already know he needs the epi-pen for the eggs, can’t I just work on the assumption that he does for the peanuts as well?”

To my relief, she agreed.

What do eggs do?

So, what are cakes like without eggs?  Dry, dense, and without structure!  Doesn’t sound very appetizing, does it?  Eggs act as both leaveners and emulsifiers, which essentially means they help our baked goods to be light and fluffy.  They increase the amount of air we can incorporate into our batters which increases the volume, tenderness and appearance of the final baked product.  Eggs are also, if you remember our “chemistry” of baking, part of the liquid equation in cakes, which means they keep our cakes moist.

As a general rule, eggs are considered a good food. They’re an excellent source of protein and contain a lot of nutrients the body needs.  Unfortunately, whole eggs also have fat and cholesterol in the yolks which many folks need to avoid for a variety of health reasons.  Other people like my son are allergic to and cannot eat the whites of the egg.

Given what eggs do for baking, many are hesitant to substitute other ingredients for them, but it is quite possible to bake without them and to also bake with just the whites of eggs.

How to substitute egg whites

If you simply want to eat healthier (i.e. without the yolks), the simplest approach is to use egg whites only.  One large whole egg is about ¼ cup of egg whites, so I usually use liquid egg whites and substitute accordingly for the whole eggs.  If you want to separate egg whites from the yolks, usually two egg whites is equivalent to one whole egg.

How to substitute for eggs altogether

If you need to avoid eggs altogether, I recommend four best approaches.  Substituting 1 tablespoon of ground flaxseed mixed with 3 tablespoons of water for every egg in a recipe; adding 1 tsp of baking soda with 1 tablespoon of vinegar (or other acid like lemon juice) to the recipe after you’ve substituted 1/4 cup of pureed fruit or vegetable or yogurt or sour cream per egg as the binder; using 1/4 cup of aquafaba which is the liquid generated when cooking chickpeas; or making or buying an egg replacer.

If you utilize the flaxseed substitution, you should mix the flaxseed and water in a mixing bowl, and let it sit to thicken.  Once it thickens, it looks a bit like beaten eggs and acts like eggs in a baked good.

If you’re making cookies or brownies instead of a cake, where the eggs act mostly as a binder, simply substituting pureed fruit or cooked vegetables in place of the eggs works very well.  My favorites to use are applesauce, bananas, pumpkin, and squash.  About 1/4 cup of pureed fruit or cooked vegetable equals one whole egg. As well, if you don’t have any dairy allergies, yogurt works nicely, especially if it’s a thick yogurt like Greek yogurt.

If, however, you need the baked good to rise, then after substituting a binder for the egg, you need to use the baking soda plus vinegar option to leaven the baked good. If you try the baking soda and vinegar approach, you mix the baking soda with the dry ingredients and add the vinegar (or other acid like lemon juice) at the very end, just as you’re mixing the dry ingredients with the moist.

A third option for replacing eggs is to use aquafaba. You can make your own by cooking dried chickpeas or you can purchase canned chickpeas and use the liquid. You’ll want no salt, no sugar added versions of store-bought chickpeas. 1/4 cup of the liquid equals to one egg. Simply whisk the liquid with a fork until frothy. You can also whip aquafaba like regular eggs into a meringue by adding cream of tartar and whisking in a mixer until white and fluffy.

A fourth way to substitute for eggs is to use the egg replacers you can purchase at the store or to make your own. Egg replacers are simply a version of the baking soda plus vinegar trick. It basically just adds a starch and a gum to a powder leavener and acid (i.e. baking powder, which is baking soda plus cream of tartar). To make your own, you can mix 1/2 tsp of baking powder (which already has the baking soda and acid mixed together in powder form) with 1 tsp of a starch like tapioca or arrowroot or cornstarch and 1/8 tsp of a gum like xanthan or guar. Add 2 tbsp of warm water and whisk. Let it sit and then rewhisk right before adding to your wet ingredients as an egg.  Simply multiply the amounts per number of eggs needed for the recipe.

Eggless Chocolate Cheesecake

Ingredients:

3 pkgs Tofutti Better Than Cream Cheese, at room temperature (or real cream cheese, if you prefer)

1/2 cup unsweetened baking cocoa

6 oz Greek plain dairy free yogurt mixed with 1/2 cup Agave , at room temperature

1/2 cup Agave 

1/4 tsp baking soda

2 tsp gluten free baking powder

1/2 cup cornstarch

1 tbsp raspberry liquor*

2 tsp gluten free vanilla

12 oz Tofutti Better Than Sour Cream, at room temperature (or real sour cream, if you prefer)

Baking Instructions:

1.  Preheat oven to 300 degrees, and prepare a 9 to 10 inch springform pan by securely wrapping aluminum foil around the outside of the pan.  Grease the bottom of the pan, but do not grease the sides of the pan to ensure proper rising of the cheesecake.  (I would use “If You Care” parchment paper, but you can Pam spray the bottom or use butter or oil to grease it.)

2.  In a large mixer, beat cream cheese just until it’s smooth, using a rubber spatula to scrape the sides down when done.

3.  Mix in cocoa and yogurt mixed with Agave, just until it’s blended.

4.  On low speed, very slowly drizzle in Agave.  You want to take your time so the cream cheese mixture can slowly absorb the Agave and retain its creaminess.

5.  Mix the baking soda, baking powder, and cornstarch together and mix into the cream cheese with the raspberry liquor and vanilla just until they’re mixed in.

6.  Add the sour cream and mix just until it’s incorporated.

7.  Pour the cheesecake batter into the prepared pan and bake for 1 1/2 hours.  A knife inserted into the outer edge should come out clean.  The center will still be creamy.  Another test is:  If you gently shake the cheesecake, only the center should slightly jiggle.

8. Turn off the oven and open the door.  Leave the cake in the center of the oven for 2 hours so it can slowly begin to cool.

9.  Remove the cheesecake from the oven, and loosen and remove the sides of the pan.  Put the cheesecake into the refrigerator to cool completely, at least four hours, but overnight is best.

* The raspberry liquor can be left out entirely.  You can also substitute other flavored liquor or 1 tsp of another extract like mint.