Creative Cooking: Free Form Tomato Vegetable Tart

“The season is ending….”

While Autumn brings the delights of apple and pumpkin season, it also means the end of the garden-fresh tomatoes, eggplants and kale, which arguably taste so much better than store-purchased varieties. To take advantage of the last of these veggies, courtesy of my sister-in-law’s and mother-in-law’s gardens, I decided I’d make a vegetable tart to go with the vegan roast I had decided to make for dinner last night.

I forewarn folks that this is not my typical recipe – it is not quick to make. It requires time but I assure you it’s so worth the effort, which is the reason I put aside my usual laziness in favor of making the tart. I also figured out how to do several of the steps at once to make the cooking more efficient, which I’ll include in the instructions.

The key to a good tart is a good crust. When I googled, though, I discovered that recipes seemed to think you needed to use no less than 1 1/2 to 2 cups of butter, eggs, white flour, and a couple of teaspoons of salt, and in some case, also sugar – all of which I didn’t agree. So, the first step was to create a tart dough which I could stand by. That meant reducing and substituting for the butter and salt, omitting eggs, and using gluten free flour. To enhance the flavor of the crust and keep the crust together without as much butter, I opted to pulse in fresh basil leaves which worked beautifully.

The second important ingredient to a good tart is the flavor from the veggies. What I found, though, is that most vegetable tart recipes seem to rely on cheese – a lot of cheese – which does give flavor but camouflages the flavor of the veggies. So, I needed to find ways to enhance the flavors so cheese would not be necessary. This meant roasting the eggplant, caramelizing onions to mix with the kale, and letting the tomatoes rest for a bit with a salt-garlic mixture.

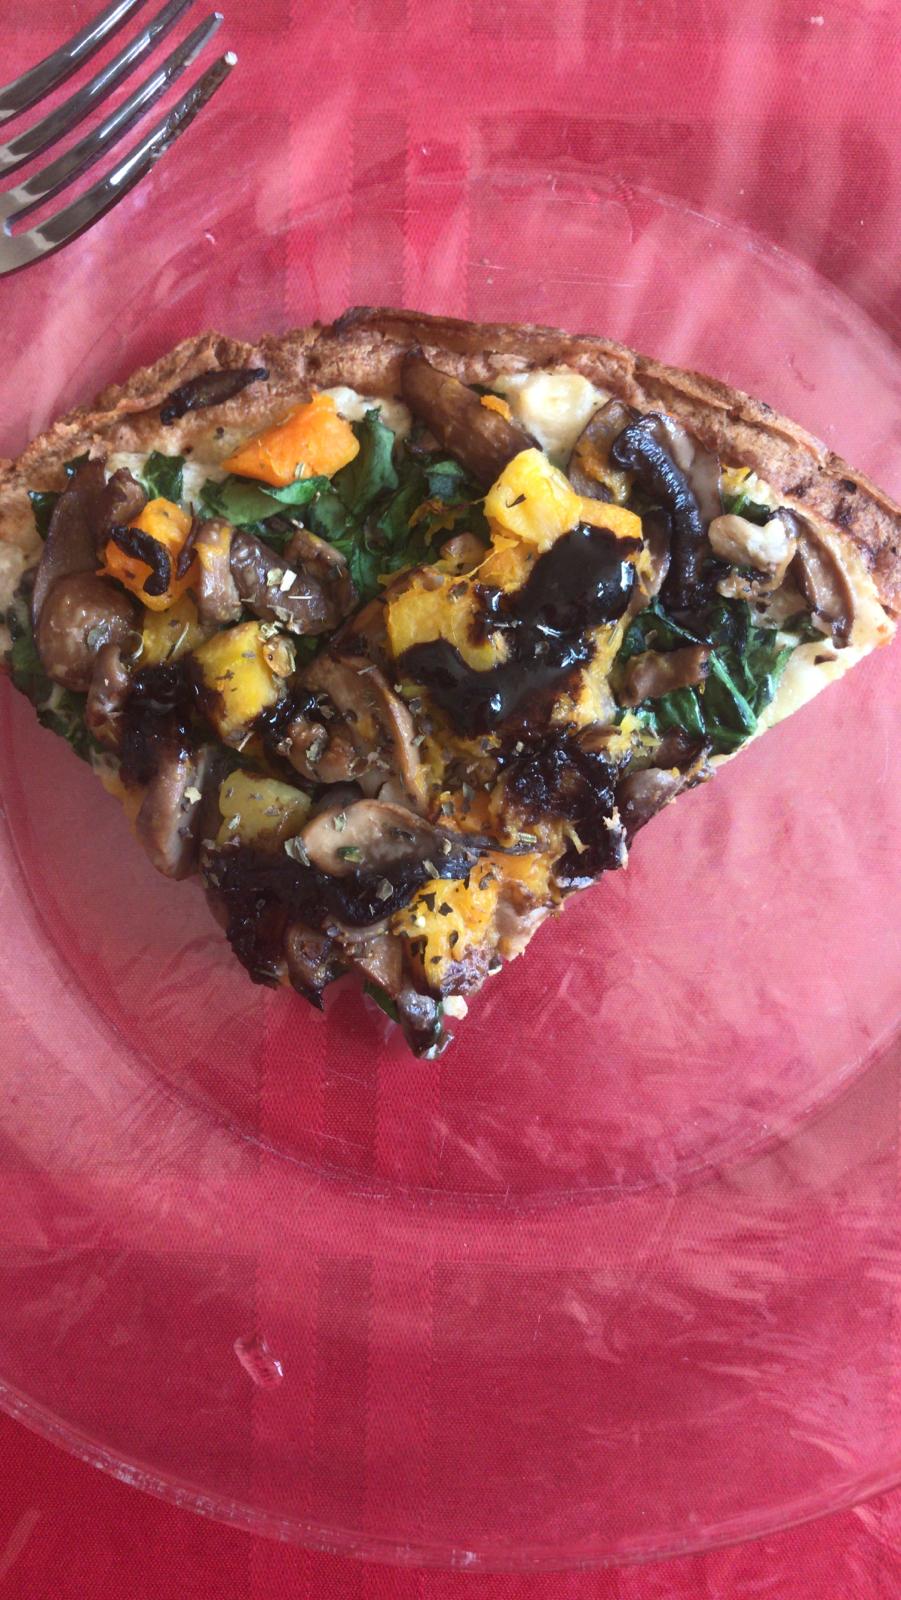
The result was a wonderful tart which we thoroughly enjoyed with dinner and which I hope you will, too. I’m thinking it will become a go-to for holiday celebrations because it was so pretty, flavorful, and vegan.

Free Form Tomato-Vegetable Tart

Ingredients:

two small eggplants (about 4-5 inches long and 2-3 inches wide)

2 cups gluten free flour blend

1 cup packed fresh basil leaves (packed means push the leaves down; if you loosely put them in, it would be 2 cups)

1/2 tsp salt

1 cup soy free vegan butter, cut into small pieces (two 8 tbsp bars)

1 tbsp vinegar (I used apple cider vinegar but balsamic or white are good if you want a different flavor)

1/4 cup water

eight medium tomatoes (about 3 inches by 3 inches; I used two different types for color contrast)

1/2 tsp salt

2 tsp minced garlic

8 oz sliced onions (about two cups; I used sweet white onions)

olive oil

5 oz fresh kale and/or spinach leaves (about 3 cups packed down)

1/4 cup vegan parmesan

1 cup packed fresh basil leaves, sliced into thin slices

Cooking Instructions:

  1. Preheat the oven to 400 degrees and prick the eggplants several times with fork tines to release steam while they are roasting. When the oven is preheated, place the eggplants on a small cookie sheet and roast them for about 40 minutes. When they are done, remove them from the oven and allow them to cool. Do not turn off the oven, because you will be cooking the tart at the same temperature.
  2. While the oven is preheating, put the gluten free flour, the basil leaves and the salt into a food processor. Pulse until they are thoroughly mixed together and the basil leaves are small pieces incorporated into the flour. Add the vegan butter and pulse until small butter pieces are incorporated throughout the flour mixture. Mix the vinegar with the water and pour into the food processor. Pulse until you have a cohesive dough. Use a rubber scraper to remove the dough from the food processor onto a piece of saran wrap. Wrap the dough and shape into a disk. Place into the refrigerator. (If you do not have a food processor, use a pastry knife or two regular knives to chop first the basil and then the butter into the flour, and then mix the liquid into the flour with a fork until a batter forms.)
  3. After putting the eggplant into the oven and the tart dough into the fridge, slice the tomatoes into about 1/4 inch slices and put them into a large bowl. (I used two different colors of tomatoes [four of each] so that they’d look prettier in the tart, but all of the same type works, too.) To the tomatoes in the bowl, add the salt and minced garlic and gently toss to coat all the tomatoes. Then just let the tomatoes sit. While they are sitting, they will release their juices, which is what you want to happen.
  4. After getting the tomatoes ready, put the sliced onions into a shallow, wide cooking pan and mix with just enough olive oil to coat the onions. Turn the burner to low heat and allow the onions to slowly cook for about 20 minutes, stirring just every once and while. When the onions are completely caramelized, they will be a golden brown, soft, and look like they have a sticky sauce on them. When they are done, add the kale and/or spinach leaves and cook for about two minutes, just until the leaves begin to wilt and the onions and kale/spinach are well mixed together. When done, turn off the burner and let them cool.
  5. By now, your eggplants will be done and cooled a bit. Peel off the skins (this is easily done with clean fingers), chop the eggplants into small pieces, and stir the pieces into the onion-kale mixture.
  6. After that is done, drain the liquid from the tomatoes.
  7. Remove the tart dough from the fridge, and on a piece of floured parchment or directly on a cookie sheet, roll the dough into a 16 inch circle. (I used a 16 inch round pizza pan which meant simply rolling the dough out to the edges of the pan with a small roller that fit directly in the pan. If you use the parchment paper, you will need to transfer the dough to a sheet pan large enough to fit the circle of dough.)
  8. Sprinkle the vegan parmesan onto the dough, leaving a one inch margin around the edge of the dough. (The parmesan will help absorb any extra moisture from the vegetables so you do want to include it. If you would rather not for any reason, I suggest using a 1/4 cup of gluten free bread crumbs instead.)
  9. Carefully put the onion-kale-eggplant mixture on top of the sprinkled parmesan, leaving that one inch margin along the edges of the dough. Then, if using two kinds of tomatoes, alternate the tomatoes in circles on top of the onion-kale-eggplant mixture. Make sure the veggies are even all the way around.
  10. Then, using clean fingers and the help of a rubber scraper, gently push up the one inch margin of dough to form an outside crust around the vegetables. Once the crust is formed, sprinkle the sliced basil on top of the tomatoes to the edge of the crust.
  11. In the still preheated 400 degree oven, place the tart and bake for a total of 50 minutes, turning the tart around halfway through the cooking time. When the tart is done, the dough would have puffed a bit, be golden brown, and firm to the touch.
  12. Remove the tart from the oven and allow it to cool for about 10 to 15 minutes before cutting into it, so that all the juices will settle, and it will be easier to cut. Use a very sharp knife or pizza cutter to cut the tart into slices.


Advertisement

Creative Cooking: Orange Chocolate Marble Bundt

“Baking grief….”

Last weekend, our family attended yet another funeral. In five years, we’ve been to over 20, a majority for friends who died too young from cancer. If you’ve been following my blog for any length of time, you can predict what I did with my grief. I went to the kitchen.

Our friend who had died had been a musician, full of fun, and who liked to laugh and keep people on their toes. So, as I thought about his personality, I wanted to create a dessert in his honor, something whimsical. Now, I know that sounds strange – how does one make a food whimsical, but I was determined.

I began by considering types of desserts, and since you all know how lazy I am, a cake was the default choice over cookies or pies or pastries. Also, because I consider Bundt cakes to be pretty and special, that also was an obvious choice.

The question was what type of Bundt cake. I wanted something a bit unusual, and as I thought about foods which were a bit different, those chocolate oranges came to my mind. I would combine an orange flavored batter with a chocolate one to make a marble cake. I wanted it to have a bit more whimsy, though, so I also decided to add mini chocolate chips to the orange batter so half the batter would be orange-chocolate and the other orange-chocolate chip.

Since I knew there’d be so much sugar from the chocolate chips, I used agave and monk fruit sweetener and unsweetened orange juice and unsweetened oat milk to reduce the added sugars in the batter. I also wanted to reduce the fat somewhat so I opted to use mostly egg whites and a lower amount of olive oil than usually called for in a Bundt cake.

The result was a tasty cake which was also pretty, and to my mind, rather whimsical – a good tribute to our friend.

Orange-Pumpkin Marble Cake

Ingredients:

3/4 cup unsweetened oat milk

1/2 cup unsweetened orange juice

2 1/2 cup gluten free flour blend (I used a whole grain blend)

2 tsp baking powder

1/2 tsp baking soda

1/2 tsp salt

1 tbsp dried orange peel

1/2 cup extra light olive oil

1/2 cup agave

1/2 cup classic monk fruit sweetener

1/2 cup liquid egg whites

1 large egg

1/2 cup Enjoy Life mini chocolate chips

second 1/2 cup of mini chocolate chips

Baking Instructions:

  1. Preheat the oven to 350 degrees. Grease the Bundt pan. I used vegan soy free butter and then sprinkled ground flax seed to coat the pan.
  2. Combine the oat milk with the orange juice and let it sit to thicken.
  3. Mix together the flour, baking powder, baking soda, salt, and orange peel, and set aside.
  4. To the oat milk mixture, add the oil, agave, monk fruit sweetener, egg whites and egg. Mix well.
  5. Divide the batter so that 60% is in one bowl and 40% is in a second bowl.
  6. In the microwave, melt the mini chocolate chips by microwaving for 20 seconds, stirring, and then microwaving for an additional 10 seconds so that you can completely stir the chips to a smooth consistency. Let it cool for a minute.
  7. Add a spoonful of the 40% batter to the melted chocolate and stir well. Add a second spoonful and stir well. Then add all of the chocolate mixture to the 40% batter bowl and mix until well combined.
  8. To the remaining 60% of the orange batter, add the second 1/2 cup of mini chips and stir until combined.
  9. To make the Bundt cake, drop alternating spoonfuls of the two batters in a layer. Then continue to layer the batter with alternate spoonfuls of the batter which are opposite to the layer below. When all the batter has been used, gently tap the pan on the counter so the layers can settle.
  10. Bake in the preheated oven for 40 to 45 minutes until the cake has puffed, is golden, and a toothpick inserted into it comes out clean.
  11. Remove the pan to a cooling rack and allow the cake to cool a minimum of 25 minutes, but longer is better. Then remove the cake from the pan to a wire cooling rack to cool completely.
  12. You can enjoy the cake as is or if you want to make it a bit more special, drizzle melted chocolate over the top and sprinkle with finely chopped bits of candied orange peel and chocolate.


Creative Cooking: Vegan Chocolate Chip Muffins

“Yes, a pick me up….”

When I was a younger mom with younger children, no one told me that I should consider those the “easier” years of being a mom. Perpetually exhausted from lack of sleep, newly learning how to be a parent, mentally and emotionally perplexed by each new developmental-stage challenge, it can seem like those parenting years are the most difficult.

Today, as an older mom of both grown and teenage children, I sometimes yearn for those- what I know now to be – “easier” days of parenting. Back then, there were challenges but most everything was within our control as parents. We could enforce bed times, make rules for behavior, put the children in car seats and strollers to keep them safe, and find a myriad of books which told us how to toilet train, get them to sleep in their own beds, and encourage their emotional abilities to interact with the world around them.

With older children, the challenges are much more challenging and mostly out of our control to fix, the children are not bound by anything we say or offer, and the few books which are out there agree that all we can do is be there for our children and hope and pray for the best.

So, some days, I just need a little pick-me-up, a treat, to keep me going in the middle of a long day of driving between colleges and home or helping with a problem long-distance by phone. If you’ve followed my blog for a while, you already know that I fully believe in comfort eating now and then. Obviously, you don’t want to overindulge all the time in too many “not as good for you” foods, nor do you want to use food as a way of dealing with your problems, because it doesn’t work. At the same time, a well-timed small treat once in a while when you’re in need of something to give you a bit of energy – physically, mentally, and emotionally – is not necessarily a bad thing.

Hence, this week’s post on vegan, gluten free chocolate chip muffins. They hit the spot, as they say. I like to make them as mini muffins because just one mini muffin usually does the trick for me, but the children prefer them regular size because otherwise they’d be likely to eat three or four of the little ones.

Vegan Chocolate Chip Muffins

Ingredients

1 cup unsweetened vegan/plant based milk (we use soy or flax or oat)

1 tbsp vinegar (choose white, apple cider, or raspberry)

2 cups your favorite gluten free flour blend (I like King Arthur’s whole grain blend)

2 1/2 tsp baking powder

1/2 tsp baking soda

2 tsp ground cinnamon

1/2 tsp nutmeg

1/2 tsp salt

1 cup Enjoy Life mini chocolate chips

1/2 cup coconut sugar or monk fruit golden sweetener

6 tbsp plant oil (we use safflower or avocado or extra light olive oil)

2 tsp gluten free vanilla extract

Baking Instructions:
    1. Preheat the oven to 350 degrees. Line a 12 regular-sized muffin tin or 24 mini-muffin tin with appropriately sized cupcake liners or grease the tins with your preferred method, and set aside.
    2. Mix together the “milk” and vinegar to make a “buttermilk”. Allow it to thicken.
    3. Combine together the flour, baking powder, baking soda, cinnamon, nutmeg, salt and chocolate chips.
    4. Add to the “buttermilk”, the coconut sugar, oil, and vanilla extract.
    5. Add the dry ingredients to the wet and mix until all dry ingredients are moistened.
    6. Evenly divide the batter among the muffin tins of choice.
    7. Bake in the preheated oven until puffed, golden and a toothpick inserted in the center comes out clean. Larger muffins will take about 20-25 minutes. Mini muffins will take 10-15 minutes.
    8. Let the muffins cool in the tins for 5 minutes; then remove them to a wire cooling rack to cool completely.

Healthy Habits: Pumpkin Oat Bundt Cake

“Have you ever tried….?”

I am continually amazed by just how many items there are on the market these days for folks trying to eat healthier and/or allergy friendly. Just a decade ago, I was driving distances to little, out of the way, specialty stores to try to find this or that. Now, I walk into the grocery store, ten minutes down the road, and every week, something new is on the shelf.

Recently, a friend asked me if I had ever tried monk fruit sweeteners since she knew I didn’t bake with sugar. Since I had not actually tried it, I thought I’d research it and give it a try.

Some things for you to know about monk fruit sweeteners:

  1. Research seems to indicate that monk fruit as a fruit does not increase blood sugar levels in diabetics, but always check the sweetener blends to make sure there are not other added sugars which may increase blood sugar levels.
  2. As a substitute for sugar, monk fruit and monk fruit sweetener blends are more expensive than even other substitutes on the market (like agave or coconut sugar or truvia). So, if finances are tight, it may not be your first option.
  3. Also, as a substitute, monk fruit sugar blends are not as easy to find in your local supermarkets as other options. I could only find it at one grocery store a couple of towns over.
  4. Monk fruit sweeteners can have a bit of an after taste, which some folks may like but some really don’t.
  5. Monk fruit sweeteners come in “classic” and “golden”. Classic is supposed to be similar to white sugar. Golden mimics brown sugar.
  6. The monk fruit sweetener packages say, “1 to 1,” for use. I would strongly discourage folks from doing so. It is really, really sweet. In the recipes I tried, using half or less worked just fine.
  7. I also discovered that, despite instructions, the monk fruit sweetener blend tended to work better in baked goods if you mixed them with the wet ingredients instead of the dry. The monk fruit sweetener mixed with the dry ingredients in brownies rose to the top during cooking, mottling the appearance and affecting the brownie texture. Dissolving the sweetener with the wet ingredients, however, alleviated both issues.

In the midst of my experiments with the monk fruit sweeteners, I needed to make a cake for a friend with diabetes who also needs to add more fiber into his diet. I decided to create an oat-filled pumpkin bundt cake, using the monk fruit sweetener. The result was a moist, tasty cake.

Pumpkin Oat Bundt Cake

Ingredients:

For the pan and streusel:

vegan soy free butter

1/4 cup ground flax seed

1/4 cup quick cooking gluten free rolled oats

1 tsp cinnamon

1 tsp nutmeg

1 tsp golden monk fruit sweetener

1/4 cup quick cooking gluten free rolled oats

1/2 tsp cinnamon

1/2 tsp monk fruit sweetener

1 tbsp melted vegan soy free butter

For the batter:

2 cups cooked, pureed pumpkin

1 tbsp minced ginger/ginger paste

1 cup extra light olive oil

1 cup golden monk fruit sweetener

3/4 liquid egg whites

2 cups gluten free high fiber/high protein flour blend (I used Bob’s garbanzo bean blend)

1 cup gluten free brown rice flour blend

2 1/2 tsp baking soda

2 tsp cinnamon

1 tsp nutmeg

1/2 tsp ground ginger

1/4 tsp cloves

2 tbsp vinegar

Baking Instructions:

  1. Preheat the oven to 350 degrees.
  2. Prepare a bundt pan by greasing it with vegan soy free butter.
  3. Then, mix the ground flax seed, oats, cinnamon, nutmeg and monk fruit sweetener. Carefully coat the inside of the bundt pan with the mixture. At least a quarter of the mixture should be left over when you are done.
  4. To the leftover mixture add the additional oats, cinnamon, and monk fruit sweetener. Combine and then mix in the melted butter. Mix until all dry ingredients are moistened. Set aside.
  5. Combine together the pumpkin, ginger, oil oil, monk fruit sweetener, and egg whites. Set aside.
  6. Mix together the garbanzo bean flour blend, the brown rice flour blend, baking soda, cinnamon, nutmeg, ginger, and cloves.
  7. Add the dry ingredients to the wet and mix well, adding the vinegar.
  8. Carefully spoon about 1/3 of the batter into the bundt pan.
  9. Sprinkle the oat mixture over the batter.
  10. Then, carefully spoon the remaining 2/3 of the batter over the oat mixture.
  11. Bake in the preheated oven for 30 to 35 minutes until the cake is puffed, golden, and a toothpick inserted into it comes out clean.
  12. Allow the cake to cool in the pan for at a minimum of 15 to 25 minutes.
  13. Remove the cake from the pan and allow it to cool completely on a wire rack.
  14. Enjoy!

Healthy Habits: Baked Pears

“He has to be careful about his levels….”

Every summer, we head to the Adirondack mountains to work at the family forest my husband’s family has run for over 60 years. Since I am allergic to everything God has created in nature, I act as the chief cook as opposed to wandering around in the woods, measuring and counting trees. As the chef, I am often cooking meals for anywhere between eight to 20 people for any given meal. This means often taking into account not just my own food allergies but other people’s food restrictions as well.

This year, I needed to be careful about foods which would spike glucose levels for diabetics, so I was trying to avoid making a lot of cakes and cookies, and I opted instead for fruit desserts like a blueberry cobbler which I made with oat biscuits which used no sugar for either the blueberries or the biscuits.

This morning, however, I needed a dessert for a brunch and wanted something healthy but not necessarily a lot of work. At the store, I noticed that they had ripe Bartlett pears on sale, so I purchased those and set about making something for the brunch. As I googled, I noticed that the most common pear dessert is to poach them, but that required watching them on the stove and thickening syrups and such, all of which was too much work.

So, I decided that I’d simply bake them with a little bit of cinnamon and honey and whole rolled oats.  The result was a nice, light dessert, which was perfect for the brunch and well received. One person said that she didn’t usually like pears but liked the dessert. So, I call that a success.

Baked Pears

Ingredients:

8 ripe Bartlett pears

2 tbsp honey

2 tbsp hot water

1/2 tsp cinnamon

1/2 tsp nutmeg

1/2 tsp very finely chopped ginger, almost like a paste

1/2 cup gluten free whole rolled oats

1/2 tsp cinnamon

1/4 tsp cloves

1 tbsp vegan soy free butter, melted

Baking Instructions:

  1. Preheat the oven to 350 degrees.
  2. Cut pears in half, remove stems by pulling them down the middle to remove the hard core, and then core out the center seeds. (I just use a small spoon.)
  3. Lay the pears in one or two pans, which are large enough to hold them.
  4. Mix together the honey, hot water, cinnamon, nutmeg and ginger until well blended. Drizzle over the pears.
  5. Combine the oats with the cinnamon, cloves and melted vegan butter. Spoon them evenly into the holes left by coring out the seeds.
  6. Bake in the preheated oven for 15 to 30 minutes (will depend on the ripeness of your pears) until the pears are golden and warm.
  7. You can eat them as is or serve them with ice cream or whipped cream.

Healthy Habits: Oatmeal Chocolate, Chocolate Chip Cookies

“It’s been soooo long….”

If you were to peruse the recipes on this site, you would notice that the cake recipes far outnumber cookie recipes. There are several reasons for that. The first is that cookies require so much more time than cakes. When one is pressed for time to make a dessert, cookies are not the most efficient to make.

The second is that “healthy” cookies are trickier to make. Adding fruits and vegetables to cakes is easy. Using them in cookies usually just means a really soft cookie which won’t keep for more than a couple of days. Swapping whole grain flours adds some protein and fiber but if you want a cookie which isn’t dry and crumbly, you still need a substantial amount of fat because cookies don’t usually require much in the way of liquid ingredients, which precludes using liquid plant oils, which affects the taste and texture of cookies anyway. And while there are many options on the market to substitute for the sugar, the fact is that they do affect the texture and taste of cookies.

The third is that I find that folks have a way of eating a whole lot of cookies in a sitting because their size and lack of filling makes eating many easy to do. This, of course, is not healthy eating, so it is easier to make cakes and control the portions.

This week, however, my son asked if I would make cookies. As he reminded me, I haven’t made any since Christmas which is when I usually spend weeks making many different type of holiday cookies for the season.

I wanted to make a cookie which I would feel good about my son eating, and of course, I also wanted it to taste good, because it’s not worth eating something that doesn’t, in my opinion. And I wanted it to be a cookie where one would fill him and not make him want a second or third or more in one sitting.

After some thinking I decided that I’d make an oatmeal cookie because oats have protein, fiber, antioxidants, vitamins and minerals. I also decided I’d make them with chocolate chips so I could use the sugar from the chips as opposed to adding sugar, and I would use dark chocolate chips because dark chocolate chips would have less sugar and more beneficial flavonoids. I also opted to make them vegan so that I could make them in the future for the vegan side of the family. Finally I added some chopped non-crystalized, candied ginger for a special flavor.

The cookies came out great and fit all my parameters. They had healthy oats, less sugar, a great taste, and eating just one was satisfying.

Oatmeal Chocolate, Chocolate Chip Cookies

Ingredients:

1 cup gluten free whole rolled oats, processed into oat flour

1 1/2 cup gluten free whole rolled oats, as is

1 1/2 cup whole grain gluten free flour blend

2 tsp cinnamon

1 tsp nutmeg

1 tsp baking soda

1 tsp baking powder

1 cup dark chocolate chips (I used Enjoy Life’s 69% dark chocolate chips)

2 to 4 tbsp non-crystalized, candied ginger (use less if you just want a hint; more if you want a more pronounced ginger taste)

1 cup dark chocolate chips (I used Enjoy Life’s 69% dark chocolate chips)

3/4 cup vegan, soy free butter

1/4 cup applesauce

1/4 cup honey

Baking Instructions:

  1. You will wait to preheat the oven because the dough needs to be refrigerated first.
  2. In a food processor, process the one cup of oats until you have something resembling flour. To the oat “flour” add the whole rolled oats, gluten free flour, cinnamon, nutmeg, baking soda and baking powder. Set aside.
  3. In a food processor, process the one cup of dark chocolate chips with the candied ginger until you have small, fine pieces. Add it to the dry ingredients and mix well.
  4. Stir in the remaining one cup of dark chocolate chips.
  5. In a mixer, cream the vegan butter. Add the applesauce and honey and mix well, scraping down the sides as needed.
  6. Add the dry ingredients to the wet and mix until the dough is well blended.
  7. Cover the bowl and put the dough into the fridge for at least one hour and no more than 24.
  8. When ready to bake the cookies, preheat the oven to 350 degrees and cover cookies sheets with parchment paper.
  9. Using a quarter cup scoop, place level, quarter cup portions of the dough onto the cookies sheets with space in between to spread. Use a fork to crisscross the dough into a slightly flatter circle.
  10. Bake for 20 to 22 minutes, rotating the pan halfway through, until the cookies are browned, larger, and slightly stiff to the touch.
  11. Put the cookie sheet on a wire rack to cool for a couple of minutes. Remove the cookies to the wire cooling rack and allow them to cool completely.
  12. They can be stored in an airtight container for several days.

NOTE: These are large cookies because I always keep in mind that summer is a good time to make ice cream cookie sandwiches. *grin*  You can halve the size by using 2 level tablespoons instead and reducing the cooking time.


Healthy Habits: Make Your Own Pizzas

Crusts from cauliflower?

I don’t know how many folks have eaten artichokes, but growing up in Korea and Japan, artichokes were not a food I had known even existed until my in-laws served it to me when I was dating my husband. The idea of using one’s teeth to scrape off tiny bits from the leaves and working your way down to the small “heart” in the center was strange to me. But then, to my husband, being served sauteed octopus for dinner by his future in-laws was a bit disturbing, to say the least.

Because we grow up in different parts of the world where certain foods are prevalent or because our family ethnicity favors specific types of food, often the variety of foods we choose to eat are limited. In this day and age, though, where food is shipped from everywhere and where companies are creating almost anything they can imagine, we can expand our food options in ways we could not before.

For folks with food allergies, this is a great thing, and an item I have come to appreciate recently is the cauliflower crust for pizzas. In the beginning, most contained cheese which was sad for someone with dairy allergies, but now companies are making them without the cheese, so folks who have gluten, dairy, and nut allergies are able to partake.

This has opened up wonderful possibilities for homemade pizza making. While companies are making gluten free pizza crusts, most of them are made with rice flour which has no nutritional value. The cauliflower crusts offer some value, and they are tasty if you prefer a thinner, crispier crust for your pizzas. By making pizza homemade, you control how healthy the pizza is. You can eliminate items like sugar (which is often in the sauces), reduce sodium and fat (which are often in the toppings), and increase the nutrients by adding vegetables other than just peppers and broccoli (which are the usual offerings from delivery places).

Here are some ideas if you want to make homemade pizzas:

The Crust:

  1. You can buy both regular and gluten free pizza crust in box versions where you add the necessary ingredients and make the crust yourself.
  2. You can go to the cold section of your grocery store and by pre-made regular and gluten free pizza dough which you just spread onto your pan.
  3. You can purchase already made, formed, partially cooked regular and gluten free pizza crusts. These usually are in the pasta-sauce-pizza sections of the grocery store and come wrapped in plastic. You just open the package and put the crust on your pan.
  4. You can find frozen regular and gluten free crusts in the freezer section of your grocery store. This is where I get the cauliflower crusts which I prefer to use.

Sauces:

  1. Traditionally folks use a pizza sauce made from tomatoes. You can find many on the market. Choose ones which have no sugar and are made with olive oil. You don’t necessarily need to use “pizza” sauce, though. You can use a marinara or spaghetti sauce which you like as well. I like Victoria’s brand which is made just with tomatoes, garlic, onions, olive oil, and herbs. You just spread the amount you prefer on the crust. You can also make your own by cooking down tomatoes with herbs until the sauce is nice and thick.
  2. If you prefer a white sauce, you can make your own in a couple of different ways: One is to heat over medium/low heat a tbsp of olive oil in a pan with garlic, onion and your favorite dried herbs. Then add two tbsp of a gluten free flour like oat or sorghum flour to the oil and stir until completely mixed. Add one cup of a favorite dairy free milk like oat or flax milk and cook, stirring frequently, until the mixture has thickened.  Add fresh, chopped herbs of your choosing and spread it over the pizza crust. A second way is to cook over medium/low heat a cup of coconut cream in a pan with garlic, onions and dried herbs of your choosing, simmering until the cream thickens, and then adding a couple of tsp of nutritional yeast and fresh, chopped herbs before spreading it over your crust.
  3. If you prefer a non-saucy alternative for your pizza, you can simply slice ripe tomatoes, drain the juice in a colander, and then layer the tomato slices over the pizza crust. As well, if you have no nut allergies, you can consider putting a cashew nut cheese spread over the crust.

Topping Ideas:

  1. One type of pizza we like is to saute mushrooms, spinach, and butternut squash, diced into small pieces, with garlic, onions and herbs spread them onto the pizza.
  2. Another option is to saute diced zucchini with garlic, onions, and herbs, and mix it with diced pieces of a favorite turkey or vegan sausage and sprinkling them onto the pizza.
  3. A third way we like to eat our pizza is to saute broccoli, cut into small pieces, with garlic, onions and herbs, and mix it with small, leftover pieces of cooked chicken and spreading that onto the pizza.
  4. A fourth suggestion is simply using whatever vegetables and meats you have in the fridge and coming up with your own combinations.

For the “Cheese”:

  1. If you don’t have a dairy allergy, then using any combinations of mozzarella, ricotta, parmesan, or romano cheeses works.
  2. For folks with dairy allergies, one option is to use dairy free cheeses like Daiya mozzarella. I find that flavoring the vegan cheeses with garlic, herbs and onions goes a long way to intensifying the taste, and I will add a tsp of olive oil and a couple of tsp of nutritional yeast to help the cheese melt better.
  3. Another option is to just dust the toppings with a vegan parmesan like Follow Your Heart parmesan.
  4. If you don’t want “cheese” altogether, you can drizzle the toppings with a glaze like a balsamic vinegar reduction where you simmer 1/4 to 1/2 cup of balsamic vinegar until its reduced and thickened.
  5. You can also simply cover the toppings with freshly chopped herbs like basil or mint.

Cooking:

  1. For the best results you should always cook pizzas at a high heat. I use 500 degrees, but if you’re not comfortable with that, don’t go lower than 425.
  2. If you are using any type of pizza dough, you should oil the pan and sprinkle it with cornmeal or flour so it won’t stick. You should also cook the dough just as it is first until it’s almost done.  At 500 degrees, that’s just five to ten minutes. Then you add the sauce, toppings, and cheese and finish cooking the dough for another five minutes until the cheese is melted or the toppings are heated through.
  3. If you are using a pre-made crust, whether from the aisle or frozen section, you add the sauce, toppings, and “cheese” options and then cook the pizza for about ten minutes (if cooking at 500 degrees). Pre-made crusts usually don’t need you to do anything to the pan like oiling because they’re already mostly cooked and won’t stick.

Recipe Revamping: Coffee Cake Muffins

“Be prepared….”

Being of a certain age and generation, I always had a bag in the car which contained a blanket, a flashlight with extra batteries, water, and extra socks, and I had been taught by my dad how to change a flat tire. Now, with the prevalence of cell phones, folks believe they are just a phone call away from help. That is, until we read the news story like the one about the couple who broke down in the middle of a snowstorm with stalled cell coverage and died from exposure.

So, being a bit OCD, I tend to err on the side of preparation rather than not, when I am travelling, and I acted no differently when I recently attended a college reunion. My husband chuckled at one of my bags. It was a large bag of allergy friendly snack items, filled completely to the top. “You do know they’re feeding you, right?” he said.

“Yes,” but I don’t know if I will be able to eat any of it,” I replied.

As it turned out, I was able to eat, but as expected, my choices were limited. One buffet of a dozen items had three side dishes which I could eat but no main entree, and at another meal, even the salad had cheese, nuts and croutons already on it, though this time I had a nicely grilled piece of chicken to make up for the missing entree the night before.

Though I didn’t need all that I had packed to eat, my daughter and I did gratefully dig into the dairy, nut, and wheat free package of double chocolate cookies I had thought to throw into the bag and which called to us after we spent two meals watching others eat decadent desserts which would kill us.

So, when I had to attend a brunch this past week, I thought it best to go ahead and bring something to contribute to the food options. I wanted to make muffins because they’d go with anything else that was offered but I wanted something “breakfasty”. In my search I discovered coffee cake muffins, but of course, the recipes were not allergy friendly and had more butter and sugar than I cared to use.

The original recipe for just a dozen muffins called for 1 1/2 cup all purpose flour, 1/2 cup brown sugar, 1/4 cup white sugar, 2 tsp baking powder, 1 tsp cinnamon, 1/4 tsp baking soda, 1/2 tsp salt, 3/4 cup milk, 1/3 cup melted butter, and 2 eggs for the batter. Then it called for 1/3 cup white sugar, 1/3 cup brown sugar, 1 tsp cinnamon, 1/2 tsp salt, 1/2 cup butter, and 1 1/2 cup all purpose flour for the streusel, as well as 1/4 cup powdered sugar with 1/2 tsp vanilla and 1 tsp of milk for a drizzle.

The first thing I decided was that all that sugar and butter had to be dealt with. I switched the melted butter in the batter to extra light olive oil, and I decided to omit sugar altogether from the batter. For the milk, I used a gluten free oat milk, and for the flour, I chose a whole grain gluten free blend. I omitted the salt and added nutmeg to complement the cinnamon. For the streusel, I reduced the sweetener to 1/2 cup and used coconut sugar instead, and I cut the butter to 1/4 cup, using a vegan soy free butter in its place. I omitted the salt from the streusel, too, adding in nutmeg to the streusel as well, and I used a gluten free oat flour for the flour to add protein and fiber, reducing the amount to 1 cup. The drizzle, I omitted altogether.

Since I have no issues with eggs, I didn’t make any substitutions but folks can always use all egg whites or flaxseed mixed with water or aquafaba or egg replacer, if need be. Also, because I switched to gluten free flour, I increased the baking soda by 1/4 tsp to help the batter rise.

Because I knew the batter wouldn’t be sweet, I poured half the batter into the muffin tins and layered a streusel topping in the middle of the muffin as well as on top. The result was a tasty, healthier version, which the folks at the brunch enjoyed as much as my family.

Coffee Cake Muffins

Ingredients:

Batter:

1 1/2 cups whole grain gluten free flour blend of choice

1 tsp cinnamon

1 tsp nutmeg

1 tsp baking powder

1/2 tsp baking soda

3/4 cup favorite plant based milk (I used a gluten free oat milk)

1/3 cup extra light olive oil

2 eggs

Streusel:

1/2 cup coconut sugar

1 cup gluten free oat flour

1 tsp cinnamon

1 tsp nutmeg

1/4 cup vegan soy free butter

Baking Instructions:

  1. Preheat the oven to 375 degrees and line a muffin tin with 12 cupcake liners.
  2. Mix together the flour, cinnamon, nutmeg, baking powder and baking soda for the batter. Set aside.
  3. Whisk together the “milk”, oil, and eggs. Add to the dry ingredients and blend well until smooth. Let it sit while you make the streusel.
  4. Mix together the coconut sugar, oat flour, cinnamon and nutmeg. Using clean hands, mix in the vegan butter until you have large crumbs and no leftover dry ingredients.
  5. Divide half the batter among the 12 muffin cups. Sprinkle the batter with half of the streusel topping.
  6. Top off the muffin cups with the rest of the batter, and sprinkle the remaining streusel topping on all the muffins.
  7. Bake in the preheated oven for 15 minutes. The muffins will have puffed, be golden and a toothpick inserted in the center will come out clean.
  8. Let the muffins cool for at least a few moments before digging in.


Healthy Habits: Easy Allergy Friendly Company Meal

Help….

This past weekend, my family traveled to New Jersey to celebrate my niece’s First Communion. The reception afterwards was at a beautiful, well-reputed restaurant where my brother had rented a room, complete with a buffet of assorted options from seafood, beef, and chicken to pasta and rice to salads and roasted vegetables. Of the ten items to choose from, I could eat three. The rest were all cooked in butter.

Fortunately, my brother had arranged for a special plate to be made for me, but it can be sad to be the odd person out, watching folks enjoy food you can’t have. This experience was fresh in my mind when a friend called to ask if there was something quick and easy she could make that would also be a “nice, company meal” because she was hosting a dinner where one person had severe food allergies. No wheat, eggs, dairy, nut, soy, or citrus foods could be served.

I applauded her desire to make something which everyone could eat and immediately thought of one of my go-to meals, chicken and vegetables. This may seem like a ho-hum meal to serve company, but if you roast whole carrots with sliced zucchini and bake tender, seasoned chicken breasts and serve both with a beet sauce, the experience becomes more than ho-hum, and if you look at the pictures, the food looks pretty, too, which enhances the appetite.

What’s even better, is that the entire meal takes only about 45 minutes from beginning to end to make, which gives you plenty of time to hang with your guests. While the veggies roast, you work on the chicken, and while the chicken cooks, you work on the sauce.

Company Baked Chicken Breasts and Roasted Vegetables

Ingredients:

2 lb bag of whole carrots, peeled (normal size, not crazy, huge ones)

Zucchini, sliced lengthwise into quarters, about size to eight medium-sized ones

6 chicken breasts, 4 ounces each (palm size portion, not crazy, hormone-induced size)

olive oil

onion powder

garlic powder

oregano

thyme

tarragon

red pepper flakes

black pepper

1 1/2 cups cooked beets (I buy precooked, ready to go ones in the vegetable section)

1 cup unsalted, no sugar chicken bone broth (I find this at my local grocery store)

1 tsp minced garlic

2 tbsp chopped onion

1/4 tsp ground cumin

1/4 tsp ground ginger

Cooking Instructions:

  1. Preheat the oven to 500 degrees.
  2. Lightly coat the carrots with olive oil and place into a large oven proof pan which will hold the carrots in a single layer with space left for the zucchini to be added.
  3. Roast for 10-15 minutes, depending on the thickness of the carrots.
  4. Remove the pan, stir the carrots, lightly coat the zucchini quarters in olive oil, and add them to the pan.
  5. Roast for 5 minutes, remove the pan and stir, adding onion powder, garlic powder, oregano, thyme, tarragon, red pepper flakes and black pepper – all to your liking.
  6. Roast for another 5 minutes and arrange the vegetables on an oven safe, serving platter, and set aside. Turn the heat down to 450 degrees.
  7. While the vegetables are roasting in the oven, line a 9 x 13 pan with parchment paper and lightly brush olive oil on both sides of the chicken breasts. Sprinkle both sides of the chicken breasts with the onion powder, garlic powder, oregano, thyme, tarragon, red pepper flakes and black pepper – to your taste and liking.
  8. Cover the chicken breasts with another piece of parchment paper, tucking the ends in around the chicken into the pan.
  9. Bake the chicken for 15 minutes.
  10. Remove the chicken from the oven and let it sit, exactly as it is with the parchment covering it, and turn down the heat to 300 degrees. Let the chicken sit for 10 minutes to reabsorb its juices.
  11. Put the veggies which have been transferred to an oven safe serving platter into the oven to finish cooking while the chicken sits for the 10 minutes.
  12. While the chicken breasts are resting and the veggies are finishing, put the cooked beets into a blender with the bone broth, garlic, onions, cumin and ginger, and puree until completely smooth.
  13. Pour the sauce into a microwave safe, serving pitcher, and microwave for a minute at a time until the sauce is warm.
  14. After the 10 minute resting time, remove the parchment paper from the chicken, remove the veggie platter from the oven, and serve both with the warmed beet sauce.


Healthy Habits: Broccoli Muffins

“He won’t eat vegetables….”

A friend with a young son who is a picky eater reached out to me a few weeks ago. I was in the midst of the busiest time of my drama season but I wanted to help her anyway. Her son’s pediatrician had said she needed to get more green vegetables into his diet, but he refused to eat vegetables. Since he has had food allergies for most of his young life, he has adapted to being picky about what he eats.

As I mentioned, I was in a rather busy time of life so trying to figure out a recipe he would eat was not high on my ideal list of using my time, so I decided that I’d consider a muffin recipe to make. One, muffins are quick and easy. Two, we could eat them with most anything as I was experimenting. Three, children like muffins, and adults can hide most anything in a muffin.

In the end I worked out a savory broccoli muffin which my family really liked and which my friend’s son ended up liking, too. He apparently never even realized it had broccoli in it! So, I share it here for you to try for yourself.

Broccoli Muffins

Ingredients:

2 cups whole grain gluten free flour blend

2 1/2 tsp baking powder

1 tsp dried oregano

1/2 tsp dried basil

1/4 tsp black pepper

1/4 tsp ground onion powder

1/4 tsp ground thyme powder

1 cup chopped broccoli florets

2 slices vegan cheese (I used Chao cheddar)

1 cup liquid egg whites

1 cup unsweetened oat milk

1/2 cup extra light olive oil

Baking Instructions:

  1. Preheat the oven to 350 degrees. Line a muffin tin with 12 cupcake liners.
  2. Combine the flour, baking powder, oregano, basil, pepper, ground onion, and ground thyme, and set aside.
  3. In a food processor, pulse the broccoli florets with the vegan cheese slices into you have well blended small pieces.
  4. Mix the broccoli and cheese mixture into the dry ingredients.
  5. Add to the dry ingredients the egg whites, oat milk, and olive oil, and mix quickly, just until the dry ingredients are incorporated into the wet and well blended.
  6. Divide the batter among the muffin tins and bake for 15 to 20 minutes until puffed, golden, and a toothpick inserted in the center comes out clean.


Cake Mix Revamping: Citrus Ginger Chip Cupcakes

“I knew you had food allergies….”

A very kind woman whom I had only recently met brought me a hostess gift which was a basket of Bob’s Red Mill gluten free cake mixes. It was lovely of her to be considerate of my allergies, and I appreciated her thoughtfulness.

Now for true confessions: I hold a prejudice against a majority of cake mixes. They have too much sugar, use the the worst type of flour with no protein or fiber, and usually are not very tasty, in my opinion. I will admit that some of that is changing. I have seen whole grain cake mixes on the market, as well as mixes claiming to have less sugar. I will also concede that using a cake mix when you are rushed for time will shave off five to ten minutes of prep time, and the convenience of that can be worthwhile to folks.

I decided to make the best of the situation, because as strong as my prejudice is, stronger still are my feelings about wasting anything. My family will tell you that I will turn leftovers into new meal after meal until every morsel is gone, rather than throw food out.

So, I assessed the Bob’s Red Mill Vanilla Yellow Cake mix to see what I could do. I could not change the sugar content or the lack of fiber and protein, but I could make sure not to add any more sugars than needed. I decided, therefore, to make cupcakes with no frosting, but I would need to jazz up the flavor if there was not going to be frosting. To do so, I zooped uncrystallized candied ginger with Enjoy Life chocolate chunks and mixed that in with the cake mix, along with some orange zest. While the candied ginger and chocolate chunks still had sugar, it would be much less than using frosting.

Once I figured out the flavors, I needed to think about the ingredients I needed to add to the mix. The recipe called for 3 eggs. I opted to use 1/2 cup of egg whites with one whole egg. It also called for melted butter or vegetable oil. I chose to substitute extra light olive oil.

When the cupcakes were done and cooled, I have to say I was not unduly upset with the result. It was still a cake mix batter with too much sugar and no protein or fiber, but it was tastier, and I had added a good fat and reduced some of the bad fat and calories. Also, as my husband is quick to point out, indulging in something not as good for you every once in a while usually will not hurt you.

Citrus Ginger Chip Cupcakes

Ingredients:

1/2 cup uncrystallized candied ginger

1 cup Enjoy Life chocolate chunks

Bob’s Red Mill Gluten Free Vanilla Yellow Cake mix

2 tsp dried grated orange peel

1/2 cup egg whites

1 egg

1/2 cup extra light olive oil

1/2 cup water

Baking Instructions:

  1. Preheat the oven to 325 degrees and line 18 muffin cups with cupcake liners.
  2. In a food processor, zoop the candied ginger and the chocolate chunks several minutes into very small pieces.
  3. In a large mixing bowl, mix together the cake mix and the ginger/chocolate pieces, adding the dried orange peel.
  4. Add the egg whites, egg, oil, and water, and using a mixer, blend slowly at first until all the ingredients are incorporated. Then on a higher speed, mix the batter for a minute or so until it’s thick and well mixed.
  5. Divide the batter evenly among the 18 muffin cups.
  6. Bake in the preheated oven for about 20 minutes until the cupcakes are puffed, firm to the touch, and/or a toothpick inserted in the center comes out clean. (When I baked them, it took 22 minutes.)
  7. Cool in the tins for about five minutes. Then remove them to a wire cooling rack to completely cool.
  8. Enjoy!


Healthy Habits: Rethinking Weeknight Pasta


“But it’s all I can eat….”

My oldest decided a few weeks ago to do the elimination diet, which basically is eliminating everything except meat, poultry, fish, and non-starchy vegetables from one’s diet. She could not eat wheat, soy, dairy, nuts, peanuts, eggs, sesame, corn, peppers, potatoes, vinegar, yeast, sweeteners of any type, etc…, which meant dinners became a bit more complicated.

Since I usually include non-meat protein in many of our family dinners, I had to rethink our meals for a few weeks to make sure we were not eating too much meat and chicken. Obviously, eating more fish and beans was one solution, but the number of fish or bean dinners we currently eat are not my husband’s and son’s favorites as it is, so I did not want to create issues there. We could increase our vegetable dishes, but not being able to add any cheese, whether dairy or soy, or add tofu meant having no protein at all, which does not work for my or my daughter’s hypoglycemia.

So, as I thought about eating more meat and chicken dishes, it occurred to me that I could rethink weeknight pasta dinners, which is a staple for most families. Pasta and sauce is quick and easy for those busy nights when families do not have much time to pull dinner together. For my purposes, pasta and sauce was also a good dinner to be able to alter for our dietary needs.

For the pasta, we simply opted to substitute many of the grain free, protein packed pastas which are on the market: red and green lentil, chickpea and bean pastas are easily found at most supermarkets and are actually quite tasty. The ingredients are literally just red lentils or chickpeas or beans. Nothing else. So, for folks who need to watch ingredients, these pastas are great one ingredient pastas. (NOTE: there are pastas which mix flours with legumes to add protein. These are fine, too, if folks can eat grains.)

For the sauces, the solution was simple: substitute half of any meat or chicken with vegetables or quinoa. That way we had the protein but not as much of it. The result were healthier sauces which were just as filling but with less meat and poultry. Some of the pasta sauces and meatball recipes we made are below in case any folks want to try them for themselves.

Beet and Meat Pasta Sauce:

In a large skillet, brown 1/2 lb of lean hamburger meat with finely chopped onions, garlic, and herbs such as oregano, basil, black pepper, and thyme. Drain the fat from the meat and add 8 oz of frozen riced beets, one cup frozen chopped spinach, and a 16 oz can of no salt, no sugar added petite diced tomatoes. Saute until most of the liquid from the tomatoes has evaporated. Add a jar of your favorite spaghetti sauce (I use Victoria’s which literally only has tomatoes, garlic, salt oregano, and onions as its ingredients). Heat until warm and serve over a protein based ziti style pasta.

Kale-Carrot Turkey Pasta Sauce:

In a large skillet, brown 1/2 lb of lean ground turkey with finely chopped onions, garlic and herbs such as oregano, thyme, basil, and black pepper. Drain the fat from the meat, and set aside. In the skillet add 2 tbsp olive oil. Heat the oil for a minute and add 1/4 cup of a gluten free flour like GF oat or sorghum or millet. Stir until well mixed with the oil. Add 2 cups of a no salt, turkey bone broth, stirring and cooking over medium heat until it begins to thicken. Flavor the sauce with herbs like oregano, thyme and basil. Add the browned turkey, 8 oz frozen chopped kale and one cup grated carrots. Heat until the kale and carrots are soft and fully cooked. Serve over a protein based spaghetti style pasta.

Quinoa Meatballs:

Mix one pound of ground beef, chicken or turkey with 2 cups of cooked quinoa. Add to taste: chopped green onions, minced garlic, black pepper, oregano, basil, thyme, dill, and onion powder. Form into quarter cup size meatballs and place the meatballs on a pan lined with aluminum foil and lightly greased with olive oil. Preheat the oven to 375 degrees. Bake the meatballs for 25 minutes until browned on top and cooked through. Serve with your favorite sauce and protein based pasta.