Cooking Techniques: Shrimp Scampi

file000250506517

“Maude is a giraffe…. George is a goat.”

When I was in high school, my geometry teacher wanted to impress upon us the importance of having all the facts. He wrote on the board, “Males are taller than females. George is male. Maude is female. Therefore, George is taller than Maude.”

He then turned around and asked us if this was a reasonable supposition. We, of course, all nodded in agreement. He then turned back to the board and wrote, “Maude is a giraffe. George is a goat.”

I was reminded about Mr. Budnitsky’s teaching, when I received an email this evening asking a funny question. Someone had purchased the recent Cook’s Illustrated magazine and wanted to know what I thought about their recipe for shrimp scampi. The friend hadn’t liked their version but since Cook’s Illustrated is supposed to be the expert for proper cooking, she wanted to know my thoughts.

First, I want to say that if one is going to spend money on a cooking magazine, you cannot go wrong with a magazine like Cook’s Illustrated. The folks who create the recipes are from America’s Test Kitchen, and this means they actually do test their recipes, over and over and over again, and not only that, but they tell you all about it which gives you plenty of food for thought — pun intended.

That being said, I do agree with my friend that I sometimes find myself wondering, too, about the presumptions that the testers/cooks make about people’s palates, because occasionally I actually disagree with what they say is the best way to make a certain dish. There are presumptions the testers/cooks make about what people like or dislike.

For example, they frequently comment that overdone poultry is not tasty. This fails to take into account, that for some cultures, the only “tasty” way to eat poultry is what Cook’s Illustrated would consider overdone. Does that mean those cultures are “wrong” about poultry? I would say, “No.” Rather, it means palates and tastes differ from person to person and culture to culture.

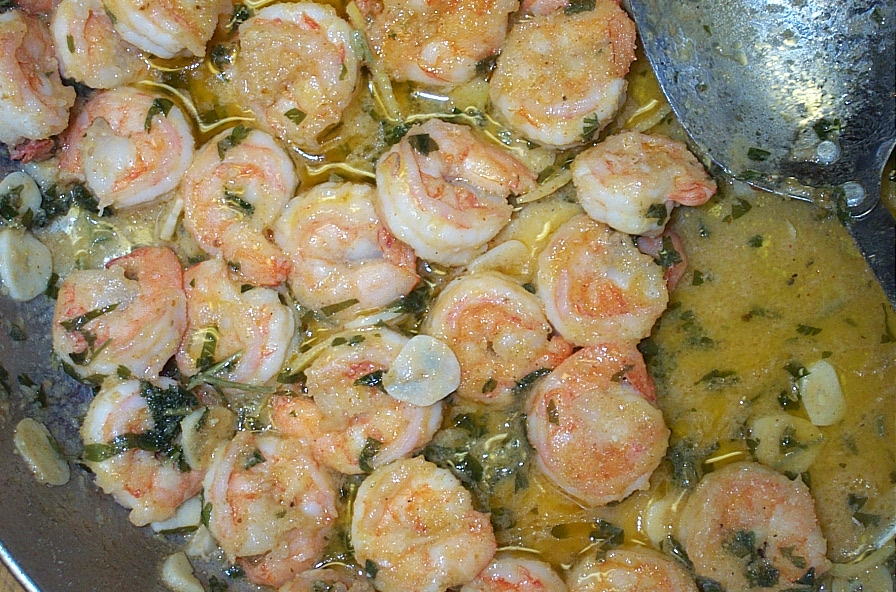
Shrimp Scampi is no different. Ironically, the name is a redundancy because scampi means shrimp, so we’re really saying Shrimp Shrimp. That fits, though, because it implies an abundance, and the number of different types  of recipes that exist for scampi is quite abundant. Do you want prefer olive oil or butter? Do you like only garlic or garlic and onions? Do you want a thick sauce to coat the shrimp or a thinner sauce to run over noodles? Do you even want noodles or do you prefer scampi plain or with rice? Do you coat the scampi with bread crumbs? Do you want to season it with basil or thyme or something completely different? Do you like a lemony sauce or more of a white wine taste or a balance? However you answered each of these questions, I guarantee you, you’ll find a recipe to match your palate.

I have a simple recipe I use which you can vary to your hearts content….

Shrimp Scampi

Ingredients:

  • Shrimp, 12 to 16 ounces (Decide whether you want to use raw shrimp or cooked shrimp. Raw means you usually have to peel and devein the shrimp. If you have cooked shrimp you can usually just throw them into the sauce at the end. Either way, about 12 to 16 ounces of shrimp is usually a good amount for dinner for four with leftovers.  If you use raw shrimp, you’ll simmer the shrimp midway through the recipe. If you use cooked, you’ll just add the shrimp at the end.)
  • Olive oil or butter, 2 tsp (Do you prefer a buttery sauce or an olive oil sauce? I usually use a combination where I saute with olive oil in the beginning and then add vegan butter at the end.)
  • Aromatics: Garlic Cloves, thinly sliced – 1/4 to 1/2 cup; Onions, diced, 2 tbsp to 1/4 cup (Think about the taste you’re going for: Do you want a deeper, mellow garlic flavor in which case you should roast the garlic before preparing your scampi.  Or do you want more of a garlic bite which means you should saute fresh garlic as you begin preparing the scampi. Do want just a garlic taste or do you  like onions, too. How much of one or the other or both flavors do you want? Vary the combination and amounts to match your tastes.)
  • Flavorings: White wine or chicken broth or a “shrimp” sauce, 1 cup (What is your taste preference? Some folks like a wine sauce; others prefer just to use broth. Many folks want the broth to taste “shrimpy”, in which case you should use raw shrimp and simmer the shrimp in wine or broth to flavor it.)
  • Seasoning: Basil, thyme, oregano? 1 tsp dried or sprigs of fresh; red pepper, black pepper? 1/4 to 1/2 tsp (What do you like for seasonings? If you prefer one over another, choose that. If you use dried, you should begin the scampi with the dried herbs. If you use fresh, don’t add the herbs until midway. Do you like the bite of red and black pepper? How much? Vary the additions and amounts to your liking.)
  • Lemon juice, 2 tbsp to 1/4 cup (Do you like a lemony sauce? if so, how lemony? Vary the amount to your liking or omit altogether.)
  • Cornstarch, 2 tsp (If you want a thicker sauce, you should mix 2 tsp of cornstarch with the lemon juice or if you’re omitting lemon juice, with the same amount of water.  If you like the sauce to be more of a liquid, then omit the cornstarch and simply cook down the sauce until it’s reduced.)
  • Vegan Butter, 1 to 2 tbsp (If you want a buttery sauce, you can add butter at the end. Many recipes will call for 1/4 cup or more of butter. I find that one to two tablespoons is more than sufficient.)

Cooking Instructions:

  1. Prepare shrimp if raw by peeling and deveining. If using cooked shrimp, make sure it’s defrosted and tails are removed.
  2. Put olive oil or vegan butter into a large pan, along with the chosen aromatics (garlic, onions or both) and seasonings if they are dry (basil or thyme or oregano). Saute over medium low heat for one to two minutes if the garlic is roasted and if onions are frozen, two to three minutes if using fresh garlic and onions, stirring continually.
  3. Add the flavoring (white wine or broth). If using raw shrimp, add the shrimp and cover the pan. If using already cooked shrimp, simply simmer the liquid. Either way, you’ll simmer for about five minutes. If using fresh herbs, add them now to the simmering sauce. If using raw shrimp, remove the now cooked shrimp from the liquid before proceeding with the next step.
  4. Mix the lemon juice, cornstarch, red pepper and black pepper and add to the liquid. Stirring continually, cook until the sauce begins to thicken. This will only take about a minute or two. If you’re going for a buttery sauce, as soon as the sauce thickens, add the pat of vegan butter and stir until it dissolves.
  5. Add the cooked shrimp to the sauce and coat them well.
  6. Serve the scampi over broccoli, rice, or pasta, or serve it as is.


Cooking Inspiration: Korean Scallion (Green Onion) Pancakes

“You want to eat pancakes, not Buddha.”

According to my parents, when my brother and I were little, we would mix up the Korean words for Buddha and pancakes. To be fair to us, the words are extremely close — buchini (boo-chin-nee) versus buchimi (boo-chim-mee) — and for Korean celebrations such as a 100 days birthday or New Year’s, the tradition is to make pancakes, some of which you place before a statue of Buddha with the hopes of bringing good luck. and the rest of which you eat.

As a grown-up in the United States, I don’t make pancakes for Buddha, but my daughters and I really enjoy eating Korean Scallion (green onion) pancakes. They’re usually made with mung beans which is similar to a yellow split pea, and sometimes people actually use yellow split peas instead. Fortunately for me, I can find mung beans at my local grocery store and don’t even need to go to an Asian store to find some.

As I thought about this new year — 2016 — I remembered a conversation I had with a friend who was in turn remembering meals his wife had made him during their first year of marriage. His comment was that over the years, their meal plan had become a rut, and he missed the different experimental dishes she made that first year.

Often, that’s exactly what happens to families. Busy schedules, finicky children’s palates, frugal living, and lack of inspiration can all lead to meals being the same week after week, and when a friend emailed me yesterday asking about something to serve which was different, I thought about Korean Scallion Pancakes. What I like about them is that they’re fairly easy to make, are made with protein (beans), that you can make them with vegetables, and they’re tasty.

What’s important to know is that the mung beans need to soften, so you do need to give them time to sit in water. A couple of hours is normally fine. I often soak them in the morning and just let them sit until when I need them in the evening. You simply put enough water to cover the beans and then add water as needed.

The other thing to know is that you don’t want to skimp on the green onions. A mung bean batter is simply there to hold all the wonderful, tasty green onions, and if you choose to add them, other vegetables. I usually make mine with green onions and thinly sliced sweet white onion. Sometimes, I also add thinly sliced carrots and red pepper. My mom makes hers with Korean kimchee, which is basically hot, fermented cabbage or spinach or any other type of vegetable she’s chosen to make kimchee out of.

Another consideration is that you do need to bind the beans to keep them from being too grainy. Recipes online will often call for you to mix the mung beans with some rice and soak the two together. I’ve found it’s easier to just mix in rice flour after the beans soak. At the stores, you can find white rice flour, brown rice flour, and sweet rice flour. My mom prefers the sweet rice flour, and that’s how I’ve always made them over the years.

A final thought is that there are two ways to make the pancakes when you cook them. After you’ve pureed the mung beans and added the rice flour and seasonings, you have to choose how you want to make the pancakes. My mom’s preferred method is to ladle some of the mung bean batter onto the pan, artistically arrange the green onions, onions and vegetables onto the batter, and then add a little bit more of the mung bean batter on top of the vegetables. This is very pretty, but takes time. Because I’m often in a hurry, wanting to make a lot and get them onto the table for dinner, I choose to mix all the green onions, onions, and vegetables directly into the mung bean batter and then ladle the batter and cook the pancakes. The pancakes aren’t as beautiful but they’re still tasty, and this way fits my more time-pressured schedule.

So, if you’re looking for something new and different to try in this new year, I have a recipe below. No quantities, because it all depends on how much you want to make, but if you purchase an 8 ounce bag of mung beans and let them soak, you’ll make enough pancakes for a family of four.

Happy New Year!

Korean Scallion Mung Bean Pancakes

Ingredients:

Yellow Split Mung beans

Water

Salt

Black pepper

Sesame oil

fresh ground ginger (optional)

Fish powder (optional)

Sweet rice flour

Green onions (chopped into longer pieces, about 2 inches — you want a lot!)

Sweet white onions (chopped into thin, long pieces, about 2 inches)

Vegetables (optional: very thinly sliced – carrots, peppers, etc…)

Cooking Instructions:

  1. Cover mung beans with water and let it sit for several hours during the day or overnight. Check the beans occasionally, and add water as needed. You want the beans to become soft enough to puree. You’ll see that the beans are absorbing the water and swelling and becoming softer.
  2. Use a food processor or blender to puree the mung beans with some sweet rice flour to make a smooth, slightly thick batter. You don’t want the batter to be too think but neither do you want it to be too thick. You can add more water as needed to think the batter or more rice flour to thicken it.
  3. Season the batter with salt and pepper, a small amount of sesame oil, and ginger and/or fish powder (if you choose). The flavor for the pancakes comes from the green onions and the mung beans themselves, so you don’t want to add a lot of the seasonings.
  4. Slice lots of green onions and mix into the batter with slices of sweet white onions and other vegetables if you choose.
  5. Over medium high heat, in a pan seasoned with sesame oil, pour batter into round pancake shapes. Cook on one side until browned and crispy, and then turn over and cook the second side. Serve with soy sauce.

Holiday Traditions: Allergy Friendly “Sugar Cookies”

website sugar cookies

“Well, they have to be the same….”

When you marry into a family who makes literally the best sugar cookies you’ll ever eat in your life, you must tread carefully about trying to revamp the recipe to be allergy friendly.

“Honey, I was thinking….”

“Yes.”

“Well, I’d really like to be able to have some sugar cookies this year… I think I could revamp the recipe to be dairy and gluten free….”

“No.”

“But what if they tasted the same?”

“Not possible.”

“Well… I think it could be possible….” I give my husband my most pleading, puppy-dog sweet face, and add… “If they don’t taste just like your family’s recipe, I’ll make another batch the “right” way.”

“Well, okay, I guess you could try….”

In the end, I only made one batch of sugar cookies because my husband and my children declared my recipe to be a success, which was good because we spent many hours baking very large batches of three different type of allergy friendly cookies this weekend, and I didn’t want to have to make any more!

So below are some hints for cut-out cookies which I’ve shared previously and my revised recipe for rolled, cut-out sugar cookies. (We’ll keep the original a family secret… *grin*)

Tips for Making Rolled, Cut-out Cookies

1.  Use wax paper to roll out the dough.  Simply cut a sheet that overlaps around a large cutting board or piece of cardboard and tape it down.  Then when you sprinkle your flour over the wax paper, your dough won’t stick to the board.

2.  Use sifter to put flour onto your cutting board and rolling pin.  If you sprinkle it on with your fingers, you’re more likely to clump the flour in places which then get stuck to your cookie dough.

3.  Use a long, thin metal spatula to periodically release your dough from the board while you’re rolling it, and before you use your cookie cutters, be sure to go completely under the entire rolled out piece of dough so that your cookies won’t stick to the board when you’re cutting the shapes.

4.  Invest in some smaller cookie shapes which you can use to cut little cookies from the dough left after you cut out the big cookie shapes.  This cuts down on the amount of dough you need to re-roll.  Put one cookie sheet aside specifically for the little cookies, which you fill up as you go along and then bake at the end.

5.  Make sure your dough for rolling is very cold and firm.  Most recipes will tell you to chill for an hour, but in reality you’re better off planning ahead and chilling your dough for several hours or overnight.  When you’re making the cookies, be sure to put the dough back into the fridge in between scooping out new dough to roll.

6.  Put all your re-roll dough into a small bowl which you then put into the freezer while you’re finishing up the regular dough.  This will make the dough firm enough for you to re-roll immediately as opposed to having to wait for it to firm back up again.

7.  Make your own colored sugars.  Put 1/4 cup of sugar into a bowl and add two to four drops of food coloring.  Carefully work the color into the sugar, using the back of a spoon to continualy “spread” the color completely into the sugar.  You can store extra, leftover sugar in a sandwich baggie for a very long time!

8.  Use parchment paper to line your cookie sheets.  Your cookies will never stick. You won’t have to clean the cookie sheets.  And you won’t have to worry about cross-contamination of your cookies.  I usually use the If You Care brand.  The parchment sheets can also be re-used over and over again on one cookie sheet.

9.  Be sure to completely cool your cookie sheets before putting new cookie dough shapes onto them.  I usually pop my cookie sheets into the freezer for a minute or two after removing the cookies.  Works like a charm.

10.  Invest in metal cookie cutters which you can use year after year. When you’re cutting out the shapes, put a pan of flour in the center which you can dip the cutters into so the cutters won’t stick to your dough.

11.  When you’re done with your cookie cutters, fill the sink with hot, soapy water and just let them sit for a while.  You’ll be able to simply rinse them off without having to try to “clean” the crevices.  Then pop them (as long as they’re metal) onto one of your cookie sheets and place the cookie sheet in the oven which is turned off and cooling down.  The residual heat will evaporate all the water, and your cutters will be sterilized and ready for next year’s use.

Allergy Friendly Rolled, Cut-Out Sugar Cookies

(This makes a lot of cookies; if you want less,

cut the recipe into thirds)

Ingredients:

3 cups sugar (This is the only time I ever use sugar because a sugar cookie just has to have sugar!)

2 cups Tofutti sour cream

2 cups Earth Balance soy free vegan butter

3 eggs, room temperature

1 tbsp ground nutmeg

6 Gluten Free Flour Blend (you’ll need just enough flour to make a soft dough – I used 6 cups of Authentic Foods brown rice gluten free blend)

Baking Instructions:  (The dough needs to chill so make the dough up the night before or several hours ahead of when you want to bake the cookies.)

1.  Mix the sugar with the sour cream and butter until well blended.

2.  Add the eggs, one at a time, and blend well.  Add the nutmeg.

3.  Add in the gluten free flour, a cup at a time, only as much as you need to make a soft dough.  Blend well.

4.  Cover the dough tightly with plastic wrap and chill overnight, or at least for several hours.

5.  Preheat the oven to 350 degrees.  Line cookie sheets with parchment paper.

6.  Line a board with wax paper.  Sprinkle the board and a rolling pin with flour of your choice (I used brown rice flour), and roll out small amounts of dough to a very thin thickness – thin enough to make a crispy cookie but not so thin that you can’t actually move the cut out dough to the cookie sheet.

7.  Cut out shapes with cookie cutters and place on the prepared cookie sheets.  The cookies will not spread a lot so you can put them fairly close together.

8.  Decorate the cookies with colored sugar and/or currants. (You can also just bake the cookies and then decorate them with icing when they’re cooled.)

9.  Bake in the preheated oven for 8 to 12 minutes.  Start with 8 minutes and then go up by 1 minute increments. (It really depends on how thin you are able to roll them in terms of how long the baking time needs to be.)  The cookies should be dry, crisp and slightly puffed.

10.  Let the cookies cool for a minute on the cookie sheet, and then move the cookies to a wire cooling rack and cool them completely. Once cooled, they’ll be nice and crispy sugar cookies.  If you eat them while they’re warm, they’ll be chewier.

11.  When the cookie are completely cooled, store them in a tightly covered container.  They’ll last for a few weeks, though after a couple of weeks, they’ll get a bit softer.


Holiday Traditions: Allergy Friendly “Fruitcake”

“How many fruitcakes does it take to hammer in a nail?”

You’ve probably heard all the fruitcake jokes which tend to make their round this time of year…. I personally think we should be applauding the folks who invented fruitcake, because it’s a rather ingenious cake. In a time when there is no refrigeration, people figured out how to use dried and candied fruits and nuts and alcohol to create a longer-lasting festive dessert.

While there does seem to be a lot of folks who won’t even try fruitcake, a substantial number of people do actually enjoy and make fruitcakes as part of their holiday tradition. An older gentleman emailed me a couple of weeks ago because he’s now gluten sensitive, and his wife told him he couldn’t have fruitcake anymore. He wanted to know if I could help….

Fortunately for him, I like fruitcake. I even like the versions with the traditional candied lemon and orange peels, cherries and citron. Fruitcake, however, doesn’t have to include these. I often make a fruitcake with just dried fruit like apricots, prunes, dates, and currants. What’s lovely about fruitcake is that you can do just about anything you want.

Some things to keep in mind:

The Batter:

Traditional fruitcake is basically a butter cake recipe. You can choose between a light cake recipe or a dark cake. Light means you’re using “light” sweeteners like white sugar, honey and/or corn syrup and usually lighter dried fruits and nuts (macadamia nuts, apricots, etc…); dark usually uses sweeteners like brown sugar and molasses and darker dried fruit and nuts (walnuts, pecans, currants, etc…).

Since I try to avoid refined sugars a much as possible, I tend to use a combination of coconut sugar, Agave, and date molasses because I can use much less than the sugar amounts normally called for in fruitcake. This means my fruitcake tends to be a “darker” recipe. I also cut the quantity of butter because traditional butter cake recipes use a lot of butter. And of course, because of my dairy allergies I’m really using a vegan “butter” instead of cow’s milk butter.

Fruitcake recipes also call for a lot of eggs. One, because fruitcake is really a lot of fruit and nuts with just enough batter to hold it together, so eggs are very necessary to the binding and baking process. Two, fruitcake is normally made in large quantities which requires a lot of eggs. To minimize the cholesterol, I use half egg whites and half whole eggs. You can use all egg whites but it will make for a drier fruitcake.

Whatever you decide to do for a batter, make it to your liking. Since I like spice cakes, I make my fruitcakes with spices like cardamom, cinnamon and nutmeg. If you like more of a yellow cake, use vanilla. If you like fruit, use orange or lemon peel.

The Dried Fruit and Nuts:

Traditional fruitcake has candied peels, cherries, and citron with nuts like walnuts and pecans. If you don’t like those, you don’t have to use them. You can use any type of dried fruit you prefer and any type of nuts you prefer. I omit nuts because I’m allergic to them. For the fruits I use a combination of the traditional and the non-traditional. Dates, dried plums, apricots, and currants are my favorite dried fruits to mix with the candied peels, cherries and citron.

A tip: I have found that what most people don’t like about fruitcake is that the fruit and nuts are too large. I use a food processor to chop everything into tiny pieces so they’re evenly distributed throughout the cake to give flavor without the chunkiness. Paradise also makes an Old English Fruit and Peel mix which has everything already chopped into tiny pieces.

The Alcohol:

Alcohol was traditionally used in fruitcake to keep the cake from getting moldy and stale in addition to adding flavor and moistness. The most common alcohol for fruitcake is either rum or brandy. Recipes vary as to how the alcohol is used. Some will tell you to soak the dried fruits and nuts in alcohol. Most, however, soak the cake in alcohol after it’s been baked. Many recipes do a combination of the two. Others simply put alcohol in the cake batter.

The main difference between which versions you choose is exactly how much of the “boozy” taste you want. Alcohol cooked into the batter will not be as strong as if you soak the fruits and nuts and/or the entire cake in alcohol. Another difference is time. Soaking fruits and nuts usually takes some hours before you can make up the fruitcake. Soaking the entire cake usually requires days.

I don’t use alcohol in my fruitcake recipes. One, I don’t particularly care for rum or brandy. Two, I don’t have the patience to wait for anything to soak. Three, we have refrigeration which keeps my fruitcake from getting moldy and stale. Instead I like to use unsweetened orange use or apple cider. Makes for tasty cakes without the alcohol.

The Baking:

Fruitcake needs to cook at a lower temperature to prevent the cake from becoming too dry, so usually it requires several hours to bake. I cut the time by baking my fruitcake in smaller mini-loaf pans or only filling regular size pans half full. Then instead of a couple of hours, the cakes cook in about one hour which fits with my schedule much better.

Cooking in the mini pans also means they’re a good size for gifting. I make a lovely chocolate fruitcake which I have given to neighbors for the holidays for years and which they actually really enjoy and look forward to each year. What’s nice about fruitcakes is that they store well if you wrap them well in plastic wrap and then aluminum foil.

Many recipes will tell you to cook the fruitcake at 250 or 275 degrees. I find that 300 degrees work just as well, allowing the cook time to be slightly less. If, however, you do choose to make a large fruitcake in a bundt or tube pan, you should opt for the lower temperatures to ensure even cooking throughout.

A Recipe:

My favorite fruitcake recipe is the chocolate fruitcake I mentioned above. I use a combination of two gluten free flour blends – one which is a lighter brown rice flour blend like King Arthur’s; the other a more high fiber/high protein blend like Bob Red Mill’s garbanzo bean blend. I use unsweetened cocoa powder and add allergy friendly chocolate chips to the dried fruit blend. If I use the candied peels and citron, I usually just add dried dates and plums. If I opt to use only dried fruit, I like to combine dried dates, plums, apricots, currants, and unsweetened coconut. Both versions make for tasty fruitcakes.

Allergy Friendly Chocolate Fruit Cake

(This recipe makes 12 mini 4 x 8 loaves)

Ingredients:

7 cups favorite dried fruits, nuts, and/or candied peels, cherries and/or citron, chopped into tiny pieces

1 cup Enjoy Life miniature chocolate chips

1 1/2 cup vegan olive oil “butter”, melted

2 cups coconut sugar

1/4 cup date molasses

3/4 cup Agave

1 cup unsweetened orange juice

1 cup liquid egg whites

4 eggs

2 cups high protein/high fiber gluten free flour blend (like Bob Red Mill’s garbanzo bean flour)

2 cups brown rice flour blend (like King Arthur)

1 cup gluten free oat flour

1 tsp cardamom

1 tsp cinnamon

1/2 tsp nutmeg

1/2 cup unsweetened cocoa powder

2 tsp baking powder

2 tsp baking soda

1 tsp salt

2 tbsp apple cider vinegar

Baking Instructions:

  1. Preheat the oven to 300 degrees. Arrange your oven racks so they are evenly spaced so you can cook on both racks at teh same time. Line 12 mini loaf pans with parchment paper so the paper hangs over the side like wings. This will make it easier to pull the cake out of the pans. Arrange the pans on two cookie sheets so they have some space around each pan for air to circulate.
  2. Mix the dried fruit, nuts, and/or candied peels and fruit with the chocolate chips. Set aside
  3. Mix the melted butter with the coconut sugar, date molasses, agave, orange juice, egg whites, and eggs. Set aside.
  4. Combine the two gluten free flour blends with the oat flour, cardamom, cinnamon, nutmeg, cocoa powder, baking powder, baking soda, and salt.
  5. Stir the wet ingredients well before adding the dried fruit mixture to it. Carefully add the dry ingredients, along with the apple cider vinegar.
  6. Mix the batter well until all the dry ingredients are thoroughly moistened.
  7. Divide the batter evenly among the 12 loaf pans. The pans will be only 2/3 full. (If you’d like to make these in larger 9 x 5 pans, fill the loaf pans only half full.)
  8. Bake the loaves for about 30 minutes and then switch the cookie sheets between the two racks for even cooking of both trays of mini-loaves. Bake for another 20-30 minutes until the fruitcakes are puffed, pulling from the sides, and a toothpick inserted into the center comes out clean.
  9. Remove the cookie sheets from the oven and put the mini loaf pans onto a wire cooling rack. Cool for 10 minutes, and then carefully remove the cakes by lifting the parchment paper wings. Cool the cakes completely on the wire racks.
  10. To store the cakes, wrap them tightly in plastic wrap and then in foil. They store in the fridge for about a week or you can double wrap them with foil and freeze them for a couple of months.


With Gratitude: Savory Triple Squash Muffinsu

“Is your kitchen ready 4 the holidays?”

I was driving to meet some friends when I saw a sign outside a home design business asking, “Is your kitchen ready 4 the holidays?”

My immediate response was, “Of course not, but who cares?” Obviously, though, people must care, or the business would not be using the sign as part of its marketing strategy.

For me, the holidays are about the three “F’s” — faith, family, and food. I confess, though, that the priorities aren’t always in that order. If I’m hosting, I tend to focus a lot on the food because I care very much that everyone attending will be able to safely enjoy what they eat.

So, when I received an email this past week in response to the post about the pumpkin cranberry muffins, I understood the desire behind the question: “Do you have a savory muffin recipe for Thanksgiving? My grandmother doesn’t like her breads to be sweet.”

This particular person had found my recipe because she was looking for an allergy friendly muffin recipe for her grandmother whose diet was restricted, but as she mentioned, she wanted something savory instead. So, for folks who want a choice, I’m posting a savory triple squash muffin recipe which I made last week and had many, many folks taste test with good reviews. They also have the added benefit of being gluten, dairy, soy, nut, sugar, and egg free.

Triple Squash Muffins

Ingredients:
1 cup gluten free whole rolled oats
1 cup boiling water
2 tbsp golden ground flaxseed
6 tbsp water
1 cup gluten free oat flour
1 cup garbanzo bean flour
2/3 cup potato starch
1/3 cup arrowroot starch
2 tsp baking powder
1 tsp baking soda
1/2 tsp salt
1 tsp dried oregano
1/2 tsp dried thyme
1/2 cup safflower oil
1 cup cooked, pureed winter squash (butternut, acorn, pumpkin, etc… your choice)
1 cup shredded zucchini
1 cup shredded yellow summer squash
1/2 cup boiling water
2 tbsp vinegar (white or apple cider)
Baking Instructions:
1.  Preheat oven to 400 degrees and line muffin tins with liners.
2.  Pour 1 cup of boiling water over 1 cup of gluten free whole rolled oats and set aside.
3.  Mix 2 tbsp of ground golden flaxseed with 6 tbsp of water and set aside.
4.  Combine 1 cup gluten free oat flour, 1 cup garbanzo bean flour, 2/3 cup potato starch, 1/3 cup arrowroot starch, 2 tsp baking powder, 1 tsp baking soda, 1/2 tsp salt, 1 tsp oregano, and 1/2 tsp thyme.
5.  Blend the oats with the flaxseed mixture, 1/2 cup safflower oil, 1 cup winter squash (butternut, acorn, pumpkin, etc…), 1 cup shredded zucchini, and 1 cup shredded summer squash.
6.  Add the dry ingredients to the wet, along with 1/2 cup of boiling water and 2 tbsp of vinegar (white or apple cider).  Mix just until the dry ingredients are fully moistened.
7.  Divide the batter evenly among 24 muffin cups.
8.  Bake for about 20 minutes until the muffins are puffed, golden and a toothpick inserted into the center comes out clean. (You may want to check after 15 minutes.  It could take up to 25 minutes.  It all depends on how accurate and well your oven keeps its temperature.  In my oven, it’s about 20 minutes consistently.)

With Gratitude: Thanksgiving Muffins

“Only two weeks to Thanksgiving and then it’s Advent!”

My son ran into the kitchen today to announce that my time to pretend the holidays were not approaching was at an end. I could ignore his heralding at six months, three months, and even one month… but two weeks! Whether I was ready or not, it was time to begin thinking.

The fact is that when you have multiple food allergies, thinking about holiday meals can be something you’d like to put off if you can, because thinking about them means figuring out exactly which and how many dishes you’ll be making simply to ensure that you have food to eat.

If you’re new to the blog, you can search by category for “holidays” and find posts I’ve previously submitted about allergy friendly holiday cooking — everything from how to minimize stress to how to revamp pies, cakes, entrees and side dishes.

This week, however, a young mom wrote asking me about ideas for a Thanksgiving muffin. Her father-in-law cannot have eggs, dairy and wheat, so she thought muffins might be easier to make than rolls. She wanted the muffins to be “Thanksgiving-ish”, though, and I had just the recipe for her.

Thanksgiving Muffins. When I think about Thanksgiving, pumpkins, squash, apples, and cranberries always come to mind. So I have a recipe that you can make just about any way you want, varying the type of cranberries you choose, your choice of pumpkin, winter squash or even a homemade applesauce in place of pumpkin, and even the spices you decide to include. And the bonus is that they’re gluten, dairy, egg, soy, and nut free, too.

Thanksgiving Muffins

Ingredients:

4 tbsp ground golden flaxseed

12 tbsp water

2 cups pureed cooked pumpkin or winter squash (butternut, acorn, etc…) or apples

2/3 cup safflower oil

3/4 cup Agave

1 1/2 cup fresh cranberries, dried cranberries, or cooked cranberries (My kids like the cooked cranberries best because they’re softer and I usually cook them with a bit of agave to make them sweeter, but you can also use fresh cranberries if you want a tart/sweet flavor contrast to the muffins or dried cranberries if you want the muffins to have some chewiness and little more sweetness)

3 1/2 cup gluten free flour blend (I usually use a homemade mixture of sorghum, garbanzo bean, and oat flour with arrowroot starch but I’ve used Bob’s Red Mill and King Arthur and Authentic Foods)

2 1/2 tsp spices (any combination of cinnamon, nutmeg, ginger, cardamom, allspice and/or cloves are good)

1/2 tsp salt

1 cup boiling water

2 tbsp vinegar (I like to use apple cider vinegar but a white vinegar is fine, too)

Baking Instructions:

  1. Preheat the oven to 400 degrees and fill 24 muffin cups with cupcake liners. (The orange, red-flecked muffins look pretty in a white liner if you put the muffins in a bowl to put on the table for the Thanksgiving meal.)
  2. Combine the flaxseed with the water and let sit for five minutes.
  3. In a large bowl mix together the cooked pureed pumpkin or squash or apples with the oil, agave and flaxseed mixture. Set aside.
  4. In a food processor chop the cranberries, no matter what type you’re using, because this will distribute them more evenly throughout the muffin. Add to the wet mixtures.
  5. In another bowl mix the flour, spices, salt, baking powder, and baking soda.
  6. Add the dry ingredients to the wet, along with the water and vinegar. Mix until all the dry ingredients are moistened.
  7. Evenly distribute the batter among the 24 muffin cups. They will be filled almost to the top.
  8. Bake in preheated oven for 15 to 20 minutes. Muffins will be puffed and golden brown and a toothpick inserted in the center will come out clean.


Autumn Fruits: Easy Marinara Sauce

website tomato sauce

“Are you going to do something with those tomatoes?”

A couple of weeks ago, my sister-in-law generously gave me several pounds of home grown tomatoes, the last picked of the season before the weather became cold. I was thrilled, but then my son became ill, and a week was lost at the hospital and helping him to recover at home.

Over the weekend, my husband looked at the tomatoes still taking up space on our counter, and asked, “Are you going to do something with those tomatoes or am I going to have to compost them?”

The idea of composting all those lovely tomatoes horrified me, so I quickly grabbed a cutting board and went to work….

Folks who have been reading the blog for a while know that I’m a big fan of the least amount of effort for great results. So, what’s something easy one can do when you have pounds of tomatoes and no idea what to do with them? Marinara sauce.

Marinara sauce is just a sauce made from tomatoes. If you make up a huge batch, though, you can freeze it and use it in a variety of ways: the base for a thicker spaghetti sauce, sauce for pizza, in Spanish rice, for ratattouille, the base for a cocktail sauce, for soups, to top enchiladas, in Sloppy Joe’s, the list is pretty never-ending. And what’s lovely is that unless you’re allergic to tomatoes, it’s allergy friendly, too – no nuts, dairy, egg, gluten, sugar, peanuts, etc….

Easy Marinara Sauce

  1. The Tomatoes: I simply cut the tomatoes into fourths and cook them as is, seeds, peels and all.
  2. The Flavoring: Whatever you’d like. I usually throw in about eight to 10 whole garlic cloves, two purple scallions quartered and a chili pepper.
  3. The Herbs: Whatever you’d like. I like basil, oregano, and thyme. Use dried herbs. If you want fresh herbs, those can be added when you actually use the marinara sauce for a recipe.
  4. The Pan: I have a lovely Circulon pan which is 12 inches in diameter and three inches deep which I use for making marinara sauce. I recommend a larger, shallower pan over a deeper but smaller pot, which is the use recommendations. The reason? Because the shallower pan allows all the tomatoes to cook down quickly without you needing to continually stir to get the top tomatoes down to the bottom where the heat source is.
  5. The Cooking: If you cook the tomatoes in the shallower pan, you only need to cook the tomatoes, with a lid on, for about 20 to 30 minutes.
  6. The Consistency: If you want a chunky marinara sauce, simply let the cooked tomatoes cool as is. If you like a smoother marinara, puree everything up in a blender or food processor. If you don’t like the seeds, strain them out after pureeing. If you want a thicker marinara sauce, add tomato paste or cooked, pureed vegetables like squash or carrots or pumpkin which also add another flavor dimension.
  7. The Storing: Marinara sauce will keep for weeks in the fridge and for years in the freezer. To store in the freezer, make sure the sauce is completely cooled and then put the sauce into freezer friendly containers or bags. I prefer to put two cups of sauce into freezer bags because that’s the amount I tend to use for most recipes and because the bags will then lie flat in the freezer, taking up less space.
  8. The Use: If you know ahead of time you want to use frozen marinara sauce, simply take the containers or bags out of the freezer the day before. If you decide at the last minute to use sauce, the sauce easily defrosts as it cooks in the microwave or in a pan.


In Vogue: ??Beans??

website beans

“Wake up!”

One morning last week I had one of those loop dreams which you may have had at some point, too: I kept dreaming that I had woken up, but of course when I finally did wake up, I realized my alarm had been blaring for ten minutes. My physical body had been doing its best to ignore that I needed to wake up but my subconscious knew I must, so it told me over and over through my dreams to “Wake up!”

I find a similar loop seems to play in people’s minds about beans. If I ask people whether they eat beans, they usually reply that they don’t but that they know they should. That “knowing they should” part is usually because they are constantly being told how good beans are for them and that loop plays in their subconscious even as they consciously ignore the information and continue to not eat beans.

In an email, I was asked this week whether or not the hype around beans is true….

Beans are high in fiber, protein, and antioxidonts, extremely low in sugar and fat, and are cholesterol free, all of which is great for our bodies. Beans also come in so many varieties that your options for cooking them are pretty much endless. They’re also quite cheap which is wonderful for the pocketbook.

At the same time, though, beans are not the answer to life’s health problems as many tout. For many folks, beans cause digestive issues which we don’t need to explain in detail. Also while adding beans to one’s diet can be good, solely subsisting on beans is not, because beans have been shown to have less protein than meats and to contain compounds which may not be great for our bodies in high doses. As well, many people today are actually allergic to legumes (peanuts, beans, peas, etc…).

So what does this mean for folks who are hearing the loop about beans and wondering whether they should or they shouldn’t? “Moderation in all things,” is my answer. It has been shown time and time again that a varied diet of fruits, nuts, beans, veggies, whole grains, small amounts of good fats, and lean meats, fish and chicken is best. So be varied. Add some beans to your diet once and a while to balance out the meat or to simply try something new, but don’t begin eating beans five meals a day because you think it may solve some health problem.

If you’re thinking you’d like to add beans to your diet and wondering how to do so, here are some suggestions:

Ways to Moderately Add Beans to Your Diet:

  1. Throw beans into your every day dishes: Making chicken enchiladas? Add a cup of black beans. Turning leftover vegetables into a soup? Add a cup of dark red kidney beans to make it a minestrone soup.
  2. Substitute beans in baked goods: A lot of dessert recipes these days call for beans instead of flour because it’s a good way to add protein and cut back on the carbs. You can use pureed black beans in brownies, white beans in yellow cake, garbanzo beans in chocolate cake… the options are limitless.
  3. Add beans as a garnish: Toss some chickpeas on top of your salad. If you make a pureed roasted vegetable soup, drop a spoonful of lentils on top.
  4. Make bean dips: Instead of your usual sour cream dip, try a bean dip. White beans pureed with garlic, thyme, lemon juice, and a tad bit of olive oil is quite yummy. Hummus with chickpeas is great but so much better when homemade. Black bean dip is tasty with tortilla chips.
  5. Use beans as fillers: Want to stretch your meat for tacos or meatloaf or a hamburger? Add some chopped, cooked beans. Don’t have quite enough leftover chicken for the stir fry? Throw in a handful of cooked beans with the chicken.
  6.  Eat beans as a side dish: Beans are tasty, and with the variety, you can experiment. Make a side dish of black-eyed peas and spinach with garlic and onions. Mix some salsa into black beans. Make a bean salad with three or more different types of bean flavored with some lemon juice and green onions.


Creative Cooking: Prunes and Beets

“It’s so beautiful!”

My son has always been afraid of thunderstorms, despite everything my husband and I have done to convince him that he has nothing to fear.

Last week, however, we had a three day heat wave; and one night the hot temperatures brought severe thunderstorms. As I was driving home from a meeting, I noticed that the heat was causing an electrical storm to light up the sky a few miles away. I rushed home, yelled at my children to hop into the car, and drove back up to the main road.

As my son watched the “lights” in the sky, he commented on their beauty and suggested we put on some Beethoven to match the rhythm of the lightning. After several minutes of watching, he didn’t want to return home, though, finally, reluctantly, he did allow me to drive home.

As we drove, I asked him what he thought about thunderstorms now, and he said he never realized they could be so beautiful.

His reaction to the lightning storm is similar to what I hear people say about unusual foods like prunes and beets. So often, people “don’t like” them without having tried them. They think they know enough to make a finite decision about them, when really they don’t.

Prunes are high in fiber and don’t cause the same types of spikes in sugar levels while delivering a wonderful sweetness to anything you put into them. Beets are high in vitamins and minerals and fiber, and like prunes, have a naturally sweet taste. As such, both prunes and beets are great additions to desserts. Below are a muffin and a bread recipe I just recently created for the fun of it.

Banana Beet Bread

Ingredients:

1 cup mashed ripe bananas (ripe means they’re spotted brown on the peel)

3/4 cup roasted chopped beets (about two; roasting beets brings out their flavor more; then I just chopped them up in the food processor — you can also now buy the beets already cooked up in packages in the stores if you don’t want to cook them yourself!)

1/2 cup safflower oil

1/2 cup Agave

1 egg

2 cups gluten free flour blend of your choosing (I used a combination of flours which mixed garbanzo bean, sorghum, and brown rice flours with potato starch and tapioca flour)

2 tsp cinnamon

1 tsp nutmeg

1/2 tsp ginger

1/4 tsp cloves

1/2 tsp baking soda

2 tsp baking powder

1/4 tsp salt

1 tbsp apple cider vinegar

Baking Instructions:

  1. Preheat the oven to 350 degrees. Line a 9 x 5 pan with parchment paper so that the paper is sticking out of the pan for lifting purposes.
  2. Combine the bananas, beets, oil, agave and egg. Put aside.
  3. Mix the flour, cinnamon, nutmeg, ginger, cloves, baking soda, baking powder, and salt.
  4. Add the dry ingredients to the wet with the apple cider vinegar and quickly mix everything together until the dry ingredients are completely moistened.
  5. Pour the batter into the prepared pan and let it sit for about five minutes before putting it into the oven.
  6. Bake for 35-40 minutes until the bread if puffed, a golden red hue, and a toothpick inserted into the center comes out clean.
  7. Cool for five minutes on a wire cooling rack in the pan. Then use the parchment paper wings to remove the bread from the pan. Cool for another 10 to 15 minutes before removing the parchment paper and allowing the bread to cool completely.

Breakfast Prune Muffins

Ingredients:

9 ounces of pitted, chopped dates

2 tbsp garbanzo bean flour

1 cup gluten free rolled whole oats

1 cup boiling water

2 tbsp ground golden flaxseed

6 tbsp water

1 cup gluten free oat flour

1 cup garbanzo bean flour

2/3 cup potato starch

1/3 cup arrowroot starch

2 tsp baking powder

1 tsp baking soda

1/2 tsp salt

2 tsp cinnamon

1 tsp allspice

1 tsp ginger

1 cup blueberries

1 cup Enjoy Life mini chocolate chips (optional, but my children like it with them when I make them as a snack food for afterschool)

Four 6 inch bananas (comes to about 1 1/4 cups mashed)

1/2 cup safflower oil

2 tbsp apple cider vinegar

Baking Instructions:

1. Preheat the oven to 400 degrees and line 24 muffin cups with cupcake liners or grease them so the muffins won’t stick to your pan.

2.  Put the prunes and flour into a food processor and finely chop the prunes into tiny pieces. (This will distribute the prunes throughout your batter.)

3. Mix the finely chopped prunes with the oats in a bowl, and pour the boiling water over them, pushing the prunes and oats down into the water so they are covered. Let sit.

4. Whisk together the flaxmeal with the water, and set aside.

5. Whisk together the oat flour, garbanzo bean flour, potato starch, arrowroot starch, baking powder, baking soda, salt, cinnamon, allspice, and ginger.  Stir in the blueberries and chocolate chips and set aside.

6. Mash the bananas and mix with the oil and the prunes and oatmeal mixture and the flaxmeal mixture.

7. Make a hole in the center of the dry ingredients and pour in the wet ingredients along with the apple cider vinegar. Mix up quickly just until the dry ingredients are moist.

8. Evenly scoop the muffin batter among the 24 muffin cups and bake for 15 minutes or until the cupcakes are golden and puffed and a toothpick inserted in the center comes out clean.

9. Remove the muffins to a wire rack and cool completely.  These keep well in a tightly covered tupperware container.

Cooking Techniques: White Sauce

Something simple yet versatile….

Every August finds me and my family up in the mountains of the Adirondacks where my husband’s family has been managing a forest for 60 years. Driving to the nearest major highway might get me two to three bars on my cell phone.  If I want to use the internet, I have to drive down into the local town to the library. Television viewing is limited to VHS tapes watched on a VCR. The radio picks up two stations, one of which is in Canadian French; and the house we stay in lacks modern amenities such as my coveted food processor, though we did upgrade the oven a couple of years ago from the kerosene/electric version to just plain electric.

For a number of years now I’ve been chief cook for the duration of my family’s stay, catering for dinners we have with the many folks who work for the family forest. While I enjoy the cooking, every summer I am reminded why modern conveniences such as food processors and hand blenders and Kitchen Aids are a joy to have in one’s kitchen. Chopping veggies for a ratatouille to feed 16 people takes about 5 minutes in my food processor — about five times as long by hand. A hand blender can turn lumps smooth in seconds — no matter how long you mash or stir with a masher or wire whisk, you’ll never get a puree. With a Kitchen Aid you can make a cake in minutes — creaming butter by hand takes a lot longer than one imagines it will.

As such, I love it when I can make something spectacular with little time and energy, so upon my return home I was thrilled to see a request for something “simple yet versatile.” My answer is just as simple: a basic white sauce.

White sauce is usually just milk, flour, and butter. On a stove top, you melt the butter (usually about 1/4 cup), stir in the flour (about 1/4 cup), add the milk (about two cups), and continuously stir until the sauce thickens. That’s it. Takes about 2 minutes.

But what you can do with a white sauce is amazing:

  1. You can adapt it to your needs: Have food allergies? You can use any type of “milk”, any type of flour, and any type of “butter” as a substitute. Trying to eat healthier? You can substitute 2 tbsp of olive oil for the butter or you can even omit the butter entirely and just stir about 1/2 cup of the flour into the milk and cook and stir until it thickens.
  2. You can add herbs and spices of any type. You want a curry sauce? Add curry powder. You want a garlic sauce? Simmer with minced garlic or stir in garlic powder. You want to try something a little different? Mix in a lot of thyme with a little bit of nutmeg.
  3. You can change-up the sauce: Want a cheesy sauce? Stir in shredded cheese or slowly melt in cream cheese. Want something with a more adult taste? Substitute a 1/4 cup of the milk with sherry or white wine or vodka. Want something a little less “milky”? Substitute half of the milk with a fat free, low sodium broth such as chicken or vegetable.
  4. You can add vegetables and meats: Looking for a veggie sauce to put over pasta or fish? Saute leeks, mushrooms and spinach and add to the white sauce with black pepper, thyme, and minced garlic. Want a nice sauce to use turn your leftover rice into a casserole? Chop leftover ham and chicken and throw it into a white sauce you’ve seasoned with curry powder.
  5. You can use it for anything: Like to make casseroles? Change up a white sauce to mix into any type of casserole — rice, pasta, veggie, meat…. Want to jazz up the side veggies or the chicken or fish? Make a sauce with freshly chopped herbs. Have just a little bit of leftover meats and veggies which you’re not sure how to use up? Throw them all into a more thickly made white sauce and serve them with toast triangles to the family.
  6. You can even use it for dessert: Want to jazz up your pie when you serve it? Make a slightly thinner white sauce sweetened with a little bit of agave with cinnamon, nutmeg and cloves. Looking for a nice topping for bread pudding? Make a vanilla white sauce by steeping vanilla beans in your milk before making the sauce. Want something to contrast with your chocolate cake? Make a sauce adding white chocolate which you can drizzle over the cake.

Recipe Creations: Chocolate Chip Carrot Snack Cake

“Yeah, but I’d rather eat that than cardboard.”

A couple of weeks ago, my son and I enjoyed a visit to a science museum where I was surprised by a new exhibit. They had created a room filled with information about healthy eating with a couple of hands-on activities for the children looking at skeletal bones and experimenting with food.

As we left the exhibit, we found ourselves behind a group of teenagers and overheard their conversation. One of the girls commented about the display that talked about how bad sugar was for our bodies, and one of the boys responded with, “Yeah, but I’d rather eat that than cardboard.”

I understood what he meant. Too often the “healthy” desserts don’t match up with our expectations for taste, and unfortunately, once someone’s had a negative experience, it turns them off to trying again.

Recently, my high school daughter had a couple of friends over, and they wanted something “sweet”. Since I don’t like to serve “junk”, I thought about what I could make, and carrot cake came to mind. The problem is that carrot cake in its traditional form is so utterly bad for you, despite the carrots. The fat content is really high because of the butter in the cake, the traditional use of nuts, and the cream cheese frosting, and to keep carrot cakes moist and binding, you use a lot of eggs.

I didn’t want to give up on this dessert, though, so I decided to work on a snack cake version, something without frosting and which would be considerably lighter in texture, taste, and calories — and of course, I wanted to eat it, too, so I made it allergy friendly for my allergies to wheat, dairy and nuts, making sure to add some flours higher in protein and fiber and minimizing the use of white refined sugar.

The result? My daughter, who has never actually liked carrot cake, loved it, and one of my daughter’s friends said it was the best carrot cake she’d ever had in her life. While I take that as the hyperbole it was, it is a reminder to me that if we continue to serve good tasting food which also happens to be healthy, then maybe, just maybe, we’ll find a way to reverse the trend of obesity, diabetes, and heart attacks….

Chocolate Chip Carrot Snack Cake

Ingredients:

1 1/2 cup gluten free brown rice flour blend (I used Authentic Foods)

3/4 cup gluten free oat flour

1/4 cup sorghum flour

2 tsp baking powder

1 tsp baking soda

1 tsp ground ginger

1 tsp ground cinnamon

1/2 tsp ground cardamom

1/2 tsp ground nutmeg

1/4 tsp salt

1 cup Enjoy Life mini chocolate chips

20 oz container crushed pineapple in its juices only

3/4 cup agave

3/4 cup safflower oil

1 cup egg whites

2 cups loosely packed shredded carrots

1 tbsp apple cider vinegar

2 tbsp agave

1 tsp ground cinnamon

1 tsp ginger

Baking Instructions:

1. Preheat the oven to 350 degrees and line a 9 x 13 pan with parchment paper.

2. Mix together the brown rice flour blend, the oat flour and the sorghum flour with the baking powder, baking soda, ginger, cinnamon, cardamom, nutmeg and salt.  Add the chocolate chips. Mix well, and set aside.

3. Drain the crushed pineapple and remove 1/2 cup of the crushed pineapples. Reserve the remaining pineapple. Puree the 1/2 cup pineapple in a food processor until it’s smooth.

4. To the pureed pineapple add the agave, safflower oil, egg whites, and shredded carrots. Mix well.

5. Add the carrot mixture to the dry ingredients with the apple cider vinegar. Blend just until everything is incorporated together and the dry ingredients are moist.

6. Pour into the prepared pan and bake in the oven until the cake is golden and a toothpick inserted in the center comes out clean. It took about 25-30 minutes for me, so I suggest setting the timer at 25 min and then checking.

7. While the cake is cooking, take the remaining crushed pineapple and mix it with the agave, cinnamon and ginger. You can put it into the fridge if you want it cold.

8. When the cake is done, serve slices of the cake with dollops of the spiced crushed pineapple.


Happy Fourth: Berry Crisp

website berry crisp

“I want something easy….”

Happy Fourth of July! I received an email yesterday, asking for a dessert that could feed a large amount of people, would be allergy friendly, was Fourth of July-ish, and would be easy to make. Fortunately, I had just the suggestion.

Berry Crisp. It’s one of my children’s favorites, and my son always says that it reminds him of the Fourth of July because of the color of the berries. What I love is that if you keep frozen berries in your freezer, you can whip this up quickly and easily any time of the year.

Berry Crisp

Ingredients:

one 16 oz pkg frozen blackberries*

one 16 oz pkg frozen raspberries*

one 16 oz pkg frozen blueberries*

one 16 oz pkg frozen strawberries*

1/4 to 1/2 cup favorite GF flour (I use either garbanzo bean or sorghum or GF oat flour because they have more fiber and protein than others; use the smaller amount if you want a juicier crisp and the larger amount if you prefer a drier crisp)

1/2 cup Agave (if you like a sweeter crisp, increase this to 3/4 c)

1 tsp cinnamon

1/2 tsp nutmeg

1/4 tsp ginger

4 cups gluten free whole grain oats

1/2 cup GF flour (I use either garbanzo bean or sorghum or GF oat flour because they have more fiber and protein than others)

1 tsp cinnamon

1/2 tsp nutmeg

1/4 tsp ginger

1/2 cup melted vegan butter

1/4 cup Agave

Baking Instructions:

1. Preheat oven to 375 degrees. Lightly grease an 11 x 15 pan with your favorite method. (If you don’t have a large pan like this, you can use several smaller dishes like the three pictured above.)

2. Empty into and mix all the frozen berries in a large bowl with the flour until they’re coated.

3. Combine the agave with the cinnamon, nutmeg and ginger and coat the berries with the agave mixture.

4.  Cover the pan tightly with aluminum foil, and bake the berries in the preheated oven for about half an hour until the berries are warm and soft and starting to bubble a little.

5.  While the berries are cooking, mix the whole oats with the flour, cinnamon, nutmeg and ginger. Mix together the melted butter and agave, and mix the oats with the butter mixture. Set aside and let the oat mixture cool.

6.  After the berries have cooked for the half hour, remove the foil from the pan, and reduce the oven to 325 degrees.

7.  Give the oat mixture a good stir. (The oats should be cooled now and have formed little clumps.) Evenly spread the oat mixture over the berries.

8.  Bake the crisp in the lower heat oven for another 15 to 20 minutes, just until the oat mixture has begun to crisp up and brown just a little.  The berries will be bubbling. (Be sure to check after 15 minutes because the oats can become too toasty very quickly.)

9.  The crisp can be served while warm with vanilla “ice cream” or “whipped cream” or just plain. It can also be eaten room temperature or cold.

If you have leftovers, you can wrap it and leave it on the kitchen counter or you can put it into the fridge.  My son thinks it’s a great breakfast food!

* NOTE: Obviously, if the season is right or if you simply prefer and don’t mind paying more, you can use fresh berries instead of frozen. If you use fresh berries, then you don’t need to use very much flour at all, so reduce the flour coating to about 2 tbsp or leave it out altogether, depending on how juicy or dry a crisp you prefer.