Autumn Appetites: Fruit Butter Muffins

“But it doesn’t look like butter….”

When my oldest was in preschool, I asked if she wanted to try apple butter on her toast, and when I placed it on the table, I could tell by her face that she was confused. “But it doesn’t look like butter,” she said.

For folks who haven’t enjoyed the taste of a fruit or vegetable butter, it’s basically a spread like jam or jelly, only with a softer, more paste-like consistency, and it is extremely easy to make your own, especially if you own a crock pot. You simply slowly cook the fruit for a long time so that it breaks down completely. And homemade fruit or vegetable butters are very allergy friendly because you control what goes into the recipe.

Folks who have been reading my posts for a while know that I like recipes which require little work, and making fruit or vegetable butter in the crock pot fits the bill perfectly. And this time of year, when I’m looking for a myriad of ways to use apples and pumpkin, making them into “butters” is ideal, though fruit and vegetable butters can be made with just about any fruit or vegetable… apples, plums, pumpkins, squash, peaches, mangoes, strawberries, turnips, cherries….

You simply chop the fruit or vegetable into pieces which you place into your crockpot. For fruit like apples, pears, plums, etc… I don’t even peel the fruit. I simply core and slice, because the nutrients are in the skins, and you’re cooking the fruit for so long that the skins break down. Vegetables with hard rinds like pumpkin and squash, though, you’ll want to peel.

Once the fruit or vegetables are in the crock pot, you can decide if you want to make the butter plain or spice it up. Adding spices like cinnamon, nutmeg, ginger, coriander, cloves, etc…, or flavors like lemon or vanilla or orange peel, etc… adds dimension to the flavor. For folks who want a sweeter butter, you can add some agave or truvia or coconut sugar (or sugar if you use it). Unless my fruit is very tart, however, I don’t add any sweetener.

Then you just turn your crock pot to low and let the fruit break down over a long period of time. How long will depend on the amount you’re making and the thickness of your fruit or vegetable, anywhere from 6 to 12 hours. You want to cook the fruit or vegetables long enough that the consistency is very thick, way past applesauce consistency. Some folks recommend propping the top of your crock pot lid to help with evaporation. I’ve never done that and haven’t had any problems with the fruit being too watery, but you can choose which way you’d like to try.

Once your fruit or vegetables are completely cooked down, you can cool them and have a chunky butter or you can puree the fruit or vegetables with a food process or blender into a smoother butter. Your choice. The butters will keep well in the fridge for a couple of weeks, or you can freeze them for several months. If you want to extend the life of the fruit butter in the fridge, you can add sugar and lemon juice which help to preserve the fruit and keep mold from growing. And of course, you can always can the butters if you are one the type to can, which I am not. *grin*

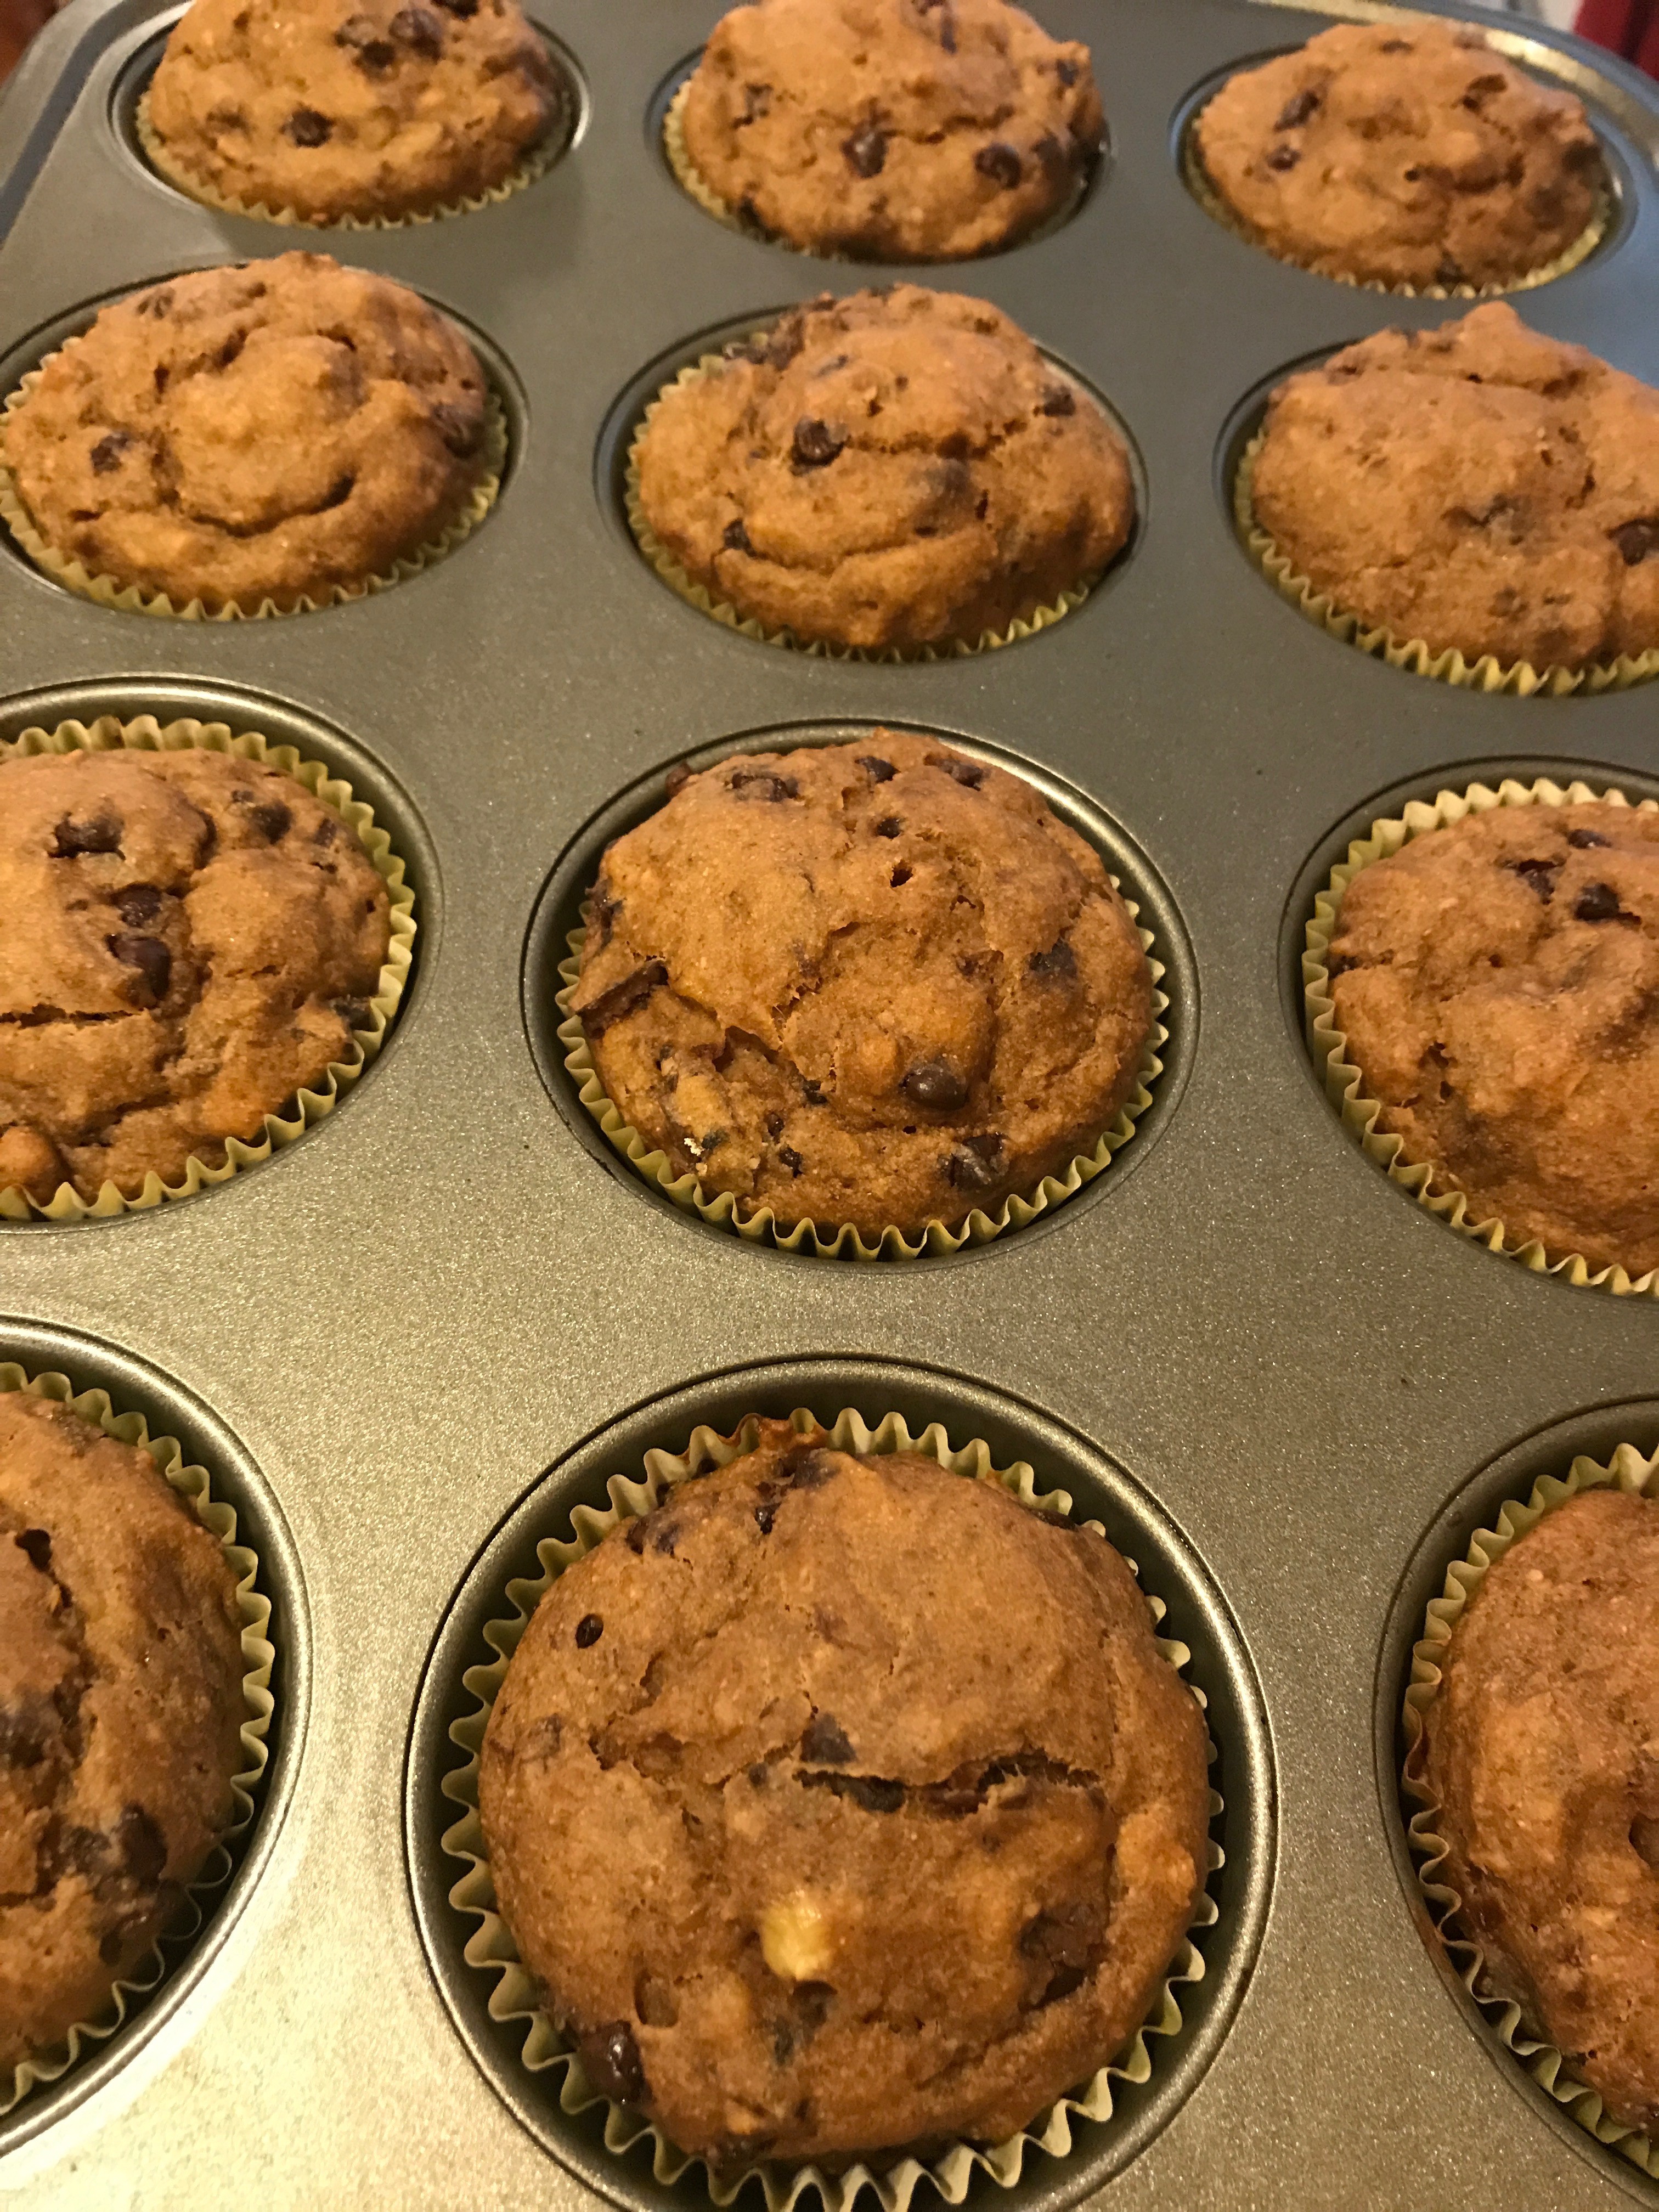
Fruit butters can be used in place of butter and jams on toasts, muffins and scones. It can be used in place of applesauce in recipes. It can be used to thicken sauces. It can be added to cookies and pies for a richer flavor. The list is endless. For myself, I like to make muffins with the butters, and below I’ve pasted in recipe that is one of my favorite creations. I have used apple butter, pumpkin butter, winter squash butter, and strawberry butter so far, and I can’t wait to try some others!

Fruit Butter Muffins 

Ingredients:

8 ounces of chopped dried fruit, your choice

1 cup gluten free instant oats

1 1/2 cup boiling water

2 tbsp ground golden flaxseed

6 tbsp water

3 cups gluten free flour blend (I like to use a garbanzo bean, sorghum, and oat flour blend)

2 tsp baking powder

1 tsp baking soda

1/2 tsp salt

2 tsp cinnamon

1 tsp nutmeg

1 tsp ginger

3/4 cup plant base oil (extra light olive, safflower, avocado, etc…)

1/2 cup fruit or vegetable butter

2 tbsp apple cider vinegar

Baking Instructions:

1. Preheat the oven to 350 degrees and line 24 muffin cups with cupcake liners or grease them so the muffins won’t stick to your pan.

2. Mix the chopped dried fruit with the oats in a bowl, and pour the boiling water over them, pushing the dates and oats down into the water so they are covered. Let sit.

3. Whisk together the ground flax seed with the water, and set aside.

4. Whisk together the flour, baking powder, baking soda, salt, cinnamon, nutmeg, and ginger. Set aside.

5. Mix the oil with the fruit butter, oatmeal mixture, and the flax meal mixture.

6. Make a hole in the center of the dry ingredients and pour in the wet ingredients along with the apple cider vinegar. Mix up quickly just until the dry ingredients are moist.

7. Evenly scoop the muffin batter among the 24 muffin cups and bake for 15 minutes or until the cupcakes are golden and puffed and a toothpick inserted in the center comes out clean.

8. Remove the muffins to a wire rack and cool completely. These keep well in a tightly covered tupperware container.

Advertisement

Creative Cooking: Dried Plum Muffins

“It’s the bacon song….”

Last night we discovered that our fridge is not working as it ought. Specifically, the refrigerator part (but not the freezer) is not staying as cold as it needs to be to keep meat from being spoiled, and when I went to start dinner, I learned that the ground turkey I had bought had gone bad. Since it was close to dinner time, I opted to do what I usually do in a crunch… we had breakfast for dinner.

The children love when we have breakfast for dinner. Pancakes, waffles, sausages, bacon, eggs… these are some of their favorite foods. Given what we had in the pantry and the freezer, last night ended up being pumpkin pancakes and turkey bacon with salad as our veggies. This, of course, meant there were pancakes and bacon available for the children to eat again this morning for breakfast.

When our son went to get bacon to eat, he began to sing. It turned out it was the “bacon song” he was making up and singing. When we laughed, he switched to the “apple doesn’t fall far from the tree” and reminded my husband and me that we do strange things all the time!

In fact, I was just accused of oddness last week when I made dried plum muffins. Someone thought it weird that I would even use dried plums. Another wondered why I did not call them prunes. I explained that dried plums have a lot of fiber, potassium, good vitamins like K, A and B, and are naturally sweet so you don’t need to add sugar. The reason I call them dried plums is because that is what prunes are, and I find people react oddly when you say you’ve made something with prunes. Of course, I discovered that dried plum muffins received the same reaction, so it may not be the name!

The fact, though, is that the muffins I made are healthier muffins with rolled oats and flax seed and garbanzo bean flour, so in addition to having no sugar, they are higher in fiber and protein. The version below have mini chocolate chips because I was making them for a children’s party, but you can omit the chocolate chips and then serve them as a breakfast muffin!

Dried Plum Muffins

Ingredients:

7 ounces of pitted, chopped dried plums (prunes)

1 cup gluten free rolled whole oats

1 1/2 cup boiling water

2 tbsp ground golden flaxseed

6 tbsp water

1 cup gluten free oat flour

1 cup garbanzo bean flour

1/3 cup potato starch

2/3 cup arrowroot starch

2 tsp baking powder

1 tsp baking soda

1/2 tsp salt

2 tsp cinnamon

1 tsp nutmeg

1 cup Enjoy Life mini chocolate chips

1 cup mashed, ripe bananas

1/2 cup safflower oil

1/2 cup water

2 tbsp apple cider vinegar

Baking Instructions:

1. Preheat the oven to 350 degrees and line 24 muffin cups with cupcake liners or grease them so the muffins won’t stick to your pan.

2. Mix the chopped dried plums with the oats in a bowl, and pour the boiling water over them, pushing the dried plums and oats down into the water so they are covered. Let sit.

4. Whisk together the ground flaxseed with the water, and set aside.

5. Whisk together the oat flour, garbanzo bean flour, potato starch, arrowroot starch, baking powder, baking soda, salt, cinnamon, and nutmeg.  Stir in the chocolate chips and set aside.

6. Mash the bananas and mix with the oil and the dried plums and oatmeal mixture and the flaxseed mixture.

7. Make a hole in the center of the dry ingredients and pour in the wet ingredients along with the apple cider vinegar. Mix up quickly just until the dry ingredients are moist.

8. Evenly scoop the muffin batter among the 24 muffin cups and bake for 15 minutes or until the cupcakes are golden and puffed and a toothpick inserted in the center comes out clean.

9. Remove the muffins to a wire rack and cool completely.  These keep well in a tightly covered tupper ware container.

Healthy Habits: Orange Cranberry Muffins and Pancakes

“Of course you’re sick….”

It never fails. A day or two into our holiday break, one of the children or my husband starts sniffling and coughing. Then one by one, they all fall victim and within three to five days all four are sick. The same thing happens during the February winter break. The adrenaline which keeps their immune system pumping through the semesters seems to slow down, and their bodies’ immune systems drop their defenses. Fortunately, over the years, my body appears to have become immune to their sicknesses so 98% of the time now, I’m healthy as I nurse them as opposed to the earlier years where I was sick as a dog, too, but had to be the mom who took care of everyone else!

While everyone is sick, I’m always trying to find ways to get more good nutrients like vitamin C into them. One of the ways they prefer is when I make foods which have ingredients high in vitamins and minerals. Oranges and cranberries are both good for the immune system so I’ve created muffin and pancake recipes which the family likes to eat.

To help boost the “good” in the muffins and pancakes I use high fiber, high protein flours and add both orange juice and cranberries. I freeze fresh whole cranberries in the freezer in two cup bags which I can just pull out when I need them, and I keep unsweetened frozen orange juice concentrate in the freezer as well. For both recipes, I use the frozen cranberries and orange juice concentrate as is without any thawing.

Enjoy!

Orange Cranberry Pankcakes

(These make a lot: enough for a family of five with leftovers for the school week

so if you don’t want that many make half the recipe instead.)

Ingredients:

4 cups milk of choice (cow, soy, flax, etc…)

1/4 cup lemon juice

1/3 cup vegan soy free butter

1 tbsp safflower oil (or canola or grapeseed or sunflower or other type you prefer)

2 cups cranberries (fresh or frozen, not dried)

1/2 cup unsweetened orange juice concentrate (frozen is fine)

1/2 cup Agave

2 eggs (or 2 tbsp ground flaxseed mixed with 6 tbsp water or 1/2 cup aquafaba*)

4 cups of your favorite high fiber, high protein gluten free flour blend **

1 tsp salt

5 tsp baking powder

Cooking Instructions:

  1. Preheat a pancake griddle to 350 and grease with preferred method. If using a pan, don’t warm the pan until you’re ready to cook the pancakes and cook the pancakes on medium heat.
  2. Mix the milk with the lemon juice and set aside.
  3. Melt the butter in a microwave for a few seconds and mix it with the oil. Set aside.
  4. In a food processor, chop up the cranberries with the orange juice concentrate and agave. Stir in the milk and the butter with the two eggs. Set aside.
  5. Mix the flour with the salt and baking powder.
  6. Add the wet ingredients to the dry ingredients and mix just until everything is moistened and the batter begins to bubble a bit.
  7. Use a 1/4 cup to pour batter onto the prepared griddle. When the pancake edges are dry and the pancake batter begins to pop little bubbles, turn them over and cook a minute on the other side to complete the pancake.
  8. If making a lot of pancakes to store for the week, put them in single layers on a cooling rack to cool completely before putting them into the fridge. To keep warm for eating, put the pancakes on an oven proof plate in the oven on the lowest temperature setting.

Notes: *Aquafaba is the liquid from a can of chickpeas. To substitute for eggs, use 1/4 cup per egg and whisk until frothy (foamy but still clear and not white like a meringue.)

** See Food FAQs under Ingredients to see some recipes for GF blends https://pajamaliving.com/flour/

Orange Cranberry Muffins

Ingredients:

2 cups cranberries (fresh or frozen, not dried)

1/2 cup unsweetened orange juice concentrate (frozen is fine)

1/2 cup Agave

1 cup milk of choice (cow, soy, flax, etc….)

1/2 cup sorghum flour

1/2 cup quinoa flour

1 cup tapioca starch

1 cup potato starch

1 tbsp baking powder

1/2 tsp salt

1/2 tsp cloves

1 tsp cinnamon

1/2 tsp xanthan gum

1/2 cup vegan soy free butter

1/2 cup Agave

2 eggs

Baking Instructions:

  1. Preheat the oven to 350 degrees. Line 24 cupcake liners in muffin tins or grease the muffin tins with your preferred method.
  2. In a food processor, chop up the cranberries with the orange juice concentrate and agave. Stir in the milk and set aside.
  3. Mix together the sorghum flour, quinoa flour, tapioca starch, potato starch, baking powder, salt, cloves, cinnamon and xanthan gum. Set aside.
  4. Cream the vegan butter with mixer. Scrape down the sides. Slowly add the agave, mixing on low until the butter is creamy.
  5. Add the eggs, one at a time, mixing the first in well before adding the second.
  6. Scrape down the sides and add the dry ingredients alternately with the cranberry milk mixture, beginning and ending with the dry ingredients, scraping down the side as needed.
  7. Fill the cupcake liners evenly with the batter (will be about 3/4 full).
  8. Bake for 15 minutes until cupcakes are puffed, golden and a toothpick inserted in the center comes out clean.
  9. Cool muffins on a wire cooling rack.

Autumn Appetites: Cinnamon Apple Strudel Muffins

apple-cinnamon-muffins

“Will you teach me to cook?”

A couple of months ago my son asked if I’d give him weekly cooking lessons because as he explained, “When I grow up I need to know how to make the two most important meals of the day:  breakfast and dessert!”

So, over the past several weeks he’s learned how to make pancakes, waffles, French toast, marble cake, brownies, and oatmeal crumb cake. This morning, since Autumn has officially begun, and my favorite apples, Honey Crisp, are finally in season, I thought I’d teach him how to make my version of an apple strudel.

Strudels are lovely recipes where dough is filled with yummy fruit, rolled and cooked. I have found them to be rather messy, though, and not easy to eat without a fork and knife. I do, however, love to make use of Honey Crisp apples during the Fall months because they are naturally sweet which means I don’t need to add any additional sweetener to them.

The recipe that follows is sort of a combination between an apple strudel and a cinnamon roll which is cooked in the shape of a muffin using muffin tins. I got the idea from a recipe by Nicole Hunn of Gluten Free on a Shoestring (http://glutenfreeonashoestring.com/). If your only issue is gluten, she is a good source to refer to for recipes. Since I, however, have multiple allergies, I’m always having to adjust her recipes to fit my particular needs. In this case, though, her idea of making cinnamon buns in a muffin tin appealed to me, and I adapted that method for my recipe, which it turns out even my eleven year old can easily make.

Making this recipe for a Saturday morning is lovely because while the forming of the muffin takes about 20 minutes, the last half of the time is them baking in the oven while you make something else to go with them, which in our case this morning was turkey breakfast sausage.

For the recipe, I created my own flour blend because I wanted the “breakfast” muffins to be fiber full and have some protein. I found over time that a combination of sorghum, millet, oat, brown rice and tapioca flour gives us the best taste and texture. I also opted to use coconut sugar because I stay away from refined white sugar. Folks who have coconut allergies, though, should go ahead and use sugar or some other sugar substitute. In addition, I chose flax milk for my liquid because I figure it doesn’t hurt to add more omega 3’s to our diet, but again, if folks are allergic or prefer some other milk, go for it.

Cinnamon Apple Strudel Muffins

Ingredients:

Filling:

Apple:

2 Honey Crisp apples

1/4 cup water

1/2 tsp cinnamon

Cinnamon:

1 cup coconut sugar

2 tablespoons cinnamon

1/4 cup vegan soy free butter (or regular if you’re not allergic and prefer)

Batter:

1 cup sorghum flour

1 cup millet flour

1 cup tapioca flour

3/4 cup brown rice flour

1/4 cup oat flour

2 tsp xanthan gum

2 1/2 teaspoon baking powder

1 1/2 tsp cinnamon

1/2 tsp nutmeg

1/4 tsp salt

1/2 cup coconut sugar (or sugar, if you’d prefer or are allergic)

1/4 cup plus 2 tablespoons of vegan soy free butter (or regular if you’re not allergic and prefer)

2 eggs

1 cup flax milk (or other type if you prefer or are allergic; I would’t recommend rice milk, though, because it’s too thin)

Topping:

1 tbsp vegan soy free butter

1 tbsp coconut sugar

1/2 tsp cinnamon

Baking Instructions:

  1. Preheat the oven to 350 degrees and grease a 12 muffin tin with your preferred method.
  2. Peel, core and chop the apples by cutting them into quarters, then slicing each quarter thinly into five or six slices, turning the slices on their sides and cutting them on the short ends into small strips. You’ll have a couple cups worth of matchstick width pieces of apples.
  3. Put the apple pieces into a shallow pan which allows the pieces to be one layer. Pour the water over the apples and sprinkle the cinnamon on top. Stir the apples to coat them well with the cinnamon and then saute the apples over medium-low heat. The water will come to a boil and then slowly dissipate. Stir occasionally until all the water is gone and the apples are soft. Usually this entire process only takes about five minutes. Turn the heat off and let the apples cool while you make the rest of the filling and the batter.
  4. Mix the coconut sugar with the cinnamon and set aside. Melt the vegan butter and set aside.
  5. Mix the sorghum, millet, tapioca, oat and brown rice flours with the xanthan gum, baking powder, cinnamon, nutmeg, salt and coconut sugar.
  6. For the next part, it works well if you have a mixer with a dough handle but if you don’t have a dough handle, you can mix the dough with spoon and then finish kneading everything in by hand: Add to the dry ingredients, the vegan butter, eggs and milk, incorporating them just until you have a ball of dough, if you’re using the mixer. If you’re doing it by hand, mix the ingredients into well incorporated and then knead on parchment paper sprinkled with flour until you have a soft, pliable ball of dough.
  7. Put the dough ball onto parchment paper sprinkled with flour (I use the brown rice flour but you can use any type you’d like). Lightly sprinkle the dough with flour and roll it into an 15 by 12 inch rectangle. I find it’s best to start in the center and slowly work your way outward in all four directions, occasionally shaping the dough with your hands into a rectangle shape. (This was the part my son found to be the most fun!)
  8.  Using a brush, brush the melted butter over the surface of the dough, leaving about a 1/4 inch on one of the short ends free of butter. It’ll seem like you have a lot of butter but be sure to use all of it on the top of the dough.
  9. Sprinkle the butter surface of the dough with the coconut sugar mixture, leaving that 1/4 inch on the short end free as before of anything.
  10. Carefully spread the apple slices evenly on top of the cinnamon covered dough so that they’re in an even single layer but mostly covering the surface with the exception of the 1/4 inch on the short end.
  11. Starting on the short end opposite the free 1/4 inch side, carefully tuck in the end and begin rolling the dough toward the uncovered end. You can use the parchment paper to help roll. With every roll of the dough, it helps to use your hands to tighten it along the entire edge before continuing with the rolling. If you are using the parchment paper and have sprinkled flour, the dough will easily roll off the paper. If you are finding that it does stick, use a spatula to gently unstick the dough from the paper before continuing with your rolling. (I have never had to do this, but just in case….)
  12. When you reach the end which is free of filling, gently seal the edge and use your hands to carefully shape the log so it’s evenly round along the entire log.
  13. Slice the log into 12 even pieces. I like to just lay a 12 inch ruler and mark off the 12 inches and then use a serrated knife to cut the pieces.
  14. Put the pieces into the greased muffin tins. You should find that they just fit into the tins. You may need to shape/squash them a bit on the sides to get them in if your dough is nice and puffy, but that’s okay.
  15. Bake in the preheated oven for 25 minutes. They’ll be puffed and golden brown. While the muffins are baking, mix the tablespoon of coconut sugar with the cinnamon. Set aside.
  16. Using a butter knive, gently go around the edges to release them from sticking. Let them cool about five minutes in the tins before removing them to a cooling rack. While they are cooling in the tins, divide the tablespoon of butter evenly on top of each of the 12 muffins and brush them until the butter is melted. Sprinkle the sugar/cinnamon mixture evenly on top of the muffins and let it melt into the butter.

Note: For the holidays, instead of using the cinnamon sugar on top, I make an icing to drizzle on top which is tofu cream cheese blended with agave and cinnamon. If you prefer to use sugar, you can mix powdered sugar with cinnamon and milk.


Creative Cooking: Currant Muffins

“Muffins again?”

For the past month my life has been drama, drama, drama – quite literally. A musical I wrote had its debut this past weekend so I had been busy directing rehearsals, working with AV for lights and sounds, producing, finalizing music, and everything else which goes into putting on a drama performance.

As such, the meals my family has eaten has been almost all crock pot meals because those I can throw together in the morning, and when we’re ready to eat in the evening, it’s ready for us. So stews, soups, chili, and the like have been our mainstays. To go with these dishes, I had been making muffins. Normally we only have muffins every so often, but after a week or two of eating muffins more regularly, I realized that our family was in a muffin rut. Blueberry, pumpkin, zucchini squash, and banana muffins seem to be our go-to muffins.

So, after a couple of weeks, I was wanting something different. As I perused the staples in my kitchen pantry, I found Zante currants leftover from our Christmas cookies. For folks not familiar with Zante currants, they’re basically just baby raisins. True currants, which we don’t often find in the States, are a different type of tart berry. (Anyone familiar with Anne of Green Gables knows the difficulties that homemade currant wine caused the literary heroine. *laugh*)

Because Zante currants are small and sweet, I figured they’d make for a nice muffin, so I pulled them out of the pantry and went to work. I didn’t want the currants to be hard in the muffin so I first soaked them in boiling water to soften them. Then, because I didn’t want the muffins to simply be the fruit sugars, I opted to puree cooked vegetables (we’ve now tried the muffins with cooked pureed carrots, butternut squash, and pumpkin – all three have worked well). I used a plant based oil (both safflower and grapeseed have worked well) and egg whites only to keep down the fat. I also simply used a store bought gluten free flour blend to keep things easy. I chose to use Agave for the moisture and added some cinnamon and cloves for taste. Even my middle child who doesn’t like “chunks” in muffins declared it a success.

Currant Muffins

Ingredients:

1 cup boiling water

2 cups Zante currants

2 cups cooked pureed vegetable of choice (carrots, pumpkin, butternut squash, etc….)

3/4 cup liquid egg whites

2/3 cup plant oil (I’ve used both safflower and grapeseed)

1 cup Agave

3 1/2 cups gluten free flour blend

3 tsp baking powder

1 tsp soda

2 tsp cinnamon

1 tsp cloves

1/2 tsp salt

1 tbsp apple cider vinegar

Baking Instructions:

  1. Preheat the oven to 400 degrees and line 30 muffin cups with liners.
  2. Add the boiling water to the currants and let sit for at least five minutes.
  3. To the currants add the pureed vegetable of choice, the egg whites, the oil, and the Agave.  Mix well and set aside.
  4. Blend together the flour, baking powder, baking soda, cinnamon, cloves, and salt.
  5. Add the dry ingredients to the wet ingredients with the vinegar and mix just until the dry ingredients are completely moistened.
  6. Evening divide the batter among the muffin cups.
  7. Bake for 15 minutes or until muffins are puffed, golden and a toothpick inserted into the center comes out clean.


With Gratitude: Thanksgiving Muffins

“Only two weeks to Thanksgiving and then it’s Advent!”

My son ran into the kitchen today to announce that my time to pretend the holidays were not approaching was at an end. I could ignore his heralding at six months, three months, and even one month… but two weeks! Whether I was ready or not, it was time to begin thinking.

The fact is that when you have multiple food allergies, thinking about holiday meals can be something you’d like to put off if you can, because thinking about them means figuring out exactly which and how many dishes you’ll be making simply to ensure that you have food to eat.

If you’re new to the blog, you can search by category for “holidays” and find posts I’ve previously submitted about allergy friendly holiday cooking — everything from how to minimize stress to how to revamp pies, cakes, entrees and side dishes.

This week, however, a young mom wrote asking me about ideas for a Thanksgiving muffin. Her father-in-law cannot have eggs, dairy and wheat, so she thought muffins might be easier to make than rolls. She wanted the muffins to be “Thanksgiving-ish”, though, and I had just the recipe for her.

Thanksgiving Muffins. When I think about Thanksgiving, pumpkins, squash, apples, and cranberries always come to mind. So I have a recipe that you can make just about any way you want, varying the type of cranberries you choose, your choice of pumpkin, winter squash or even a homemade applesauce in place of pumpkin, and even the spices you decide to include. And the bonus is that they’re gluten, dairy, egg, soy, and nut free, too.

Thanksgiving Muffins

Ingredients:

4 tbsp ground golden flaxseed

12 tbsp water

2 cups pureed cooked pumpkin or winter squash (butternut, acorn, etc…) or apples

2/3 cup safflower oil

3/4 cup Agave

1 1/2 cup fresh cranberries, dried cranberries, or cooked cranberries (My kids like the cooked cranberries best because they’re softer and I usually cook them with a bit of agave to make them sweeter, but you can also use fresh cranberries if you want a tart/sweet flavor contrast to the muffins or dried cranberries if you want the muffins to have some chewiness and little more sweetness)

3 1/2 cup gluten free flour blend (I usually use a homemade mixture of sorghum, garbanzo bean, and oat flour with arrowroot starch but I’ve used Bob’s Red Mill and King Arthur and Authentic Foods)

2 1/2 tsp spices (any combination of cinnamon, nutmeg, ginger, cardamom, allspice and/or cloves are good)

1/2 tsp salt

1 cup boiling water

2 tbsp vinegar (I like to use apple cider vinegar but a white vinegar is fine, too)

Baking Instructions:

  1. Preheat the oven to 400 degrees and fill 24 muffin cups with cupcake liners. (The orange, red-flecked muffins look pretty in a white liner if you put the muffins in a bowl to put on the table for the Thanksgiving meal.)
  2. Combine the flaxseed with the water and let sit for five minutes.
  3. In a large bowl mix together the cooked pureed pumpkin or squash or apples with the oil, agave and flaxseed mixture. Set aside.
  4. In a food processor chop the cranberries, no matter what type you’re using, because this will distribute them more evenly throughout the muffin. Add to the wet mixtures.
  5. In another bowl mix the flour, spices, salt, baking powder, and baking soda.
  6. Add the dry ingredients to the wet, along with the water and vinegar. Mix until all the dry ingredients are moistened.
  7. Evenly distribute the batter among the 24 muffin cups. They will be filled almost to the top.
  8. Bake in preheated oven for 15 to 20 minutes. Muffins will be puffed and golden brown and a toothpick inserted in the center will come out clean.


Creative Cooking: Prunes and Beets

“It’s so beautiful!”

My son has always been afraid of thunderstorms, despite everything my husband and I have done to convince him that he has nothing to fear.

Last week, however, we had a three day heat wave; and one night the hot temperatures brought severe thunderstorms. As I was driving home from a meeting, I noticed that the heat was causing an electrical storm to light up the sky a few miles away. I rushed home, yelled at my children to hop into the car, and drove back up to the main road.

As my son watched the “lights” in the sky, he commented on their beauty and suggested we put on some Beethoven to match the rhythm of the lightning. After several minutes of watching, he didn’t want to return home, though, finally, reluctantly, he did allow me to drive home.

As we drove, I asked him what he thought about thunderstorms now, and he said he never realized they could be so beautiful.

His reaction to the lightning storm is similar to what I hear people say about unusual foods like prunes and beets. So often, people “don’t like” them without having tried them. They think they know enough to make a finite decision about them, when really they don’t.

Prunes are high in fiber and don’t cause the same types of spikes in sugar levels while delivering a wonderful sweetness to anything you put into them. Beets are high in vitamins and minerals and fiber, and like prunes, have a naturally sweet taste. As such, both prunes and beets are great additions to desserts. Below are a muffin and a bread recipe I just recently created for the fun of it.

Banana Beet Bread

Ingredients:

1 cup mashed ripe bananas (ripe means they’re spotted brown on the peel)

3/4 cup roasted chopped beets (about two; roasting beets brings out their flavor more; then I just chopped them up in the food processor — you can also now buy the beets already cooked up in packages in the stores if you don’t want to cook them yourself!)

1/2 cup safflower oil

1/2 cup Agave

1 egg

2 cups gluten free flour blend of your choosing (I used a combination of flours which mixed garbanzo bean, sorghum, and brown rice flours with potato starch and tapioca flour)

2 tsp cinnamon

1 tsp nutmeg

1/2 tsp ginger

1/4 tsp cloves

1/2 tsp baking soda

2 tsp baking powder

1/4 tsp salt

1 tbsp apple cider vinegar

Baking Instructions:

  1. Preheat the oven to 350 degrees. Line a 9 x 5 pan with parchment paper so that the paper is sticking out of the pan for lifting purposes.
  2. Combine the bananas, beets, oil, agave and egg. Put aside.
  3. Mix the flour, cinnamon, nutmeg, ginger, cloves, baking soda, baking powder, and salt.
  4. Add the dry ingredients to the wet with the apple cider vinegar and quickly mix everything together until the dry ingredients are completely moistened.
  5. Pour the batter into the prepared pan and let it sit for about five minutes before putting it into the oven.
  6. Bake for 35-40 minutes until the bread if puffed, a golden red hue, and a toothpick inserted into the center comes out clean.
  7. Cool for five minutes on a wire cooling rack in the pan. Then use the parchment paper wings to remove the bread from the pan. Cool for another 10 to 15 minutes before removing the parchment paper and allowing the bread to cool completely.

Breakfast Prune Muffins

Ingredients:

9 ounces of pitted, chopped dates

2 tbsp garbanzo bean flour

1 cup gluten free rolled whole oats

1 cup boiling water

2 tbsp ground golden flaxseed

6 tbsp water

1 cup gluten free oat flour

1 cup garbanzo bean flour

2/3 cup potato starch

1/3 cup arrowroot starch

2 tsp baking powder

1 tsp baking soda

1/2 tsp salt

2 tsp cinnamon

1 tsp allspice

1 tsp ginger

1 cup blueberries

1 cup Enjoy Life mini chocolate chips (optional, but my children like it with them when I make them as a snack food for afterschool)

Four 6 inch bananas (comes to about 1 1/4 cups mashed)

1/2 cup safflower oil

2 tbsp apple cider vinegar

Baking Instructions:

1. Preheat the oven to 400 degrees and line 24 muffin cups with cupcake liners or grease them so the muffins won’t stick to your pan.

2.  Put the prunes and flour into a food processor and finely chop the prunes into tiny pieces. (This will distribute the prunes throughout your batter.)

3. Mix the finely chopped prunes with the oats in a bowl, and pour the boiling water over them, pushing the prunes and oats down into the water so they are covered. Let sit.

4. Whisk together the flaxmeal with the water, and set aside.

5. Whisk together the oat flour, garbanzo bean flour, potato starch, arrowroot starch, baking powder, baking soda, salt, cinnamon, allspice, and ginger.  Stir in the blueberries and chocolate chips and set aside.

6. Mash the bananas and mix with the oil and the prunes and oatmeal mixture and the flaxmeal mixture.

7. Make a hole in the center of the dry ingredients and pour in the wet ingredients along with the apple cider vinegar. Mix up quickly just until the dry ingredients are moist.

8. Evenly scoop the muffin batter among the 24 muffin cups and bake for 15 minutes or until the cupcakes are golden and puffed and a toothpick inserted in the center comes out clean.

9. Remove the muffins to a wire rack and cool completely.  These keep well in a tightly covered tupperware container.

Simple Pleasures: Chocolate Chip Muffins

website choc chip muffins

“Well, can you make it a junky, healthy snack, then?”

My son has a sweet tooth – there is no doubt about that – and every day he looks for a way to finagle a treat. For a mom who’s trying to feed her children healthy foods, it can become tiresome to always be “fighting” about what is good and what it isn’t. So, I’m always creating recipes which can be a compromise between what my son considers a treat and what I think is healthy.

The other day, my son really wanted something “junky” as he called it, and I advocated for something healthy. When he asked me for a “junky, healthy snack” I laughed, but then I got to work. After all, if I could create something he thought was “junky” but it really wasn’t, then we’d both be happy.

I asked my son what he wanted, and he replied that he wanted a chocolate chip muffin. He, of course, meant one of those monstrosities they sell at the store which is all white flour and butter and huge chocolate chips, a lot of them. I wasn’t going for that, but it did give me an idea, and the result was a low fat chocolate chip muffin which was full of potassium from bananas, antioxidants and fiber from dates, and protein (and fiber) from oat and garbanzo bean flour – plus the muffins were free of dairy, soy, gluten, eggs, nuts, and refined sugar. What more could a mother ask?

And my son plus my daughters, and later, my writing group, all enjoyed the muffins immensely.

Chocolate Chip Muffins

Ingredients:

8 ounces of pitted, chopped dates

1 cup gluten free rolled whole oats

1 cup boiling water

2 tbsp ground golden flaxseed

6 tbsp water

1 cup gluten free oat flour

1 cup garbanzo bean flour

2/3 cup potato starch

1/3 cup arrowroot starch

2 tsp baking powder

1 tsp baking soda

1/2 tsp salt

2 tsp cinnamon

1 tsp nutmeg

1 tsp ginger

1 cup Enjoy Life mini chocolate chips

Four 6 inch bananas (comes to about 1 1/4 cups mashed)

1/4 cup safflower oil

2 tbsp apple cider vinegar

Baking Instructions:

1. Preheat the oven to 400 degrees and line 24 muffin cups with cupcake liners or grease them so the muffins won’t stick to your pan.

2.  Use a food processor to finely chop your dates into tiny pieces. (This will distribute the dates throughout your batter.)

3. Mix the finely chopped dates with the oats in a bowl, and pour the boiling water over them, pushing the dates and oats down into the water so they are covered. Let sit.

4. Whisk together the flaxmeal with the water, and set aside.

5. Whisk together the oat flour, garbanzo bean flour, potato starch, arrowroot starch, baking powder, baking soda, salt, cinnamon, nutmeg, and ginger.  Stir in the chocolate chips and set aside.

6. Mash the bananas and mix with the oil and the dates and oatmeal mixture and the flaxmeal mixture.

7. Make a hole in the center of the dry ingredients and pour in the wet ingredients along with the apple cider vinegar. Mix up quickly just until the dry ingredients are moist.

8. Evenly scoop the muffin batter among the 24 muffin cups and bake for 15 minutes or until the cupcakes are golden and puffed and a toothpick inserted in the center comes out clean.

9. Remove the muffins to a wire rack and cool completely.  These keep well in a tightly covered tupper ware container.


Creative Cooking: Using Baby Food

“If you could choose one superpower, Mommy, what would it be?”

My son is always asking me questions which cause me to think. When he asked me about which superpower I’d like to have, I had to take few minutes to consider my answer. I finally said, it would be difficult for me to choose between supersonic hearing so I could catch what my children were whispering about and the ability to fly, just because, well, that would be cool.

In response, my son said that he would choose the ability to change into different animals because then he’d have lots of powers. If he wanted to fly, he’d become a bird; if he wanted to be invisible, he’d become a chameleon; if he wanted to be fast, he’d become a cheetah; if he wanted to be strong, he’d become an elephant. (These are the examples he gave me.)

I have to say that I was quite impressed. My limited linear thinking brought a quandry, forcing me to have to choose between superpowers I wanted.  My son, however, had thought outside the box and found an answer which would give him the opportunity to have all the possible powers he could want.

When it comes to cooking, I think we can sometimes get caught in the same trap. We think about how to cook and what to cook in only one way, whether it’s only cooking the way we were taught or sticking to only traditional methods and ingredients or  being afraid to ever experiment. We don’t consider that maybe there’s an “outside of the box” approach we can take to both ingredients and process.

Recently I received a question from a mother which made me think about an “outside the box” cooking option which I use. Baby food. A mom wanted to use bananas in muffins but her daughter didn’t like the chunkiness of the banana, which is the consistency she got when she mashed them, or the little black specks, which showed up if she pureed them in her food processor. (It occurred to me that this mother must have children on the spectrum like I do!)

My response to her was to use baby food. Nowadays, at least at my grocery store, you can get all natural (only fruit or vegetables and water), jarred baby food, and there are many benefits to using the baby food: 1) They keep well in your pantry so they’ll be on hand when you need them; 2) when on sale, you can get them at a really low price which is more affordable than fresh fruit and vegetables; 3) they provide a concentrated flavor without the work; and 4) the jars are wonderful to have on hand for those craft projects your kids are required to do for school or for those cute little holiday gifts you always see in the “make your own” magazines but which you never do because you don’t have those little jars!

Some uses for baby food:

1. To make muffins, breads, pancakes, waffles, cakes, etc…: Use the baby food version in your recipes instead of having to cook and puree or mash the fresh equivalent.

2. As a thickener: Vegetable baby food is great for thickening your gravies, soups, pasta sauce, casseroles, stews, etc…. They add flavor and thickness without adding anything else.

3.  To add nutrients to your recipes: Add vegetable baby foods to your meatloaf instead of that sugary condensed tomato soup. Make a glaze for your chicken with a fruit baby food. Use baby food as a binder for your bread crumb coated baked fish or for your meatballs. Create your own fruit or vegetable butter for spreading onto toast.

4.  As a mix-in: Mix in baby food to store bought yogurt or cream cheese or cottage cheese to create a flavorful treat. Add baby food to the smoothie you make for breakfast. Mix in baby food to your favorite dipping sauce to create a new flavor.

Chocolate Chip Muffins

(makes 24)

Ingredients:

3 1/2 cups gluten free flour blend

4 tsp baking powder

1 tsp baking soda

1/2 tsp salt

2 tsp cinnamon

1/2 tsp nutmeg

1/4 tsp cloves

1 cup Enjoy Life mini chocolate chips

Four 6 0z jar containers of banana baby food

3/4 cup liquid egg whites

1/2 cup Agave

1/2 cup safflower oil

Baking Instructions:

1. Preheat the oven to 400 degrees and line 24 muffin cups with cupcake liners.

2. Mix the flour, powder, soda, salt, cinnamon, nutmeg, and cloves together. Stir in the chocolate chips. Set aside.

3. Mix the baby food, egg whites, agave, and oil together.

4. Add the dry ingredients to the wet and very quickly mix the batter up just until the dry ingredients are moist.

5. Divide the batter evenly among the 24 cups. The cups will be filled to the top.

6. Bake for 15 minutes or until a toothpick in the center comes out clean. Cool in the muffin tins for five minutes. Remove the muffins to a wire cooling rack to cool completely.


Sodium Extract: Thinking about Salt

OLYMPUS DIGITAL CAMERA

The chickens ruined it.

The town meeting was on target for being the shortest I’d attended in twelve years.  Every warrant article had passed unanimously with nary a peep, blink or cough.  Even the 17 million dollar town budget had passed for the first time in my memory with no debate.  I was overjoyed at the prospect of an early meeting end, some time with my children, and a reasonable bedtime for myself.

But then the chicken warrant was read.

45 minutes of discussion followed about the pros and cons of changing the current regulations to allow chickens on less acreage.  Everything from tick control to poop possibilities were presented and argued by the “defense” and the “prosecutors”.

All my dreams and wishes for the evening swished straight down the drain because of one local hotbed issue.

Salt Disagreement

In the same way, salt can be a source of immeasurable disagreement among even the experts.  Some say everyone should refrain from salt usage.  Others state that only folks with family histories of health issues need to worry.  Still more present arguments for why we need to keep salt in our diets.  It can be confusing and frustrating to try to sort out exactly what we should know and do.

Salt Facts

Salt isn’t necessarily bad in and of itself.  It provides flavor in cooking; it helps metabolize yeast in breads; it draws moisture from veggies and fruits when needed; and it tightens protein bonds, giving strength to dough and batter when we bake. In our bodies, salt helps our blood cells, our nerves and our muscles; and unfortunately salt isn’t something our bodies make, so we need to ingest it.

On the other hand, folks prone to high blood pressure, migraines, heart and stroke problems, and kidney stones have found that cutting back on their sodium intake helps their overall health.  In addition, studies do reveal that our bodies only need so much salt to function properly, and we have a tendency to eat way above that amount.

Salt Moderation

Sodium is naturally in a lot of the foods we eat, and simply eating fresh fruits and veggies and low fat meat and chicken and fish will provide our bodies with much of the sodium we need.  So, for myself and my family, when I cook, I don’t usually add salt.  Herbs and spices lend flavor to just about anything cooked or baked without any need for salt.  In most baked goods, you can almost always cut the salt by half and your baked product will not be affected in taste or texture.  Sometimes you can even omit it altogether.  When I do want to use salt, though, I judiciously use small amounts of coarse salt.  The coarse salt tends to give you that slightly salty flavor without overdoing it, and by reducing the amount and using the slightly large salt crystals, you do cut down  on your actual sodium intake, even if only by 25%.

Salt in Processed Products

Of course, most of our salt “problems” stem from the products on the grocery shelves which tend to have large amounts of either salt or sugar to both preserve and provide flavor.  The good news is that many companies are making low salt and reduced sugar versions of their products.  You just have to look for them and choose to use them.

A few years back my children discovered a breakfast muffin they liked, but I was horrified by the amount of salt in one muffin from the bacon, the salt in the batter, and the cheese.  So I revamped the recipe, omitting the salt in the batter and using reduced sodium products.  Of course, I also made other changes to fit my family’s allergies, but you’ll see those all below.

Breakfast in a Muffin

Original Ingredients:

2 cups all purpose white flour

1 tbsp white sugar

1/2 tsp salt

2 1/2 tsp baking powder

3 whole eggs

1 cup cream

1/2 cup melted butter

12 strips cooked bacon

12 medium egg yolks (they tell you to save the whites for another recipe)

1/2 cup cheddar, swiss or jack shredded cheese

Revamped Ingredients:*

2 cups 100% whole wheat flour

2 1/2 tbsp baking powder

1/2 tsp dried thyme (crush the thyme leaves in your hand before adding)

1/2 tsp dried basil

1 tsp dried oregano

1/4 tsp black pepper

1/4 tsp onion powder

3/4 cup liquid egg whites (I use the egg whites from the yolks needed later)**

1 cup soy milk

1/2 cup safflower oil or grapeseed oil or Smart Balance oil

1 tbsp Agave

12 strips cooked low sodium turkey bacon

12 small egg yolks

1/2 cup reduced fat reduced sodium shredded cheddar cheese

Baking Instructions:

1.  Preheat oven to 400 degrees.  Prepare a 12 cup muffin tin.  (I usually use “If You Care” muffin cups, but you can spray the tin or coat it with oil or butter.)

2.  Blend the flour, thyme, oregano, basil, pepper and baking powder together.  Set aside.

3.  Whisk the egg whites until frothy (which just means they’ll be bubbly and a little thicker looking).  Add the milk, oil, and Agave, and mix well.

4.  Add the wet ingredients to the dry, mixing quickly just until the dry ingredients are moistened.

5.  Put 2 tablespoons of the batter into the bottoms of each of the muffin tins.

6.  Insert a bacon strip in a circle into the batter of each tin and carefully put an egg yolk into the center of the bacon.  (If your yolk breaks, don’t sweat it.  It still tastes good, even if it doesn’t look as pretty when you cut the muffin.)

7.  Cover the muffins evenly with the remaining batter.  (I usually put 1 tablespoon of batter on top and then find that I can add about another 1/2 tbsp of batter to each muffin to finish up the batter.)

8.  Divide the cheese evenly on top of each muffin.

9.  Bake the muffins in the preheated oven for 20-25 minutes.  (The muffins will rise, and the cheese will be a golden brown on top.)

10.  Cool the muffins for five minutes in the pan before removing to cool.  To serve, slice the muffins in half vertically to reveal the pretty yolk and bacon strip inside.

*  As always you can substitute ingredients to fit your needs, so for example, you don’t have to use soy milk if you’re allergic.  Use another type.

** I separate the twelve yolks from their white ahead of time into a little bowl and use the whites for the egg whites needed in the batter.  Then I gently spoon the yolks out of the bowl into each of the bacon circles.

Understanding Ingredients As a Whole: The Art of Chemistry

website chemistry

My kitchen table was a mess.

As a treat, I made root beer floats for the children.  Unfortunately, I forgot my chemistry.  I put in the ice cream first, and then I added the soda.  If you know your chemistry, you’re already nodding your head, laughing at me, because you know why my table was a mess.

The cold temperature of the ice cream released the carbon dioxide – that wonderful gas which makes our sodas fizzy – from the root beer, and the gas bubbles reacted with the proteins in the ice cream, creating froth and foam – much too much froth and foam – which erupted like a volcano out of the glass and onto my table.

The children, especially my young son, were absolutely delighted by this impromptu science experiment, but it was a reminder to me that the art of cooking is always tempered by certain laws which we must keep in mind.

Recipes Have Ratios

For example, if we were to carefully analyze many different cake recipes right now, we would notice an average ratio to the ingredients in the recipes – something like this:

•2 cups flour ingredients

•2 cups liquid ingredients (which includes the eggs, where 2 whole large eggs equal to about ½ cup of liquid)

•1/2 cup fat ingredients (like butter or oil)

•1 cup dry sweetening ingredients (like sugar or brown sugar)

•2 tsp dry leavening ingredients (like baking powder or baking soda or a mix of the two)

•½ tsp to 1 tsp salt

•1 tsp to 2 tsp flavoring (like vanilla or cinnamon)

Recipes Have Patterns

We’d also discover a pattern to the ingredients where usually:  1. The weight of the liquid ingredients is the same as or more than the weight of the sugar.  (One cup of sugar is said to be about 7 ounces in weight.); 2. The sugar weight is equal to or more than the flour.  (One cup of white flour is said to weigh about 4 ½ ounces.); 3. The eggs weigh the same as or more than the fat.  (Two whole large eggs are said to weigh just under 4 ounces.); and 4. For every cup of flour, the recipe will call for 1 tsp of baking powder or ¼ tsp of baking soda.

Both the ratio and the patterns are important for us to know if we want to create foolproof cakes.  If, however, we know these basic conventions for cake baking, then we can artfully experiment within that framework to successfully create delicious cakes which are tailored to our dietary restrictions and needs – as well as other baked goods such as cookies and muffins which have their own ratios and ingredient patterns.

Paula’s Son’s Favorite Snack Muffin:  Peanut Butter Muffins

Ingredients:

2 tbsp favorite plant based oil (olive, safflower, avocado, etc….)

2 tsp honey

3 tbsp Agave

1/2 cup rolled whole grain regular or gluten free oats

3 cups 100% whole wheat flour or 2 1/4 cups favorite GF whole grain flour blend 

2 cups rolled whole grain regular or gluten free oats, pulsed in a food processor until to make a crumbly oat flour

4 tsp gluten free baking powder

2 tsp ground cinnamon

1/2 tsp salt* 

1/2 cup Agave 

2 mashed or pureed ripe bananas

1 cup applesauce

2/3 cup peanut butter** (you can substitute another “butter” if you are allergic)

1/2 cup egg whites or 2 tbsp ground flaxseed mixed with 6 tbsp of water 

1 1/2 cup soy milk (you may use another type of milk, if necessary)

1 tsp gluten free vanilla extract

Baking Instructions:

1.  Preheat the oven to 400 degrees.  Prepare muffin tins for 18-24 muffins, depending on the size muffins you want. (I would use “If You Care” muffin cups, but you can use Pam spray or grease them with butter or oil.)

2. Stir the canola oil, honey, and Agave together.  Mix in the rolled oats until they are completely coated.  Set aside.

3. Whisk together the flour, processed oats, baking powder, cinnamon and salt.  Set aside.

4. Mix together the Agave, mashed bananas, applesauce, peanut butter, and egg whites or flaxseed mixture.  Add the milk and vanilla.

5.  Quickly combine the dry ingredients into the wet, stirring just until the dry ingredients are moist.  Spoon batter into prepared muffin cups.

6. Carefully sprinkle oat topping onto each muffin. (Will be sticky work!)

7. Bake for 15-20 minutes until a wooden toothpick inserted into the center comes out clean.

8. Cool for at least five minutes in the muffin tins before removing.

* You can omit the salt, if you want.

** I use Teddy’s no salt, no sugar added peanut butter.