Creative Cooking: Chicken-Kale-Corn Fritters

“You deserve it….”

I have been thinking a lot lately about the idea of what people deserve. My daughters recently graduated from college and high school and received honors and recognition, and folks said, “They deserved it!” I received an award, recognizing 17 years of volunteer work in our school district, and everyone said, “It’s about time! You deserved it!” A person I know who has made bad choices was told, “You get the consequences you deserve.”

We hold notions about worth very highly in our society. The standards of worth vary from situation to situation, within contexts, and between race, gender, class, and other constructs, but the idea of folks being deemed deserving, whether of something good or something bad, hold strong and fast, even if people are not always aware that they do.

Recently, some friends and I went out to dinner, and in an age of food allergy awareness, I was surprised that this particular restaurant only offered two options for me to be able to eat out a very extensive four page menu of selections. I could have grilled chicken or grilled steak. Fortunately, I am not vegan, so I opted for the grilled chicken, but what if I had been? As I pondered this with my husband, we concluded that the restaurant might presume folks with dairy allergies would just go someplace else to eat, given that they don’t cater to that type of clientele.

There’s certainly nothing wrong with that. Plenty of other restaurants do cater to folks with multiple food allergies, and now my friends and I know not to choose that particular restaurant for a future gathering. I can’t help but wonder, though, about whether or not folks with food allergies “deserve” to be able to have more than a choice of grilled chicken or grilled steak when going out to eat to a restaurant which comes highly recommended.

Whether we think we do deserve it or not won’t change that particular restaurant’s menu for now, but it serves as yet another reminder to me that I firmly do believe all people deserve to be able to eat good food, regardless of food allergies and health restrictions. So, last week, when I decided to make chicken and corn fritters, my goal was to create something which was healthier than all the recipes I found.

I had leftover corn and chicken which I wanted to use, and when I put the ingredients into “recipes”, out popped many recipes for chicken and corn fritters. The problem, though, was that they all called for deep or pan frying with a lot of oil, as well as a lot of white flour and many eggs. I wanted something which I could feel good about eating.

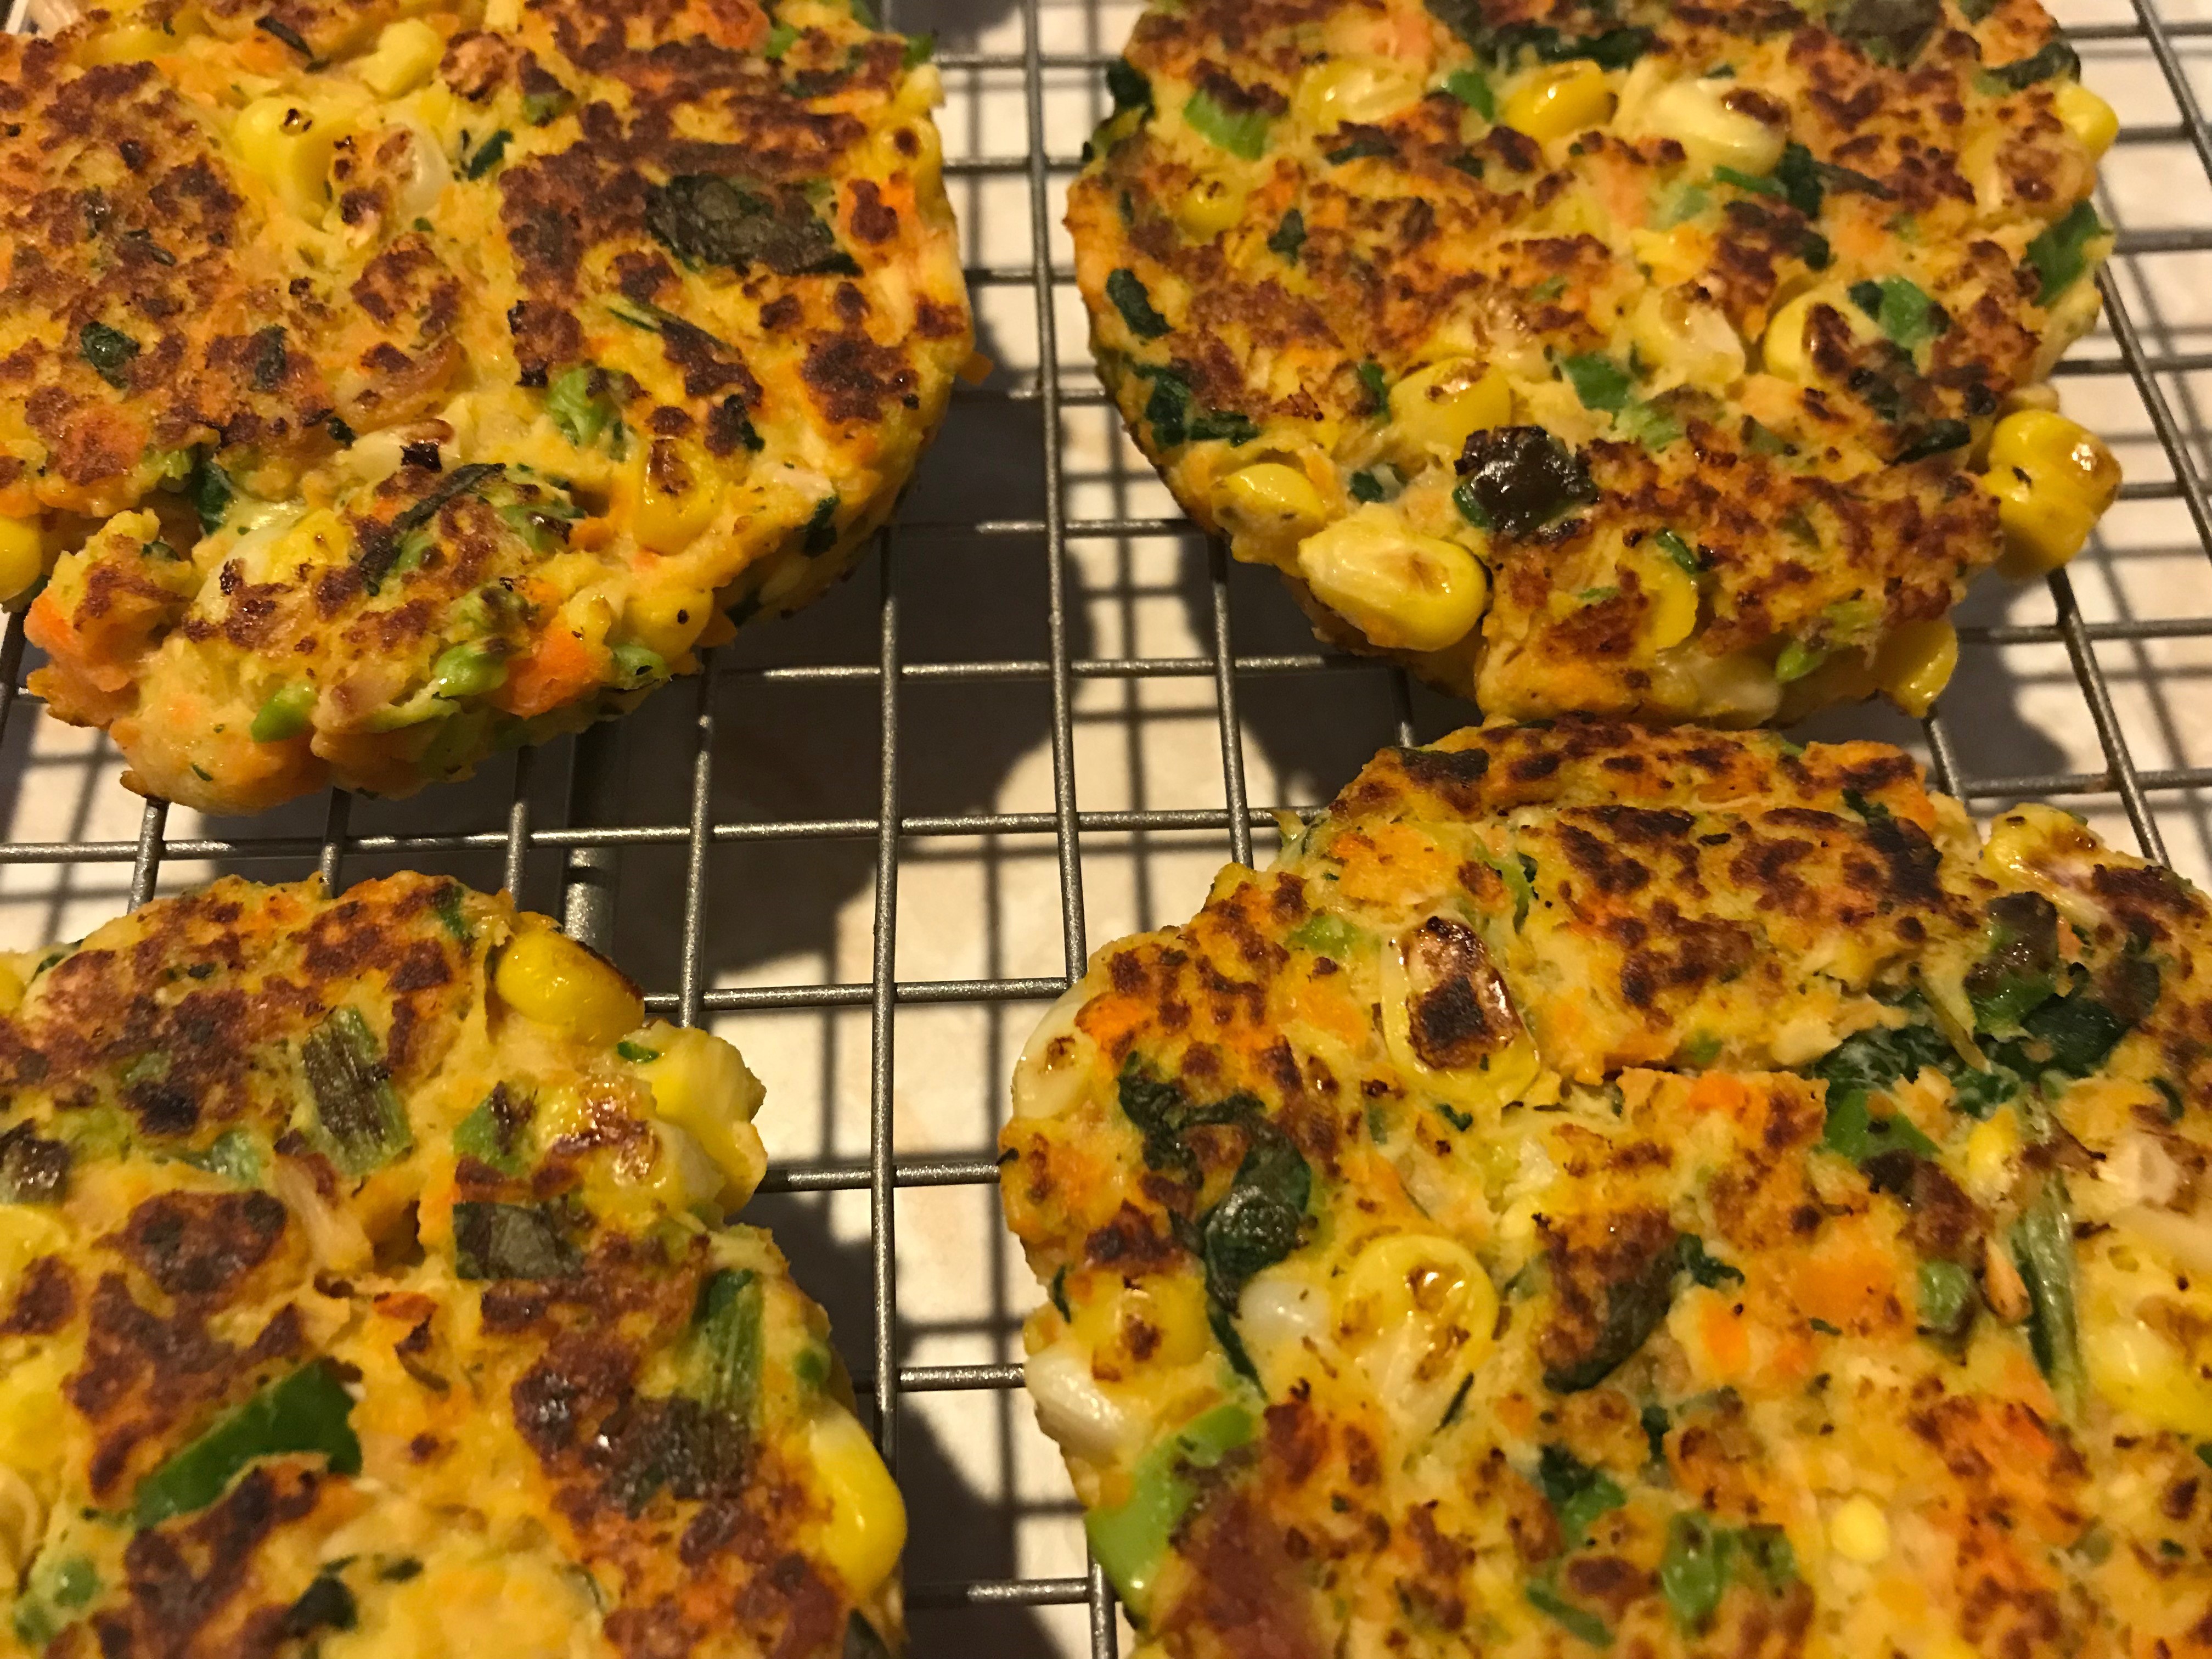
So, I made several changes. First, I added kale to the chicken and corn, because I also had leftovers of that. Secondly, I opted to puree cooked carrots as the main binder which allowed me to reduced the flour substantially and use half as many eggs. I also chose oat flour for my flour to add protein and fiber, and used egg whites instead of whole eggs. Finally, instead of frying the fritters in oil, I used the Pompeian non-propellant olive oil only spray and cooked the fritters on a griddle. The result were delicious, healthier fritters which used up my leftovers and didn’t leave anyone with that heavy feeling you often get with fried foods.

Chicken-Kale-Corn Fritters

Ingredients:

3 cups chopped, cooked chicken

3 cups cooked corn, cut off the ears

1 cup cooked, chopped kale

3 cups cooked, chopped carrots

1 cup “milk” (I used soy milk but you can use whatever type you’d like)

1 cup chopped green onions

3/4 cup egg whites (can also just use 3 whole eggs or if you want an egg free version, substitute 3 tbsp ground flaxseed mixed with 9 tbsp of hot water which you let sit to thicken or use 3/4 cup of aquafaba or simply increase the flour below to 1/2 to 3/4 cup)

1/4 cup gluten free oat flour (or any high protein/high fiber flour you’d like)

1 tbsp chopped fresh herbs (I used cilantro and basil, but feel free to vary it)

2 tsp minced garlic

1/2 tsp black pepper

1/2 tsp red pepper flakes (optional but I like the flavor it adds)

Pompeian non-propellant olive oil cooking spray

Cooking Instructions:

  1. Mix the chopped chicken, kale and corn together.
  2. Puree the cooked carrots with the “milk” and add to the chicken-veggie mixture and blend well.
  3. Add the green onions.
  4. Whisk the egg whites (or whole eggs or flaxseed mixture) and add to the fritter mix, stirring well.
  5. Add the oat flour, herbs, garlic and the peppers and stir until all is well incorporated.
  6. Preheat a griddle to 350 or a shallow pan over medium heat and spray with the Pompeian olive oil spray.
  7. Stir the fritter batter and scoop mixture by the 1/4 cup and drop onto the hot griddle. Using a spatula, spread the mixture into 1/2 inch think circles.
  8. Cook for a couple of minutes on one side until browned. Flip with the spatula and cook on the other side until browned. Remove and repeat with the remaining mixture. You may need to occasionally respray the griddle with the olive oil spray. (Tip: to keep them warm, preheat the oven to the lowest temperature and put the fritters onto an oven safe plate in the oven.)


Advertisement

Healthy Habits: Quinoa Black Bean Salad

“It’s a bit difficult to avoid all of nature….”

Recently my health insurance provider decided that they wouldn’t cover allergy medications any more which is a big blow to my health. When one goes to an allergist for the first time, the allergist will test you for 80 most common allergens. I am allergic to 78. Have been since I was a child, and they haven’t changed in over 40 years, despite repeated testing every seven years.

For the first thirty years of my life, I coughed, hacked, and sniffled my way through life, never without huge wads of tissues in hand and rarely able to breathe through my nose. The advent of new medications, specifically nose sprays, seemed an opportunity for relief. True to my life, though, it turned out I was allergic to most of the new medications. Go figure! But there was one which actually worked, and for the past 15 years, I was able to breathe through my nose, divest down to one tissue a day, and only hack, cough and sniffle two or three times a year when the allergy seasons were at their worst.

Now, though, I’ve slowly begun a descent back to what I had forgotten, not being able to breathe unless completely upright, blowing my nose so often that it’s red and raw, once again needing to invest in my own tissue company, and finding myself at the doctor’s more than I’d like to be for antibiotics for sinus infections.

On the plus side, I’ve been so sick at times that I’ve been forced to stay at home which is an unusual opportunity for me because I suddenly have time which I wouldn’t have had if I were out at my usual meetings and running of errands. It has also meant I can see firsthand which parts of my life really must be attended to and which can survive without me.

On the downside, feeling unwell makes me tired which stimulates cravings for food which aren’t always the healthiest of choices. Since I always have to watch my weight and my sugars, I have been trying to create comfort foods which curb my cravings but which are healthy.

One such recipe is for a quinoa salad. If you are unfamiliar with quinoa, it is essentially a seed which is a good protein source.  Because it cooks similarly to rice, folks tend to eat it like a grain, and folks who are diabetic or needing to watch carbs should know that quinoa is high in carbohydrates. Since quinoa is also high in protein and fiber, though, eaten judiciously, quinoa is a great comfort food.

I make a quinoa salad which I and my family really likes which uses multi-colored quinoa, black beans, kale and carrots. The quinoa and black beans provide the carbs which are filling but also fiber and protein. The kale and carrots provide nutrients gained from vegetables and cuts the amount of quinoa (and hence the carbs) in a cup serving.

Quinoa Black Bean Salad

Ingredients:

2 cups water

1 cup multi-colored quinoa

2 cups frozen, chopped kale

1 cup thinly sliced baby carrots

16 oz can of no salt, no sugar added black beans, rinsed well and drained completely of all water

3 tbsp olive oil

1 tbsp apple cider vinegar

1/4 tsp salt

1/4 tsp black pepper

3/4 tsp ground cinnamon

3/4 tsp ground cardamom

1-3 tsp honey (optional; use desired amount of sweetness if using; if making for just the family, I omit; if making for company, I use 2 tsp)

Cooking Instructions:

  1. In a medium saucepan, pour the water and add the quinoa. Bring the water to a boil, then lower the heat and simmer until the quinoa has plumped, is showing white rings, and has absorbed all the water. This will take anywhere from five to 15 minutes, depending on how vigorously you are simmering the water. I find that it’s helpful to stir the quinoa every so often.
  2. Once the water is absorbed, remove the pan from the heat, cover the quinoa and let it sit. You want the quinoa to be completely dry before you mix it with other ingredients. This can take anywhere from 10 to 30 minutes, depending on how much of the water was actually absorbed into the quinoa before you removed it from the heat.  When it’s completely dry, you will be able to fluff the quinoa with a fork. If the quinoa clumps together when you try to stir it, then it’s still a bit damp.
  3. While the quinoa is drying, thinly slice baby carrots to make a cup. You can use regular sized peeled carrots but then you’ll want to cut the thin slices in half because you are only cooking the carrots a short amount of time in the microwave with the kale, and you don’t want the carrots to be hard. Once you have a cup’s worth chopped, put it aside for the moment.
  4. Put 2 cups of frozen, chopped kale into a microwave safe bowl.  Follow the instructions for cooking, only halfway during the cooking time, remove the bowl, stir the kale and add the cup of chopped carrots. Finish cooking the kale in the microwave.
  5. Add the kale, carrots and black beans to the quinoa and mix well.
  6. In a measuring cup, whisk together the olive oil, apple cider vinegar, salt, pepper, cinnamon and cumin and honey, if using.
  7. Drizzle the dressing onto the quinoa salad and use a spoon to incorporate the dressing into the quinoa salad.
  8. Salad can be served warm or cold. Can store in the fridge for a long time.

Autumn Appetites: Winter Squash-Kale-Bean Soup

“Grandma’s wisdom….”

Last week I read that the folks at America’s Test Kitchen learned something which my grandmother had taught me 30 years ago and which she had known for many more years than that before she taught me. Not for the first time, I was surprised that those culinary “experts” hadn’t known something which I had figured was known by many.

As I thought more about it, though, I realized that there’s a difference between folks who have culinary jobs and people who have years and years of cooking experience. My grandmother raised eleven children and had to find ways to stretch food as much as she could, and she learned the best ways to make food and how to keep things as simple as possible whenever she could.

What I had learned from my grandmother, which America’s Test Kitchen apparently just learned this month according to their magazine, is that you never boil corn on the cob. You bring water to a boil and then you let the ears of corn sit in the hot water for a set time, depending on the amount of corn. This is how I’ve made corn on the cob ever since my grandmother showed me as a teenager. I had taken it for granted that others knew, too.

I figured my grandmother had learned it from someone before her, but she may also have simply figured it out on her own after cooking for so many for so long. I started thinking about the many other tips my grandmother had given me over the years when I was younger before she passed away, and I realized a lot of my cooking depends on things I learned from her. Just this past weekend, I made one of my family’s favorite soups, which uses tips I learned specifically from my grandmother.

My grandmother rarely had “fresh” food in the house. Dependent on food from local farms, which tended to be seasonal, certain foods simply weren’t accessible year round. So, she always had meat and vegetables frozen in a big freezer and jars of canned beans, jellies, sauces, and fruits in the “pantry” which was the walk-through area between the garage and their double-wide trailer. From her, I learned how to create foods which use staples from the freezer and pantry and which can be quickly put together to feed a lot of people.

The winter squash, kale and bean soup I made uses frozen squash, which I roasted last year, pureed, and froze; frozen kale which I always keep on hand, purchasing them by the bagfuls at the grocery store when they’re in season (early Spring and then again in the Fall); canned, unsalted, no sugar added beans, which I keep in my pantry; and no salt, fat free vegetable broth which I also keep in my pantry. I mixed everything together in my crock pot with some herbs and let it cook all day. When evening came, we had a hearty soup for dinner which warmed both the heart and the tummy.

Winter Squash-Kale-Bean Soup

Ingredients:

9 cups thawed, frozen pureed cooked winter squash (equivalent to 6 of those 12 oz packages you can purchase in the freezer section of the grocery store)

1 cup frozen chopped kale (equivalent to half a 16 oz bag you can purchase in the frozen section of the grocery store)

One 16 oz can of no salt, no sugar added white or northern or cannellini beans, rinsed and drained

1/2 tsp dried thyme, crushed between your fingers before putting in

1 tsp onion powder

1/2 to 1 tsp salt

1/4 tsp black pepper

No salt, fat free vegetable broth (amount will depend on how thick or think you like your soup, between 1 to 3 cups)

Cooking Instructions:

In a crock pot (4 1/2 quart will work), mix the thawed squash with the frozen kale, the can of beans, the thyme, onion powder, salt and black pepper. Add the desired amount of vegetable broth and let it cook in the crock pot on low all day (6-8 hrs) or on high for half the day (3-4 hrs).


Menu Suggestion: Stuffed Flounder

“We’d like to take you on a whale watch.”

Some friends of ours wanted to thank us for having been there for them over the years and suggested treating us to a whale watch, something the children had always said they wanted to do but which we’d never had.

The day was beautiful, and as we began the journey towards the open seas, the children had a great time watching the waves, feeling the wind, and chatting with our friends. Slowly, however, we began to realize that our children suffer from seasickness, and within an hour of the trip, the children were… well, let’s just say, their symptoms weren’t the pleasant kind.

While my daughters were old enough to fend for themselves, I ended up being caretaker for my son, holding him, watching his face, helping him to rinse his mouth, and the like. By the time it was clear there really wasn’t much else left to come out of him, he was just plain exhausted, and he fell into a deep sleep.

Just after he fell asleep is, of course, when we finally reached the deepest waters and amazingly enough there were three beautiful whales to be seen for a very long time. Unfortunately, I couldn’t rouse my sleeping son to see it. After his miserable experience, he wanted nothing to do with the whales and just kept pushing me away, insisting he’d rather sleep. In the end he missed what would probably have been one of the best experiences of his life.

Sometimes I feel people behave similarly when it comes to the idea of eating fish. They had a bad experience once or they ate some which didn’t taste to their liking or they don’t like the look and smell of fish in general, and they write off all fish and end up missing food which is not only very healthy for them but which can be incredibly tasty.

Recently we wanted to make a special meal for dinner, and I chose to make flounder. Flounder is one of those fishes you’ll often find on a restaurant menu because it’s very mild tasting. As a rule my children actually prefer salmon over most white fish, but I like to use flounder (or sole, as it’s sometimes called, too) when I want to make a nice stuffed dish for a special occasion.

What’s nice about flounder is that is has all the health benefits of fish while also being low in mercury which they’re always telling you to be wary of eating too much of. For stuffing purposes, it’s a nice fish because they’re thin and layer and roll well.

By now, if you’ve been reading my blog for a while, you know that I’m a firm believer in making things as easy as possible. So, this post is about how to make a quick and easy stuffed flounder. There is no rolling of fish, no trying to hold the rolled fish and stuffing while trying to roll it in bread crumbs, too. This is my version of what is actually a very nice company dish, which you can adapt to your own tastes.

Tips for Stuffed Flounder:

1. The flounder: The two big debates you’ll always hear are “wild versus farmed” and “fresh versus frozen”. Generally speaking, people say that wild fish doesn’t have the types of chemicals you’ll find in farmed fish. Personally, I think you’re going to find both bad and good in anything you eat these days, from fruit and veggies covered in pesticides to milk produced from cows given growth hormones. Be wise about moderating what you, wash all your produce, and recognize that sometimes the good health benefits outweigh the possibility of ingesting something not as good. Fortunately, flounder isn’t as greatly farmed as salmon, so most flounder found in the stores are usually wild anyway.

As for fresh versus frozen, people make a big deal about frozen fish being second rate. I personally have never found anything to complain about. Frozen fish is cheaper and ready when you want to use it instead of having to eat it on its freshness timetable. The tip is to make sure that after you defrost it, you rinse the fillets and pat them completely dry. If you choose to purchase fresh flounder at a fish market or at the grocery store, make sure they’re fillets (unless you like skinning and boning a whole fish yourself, in which case, go for it) which are a nice white color, not graying, and which don’t smell – fresh flounder really doesn’t smell all that fishy.

2. The stuffing: You can use almost anything you want to stuff flounder. People will use bread crumbs, stuffing, rice, vegetables, even meat. I personally prefer to use vegetables, and the recipe I will be sharing uses frozen greens mixed with other sauteed vegetables.

So, you can choose spinach, kale, collards, turnip greens, your choice. For my recipe, it is important to use thawed frozen versions of these as opposed to fresh because you need the moisture from the frozen varieties for making the creamy sauce for the vegetable stuffing.

For other vegetables, any possible combination exists. My personal favorites are spinach and mushrooms or kale and zucchini and squash or collards and carrots, but you can use whatever foods you like best.

3. The topping: When you’re making a stuffed flounder, you can leave it bare or you can cover it. I prefer to cover the flounder because it helps to keep the flounder from drying out too much. Many recipes will call for either coating it in breadcrumbs or making a sauce to pour over it. I prefer to use a light breadcrumb topping because I’m not actually rolling the flounder to stuff it.

For a breadcrumb topping, I use a nice gluten free high fiber bread which I pulse into tiny breadcrumb pieces, but you can always use a gluten free packaged bread crumb mixture, too. The key is to not use as much as most recipes call for and to use a nice olive oil instead of butter and to mix it with lovely herbs for a great taste.

4. The preparation: Most stuffed flounder recipes tell you to individually roll the flounder around the stuffing, and it is true that those little rolled pieces of fish look quite pretty when you put them onto your company’s plate. The problem I find, though, is that it’s not always easy to roll the fish around the stuffing and to get it to stay rolled, and when you go to eat it, it’s actually quite a mess because the fish will fall apart and then you’re eating the fish and stuffing separately anyway.

So, what I do is to put a layer of fish on the bottom of a pan, put my stuffing on top of those fillets, and then cover the stuffing with a second layer of fillets. This way, you have fish on both sides of your stuffing without the hassle of rolling, and when you eat it, the tastes of the fish and the stuffing meld together in your mouth. In addition, when the fish is topped with bread crumbs, the final presentation is quite pretty and easy to serve.

Stuffed Flounder

(Recipe for a company crowd, can cut in half for a family)

Ingredients:

1 tbsp olive oil

1 tbsp minced garlic

1 tbsp minced onions

16 oz sliced mushrooms or sliced zucchini and squash or sliced carrots

10 to 16 oz thawed frozen spinach or kale or collards:  Do NOT squeeze out any of the liquid.

1/4 tsp ground black pepper

1 tsp dried oregano

1/2 tsp dried crushed thyme

8 oz tofu cream cheese

14 thin flounder fillets

1 cup gluten free high fiber bread crumbs

1 to 2 tsp olive oil

2 tsp Italian herb blend

Cooking Instructions:

1.  Lightly grease an 11 x 15 pan and preheat the oven to 375 degrees.

2. In a large sauteing pan, mix the olive oil with the garlic and onions and cook for about a minute over meduim low heat until fragrant.

3. Add the mushrooms or zucchini and squash or carrots and saute for 3 to 5 minutes until the vegetables are softer and beginning to cook through.

4. Add the spinach or kale or collards along with the pepper, oregano and thyme and cook for another 3 to 5 minutes until most but not all of the liquid has begun to evaporate.

5. Put the tofu cream cheese into the center of the vegetable mixture and continue to stir and mix the cream cheese into the vegetables over medium low heat until its completely melted and incorporated into the mixture. This usually takes about 2 to 4 minutes.

6. Layer seven flounder fillets on the bottom of the baking pan. Cover each fillet with the vegetable mixture. Cover the vegetable stuffing with the last seven fillets, and flatten the layered fish so it completely fills your pan and is even.

7. In the same pan you used for making the vegetable stuffing, mix the bread crumbs with just enough olive oil to moisten them and with the herb blend. Saute for a minute.

8. Evenly divide the bread crumbs over the top of the stuffed fillets and pat the crumbs down so they stick to the top of the fish.

9. Bake for about 20 minutes. The topping will be golden brown, the fish a nice white, and there will be some bubbling from the stuffed vegetable mixture.

If your oven runs hot, check it at 15 minutes. You don’t want to overcook the fish. If by some chance you do, overcook it a little bit, cover the pan with foil and let it sit, covered, until you’re about to serve it.  This will restore some of the moisture to the fish.

10. Serve the stuffed fish with a nice salad of mixed greens and herbs and enjoy!


Summer Veggin’: Kale

website kale

“One’s the size of a grape; the other the size of a lemon. Good news is that none are the size of a grapefruit.”

Last week I had to have a biopsy. One of my children asked me what I was thinking as the doctor talked to me about my “very slight but we still have to check” possibility of cancer.

She laughed when I answered, “Honestly? I was wondering why doctors insist on using food for their size measurements. I love grapes and lemons, and now I’m not going to be able to look at them in the same way again!”

It may just be me, but wouldn’t quarters and golf or tennis balls suffice just as well? And while I’m already digressing:  Should anyone be given the choice of being awake or asleep during a biopsy, choose sleep, unless you are absolutely certain your doctor won’t insist on showing you what she has just removed! Because otherwise you might discover that you really will never eat another grape or lemon again.

Since my food choices are dwindling as the result of my experience, I decided it would be nice to do a post that might expand other people’s food options, and I’m opting to talk today about kale, one of my favorite summery foods.

For folks who might not be familiar with kale, it’s a cruciferous vegetable like cauliflower, cabbage and broccoli; and like those three, kale is very, very good for you. It’s has cholesterol lowering benefits, detoxifying properties, about 20 different needed nutrients, including omega 3’s, and is said to help reduce certain cancers.

I’ve found, though, that people don’t often know what to do with kale, so I’m going to share some thoughts with you.

1. Purchasing Kale:  When you buy kale from the store, look for them in fresh bunches in the produce section of the store. It’s cheaper that way! Stay away from bunches where the leaves look like they’re wilting, are beginning to yellow, or have many holes in them. Good kale will be a deep green with sturdy leaves.

2. Keeping Kale:  Do not wash kale until you are ready to use them. If you won’t be using them immediately upon purchase, put the bunch into a baggie which you can seal and put the kale into the fridge. I don’t often keep kale for longer than two to three days myself, but I’m told by others that kale will keep for a good five days or so in the fridge.

3. Freezing Kale: If I won’t be using kale within two days or so, I will freeze it. Best practices say to wash the kale, remove the leaves from the stems, blanch in boiling water for a minute or two, plunge into chilled water to stop the cooking, drain, dry and then put them into a freezer bag to freeze. I confess, I very rarely do that. I wash and dry my kale, chop the leaves off the stem into bite size pieces, stuff as much as I can into my freezer bag, seal it tightly without any air and freeze. I have not found much difference in the kale when I take it out of the freezer and pop it into a soup or casserole. The only thing blanching seems to do is slightly reduce the bitterness of kale, but I like that bitter taste. You can decide for yourself, though, whether I’m also just lazy.

4. Cooking with Kale: Kale is wonderfully versatile. You can use it in soups, casseroles, as chips, as a vegetable side dish, in stir frys, in omelets and anything else you’d normally use spinach for, in smoothies, and even in cakes! It’s moisture content keeps dishes from becoming dry and it’s slightly bitter tastes are a nice contrast to other herbs and seasonings and flavors in a dish.

Some things to keep in mind:

Always cut the kale leaves off the thick, woody stem. Those stems don’t taste very good.

Kale requires a bit of cooking time to soften so plan ahead that you’ll need to saute the kale for a good ten minutes or cook the soup a little bit longer.

Kale cooks down just like spinach so if you need a cup of cooked kale, you’ll need at least twice that amount of raw kale.

Keep kale handy in the freezer so you can simply add it to recipes without having to cook it to soften it first.

For easy chopping, after you’ve removed the leaves from the stem, just stack all the leaves on top of one another and slice.

5. Ideas for using Kale: We have several favorite ways of eating kale, but if you’re looking for a few easy ideas for getting started, here are three my kids really like:

One, is to make kale chips. Simply brush kale with a tiny bit of olive oil, sprinkle with the seasoning you prefer (salt, pepper, herbs, garlic or onion powder, grated parmeson, etc…), chop the leaves off the stems into bite size pieces, and bake in the oven on a cookie sheet at 350 degrees for anywhere from five to 20 minutes, depending on the sizes and thickness of your pieces until the leaves are dry and crispy.

Another suggestion is to make a bean and kale saute. Saute your chopped kale in a little bit of olive oil with chopped garlic and onions until the leaves have started to wilt, mix in white cannellini beans and cook until both are soft and warmed through. Top with a small sprinkling of chopped turkey bacon or shredded cheese, if desired.

Make a frittata: Brown chopped potatoes in a little bit of olive oil with some salt and pepper. Add chopped kale when the potatoes have crisped to your liking. Once the kale is soft and wilted, beat up some egg whites mixed with a couple of whole eggs and pour the egg mixture carefully over the potatoes and kale. Add herbs of your choice. Cover the pan and slowly cook the frittata over low heat until the eggs have cooked through.