Cooking Techniques: Allergy Friendly Pie Crusts

website crusts

“Yay! Thanksgiving in October!”

My ninth grade daughter is taking French this year for the first time, and the high school she is at hosts an exchange program with another high school in France. We were asked to host a French student for two weeks, and one of the suggestions for entertainment was to have a Thanksgiving meal with them, since that would be a different experience for them.

We were happy to oblige, as you can tell by my son’s response above.

As we prepared, we explained to our French student that no matter what people say about the Turkey and the side dishes and the rolls, that Thanksgiving really is all about the pies: apple pie, pumpkin pie, mincemeat pie, cranberry pie, pecan pie, sweet potato pie, pear pie, buttermilk pie, and every possible variation of these pies which exist.

For folks with food allergies, though, pies can be tricky. May people struggle with pie-making in general, even when you’re able to use white flour, butter, and salt. The thought of trying to make a pie crust with substitutions is something a lot of folks simply just don’t want to consider.

The good news, though, is that making a gluten, dairy, soy, salt free pie crust is actually easier than making a traditional pie crust. You just need to know a few things, and you’ll be on your way to a great Thanksgiving dessert buffet!

Tips for Allergy Friendly Pie Crusts:

1. It’s just a simple swap: Because pie crusts don’t need to rise the way breads and cakes do, you can simply substitute your favorite gluten free flour for the all purpose flour. No need to make up any special flour blends at all. If you want a flakier, crispier, closer to traditional pie crust, opt for flours like brown rice or sorghum. If you want a more substantive crust with flavor, protein and fiber, try garbanzo bean or gluten free oat flour. If you have a gluten free flour blend sitting around in your closet, you can by all means use, too.

2. Cold is best all the way around: All pie crust recipes call for cold butter or shortening, cold ice water, and to put the made crust in the fridge for a little while. Why? Because warm pie crust dough sticks and won’t roll very well. Warm pie crust dough makes for a denser, less flaky crust.

What I find works wonderfully is to stick your measured butter and/or shortening into the freezer for five 10 minutes or so before using, to put ice cubes into your water, and to put your prepared pie crust dough into the fridge for a minimum of thirty minutes, an hour at the most.

3. “Fat” substitutions work: I use soy free vegan butter and shortening in my pie crusts all the time without any difference. So you can simply use what works for you without worry. It’s a straight one to one substitution ratio. What you should know, though, is that the allergy friendly versions tend to be softer than regular butter and shortening so sometimes I freeze them a little longer more like 10 to 15 minutes.

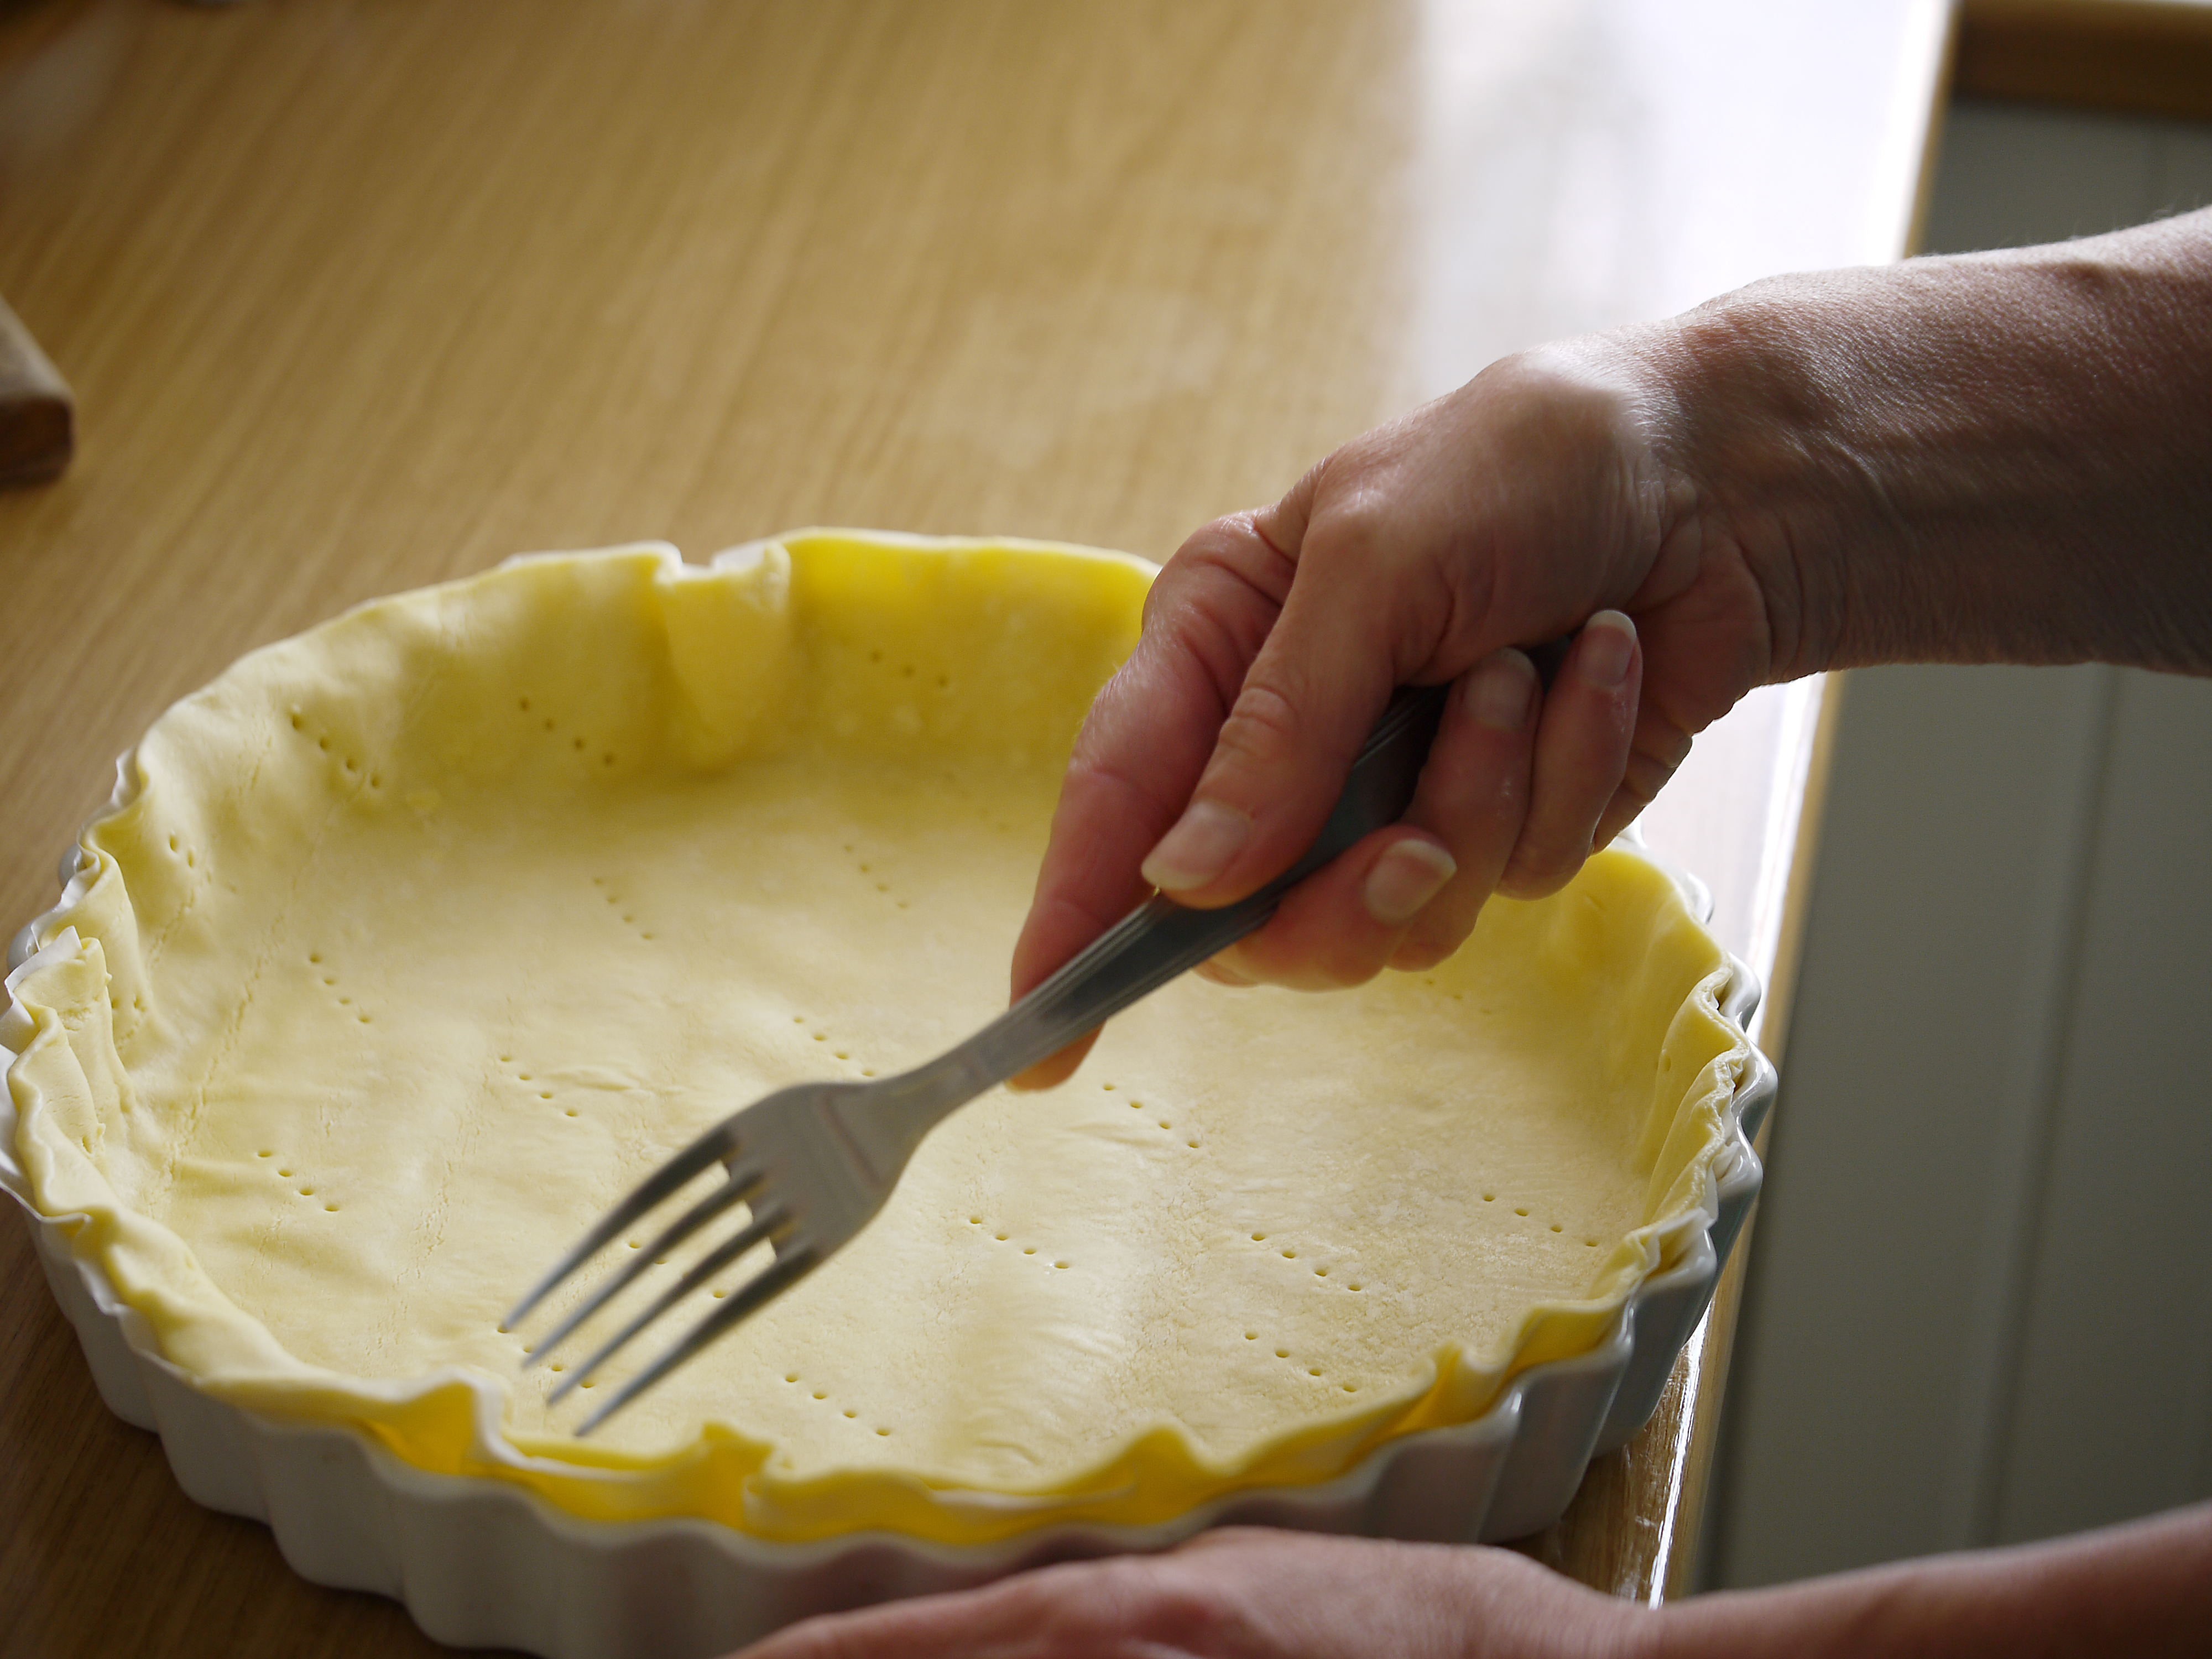
4. Work around and with the rolling: When it comes to pie crusts, the rolling out of the dough is what usually causes issues for people. I’ve learned a couple of things:

One, you don’t have to roll the bottom crust. I shape my dough into a slightly flattened disk (about an inch high) which I cool in the fridge for my 30-60 minutes, and then I simply use my fingers to push the dough outward from the center to the edges. It takes less than five minutes and actually makes for a more even crust.

Two, when I do have to roll the crust for the top part of a pie, I’ve found that putting the dough between two pieces of wax paper which I’ve also lightly greased is the best approach. The dough rolls easily, doesn’t stick, and comes off when I go to put it on top of the pie.

5. Be creative with the flavoring: Salt is the go-to for pie crusts, but it doesn’t have to be. If you’re making an apple pie, add some cardamom to complement the cinnamon in the pie. If you’re making a pumpkin pie, add grated orange peel as a contrast to the pumpkin. If you’re making a sweet potato pie, add grated nutmeg to intensify the sweet potato taste. You simply add the spices to the dry ingredients of the pie dough before cutting in the fat.

6. Know the effects of the process: Another issue people often have problems with is making their dough too dry or too wet. It’s important to understand the dynamics of the different ways you process the dough:

If you use a food processor which is what many recipes say to do nowadays, the dynamics of the food processing blade means the water is incorporated quickly and efficiently. If you have cut the fat in yourself with a hand pastry blender of two knives and are adding the water by stirring the dough with a fork, the water will drain into different parts of your dough more quickly than you can stir it. As a result you will often need more water for hand processing than when using a food processor.

Also, a food processor will draw the dough naturally into a ball which makes it easy for you to see that you have enough water. When you stir the dough by hand, the dough will usually not form a ball unless you’ve added too much water.

So, a tip: If a recipe calls for a certain tbsp amount of ice water for use in a food processor, it will normally mean you’ll need about two tablespoons more for hand stirring, so if my dough looks dry after the amount specified, I will go ahead and add two more tablespoons, and then even if it looks dry still, I will push the dough together with my hands to form two disks. If the dough will stick together, it’s fine, if there are dry pieces falling off, I simply wet my hands with the ice water and incorporate those dry pieces into the disks.

Struesel Pear Cranberry Pie

(This recipe makes two pies)

Ingredients:

Pie crust, prepare enough for two bottoms only

1 cup agave

1/4 cup water

one 12 oz package of fresh cranberries (be sure to check for stems)

8 pears, washed, cored and sliced into 12-16 slices each

3 tbsp cornstarch

3 tbsp water

2 cups gluten free whole oats

1/2 cup sorghum flour

1 tsp cinnamon

1/2 tsp nutmeg

1/4 tsp ground cloves

1/2 cup vegan soy free butter*

Baking Instructions:

1. Prepare your favorite pie crust recipe. If you don’t have one, Bob’s Red Mill pie crust mix works very well. Would recommend adding some spices to jazz it up a bit, though.  Line the bottoms of two 9.5 inch pie pans with the crusts.

2. Mix agave with water and put into a stove top pan large enough to hold all the pears.

3. Add the cranberries and bring to a boil. Cook for a minute or two until the cranberries begin to pop.

4. When the majority of cranberries have popped, add the pears, stirring to coat with the cranberries. Cook for 3-5 minutes until pears have softened.

5. Mix the cornstarch with the water, and making a well in the center of the pear mixtures, slowly add the cornstarch, stirring continually. Mix the cornstarch syrup thoroughly with the pear-cranberry mixture, cooking for a minute or two to make sure the syrup has thickened.

6. Evenly divide the pear-cranberry mixture between the two pie crusts.

7. In a food processor, add the oats, sorghum flour, cinnamon, nutmeg, cloves and butter.  Process until the mixture is a nice crumbly topping.

8. Evenly distribute the topping over both pies to completely cover them.

9. Bake in a preheated 375 degree oven for about 40-45 minutes until the pie is bubbling and the streusel is golden brown.

10.  Cool completely before serving.

* This makes for a savory topping which contrasts with the sweetness of the pear-cranberry mixture. If you happen to like your toppings sweet, you should add a tbsp or two of Agave with the butter.


Advertisement

Handling Holidays: Pies

website pies

“As American as apple pie.”

As the story goes, the Pennsylvania Dutch invented the two crusted fruit pie as we know it today, and apparently being able to have pies regularly with your meals was seen as a status symbol.  Whether this is all true or not, I don’t know, but I do know that my husband would rather have a pie than a birthday cake; that my members of my extended family would think Thanksgiving had gone horribly wrong if no pies were present; that figures say 700 million dollars in pies are sold every year in the U.S.; and that students everywhere are thrilled to celebrate Pi Day with pies of every type every year.

Ironically, though, pies, which are made with “good for you” ingredients like fruit and vegetables, are full of fat, sodium, and allergy triggers like wheat, nuts, and dairy.

Fortunately, when it comes to desserts, however, pies are probably the easiest to adapt for healthier eating or for an allergy restricted diet.  They usually don’t require very exact ratios of ingredients, and because you don’t need to make anything “rise”, you can pretty much substitute any ingredient with another without worry of disastrous results.

Healthier Pies

If you simply need to eat healthier, here are a few easy fixes to try:

For Crusts:

1.  Swap the white flour in the crust for whole wheat.  100% whole wheat has a higher fiber content, but you can also use white whole wheat if you want something closer to white flour.  Since 100% whole wheat flour is denser than white, you should use about 1/4 cup less in your recipe.

2.  Swap out the butter or shortening with coconut oil, which is actually a solid, not a liquid as the name implies.  It’s considered a healthier fat than butter and shortening.

3.  Make a crust using a liquid healthy oil as opposed to a solid fat.  A general recipe:  1 1/3 cup flour, 1/2 tsp salt, 1/3 cup oil, 3 tbsp “milk”.  I have used safflower oil, grapeseed oil, canola oil, etc… and almond milk, soy milk, and rice milk — all to success.

4. Substitute part of the flour in the recipe with a nut flour, coconut flour or soy flour.  You can substitute up to half of the flour with  a nut flour, about 1/4 of the flour with coconut flour, and up to 1/3 of the flour with soy flour.

For Fillings:

1.  Use Agave or Stevia or Coconut sugar in place of the sugar in the recipe.  For every cup of sugar use about half of any of these substitutes.  If you use the Agave and it’s simply a couple of tablespoons to 1/4 cup, don’t worry about it being a liquid.  If you’re using a cup or more, though, decrease any other liquid by at least 1/4 cup to 1/2 cup or increase a flour ingredient by 1/4 to 1/2 cup.

2.  Swap out any “whole” milk product (milk, yogurt, cream cheese, etc….) for a lower fat, lower sodium variety.

3.  Substitute egg whites for any whole eggs.  If you’re worried about the texture of a certain type of pie like pecan pie, use half whole eggs and half egg whites.

4.  Use date molasses instead of regular molasses.  You can use the same amount of date molasses as regular molasses.

Allergen Friendly Pies

If you need to substitute traditional ingredients, here are a few things you can try:

For Pie Crusts:

1.  Make a gluten free crust instead of a wheat flour type.  There are tons of recipes online you can follow.  Companies like Bob’s Red Mill also have their own pie crust mixes which you just add water to and roll out.  HINT:  These always need slightly more water than the instructions indicate, though, and you’re best rolling them out between wax paper.

2.  Substitute water or your type of “milk” (soy, rice, almond, coconut, etc…) for any milk in a crust recipe.

3.  Substitute vegan butter or coconut oil for any butter called for in a recipe.

4.  Use a recipe that calls for a liquid oil as opposed to butter so you can use safflower, canola, grapeseed, walnut, pumpkin, etc… oils instead.   A general recipe:  1 1/3 cup flour, 1/2 tsp salt, 1/3 cup oil, 3 tbsp “milk”.

For Fillings:

1.  Substitute vanilla soy milk for evaporated milk.  1 1/2 cups is equal to those 12 oz cans usually called for in a pumpkin pie recipe.

2.  Substitute vegan butter or a liquid oil or coconut oil for any butter called for in a recipe.  If you’re making a fruit pie that calls for “dotting with butter”, you can just omit the butter altogether and still have a tasty pie.

3.  Use a gluten free flour like garbanzo bean instead of a wheat flour.

4.  Make your own dairy free sweetened condensed milk.  This recipe only works for a pie that is going to be baked:  Beat 2 eggs until thick.  Add 1 cup brown sugar and mix well.  Add 1 tsp vanilla and mix well.  Add 2 tbsp of a flour and beat for one minute.  Add 1/2 tsp baking powder and 1/4 tsp salt.  Beat for another minute.  Set aside until you need to add it to your recipe.  This is equivalent to one 14 oz can of sweetened condensed milk.

You can also try making homemade sweetened condensed milk by mixing about 2 1/2 cups of your type of “milk” (rice, nut, coconut, soy) with 8 tbsp sugar or agave.  Stir well and simmer over low heat until the “milk” has reduced and thickened.  This will take a couple of hours.  Keep the heat low and stir frequently.  When it’s thickened, you can add 1/8 tsp of salt and/or 1/2 tsp vanilla, if you’d like.  Put a clear plastic wrap up against the mixture before cooling in the fridge to prevent a “skin” from forming.

5.  Use a frozen non-dairy dessert to replace the vanilla ice cream as a topping.

6.  Make a dairy free whipped cream.  Chill a can of full fat coconut milk overnight.  Turn the can upside down and drained out the liquid.  Put the cold cream into a cold mixing bowl and whip into it’s light and fluffy.

7.  Make a soy cream:  Mix one pint soy creamer, 1/2 cup soy sour cream, 1/4 cup Agave, 2 tablespoons cornstarch, and 1/4 teaspoon salt.  Cook over low heat until it thickens, stirring constantly.  Remove from the heat and add 2 teaspoons vanilla.  Scrape into a heat safe bowl and press plastic wrap directly against the cream to prevent a “skin” from forming.  Cool in the fridge.  Before serving, whisk the cream to make it lighter and fluffier.

8.  Substitute eggs with 1 tbsp ground flaxseed meal mixed with 3 tbsp water for every egg needed in the recipe.  Simply mix up the meal with the water and let it sit for at least five minutes to thicken to an egglike consistency.

Crustless Dairy Free Gluten Free Pumpkin Pie

Ingredients:

2 cups cooked, pureed pumpkin or 1 15 oz can of pumpkin

1 1/2 cup vanilla soy milk (or milk of your choice: evaporated milk, rice, almond, coconut)

1/2 cup liquid egg whites (or two whole eggs or 2 tbsp flaxseed meal mixed with 6 tbsp water)*

1/2 cup Agave

1/2 cup garbanzo bean flour (or other gluten free or wheat flour of choice)

1 tsp ground cinnamon

1 tsp dried orange  peel

1 tsp gluten free baking powder

1/2 tsp ground ginger

1/2 tsp ground nutmeg

1/4 tsp ground cloves

1/8 tsp salt

1/2 cup gluten free whole grain rolled oats

1/2 tsp ground cinnamon

1 tbsp Agave

1 tbsp melted vegan butter or oil such as grapeseed

Baking Instructions:

1.  Preheat an oven to 350 degrees.  Lightly grease a 9.5 or 10 inch pie pan with your preferred method.

2.  Mix the pumpkin with the soy milk, egg whites, and Agave.

3.  Mix the garbanzo bean flour with the cinnamon, orange peel, baking powder, ginger, nutmeg, cloves, orange peel, and salt.

4.  Mix the dry ingredients into the pumpkin mixture and pour into the prepare pie pan.

5.  Mix the rolled oats with the cinnamon.  Add the Agave and melted “butter” or oil, and combine well to make an oat topping.

6.  Use clean hands to evenly top the pumpkin mixture with clumps of the oat topping.

7.  Bake in the preheated oven for about 50 minutes.  The pie will be puffed and golden.

8.  Cool for 15 minutes on a wire cooling rack.  Then put into the fridge to cool completely.

* If you like your pumpkin pie denser, simply whisk in the egg whites with the rest of the liquid ingredients.

If you prefer a lighter, creamier version, though, whip the egg whites with 1/8 tsp of cream of tartar until they’re stiff. Mix the wet and dry ingredients together, and then gently fold the egg whites into the batter until they’re fully incorporated.

To fold egg whites:  Used a large curved spatula and be sure to put your batter into a large bowl.  Gently scoop your egg whites on top of the batter.  Then go along the curve of the bowl along the bottom of the batter with your spatula to gradually get some of the batter.  Scoop the batter gently into the center of the egg whites.  Then scoop your spatula back up toward the top of the batter and start all over again.  Essentially you’re just really, really gently incorporating the batter into the egg whites.

When You’re Out of What You Need

DIGITAL CAMERA

“What do you mean we’re out of baking powder?”

My younger two children and I were busy, baking a variety of quick breads for a luncheon we were hosting the next day.  Their favorites were on tap:  chocolate chip date bread, pumpkin, a gluten free banana bread, and a lemon poppy seed.

The kitchen held the evidence of our hard work:  flour scattered on the counter top and kitchen stools – courtesy of my son; millimeter tabs of butter sticking to the kitchen aid and measuring spoons – my daughter’s workmanship; and measuring cups and ingredients cloistered in the center – my attempt at providing some measure of organization and neatness to the mess.

All had been going well with two of the four breads in the oven and our attentions turned toward the last two breads when my daughter said, “We’re out of baking powder.”

“What you do mean we’re out of baking powder?  When did we run out of baking powder?”

“I used the last bit in the pumpkin bread.”

“So, why didn’t you tell me BEFORE we started making the banana bread?”

“I dunno.”

That last statement, of course, was presented with the traditional shrug and vacant expression we moms have come to associate with such an explanation from our children.

Fortunately for my daughter, I know a trick or two, and we were able to finish preparing the last two breads despite running out of baking powder.

The same experience

Chances are that you’ve had a similar experience sometime in your life of cooking. You’re halfway into a recipe and suddenly realize you’re all out of a key ingredient. Sometimes you haven’t begun cooking but would really like to make something which requires an ingredient you don’t currently have in the house.

What can you do?

Do you have to stop cooking or forget making that particular recipe?  The answer is usually, “No,” because chances are good that you actually have what is necessary to substitute for most key recipe ingredients. If you google the ingredient you’re missing, you’ll find a whole host of online recommendations for substitutes, but a few of the more common culprits are listed below.

Common Culprits

1.  You’ve run out of baking powder:  People tend to always have baking soda in the house because we use it for more than just cooking.  If you run out of baking powder you can make your own.  For each teaspoon of baking powder you need, simply add to your recipe 1/4 tsp of baking soda plus any ONE of the following: 1/2 tsp cream of tartar OR 1/2 cup buttermilk or yogurt OR 1/4 cup molasses.  I usually determine which ingredient I’ll use by what I have in the house and which might taste better in the recipe.

2.  The recipe calls for buttermilk which you don’t buy:  Whenever a recipe calls for buttermilk, you can make your own.  Simply add 1 tablespoon of vinegar or lemon juice to 1 cup of your type of milk (cow, soy, rice, etc…) and let it sit for five minutes.  It’ll thicken up, and you can simply stir and use whatever amount you need for your recipe.  You can also mix 3/4 cup of yogurt with 1/4 cup of milk or 3/4 cup sour cream with 1/4 cup milk.  Again you can choose simply by what you have in stock or by which you’d think would taste best in your recipe.

3.  You’re baking, and you’re completely out of eggs:  No worries.  1 tablespoon of ground flaxseed mixed with 3 tablespoons of water is equivalent to one egg.  If you don’t have ground flaxseed on hand, 1/4 cup of a pureed fruit or vegetable like applesauce or pumpkin will substitute as an egg binder.  If the egg is acting as a leavener in your recipe (like for a cake), you can replace the egg by adding an extra 1 tsp of baking soda to your dry ingredients and mixing in 1 tablespoon of vinegar as the last ingredient to the batter.

4.  The recipe wants you to use milk but you’re out:  If it’s a baking recipe like a cake or cookies, you can always use another liquid like fruit juice or even water.  If you’re making something like a soup that uses milk simply as a liquid, you can substitute a vegetable or chicken broth or water seasoned with herbs.  If you’re making a dish that uses milk to make it creamy and thick, you can substitute cooked pureed vegetables in an equal amount.  If you’re baking something that needs the milk to give it density and thickness, substitute yogurt or sour cream, but reduce your fat (butter, oil, etc…) by about 1/4 cup.

5.  You need sour cream but you never buy it:  You can substitute yogurt which you’re more likely to have but for every cup of sour cream you’ll use 1 cup of yogurt mixed with 1 tablespoon of flour.  You can also substitute using 3/4 cup of a homemade buttermilk and adding about 1/3 cup of a solid fat (butter) to your recipe.

6.  You’re completely out of yogurt:  Substitute one cup of sour cream or homemade buttermilk or pureed cottage cheese for every cup of yogurt needed.

7.  You don’t buy cottage cheese or ricotta cheese for dietary/allergy reasons: Simply substitute pureed tofu in equal amounts.

8.  The recipe wants you to use molasses or honey instead of sugar which is all you have or vice versa:  1 cup of molasses is equal to 3/4 cup of sugar and 1 cup of honey is equal to 1 1/4 cup of sugar.  What’s important to remember is that molasses and honey are wet ingredients verses the dry ingredient sugar.  So, if you’re adding molasses or honey instead of sugar, reduce another liquid ingredient by at least a 1/4 cup. If you’re substituting sugar, make sure to increase the liquid by at least a 1/4 cup.  For all three you can always substitute half the amount of Agave remembering to reduce the liquid by 1/2 a cup if you’re using the Agave for the dry sugar.  You can also use 1/2 the amount of Truvia for sugar.  If you substitute Truvia for the molasses or honey, be sure to increase your liquids to adapt for the loss in wet ingredients.

9.  Your recipe calls for tomato sauce and you only have tomato paste:  3/4 cup of tomato paste mixed with 1 cup of water will give you about 2 cups of a tomato “sauce”.  FYI:  If you only have tomato sauce and need tomato “juice” in your recipe, 1/2 cup of tomato sauce mixed with 1/2 cup of water is equivalent to 1 cup of tomato juice.

10.  Your recipe wants you to use a certain type of meat, vegetable, bean or whatever and you only have another type:  Go head!  Substitute!  Use what you have.  Just be sure that what you’re using is comparable. For example, salmon, halibut and tuna are all fish with similar texture, thickness and cooking time, while cod and haddock cook similarly, as does flounder, tilapia and catfish. For vegetables, substitute one root vegetable for another (carrots, turnips, potatos, etc…), a flower vegetable for another (broccoli, cauliflower, brussel sprouts, etc…) and make sure everything is cut to the same shape and size and thickness so your cooking times will stay the same.

A recipe

Since I’ve had a couple of requests now for how I make apple pie and apple crips, I’m going to share those below.

Apple Pie or Apple Crisp

Apple Filling:

Ingredients:

10 cups peeled, cored, sliced apples*

1/4 cup Agave

1 tablespoon lemon juice

2 tsp favorite spices**

Cooking Instructions:

1.  Put apples into a pan which allows them to be evenly distributed and cooked.

2.  Mix agave with lemon juice and spices and pour over the apples.

3.  Cook the apples over medium-low heat, stirring occasionally until the apples begin to soften and release some of their juices.  Usually about 15 to 20 minutes. They’ll lose that “raw” look and take on a slightly darker hue.

4.  Drain the apples, keeping the liquid and returning the liquid to the original cooking pan.  Cook the liquid down over medium-low heat until it’s reduced by about half.

5.  Mix the reduced liquid back in with the apples and set aside.

* Use apples which are good, crisp, sweet eating apples like honey crisp, juno gold, gala, braeburn, etc… which don’t need a lot of sweetening.  Regular pies and crisp tend to call for baking apples which are blander and that’s why the recipes call for two cups of sugar!  FYI:  A regular fist size apple will yield about one cup of apple slices.  The newer gigantic sized apples are usually about two cups.

(NOTE:  If you only have Macs or Empires or green apples, you can still use them, but since they are dry apples, you’ll notice that the liquid actually gets absorbed as they soften.  No worries.  Just skip steps 4 and 5.  Mac/Empire apples will soften more quickly than the crisp, eating apples.  Green apples will take longer.)

** I vary the spices.  Sometimes I just use cinnamon and nutmeg.  Other times I use ginger and cardamom.  Occasionally I use all four mixed together. Experiment to see what flavors you like.

For Apple Pie:

1.  I use Bob’s Red Mill gluten free baking and biscuit mix recipe for pie crust, only I add 1 1/2 tsp cinnamon and 1/2 nutmeg to the dry mix before adding the water. My two tips if you’re going to use that pie mix, though:  The dough usually needs a bit more water than they say, and to roll out the dough, put your dough between two pieces of wax paper.  It’ll roll out nicely and you can easily pull it off when you put the dough into the pan or as the top crust.

2.  After you’ve put your bottom crust into your pie pan, give the apples a good mix before layering them carefully one on top of each other in circle in the pie crust. Be sure to pour off any leftover liquid over the top of the apples when you’re done layering them.

3.  Cover the apples with your top crust and fold your edges in whatever manner you prefer (pinching, forking, free-style).

4. Melt a tablespoon of vegan butter and mix it with 1 tsp agave and 1/2 tsp cinnamon.  Brush the crust with the mixture, put in steam slits, and cover the pie edges with an edge cover or with aluminum foil.

5.  Bake for 35 to 40 minutes in a preheated 375 degree oven until the crust is browned and the apples are bubbling.

For Apple Crisp:

1.  Mix the apples and liquid one last time before placing into a 9 x 13 pan.

2.  Combine 2 cups gluten free whole grain rolled oats with 1/2 cup gluten free flour like garbanzo bean flour, 1 tsp cinnamon, 1/2 tsp nutmeg, and 1/2 tsp ginger.

3.  Cut in with a pastry blender 1/2 cup vegan butter to form a crumbly mixture.

4.  Add 1/4 cup agave and mix well until the dry crumbs are damp.

5.  Using your clean hands, crumble the oat mixture evenly over the apples.

6.  Bake for 15-20 minutes in a preheated 350 degree oven until the topping is browned and the apples are bubbling.