Fruitful Flavors: Peach Pie

“It won’t come off the pit….”

One of the many enjoyments of summer is eating a freshly picked, sweet and juicy peach. We have a farm down the road which grows peaches, and it is always a highlight of our summer when the peaches are ripe and ready for us to purchase and eat. The other day, though, someone asked me how I get peaches off their pits for making pies and cobblers, and I explained that I didn’t.

Peaches come in two varieties, clingstone and freestone. Both yellow and white peaches can be either. The irony is that the variety which is most difficult to remove from the pit, the clingstone, is the sweeter and juicier of the peach varieties. The peaches which fall off their pits, the freestone, are not as sweet and juicy. Most of the peaches one finds at the grocery stores are the clingstone variety because they are sold for taste. Hence, my friend’s frustration with removing the peach slices for baking.

If folks want to make peach pie or cobbler or crisp or muffin or cake using fresh peaches, the best option is to purchase freestone peaches which easily twist off the pits if the peach is ripe. If using clingstone peaches, then folks need to resign themselves to cutting the peach slices off the pit which means the slices won’t be pretty.

I don’t tend to do either, because as anyone who has followed my blog for a while knows, I am lazy and like to cook food as easily and quickly as possible. So I keep frozen, no sugar added peaches in my freezer and just pull them out when I have a hankering to bake with peaches. The fresh peaches, I just eat as a snack, enjoying their flavor as is.

The conversation with my friend of course gave me a craving for peach pie, so I went ahead and baked one yesterday which I’ll share below. You’ll note that there’s no sugar and very little sweetener at all because the flavor and sweetness comes from sauteing the peaches to concentrate the flavor and sweetness. Folks can also switch up the spices to your own tastes. Sometimes I like to use cardamom and ginger instead of cinnamon and nutmeg.

Some thoughts on pie crusts, too.  I made my own, but folks can use a store bought pie crust, whether gluten free or wheat. If you choose to make your own, you can follow a favorite recipe. Otherwise, some information for your use to to make your own pie crust.

Pie crusts are basically flour, fat and water. For every one cup of flour, whether wheat or gluten free, you will usually use 3 to 6 tbsp of a fat, whether butter, shortening or oil, or a combination of the three, and for every cup of flour you usually need 1 to 3 tbsp of water. Depending on tastes, some recipes call for a little bit of salt; others call for the addition of a little bit of sugar. I tend to use neither, opting instead to flavor my crust with spices like cinnamon, cardamom, nutmeg, ginger, cloves, etc….

Tips for making “from scratch” crusts:

  1. If using solid fats, the colder the better: Put your butter and/or shortening into the freezer for ten minutes before cutting it into your flour. This is especially good for dairy free versions of butter which tend to be softer in texture. You want the fats to slowly melt in the oven while cooking, not become soft while you’re still preparing the crust.
  2. If using oil, the milder the better: Plant oils are great for crusts because they have healthy fats and you don’t have to cut the fat into the flour. You can simply stir the fat into the flour. You want, however, to use mild tasting oils like safflower, sunflower, canola, etc… because otherwise the oil flavor overpowers everything else. If you are using an oil for the fat, be sure to decrease the amount of water because you only want enough liquid to moisten the crust enough to hold together.
  3. The colder the better for the water: Recipes for crusts will call for ice water. This means literally putting ice into the water, because you want to prohibit gluten development. Now, if you’re making a gluten free crust, that isn’t an issue but if you’re using solid fats, the cold water will help keep the fats cold until the pie goes into the oven. Use just enough water, though, to moisten the flour enough to hold together.
  4. If you want tender, flakier crusts, use acids or alcohol: Acids like lemon juice or vinegar or an alcohol like vodka cook off in the baking process but react with the other ingredients to make for a flakier crust by tenderizing the dough. You only need to replace one to two tablespoons of the ice water.
  5. If want tender, flakier crusts, use lower protein flours: The lower the protein, the flakier the crust, but of course, that makes for a more delicate crust and one which is more carb intense. Find a balance. For example, use a whole wheat pastry flour which has less protein than 100% whole wheat flour but which is a sturdier flour than all purpose white flour. If using gluten free blends, choose a combination of brown rice flour and sorghum or oat which combines a lighter flour with a protein flour.
  6. If you want a crust that is easier to handle: Adding an egg yolks makes for a more pliable, sturdier dough to work with. It also makes for a richer tasting crust.
  7. For easier rolling and handling, cold is better: It is a good rule of thumb to put your crust into the fridge for half an hour to an hour because rolling soft dough makes it more likely that the dough will stick, causes the fats to melt before their time, and will be harder to transfer to the pie plate.
  8. For easier rolling and handling, paper is better: When rolling out the dough, if you don’t want the crust to stick and want an easier way to transfer the crust, use wax paper or parchment paper which you sprinkle flour onto. After putting the dough down, sprinkle it with flour and top with a second piece of wax or parchment paper. Then roll. The papers prevent sticking, and when you’re ready to transfer the crust, you can just pick up the paper and flip it onto the pie plate.
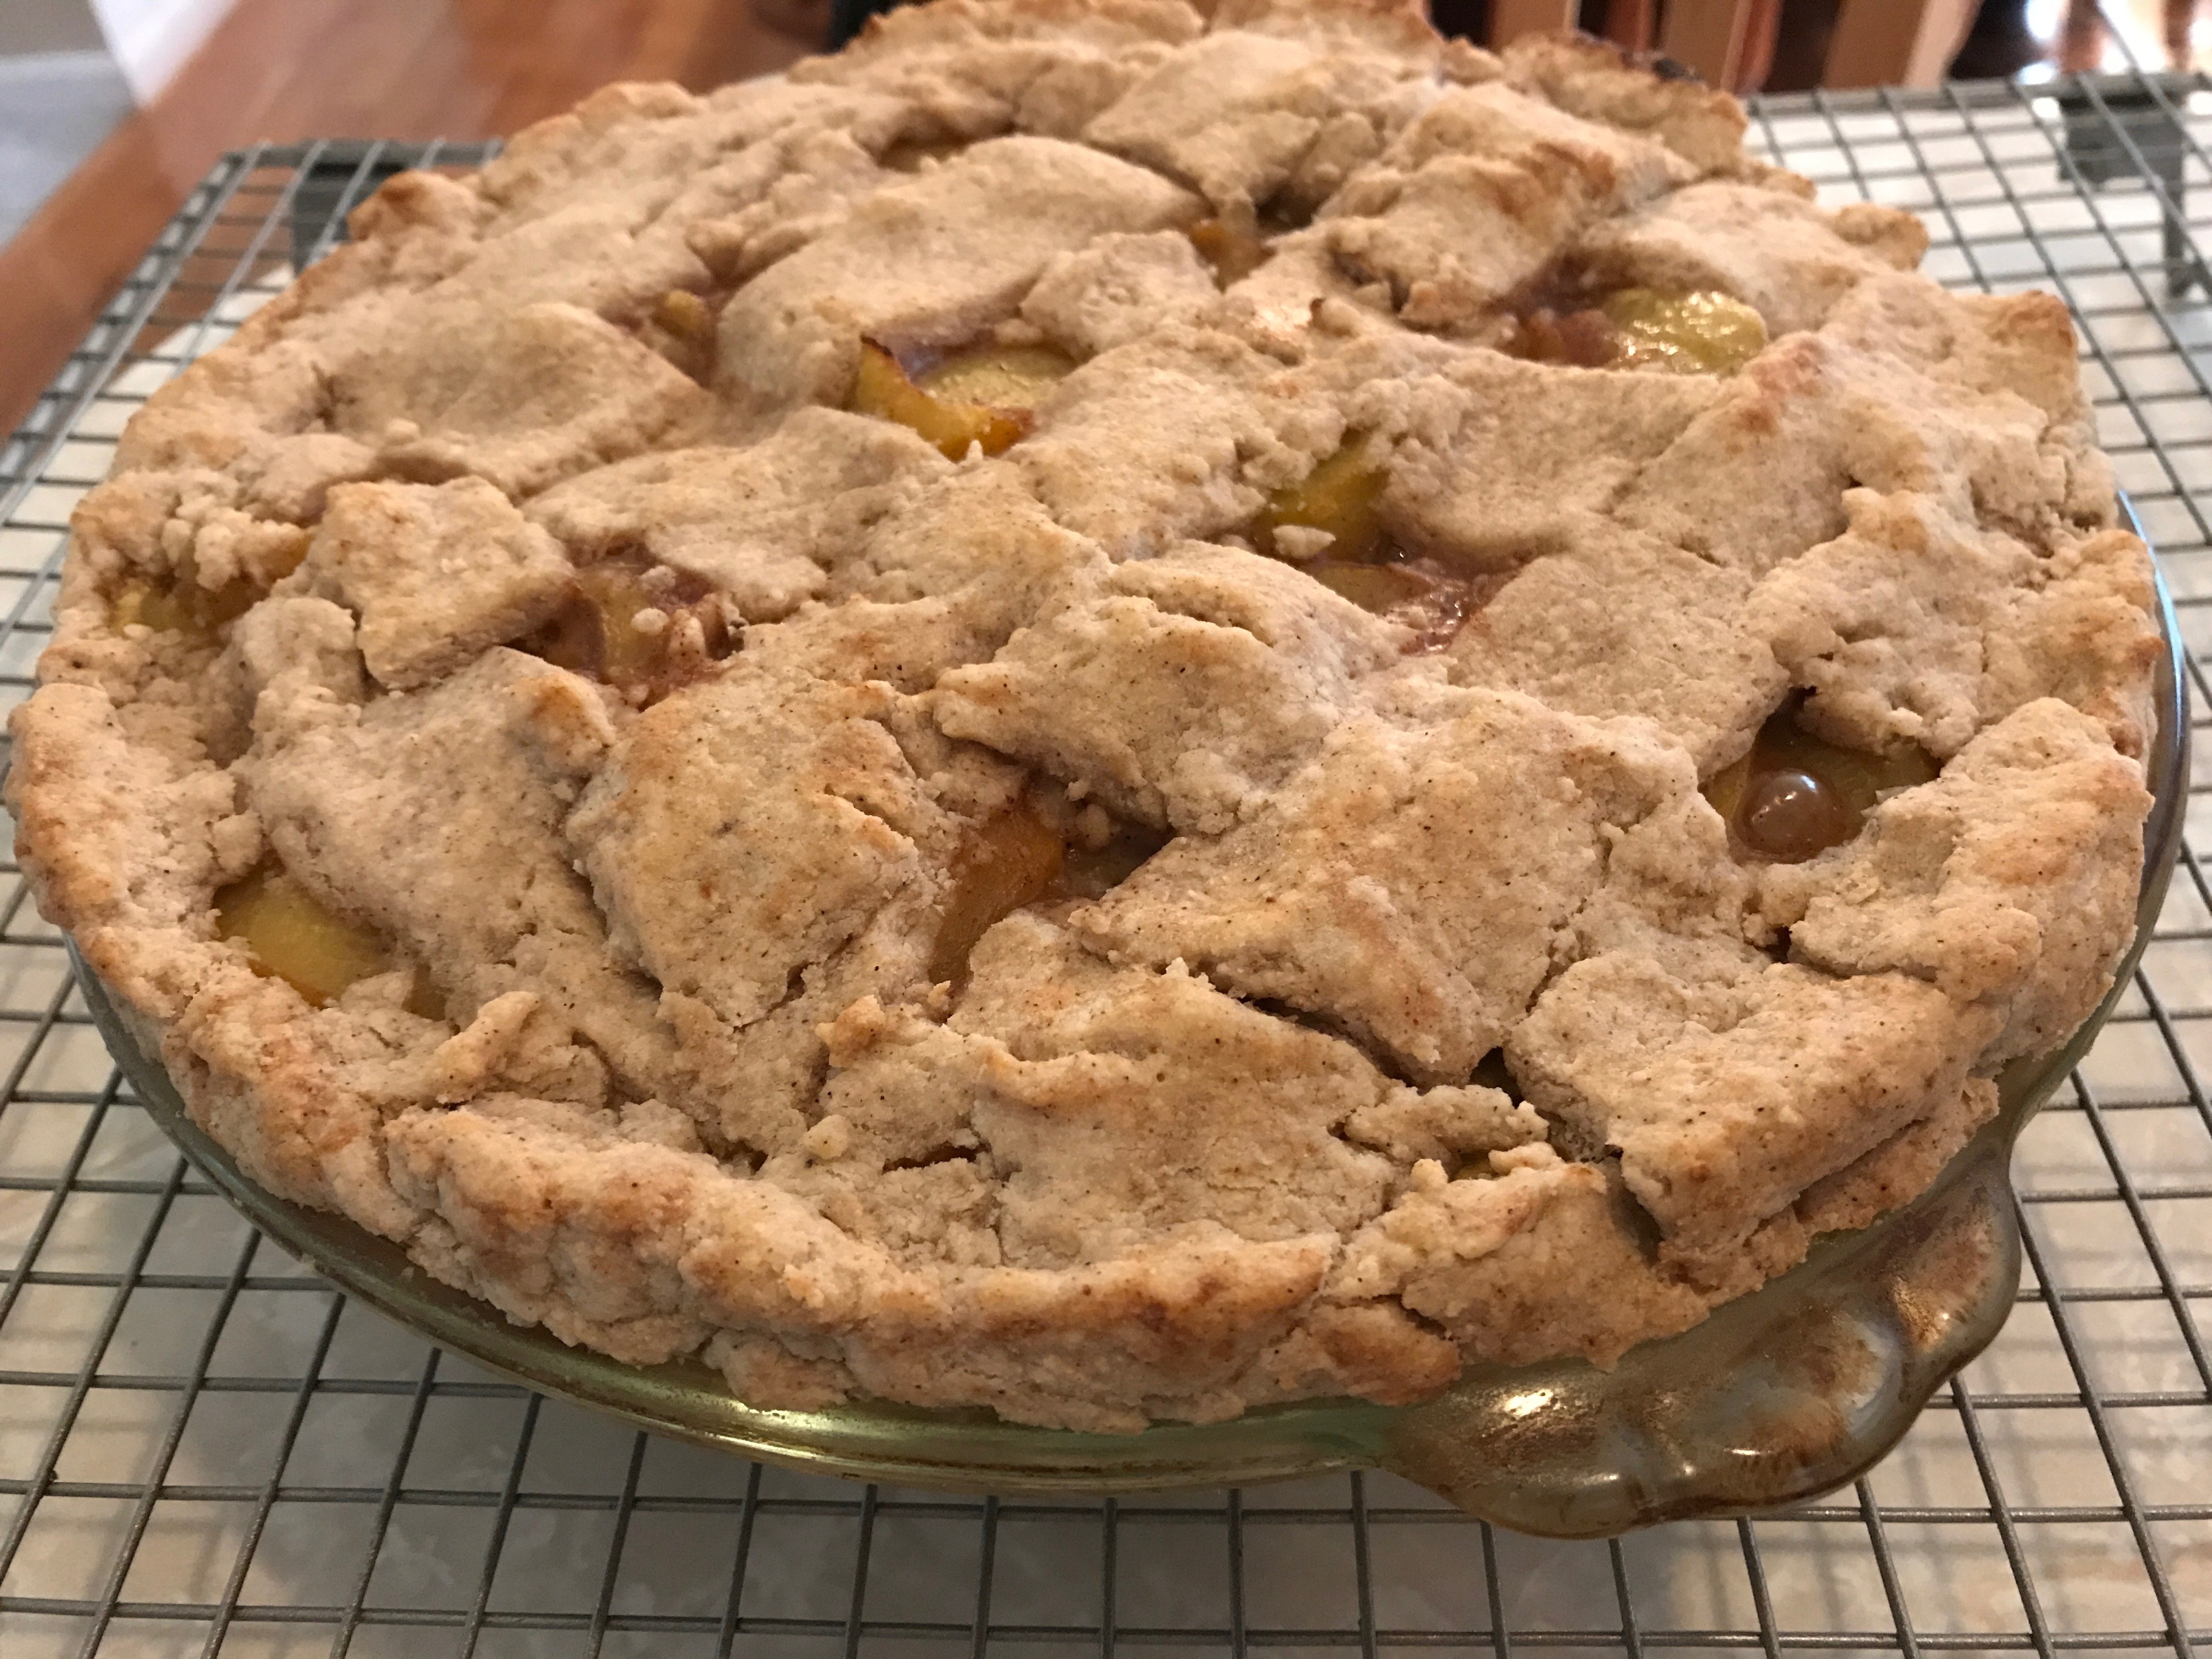
Peach Pie

Ingredients:

3 pkg 16 oz thawed frozen peaches, no sugar added or 6 to 7 cups sliced fresh peaches

1/2 cup water

1/4 cup agave

1 to 2 tsp cinnamon

1/2 to 1 tsp nutmeg

3 tbsp cornstarch or arrowroot starch or tapioca starch

Pie Crusts

Cooking Instructions:

  1. Preheat the oven to 400 degrees.
  2. In a shallow pan mix the water with the agave, cinnamon, nutmeg and starch.
  3. Add the peaches and stir to coat well.
  4. Continue to stir as the mixture comes to a slow boil and begins to thicken.
  5. When the mixture has become glutinous and is sticking to the peaches, turn off the heat and let the peaches cool.
  6. Line the bottom of a 9.5 inch glass pie plate with a pie crust.
  7. Fill the crust with the peaches, layering the peaches individually into the crust, using your clean fingers.
  8. Top the peaches with the top crust and make slits or create a lattice crust to cover the peaches.
  9. Bake for 15 minutes. Cover the entire pie with aluminium foil and bake for 20-25 minutes. Remove the foil and bake for another 10-15 minutes until the crust is golden brown and the peaches are bubbling.
  10. Remove the pie from the oven to a cooling rack and allow it to cool at least an hour before slicing into it.


Shortcut Cooking: Oatmeal Date Cookies

“We haven’t made cookies in a while….”

My husband had some errands to run, and my high school daughter was playing with the band at an event. So, this left my son and I to occupy our time together. Since I had a workshop coming up, I suggested that we do some baking.

The problem was deciding what to bake. I’d had a series of workshops recently and done a lot of baking so I was a bit tired of the same ol’, same ol’, which were a stock series of recipes which I usually make for the workshops because they’re quick and easy in addition to representing the various different substitutions I teach about in the workshops.

My son’s suggestion was that we make cookies because we hadn’t made them in a long, long time.

There was a reason for that…. I have found that cookies take longer to make, both in the assembling and in the baking. But my son was correct, that we hadn’t made any in a while, and they would be something different. So, we went to work creating a recipe.

I decided that if we were going to bake cookies, I wanted to make something that would be quick. This meant beginning with what we had in the pantry and not creating everything from scratch. So, we opted to use a gluten free flour blend that I had already made up for another item and had leftovers of in the pantry. We also decided to use pre-chopped, store-bought dates which we found in the pantry as well. Because I’m always trying to be healthy, we chose to make oatmeal cookies with whole rolled oats, also in in the pantry, and to use coconut sugar instead of white sugar so I could use half the amount I’d have to use of white sugar.

Using the mixer sped the assembling process up, and because we decided to make oatmeal cookies, we could simply drop the batter onto the parchment paper and flatten them without any rolling or forming. By using vegan butter, I minimized the spreading so I could put 16 cookies (the 1 tbsp size) instead of 12 to a cookie sheet which meant all the cookies fit onto just four cookie sheets, so I could bake two sheets at a time in the oven, resulting in only 20 minutes of baking time.

The result was that from when we started rummaging in the pantry to when the second batch of two cookie sheets came out, it was less than 45 minutes. Now, those are cookies worth making!

Oatmeal Date Cookies

(These make about 60 small cookies or 30 large cookies.)

Ingredients:

1 1/2 cup Gluten Free flour blend (I used a homemade blend of garbanzo bean and sorghum flours mixed with tapioca and potato starch)

3 cups Gluten Free whole rolled oats

1 tsp salt

2 tsp baking powder

2 tsp cinnamon

8 oz pkg pitted, dried, chopped dates

1 cup vegan soy free butter or coconut oil or natural shortening

1 cup coconut sugar

2 tbsp ground flaxseed mixed with 6 tbsp water (Mix ahead of time and let it sit)

2 tbsp additional water

Baking Instructions:

  1. Preheat the oven to 350 degrees and line cookie sheets with parchment paper.
  2. Mix together in a bowl the flour, oats, salt, baking powder and cinnamon. Stir in the dates. Set aside
  3. In a mixer, cream the butter with the coconut sugar.
  4. Add the flaxseed mixture with the dry ingredients and the additional water. Mix until well combined.
  5. On the prepared cookie sheets, drop the cookie batter by 1 tablespoon-full for smaller cookies (2 inch diameter) or 2 tablespoons-full for larger cookies (4 inch diameter). Leave about an inch in between the cookies.
  6. Press the dough down with a fork in both directions and bake in the preheated oven for 8-10 minutes for the small cookies until the cookies are puffed, golden and stiff to the tough. For the larger cookies, turn the pan around after 8-10 minutes and bake for another 8-10 minutes.
  7. Allow the cookies to cool for a couple of minutes on the cookies sheets before moving them to a wire cooling rack with a spatula to cool completely.

Healthy Habits: Quinoa Black Bean Salad

“It’s a bit difficult to avoid all of nature….”

Recently my health insurance provider decided that they wouldn’t cover allergy medications any more which is a big blow to my health. When one goes to an allergist for the first time, the allergist will test you for 80 most common allergens. I am allergic to 78. Have been since I was a child, and they haven’t changed in over 40 years, despite repeated testing every seven years.

For the first thirty years of my life, I coughed, hacked, and sniffled my way through life, never without huge wads of tissues in hand and rarely able to breathe through my nose. The advent of new medications, specifically nose sprays, seemed an opportunity for relief. True to my life, though, it turned out I was allergic to most of the new medications. Go figure! But there was one which actually worked, and for the past 15 years, I was able to breathe through my nose, divest down to one tissue a day, and only hack, cough and sniffle two or three times a year when the allergy seasons were at their worst.

Now, though, I’ve slowly begun a descent back to what I had forgotten, not being able to breathe unless completely upright, blowing my nose so often that it’s red and raw, once again needing to invest in my own tissue company, and finding myself at the doctor’s more than I’d like to be for antibiotics for sinus infections.

On the plus side, I’ve been so sick at times that I’ve been forced to stay at home which is an unusual opportunity for me because I suddenly have time which I wouldn’t have had if I were out at my usual meetings and running of errands. It has also meant I can see firsthand which parts of my life really must be attended to and which can survive without me.

On the downside, feeling unwell makes me tired which stimulates cravings for food which aren’t always the healthiest of choices. Since I always have to watch my weight and my sugars, I have been trying to create comfort foods which curb my cravings but which are healthy.

One such recipe is for a quinoa salad. If you are unfamiliar with quinoa, it is essentially a seed which is a good protein source.  Because it cooks similarly to rice, folks tend to eat it like a grain, and folks who are diabetic or needing to watch carbs should know that quinoa is high in carbohydrates. Since quinoa is also high in protein and fiber, though, eaten judiciously, quinoa is a great comfort food.

I make a quinoa salad which I and my family really likes which uses multi-colored quinoa, black beans, kale and carrots. The quinoa and black beans provide the carbs which are filling but also fiber and protein. The kale and carrots provide nutrients gained from vegetables and cuts the amount of quinoa (and hence the carbs) in a cup serving.

Quinoa Black Bean Salad

Ingredients:

2 cups water

1 cup multi-colored quinoa

2 cups frozen, chopped kale

1 cup thinly sliced baby carrots

16 oz can of no salt, no sugar added black beans, rinsed well and drained completely of all water

3 tbsp olive oil

1 tbsp apple cider vinegar

1/4 tsp salt

1/4 tsp black pepper

3/4 tsp ground cinnamon

3/4 tsp ground cardamom

1-3 tsp honey (optional; use desired amount of sweetness if using; if making for just the family, I omit; if making for company, I use 2 tsp)

Cooking Instructions:

  1. In a medium saucepan, pour the water and add the quinoa. Bring the water to a boil, then lower the heat and simmer until the quinoa has plumped, is showing white rings, and has absorbed all the water. This will take anywhere from five to 15 minutes, depending on how vigorously you are simmering the water. I find that it’s helpful to stir the quinoa every so often.
  2. Once the water is absorbed, remove the pan from the heat, cover the quinoa and let it sit. You want the quinoa to be completely dry before you mix it with other ingredients. This can take anywhere from 10 to 30 minutes, depending on how much of the water was actually absorbed into the quinoa before you removed it from the heat.  When it’s completely dry, you will be able to fluff the quinoa with a fork. If the quinoa clumps together when you try to stir it, then it’s still a bit damp.
  3. While the quinoa is drying, thinly slice baby carrots to make a cup. You can use regular sized peeled carrots but then you’ll want to cut the thin slices in half because you are only cooking the carrots a short amount of time in the microwave with the kale, and you don’t want the carrots to be hard. Once you have a cup’s worth chopped, put it aside for the moment.
  4. Put 2 cups of frozen, chopped kale into a microwave safe bowl.  Follow the instructions for cooking, only halfway during the cooking time, remove the bowl, stir the kale and add the cup of chopped carrots. Finish cooking the kale in the microwave.
  5. Add the kale, carrots and black beans to the quinoa and mix well.
  6. In a measuring cup, whisk together the olive oil, apple cider vinegar, salt, pepper, cinnamon and cumin and honey, if using.
  7. Drizzle the dressing onto the quinoa salad and use a spoon to incorporate the dressing into the quinoa salad.
  8. Salad can be served warm or cold. Can store in the fridge for a long time.

Vegan Veggin’: Chickpea Curry

“Life should be more than simply surviving successfully….”

For anyone keeping track, my usual every two to three weeks posts have not appeared for the past six weeks. Unexpected events pushed aside time I might have used to post. Some were unplanned but pleasant surprises such as an opportunity to write a song and create a video, a blast of inspiration for a new play, a push to apply for a writing fellowship, bookings for eight workshops in eight weeks, trips to see family and do college touring with my middle child. Others were not as welcomed occurrences. Friends and friends’ children struggling with depression and needing support, making time to visit a special family friend who may not be with us on this earth much longer, our oldest wrestling with issues requiring parental wisdom, extra responsibilities because of difficulties in the lives of others, our middle child being in a car accident.

Last night, a friend asked if I wanted to cancel and reschedule a get-together we had planned a couple of months ago for this coming week with a group of moms I know.

“Why?” I asked.

“Because there’s so much going on for you right now. You’re just trying to survive, aren’t you?”

“No, no I’m not,” I said.

And it’s true. I don’t believe in survival mode. The more difficult life is, the more likely I am to get together with a friend for lunch, take my son on a trip to a museum, go out to dinner as a family, dance with my daughter in the living room, or help a friend with a book edit even though someone might argue my time would be better spent elsewhere.

Life is short, and life can turn on a dime. I’ve been to enough funerals to attest to both facts, and I have now had two of my three children in car accidents which could have taken them from me without any warning. Life is not meant to be survived. It is meant to be lived. Every minute, every day, because you don’t know what you’ll have for time.

And that may be why I invest so much of my time helping people with their food issues. Physical necessity dictates not only that we have to eat but that we need to do so at regular intervals throughout the day. This means part of our “living” time is thinking about what to eat, making what we’ll eat, and eating. So, food, too, should not just be about surviving but about enjoyment and benefit, just like everything else we do in and with our lives.

This year my oldest decided she would become vegan, and recently my husband’s sister’s family decided to do the same. For my daughter, eating vegan means doing her part to make the world a better place to live. For my brother-in-law and nephews and niece, it’s about embracing a better, healthier lifestyle. For both, they are making choices to live lives which are not just about surviving but about being happy with the decisions they make about what to eat.

Given my dairy allergies and my son’s egg allergies as a child, a lot of what I make was already vegan, but I’ve begun experimenting with more recipes of late to expand my repertoire. Last month I made a vegan chickpea curry which the family really liked and which is so easy because it just cooks in the crock pot. I will share it below.

Chickpea Curry

Ingredients:

Two 16 cans no salt, no sugar chickpeas, drained and rinsed (you can save the liquid and use the aquafaba as an egg substitute or to make meringues or mousse or another recipe)

16 oz package thawed frozen cauliflower

16 oz package thawed frozen carrots

20 oz package thawed frozen chopped butternut squash

16 oz package frozen chopped kale

10 oz package frozen chopped red peppers

1 tsp olive oil

1 tbsp minced garlic

1-3 tbsp curry powder (if you like your curry very mild, use the smaller amount; if you like a stronger flavor, use 2 or 3 tbsp)

2 tsp paprika

one 14 oz can of petite diced no salt no sugar tomatoes

one 14 oz can of coconut milk or 1 1/2 cup preferred other type of vegan milk

1/4 cup gluten free flour

Cooking Instructions:

  1. In a 6 quart crock pot mix together the chickpeas, cauliflower, carrots, squash, peppers and kale.
  2. In a shallow pan, heat the olive oil for a minute, then add the garlic, curry powder, and paprika. Heat for a minute, stirring continually.
  3. Add the tomatoes and bring to a simmer, about 3-5 minutes.
  4. Add the “milk” and bring to a slow boil.
  5. Stir in 1/4 cup flour and whisk well, stirring continually until the mixture is smooth and begins to thicken.
  6. Pour the sauce over the ingredients in the crock pot and blend well.
  7. Cook on low for 6 to 8 hours or high for 3 to 4.
  8. Serve by itself or with rice or with bread.


Creative Cooking: Partial Chocolate Chocolate Chip Banana Muffins

“I told him you could probably do it….”

Last week on the drive home from church, my son told me that he’d told his Sunday School leader that I could probably make banana muffins for his group this week but that I needed to confirm for the leader that I could.

“Of course,” I said. After all banana muffins aren’t all that difficult.

Well, lesson learned: Always make sure to get all the facts before you agree to anything! It turned out that among all the boys in my son’s group, there were allergies to nuts, peanuts, wheat, eggs, soy, and dairy. The allergies wouldn’t be that difficult, given what I do, which is to make allergy friendly baked goods. But then I learned that one boy doesn’t like banana chunks; another boy will only eat chocolate muffins; a third prefers chocolate chips in a muffin versus being completely chocolate; and a fourth has to limit his sugar intake because it makes him bounce off the walls.

Any other person might have decided that there was no way to accommodate everyone, but I was determined to not be that person. So, I went to work….

Removing chunky bananas was easy. I simply pureed the bananas and no chunks! To make the muffins gluten free, I used Cup4Cup whole grain gluten free mix which was also dairy, nut and soy free. To replace the eggs, I only needed to increase the baking soda and use vinegar because the bananas would act as a binder, so we only needed to help it rise. For the liquid ingredients, I used safflower oil instead of butter and water instead of a milk product or substitute which would have had soy or nuts. In place of the sugar, I used Agave which allowed me to use only 1/3 the amount that the recipe would have called for sugar.

The question I was left with was how best to make a muffin that was chocolatey enough for the one boy but not too much for the other. After pondering for a while, I hit upon a solution. I stirred Enjoy Life allergy friendly mini chocolate chips into the dry ingredients and then poured boiling water on top before adding the wet ingredients and the vinegar. The result was that the hot water began to partially melt the chips which turned the batter chocolately but not completely so and left enough chips intact for the muffins to be banana chocolate chip muffins.

The result seemed to be a hit.

Partial Chocolate Chocolate Chip Banana Muffins

Ingredients:

2 1/2 cup pureed ripe bananas (I needed four)

1/2 cup safflower oil

1/2 cup Agave

3 cups gluten free flour blend (I used Cup4Cup whole grain dairy, nut, soy free blend)

2 tsp baking powder

2 tsp baking soda

2 tsp cinnamon

1/2 tsp salt

10 oz package Enjoy Life mini chocolate chips

3/4 cup boiling water

2 tbsp vinegar (I used apple cider vinegar)

Baking Instructions:

  1. Preheat the oven to 350 degrees and line 24 muffin tins with liners.
  2. Mix the pureed bananas with the oil and agave. Set aside.
  3. Blend together the gluten free flour blend, baking powder, baking soda, cinnamon and salt.
  4. Stir in the mini chocolate chips.
  5. Pour the boiling water on top of the dry ingredients.
  6. Pour the wet ingredients on top of the boiling water.
  7. Add the vinegar and then stir until the dry ingredients are completely moistened. Your batter will turn chocolately but a majority of the chips will remain intact.
  8. Divide the batter evenly among the 24 tins. The tins will be filled to the top.
  9. Bake for 15 to 20 minutes until the muffins have risen, are firm to the touch and a toothpick inserted in the center comes out clean.
  10. Enjoy!


Healthy Habits: Aquafaba

website souffles

“What?”

I travel to libraries to give workshops on allergy friendly and healthier baking. Last weekend, at a workshop, I spoke with a group of about 30, and I received an email this week with a follow up question about aquafaba.

If you have not heard about the new rage, aquafaba, it’s apparently the words for water and beans and refers to the liquid you find in a can of chick peas or after you cook dry chick peas.  The chemistry of the liquid is yet to be determined but what is known is that it makes for a wonderful egg and dairy substitute. You can whip it like eggs to make meringues or replace eggs in baked goods or mayo or waffles and more.  You can whip it like heavy cream to replace dairy in whipped cream, mousse, or ice cream and more.

For my workshops, I always bring samples so folks will know that I’m telling the truth about being able to “have your cake and eat it, too”, and I try to provide a variety of desserts which are gluten, dairy, nut, peanut, soy and egg free. Depending on the season, the particular items I bake vary. For this workshop, I made meringues with the aquafaba and a chocolate cream pie with an aquafaba topping so folks could see how the aquafaba worked as both an egg and a heavy cream substitute.

The participant in the workshop who had emailed me did so because she was looking for the meringue recipe which wasn’t actually on this site. So, I’m remedying that situation by including it below. *grin* I’m also including some other tips for how you can use aquafaba in recipes.

Tips for using aquafaba:

  1. Purchase no salt, no sugar added versions of the chick peas if you are using canned chick peas. This helps you to control the sodium and sugar levels. You simply drain the liquid into a bowl and use your chick peas for another recipe at another time. If you prefer to use dry beans, soak them until doubled in size, bring the water to a boil, then simmer until the beans are soft. Drain the liquid into a bowl for your use and save the chick peas for another recipe.
  2. To use the aquafaba as a regular egg sustitute, simply measure out 1/4 cup per egg needed and whisk the egg with a fork just until frothy. Then use in your recipe as you would an egg. Works well for baked goods and French toast.
  3. To use the aquafaba as eggs which need to be whipped for angel food cake or Belgium waffles, start with room temperature aquafaba, add between 1/4 to 1/2 tsp cream of tartar and whip with the whisk handle of your mixer until stiff peaks form (as pictured above). Fold into your mixtures are indicated in your recipes.
  4. If you want to whip the aquafaba for a meringue topping or meringue cookies or to use as a whipped cream topping or as a substitute for heavy cream in ice cream, when you add the cream of tartar to the room temperature liquid, you should also add your sweetener at the same time. If you try to fold in the sweetener after you’ve whipped the aquafaba, it will deflate and soften. I find that powdered sugar works the best because it’s the lightest weight. Depending on how sweet you like your foods, 1/2 cup to 1 cup of powdered sugar per 15 oz can of liquid works well for most recipes. After you have added both the cream of tartar and powdered sugar, then you can whip the aquafaba to the desired stiffness. It’s best to check if the sweetness is to your liking when soft peaks have begun to form so you can add more if needed before you reach the stiff peak stage.

How to Make Aquafaba Meringues:

To make the aquafaba meringues you simply need a 15 oz can of chickpeas.  Drain the liquid into your mixing bowl and put the chickpeas in the fridge for another use.   Add at least 1/4 tsp and up to 1/2 tsp of cream of tartar.  Then add powdered sugar to your liking.  Start with 1/2 cup to 1 cup of powdered sugar. You can always add more later if you find it’s not sweet enough for you. Add 1 tsp of vanilla alone or with 1/4 cup of unsweetened cocoa powder if you want vanilla or chocolate flavor.

After you’ve put everything into your mixer, use the wire whisk handle to whip the aquafaba until it looks like the picture above.  It usually doesn’t take very long.  (When the peaks are still soft, check the sweetness to see if you need to add any more before whipping to stiff peaks.)

After it’s whipped to stiff peaks, put some into a gallon zip lock bag and snip off the end.  Preheat your oven to 250 degrees and line a cookie sheet with parchment paper. Using the ziplock bag, pipe meringues onto the parchment paper.  I usually make them about tablespoon size. I also like to make the meringues pretty by sprinkling a mixture of unsweetened cocoa powder and powder sugar on top of each meringue before putting them into the oven.

Once you’ve filled the cookie sheet with your meringues, pop them into the oven and bake them for at least an hour.  Then check them.  When they are done, they’ll be hard and dry.  If they’re not quite done, cook them longer for 15 minutes at a time until they are.  (If you make them tablespoon size, they’ll be done after an hour.  If you made them larger, they may take more time.)

Once they’re done, turn off the oven and let them cool in the oven for half an hour.  Then take them out and let them cool completely on a wire cooling rack.  When you go to take them off the parchment paper after they’ve cooled, carefully lift them off and place them into a tupperware, using parchment paper or plastic wrap to layer them.  They’ll keep for a good while in the tupperware.

Valentine Greetings: Chocolate Surprise Cupcakes

choc-surprise-cupcakes

“Yay! Another snow day!”

After a winter of warm days and relatively little snow, Mother Nature decided that we needed three feet to fall within a week and a half. My middle child is vexed that the three tests she was supposed to have had a week ago still have not been administered due to two snow days and three start of school delays. My oldest and youngest, however, have been thrilled for the extra time to hang out in dorms with no classes (my oldest at college) and to play at home with the family (my youngest in middle school).

As a family, we’ve made use of the snowbound time to catch up on the never-ending t0-do list and to spend time together since the youngest really wanted us to play with him. Many hours sledding in our backyard, playing board games, competing on the Wii, and watching reruns of old shows left the family in the mood for something “special” to eat.

Since Valentine’s Day is tomorrow, we decided to make some Chocolate Surprise Cupcakes, one of the family’s favorites. You make a chocolate raspberry center which you tuck into the cupcake batter so when you eat it, you enjoy a nice creamy flavor surprise.  What’s nice about this recipe is that it’s free of most foods folks tend to be allergic to, so just about anyone can enjoy them.

Chocolate Surprise Cupcakes

Filling Ingredients:

1 cup Enjoy Life mini chocolate chips

2 tbsp Polaner’s seedless raspberry All-Fruit

2 tbsp Earth Balance vegan, soy free butter

Cooking Instructions:

  1. In a microwave safe large glass container, place all three ingredients and microwave for 1 minute. Stir until the mixture is completely smooth.
  2. Place the container in the refrigerator and let the mixture cool and begin to thicken. It can take anywhere from 10-30 minutes, depending on how hot your microwave makes the chocolate, how exact your measuring is, etc…. What you want is for the mixture to be thick enough when you spoon it that you can mound the chocolate onto a cookie sheet.
  3. When the chocolate has thickened enough to form little mounds, place a piece of wax paper on a cookie sheet and create 24 chocolate mounds using a teaspoon to scoop out the chocolate mixture. You essentially are making a little “hershey kiss” of your own.
  4. Once you have 24 more or less equally sized chocolate mounds, put them into the fridge to harden while you make the cupcake batter.

Cupcake Ingredients:

3 cups favorite gluten free flour blend

1/2 cup unsweetened Hershey’s Special Dark cocoa powder

3 tsp baking soda

1 tsp salt

1 cup agave

3/4 cup safflower oil

2 cups water

2 tsp vanilla

3 tbsp vinegar

Baking Instructions:

  1. Preheat oven to 350 degrees and line 24 cupcake tins with cupcake liners.
  2. Mix the flour, cocoa powder, baking soda and salt well and set aside.
  3. Mix the agave, oil, water, and vanilla and add to the dry ingredients with the vinegar. Mix well until the dry ingredients are moistened.
  4. Put 1 1/2 tbsp of batter into each of the 24 cupcake tins.
  5. Carefully peel and place one of the chocolate raspberry mounds into the center of each of the cupcake tins.
  6. Divide the remaining batter evenly among the cupcake tins (about 1 1/12 tbsp) to cover the chocolate mounds.
  7. Bake in the preheated oven for 15 to 20 minutes. The cupcakes will be rounded, firm to the touch, and a toothpick inserted into the center will come out clean. My oven always bakes them in 15 minutes but a friend said hers took 20.
  8. Let the cupcakes sit in the tins for 5 minutes. Then remove them to a wire cooling rack to cool completely.
  9. Frost with your favorite frosting recipe or use the one below is one I’ve adapted from Elana’s Pantry.

Frosting Ingredients:

1 cup Enjoy Life mini chocolate chips

1/2 cup avocado oil

2 tbsp agave

2 tsp vanilla

your preference of “milk”

Cooking Instructions:

  1. Mix the chips, oil, and agave together in a microwave safe glass container.
  2. Heat the chips for 1 minute. Stir. If it needs to be heated more, do so 20 seconds at a time until you can stir the chips smooth.
  3. Add the vanilla and stir well.
  4. Transfer the mixture to your mixer bowl.
  5. Put into the freezer until the mixture begins to hard around the edges but is still softer in the center.  This can take between 15 to 30 minutes.
  6. Using your mixer, blend the chocolate mixture on high speed until the mixture becomes thick and smooth. You may need to scrape down the sides a couple of times.
  7. Add “milk”, a teaspoon at a time until the mixture is to the creamy consistency you prefer for frosting your cupcakes.


Healthy Habits: Tofu

“The parts all contribute to the whole.”

As a drama director my job is to help folks bring every aspect of a character to life. Some excel at body language. Others mimic voices well. Most know how to speak with emotion but not always how to use facial expressions to enhance the emotion. When I work with folks, I get questions like, “But I sound just like an old lady. Isn’t that enough?” Or “What difference does it make how I walk?” And then I have to explain that every aspect of a character – how they speak, walk, dress, gesture – has to be spot on for the audience to believe in the illusion we are creating.

When I received an email this week from a wife who wants to get her husband to eat more tofu, I thought about the types of illusions created by food and cooking. Restaurant chefs learn how to garnish plated food artistically because “beautiful” food is better tasting. Right? Not necessarily but the illusion is created and our brains believe it, so our palate does too… sometimes. *grin* When we’re sad or upset, and we eat, it’s because somewhere along the line the illusion was created that “comfort” food is comforting. And sometimes it is, but most of the times it just makes us fat. *wry grin*

That doesn’t mean all illusions are bad, though, when it comes to food. For food like tofu, creating illusions is precisely what helps when a wife wants her husband to eat more of it so he can live a longer, healthier life. *grin* When one’s husband really wants a meat chili, what can you do to get his brain to believe in the satisfaction of a tofu chili instead? If he wants chicken in his stir fry, how can you make tofu an acceptable substitute?

The answer lies in the parts contributing to the whole. For example, what makes chili taste like chili? It’s the spices and the traditional add-in’s. Almost every chili recipe calls for chili powder or actual chili peppers. Most include onions and peppers, regardless of whatever else is also added. So, the key is to infuse all the part of a tofu chili with the flavoring which your taste buds associate with a chili. The other important factor in chili is the texture. People are particular about chili – that’s why you see all the debates about chunks of meat versus ground meat and meat only versus meat with beans. So, you have to mimic the texture of the type of chili you’re trying to substitute tofu into. I have a recipe below which I use which a lot of folks have liked in the past.

Another example of how to create illusions with tofu is baked tofu recipes. Commonly folks will substitute tofu in a stir fry or recipe by simply adding chopped tofu instead of chicken or beef. The problem is that folks were expecting a “meaty” taste and texture, but plain tofu is not going to supply that. Baked tofu, however, does. When tofu is baked, it becomes crispy on the outside and meaty, chewy in the center, the way beef and chicken can be. It’s obviously not the exact same, but if you flavor the tofu as you would the beef or chicken in a stir fry, you’ll find that the brain can buy into the substitution. Below I’ve pasted in some tips for making baked tofu.

Crockpot Tofu Chili

Ingredients:

2 cups chopped kale

2 cups sweet white corn

1/2 cup chopped onions

1 1/2 cup chopped peppers (I like to mix red, yellow and green for color)

2 cups chopped butternut squash

1 tsp minced garlic

1 tsp ground chili powder

1/2 tsp ground cumin

28 ounce no salt added diced tomatoes

16 oz can drained, rinsed no salt added dark red kidney beans

1 tsp minced garlic

1 tsp ground chili powder

1/2 tsp ground cumin

2 tsp olive oil

1/2 tsp ground cumin

1 tsp ground chili powder

1 tsp minced garlic

1 tsp ground onion powder

2 14-16 ounce extra firm tofu

1 tsp ground cumin

1 tsp ground chili powder

1 tsp minced garlic

Cooking Instructions:

  1. Mix the kale, corn, onions, peppers, and squash with the garlic, chili powder, and cumin in a 6 cup crockpot.
  2. In a bowl mix the tomatoes and beans with the garlic, cumin and chili powder and then add them to the vegetable mixture in the crockpot.
  3. In a large pan, saute the olive oil with the cumin, chili powder, garlic and onion powder for about 30 seconds. Using your hands crumble the tofu into the pan so that they are in large chunks that look like ground meat. Mix the tofu into the hot seasonings well and saute until the water has evaporated out of the tofu mixture. Add to the mixture in the crockpot.
  4. Mix all the ingredients with the final dashes of cumin, chili powder and garlic. Cook on low for 4 to 6 hours.
  5. NOTE:  If you do not cook out all the water from the tofu, the chili will become watery. If that happens, simply use a spoon to scoop out the excess water and then remix your chili.

Tips for Making Baked Tofu:

  1. The tofu: Make sure you are using at least firm tofu. Extra or super firm is best.
  2. The seasonings: You can use whatever you want. Soy sauce, sesame oil, herbs, spices, pesto, black pepper, bottled sauces, whatever you like. You want to make sure to completely coat your tofu cubes well before you begin to bake them. If you use something like minced garlic, you should add that to the tofu later in the baking time so the minced garlic doesn’t burn. If you want to use a sauce, you can toss the tofu with oil and bake it and then toss them with the sauce after they’re done as opposed to before you bake them.
  3. Oil: Baked tofu works best if you have a little bit of fat to help with the crisping. I prefer to use oil. You can use olive oil or sesame oil or a nut oil or another plant oil… it all depends on the flavor you want and the seasonings you want to complement. Toss the tofu in the oil before tossing them with the seasoning you want to use.
  4. Shape: Cut the tofu into cubes for best baking. I like 1 inch cubes.
  5. Oven: 350 degrees is a good temperature to slowly bake the moisture out of the tofu and to create a crispy exterior.
  6. Baking Sheet: The best way to bake tofu is on a cookie sheet lined with parchment. It helps to absorb the moisture without causing the tofu to stick and allows the heat to reach all sides of the tofu.
  7. The baking: It’s good to place the tofu in a single layer and to turn them over at some point so the bottom side gets some of the circulating heat on it. The time will vary, depending on how watery your tofu is and how many you have on a sheet. Some tofu will be done in 15 minutes, others can take 30 minutes or longer. Some recipes will tell you to toss the tofu in cornstarch. This helps to reduce the moisture which can cut down on the time in the oven and can create a crispier texture. Other recipes will tell you to place items on top of the tofu to squeeze out the extra moisture before baking. This can cut down on the time, too. I never do that because I have no problem with baking the tofu a little longer while I do have issues with too many steps and the risk of squashing my tofu so I can’t have my neat little cubes.

Happy New Year: Chocolate Torte

mint-torte

“It’s great! You get to choose….”

When I was a child in the ’70s, a new type of story was filling the market. It was a story book where you got to choose what happened. You’d be introduced to the characters and a situation but then you’d reach the end of the first chapter where you were told to choose which action then would happen. If you chose one, you’d be sent to a certain page. If you chose the other, you’d turn to another page. When you had finished whichever chapter you chose, you were given another set of choices, and this continued until you reached the end of the book.

For a young reader it was a fun way to extend the adventures in the book because you could keep reading the same book over and over, making different choices each time for a completely new story.

As an adult, I love the complexities of life which are subtly shown by this “pick the next action” type of storytelling. Our lives are made up of little daily decisions which lead to other little decisions, to regrets, to rewards, to joys, to sorrows, to bigger choices, to serious consequences, to surprises… and there are times when we wish we could go back and make another choice, and other times when we are grateful we made the choices we did.

New Year’s is usually a time when we find ourselves thinking back upon the choices of the year which just passed and thinking about the decisions we’ll need to make for the new year to come. For most, our years are a mixture of both good and bad, and New Year’s is when we think about how to make more good in the year to come. The truth, though, is that every minute of every day, all year long, is an opportunity because we continually are writing our life stories with every decision, every thought, every word, every action we pursue.

So, as we begin 2017, I invite and encourage you to consider the choices you’ll make for a healthier, happier you. Whatever the choices you make in 2017, my hope and prayer for you is that the new year will be filled with much light, much love, and much laughter.

And in the spirit of choices, I give you a recipe for a chocolate torte which allows you to choose how you want to make it to fit your particular dietary needs and preferences. You can make the cake layers plain chocolate, minty chocolate, almond chocolate or fruity chocolate. You can make the filling any of the same flavors and in a variety of ways. You can top it any way that you want.  You can make it gluten, dairy, nut, soy, egg or all of the above free. It’s your choice!

Happy New Year!

Chocolate Torte

Cake Layer Ingredients for You to Choose:

2 cups flour (favorite gluten free blend or whole wheat)

1 cup unsweetened cocoa powder (natural unsweetened or special dark)

1 to 2 cups sweetener (2 cups sugar or 2 cups coconut sugar or 1 cup agave)

3 tsp leavener (2 tsp baking soda and 1 tsp baking powder for gluten free flour or 1 1/2 tsp baking soda and 1 1/2 tsp baking powder for wheat flour)

1 tsp salt

1/2 cup binder (2 whole eggs or 1/2 cup liquid egg whites or 2 tbsp ground golden flaxseed mixed with 6 tbsp of water or 6 tbsp aquafaba**)

1 cup “milk” (if using wheat flour, any type of milk such as cow, soy, flax, oat, hemp, almond or if using gluten free flour any type of milk such as cow, soy, flax, oat, hemp, almond mixed with 1 tbsp either lemon juice or vinegar to make a buttermilk)

1/2 cup plant oil (safflower or sunflower or grapeseed or canola or light olive oil or a nut oil)

2 tsp extract ( 2 tsp vanilla or 1 tsp vanilla and 1 tsp mint or 1 tsp vanilla and 1 tsp almond or 1 tsp vanilla and 1 tsp orange extract)

1 cup boiling water

1 tbsp vinegar or lemon juice (white distilled vinegar or apple cider vinegar or raspberry vinegar or lemon juice)

Caking Baking Instructions:

  1. Preheat oven to 350 degrees and prepare four 9 inch cake pans by either lining them with parchment paper or greasing and flouring them or spraying them with Pam spray. Move the racks in your oven so they are evening spaced for putting two cake pans on each rack.
  2. Mix together the flour, cocoa powder, sweetener (if using sugar or coconut sugar), baking soda, baking powder and salt. Set aside.
  3. Mix together the binder, “milk”, oil, extract and sweetener (if using agave).
  4. Add the wet ingredients to the dry with the boiling water and the vinegar or lemon juice. Blend just until dry ingredients are moistened.
  5. Divide the batter evening among the four prepared pans. Bake in the oven for 15 minutes, switching the cake pans between the two racks halfway through. Cakes will be slightly puffed, pulling away from the edges, and a toothpick inserted in the center will come out clean.
  6. Leave the cake layers in the their pans and allow them to cool on a wire cooling rack.

Note: ** Aquafaba is the liquid from a can of chickpeas. To substitute for eggs, use 1/4 cup per egg and whisk until frothy (foamy but still clear and not white like a meringue.)

Torte Fillings for You to Choose:

Option One Ingredients: A Light Dairy and Egg Free Mousse-like Filling

Liquid from one 15 ounce can of chickpeas

1/4 tsp cream of tartar

1/4 cup powdered sugar

1/2 cup dark chocolate or semi sweet chocolate (regular type or Enjoy Life allergen free type)

1 tsp vanilla extract or 1 tsp mint extract or 1 tsp almond extract

Cooking Instructions:

  1. If you have a Kitchen Aid or other heavy duty mixer, use it. Drain the liquid from the can of chickpeas into the mixing bowl. (Use the chickpeas for making hummus or a curry dinner entree or in your salad or for a roasted snack.)
  2. Add the cream of tartar and begin mixing the liquid on low speed, slowly increasing to the highest. As the liquid begins to become frothy and foamy, add the powdered sugar, one tablespoon at a time. Mix until the liquid becomes thick white peaks like an egg meringue.
  3. Put the chocolate pieces into a microwave safe dish for a minute and stir until the pieces are all melted or put the chocolate pieces in a pan over another pan filled with boiling water and heat and stir until the chocolate is all melted.
  4. Add the extract of choice to the chocolate and mix well.
  5. Add a little bit of the chickpea meringue to the chocolate mixture and gently fold it into the chocolate. Then add the chocolate mixture to the bowl of meringue, folding in just a little at a time until all the chocolate has been added and folded into the meringue. Transfer to the fridge to thicken until needed to fill the torte cake layers.

Option Two Ingredients: A Heavier Mousse-like Filling (can be made dairy free)

2 cups of heavy cream or cold coconut cream (put coconut cream into the fridge to cool overnight, turn the can over and open so that the liquid is at the bottom, drain the liquid, and use the cold cream in place of the heavy cream)

1 1/2 tsp vanilla extract or mint or almond or orange

1/4 cup sugar or 1/4 cup powdered sugar or 1/4 cup coconut sugar or 2 tbsp agave

Cooking Instructions:

  1. Mix the cream with the extract and beat at a high speed until soft peaks begin to form. Add the sweetener of choice, a little at a time, and continue beating until stiff peaks form. Put the whipped filling in the fridge until needed to assemble the torte cake layers.

Option Three Ingredients: A Creamier Filling

5 ounces chocolate pieces (dark or semi-sweet, regular or Enjoy Life)

12 ounce whipped topping, thawed (regular or dairy free coconut version)

8 ounce cream cheese (regular or dairy free soy version)

1 tsp vanilla extract or mint or almond or orange

Cooking Instructions:

  1. Mix the chocolate pieces with 1/2 cup of the whipped topping and microwave 30 to 60 seconds until melted and smooth. (Stir after 30 seconds to see if you need more time.)
  2. In a mixer, whisk the cream cheese until smooth. Add the chocolate mixture and beat well.
  3. Add the remaining whipped topping and blend well. Put into the fridge until needed to assemble the torte cake layers.

Options Four and Five: Thicker Fillings

Make your favorite mousse recipe as a filling or simply your favorite frosting recipe as the filling.

Assembling the Torte:

  1. On a cake platter lay the first cake layer. Spread one third of the filling you chose to make.
  2. Top the filling with the second cake layer and spread the second third of the filling.
  3. Top the filling with the third cake layer and spread the last of the filling.
  4. Place the last cake layer on top.
  5. Choose a topping option to cover the sides and top of the torte.

Topping the Torte:

Option One (which is pictured at the beginning of this post):

Melt dark chocolate or semisweet chocolate chips (regular or Enjoy Life variety) in your microwave and stir until smooth. using a frosting spreader, coat the sides and top of the cake with the melted chocolate in a very think layer. Before the chocolate solidifies, sprinkle the top with chopped chocolate pieces.

Option Two:

Make your favorite frosting recipe and frost the sides and top of the torte.

Option Three:

Make a ganache: Warm 1 cup heavy cream or coconut cream in a microwave just until hot to the touch. Pour over 8 ounces of dark chocolate or semisweet or bittersweet chocolate pieces (regular or Enjoy Life variety) and stir until completely smooth and silky. Allow ganache to cool to a spreadable consistency.


Holiday Happenings: Cranberry Sauce

bags-of-cranberries

“Apparently cranberry sauce is underappreciated….”

My husband came home the other day and told me about a news story on the radio. The topic was cranberry sauce and how it was not as appreciated as other foods eaten during the Thanksgiving meal. This, of course, spurred discussion among our family about our own cranberry preferences. My son will only eat jellied cranberry sauce with no chunks. My oldest, my husband and I love cranberry sauce in any form. My other daughter won’t eat it, no matter the texture.

Cranberries, however, are very good for your health, containing antioxidants, fiber, and many nutrients needed by the body. What I find, though, is that because they have such a tart flavor, folks use way too much sugar when cooking with them. So, I like to make my own cranberry sauce instead of purchasing it from the store.

When I tell folks that I make cranberry sauce, they always seemed to be surprised, which I find surprising since cranberry sauce is the easiest food to make. You simply put cranberries into a pot with water and sweetener and let it cook down. The entire process takes about 10-15 minutes, at the most.

Where the creativity comes in is deciding what type of cranberry sauce you’d like for Thanksgiving. You can add other fruits to the cranberries like pears or apples or tangerines or oranges or apricots or cherries to add a contrasting fruity flavor to the cranberries. You can add red wine or port or bourban if you’d like a more complex flavor. You can add ginger or maple or anise or jalapeno if you’re looking to try something a little different this year. You can use water, orange juice, apple cider or any other liquid you can imagine to change the flavor. You can add nuts or dried fruits to add crunch and texture. You can even change up the texture of the sauce, making it chunky, relish-style or jellied.

And after Thanksgiving the cranberry sauce can be “recycled” in many ways. Swirl it into your favorite cheesecake recipe. Add the sauce as a fixing for your favorite sandwich. Mix it into a muffin recipe. Top pancakes or waffles with it. Combine it with another fruit to make the filling for a pie. Stir it into your breakfast oatmeal. Use it as a spread for a slice of quick bread like banana or zucchini. Combine it with cream cheese for a dip. Top vanilla ice cream with it. The ideas are endless.

A food as versatile as cranberry sauce is truly just begging for you to experiment this year. And what’s great is that unless you’re allergic to cranberries, people with food allergies can eat it!

Some tips:

  1. The cranberries: It doesn’t matter whether you use fresh or frozen cranberries. The general rule of thumb is that about 12 ounces of cranberries requires about 1 cup of liquid.
  2. The sweetener: For most recipes, for 12 ounces of cranberries, they’ll call for 1 cup of sugar. I’d suggest you cut that in half and save your health or use 1/4 cup Agave or 1/2 cup of coconut sugar or 1/3 cup truvia.
  3. The add-ins: Decide what type of cranberry sauce you’d like to make and add the ingredients in with the cranberries so that they all cook together and the flavors meld.
  4. Traditional Style: To make traditional cranberry sauce, simply put all your ingredients into a pot, bring the liquid to a boil, let it simmer for about 5-10 minutes until the cranberries pop and are the texture you’d like, remove from the heat, let it cool, and then refrigerate until you’re ready to use it.
  5. Relish Style: Simply use your food processor to chop up the cranberries, sweetener and additions and refrigerate. You should decrease the liquid, though, and only add just enough to moisten the relish.
  6. Jellied Style: Prepare the sauce as you would for the traditional but then push everything through a strainer, mashing the ingredients as much as you can to get as much as you can into the sauce and then refrigerate what you’ve pushed through the strainer.


Autumn Appetites: Winter Squash-Kale-Bean Soup

“Grandma’s wisdom….”

Last week I read that the folks at America’s Test Kitchen learned something which my grandmother had taught me 30 years ago and which she had known for many more years than that before she taught me. Not for the first time, I was surprised that those culinary “experts” hadn’t known something which I had figured was known by many.

As I thought more about it, though, I realized that there’s a difference between folks who have culinary jobs and people who have years and years of cooking experience. My grandmother raised eleven children and had to find ways to stretch food as much as she could, and she learned the best ways to make food and how to keep things as simple as possible whenever she could.

What I had learned from my grandmother, which America’s Test Kitchen apparently just learned this month according to their magazine, is that you never boil corn on the cob. You bring water to a boil and then you let the ears of corn sit in the hot water for a set time, depending on the amount of corn. This is how I’ve made corn on the cob ever since my grandmother showed me as a teenager. I had taken it for granted that others knew, too.

I figured my grandmother had learned it from someone before her, but she may also have simply figured it out on her own after cooking for so many for so long. I started thinking about the many other tips my grandmother had given me over the years when I was younger before she passed away, and I realized a lot of my cooking depends on things I learned from her. Just this past weekend, I made one of my family’s favorite soups, which uses tips I learned specifically from my grandmother.

My grandmother rarely had “fresh” food in the house. Dependent on food from local farms, which tended to be seasonal, certain foods simply weren’t accessible year round. So, she always had meat and vegetables frozen in a big freezer and jars of canned beans, jellies, sauces, and fruits in the “pantry” which was the walk-through area between the garage and their double-wide trailer. From her, I learned how to create foods which use staples from the freezer and pantry and which can be quickly put together to feed a lot of people.

The winter squash, kale and bean soup I made uses frozen squash, which I roasted last year, pureed, and froze; frozen kale which I always keep on hand, purchasing them by the bagfuls at the grocery store when they’re in season (early Spring and then again in the Fall); canned, unsalted, no sugar added beans, which I keep in my pantry; and no salt, fat free vegetable broth which I also keep in my pantry. I mixed everything together in my crock pot with some herbs and let it cook all day. When evening came, we had a hearty soup for dinner which warmed both the heart and the tummy.

Winter Squash-Kale-Bean Soup

Ingredients:

9 cups thawed, frozen pureed cooked winter squash (equivalent to 6 of those 12 oz packages you can purchase in the freezer section of the grocery store)

1 cup frozen chopped kale (equivalent to half a 16 oz bag you can purchase in the frozen section of the grocery store)

One 16 oz can of no salt, no sugar added white or northern or cannellini beans, rinsed and drained

1/2 tsp dried thyme, crushed between your fingers before putting in

1 tsp onion powder

1/2 to 1 tsp salt

1/4 tsp black pepper

No salt, fat free vegetable broth (amount will depend on how thick or think you like your soup, between 1 to 3 cups)

Cooking Instructions:

In a crock pot (4 1/2 quart will work), mix the thawed squash with the frozen kale, the can of beans, the thyme, onion powder, salt and black pepper. Add the desired amount of vegetable broth and let it cook in the crock pot on low all day (6-8 hrs) or on high for half the day (3-4 hrs).


Recipe Revamping: Saltine Brickle

“Please, can you help me?”

I receive emails from various types of people. Folks who have toddlers with food allergies. Mature adults whose doctors have put them on restricted diets. People who have suddenly developed food allergies after years of eating anything they wanted. Diet conscious folks who want to eat healthier. What all these folks have in common, though, is that they’ve always been adults.

This week I received an email for the first time from a child who had stumbled upon my site. She is ten and apparently really likes saltine brickle, which she had tried at a friend’s house. Her mother, however, had told her it had too much fat and sugar and wasn’t good for her. Like many folks of her generation, she went online to see if there was a solution to her problem.

In her email to me, she wanted to know if I could “fix” the recipe so it wouldn’t have as much fat and sugar but still taste good.

I confess, I found her and her email just too cute! Of course, I had to do what I could to help her out. It turned out that she has both a nut and dairy allergy, so I needed to accommodate those in the revamping of the recipe.

When you google saltine brickle recipes, you’ll find that the recipes call for anywhere from 1 to 2 cups of butter, usually about 1 cup of sugar, and anywhere from 1 1/2 to 3 cups of semi-sweet chocolate chips. The first order of business became all that butter. I opted to cut the amount down to 1/2 cup, and for the dairy allergy I used vegan soy free butter. The second item to tackle was the sugar. I could have simply cut the amount, but since I don’t like to use sugar as a general rule, I chose to use agave and cut the amount down to only 1/4 cup of it. For the chocolate, I swapped dairy and nut free dark chocolate mini chips for the regular sized semi-sweet chocolate chips, and I reduced the amount to 1 cup. To make the dessert slightly “better” I used a whole grain cracker instead of the white flour saltines. I tried Market Basket whole grain saltines, Manischewitz whole grain matzo, and Van’s whole grain gluten free crackers. For the final change, I decided to add some protein to the dessert and sprinkled pumpkin seeds on top.

The final creations were all tasty and worth the effort, and the young girl wrote to tell me that her mom let her make my version because she, one, thought it was great that her daughter showed initiative, and two, because she agreed that the reduction in sugar and butter and the addition of whole grains and protein made them “better” for eating.

Saltine Brickle

Ingredients:

40 whole grain saltine sized crackers, your choice of wheat or gluten free (you want to make a 16 inch x 10 inch rectangle; if using the matzo crackers, you’ll obviously use less because they are larger crackers) 

1/2 cup vegan soy free butter

1/4 cup agave

1 cup allergy friendly dark chocolate mini chips

1/2 to 1 cup pumpkin seeds (I used the no salt added version but I tried both roasted and raw and liked both; if you have no allergies to nuts or peanuts, try using those if you don’t like pumpkin seeds; the amount to use depends on whether you just want a few seeds on each cracker or want the crackers to be covered with them.)

Baking Instructions:

  1. Preheat the oven to 425 degrees.  Line a rectangle 17 x 11 inch pan with aluminum foil. Generously grease the foil with your favorite method.
  2. Place the crackers on the foil lined pan to make a 16 x 10 inch rectangle.
  3. Melt the vegan butter in a small saucepan over low heat, stirring frequently (should take only about a minute). Add the agave.
  4. Carefully pour the butter mixture over the crackers so each cracker is covered.
  5. Bake the crackers in the oven for  4 minutes. Remove the pan and turn off the oven.
  6. Sprinkle the mini chocolate chips over the crackers and put the pan back in the turned off oven for 1 minute.
  7. Using a spatula, carefully spread the melted chocolate so all the crackers are covered.
  8. Sprinkle the pumpkin seeds over the top of the chocolate.
  9. Put the pan into the freezer for about 10 minutes until the chocolate has solidified.
  10. Break apart the brickle and enjoy!