Corona Cooking: Vegan Chocolate Chocolate Chip Zucchini Cake

“It is all too much…”

For three months, the world has been in various stages of shutdown due to the pandemic. Bubbling tensions of hundreds of years of injustice is rising to the surface again. People we have known and loved have died, and the only comfort we can give to the families is through virtual funerals. Our family life has been upturned by an ongoing health issue. My brother and many people we know are worried that they will lose their businesses. Relatives and friends have lost their jobs altogether. People we care about have been exposed to and/or contracted the virus. We have not seen family and friends in person for months due to travel bans. For the first time in 25 years, I am back in that stage of applying and interviewing for jobs – just as jobs have become scarcer.

The other day, one of my children made the comment that “It is all too much.” I understood what she meant. At times, life can feel overwhelming. These are situations which we have little control over so they cause much stress, worry, and anxiety. We like to be in control. We want to be able to “do” something, to fix the problems. When we can do nothing, it leaves us floundering.

So, I find myself doing all the routine things. Making my bed in the morning. Mowing the grass when it is high. Gardening. Cleaning. Cooking.

As I continue with my routines, I pray.  I pray for all that I mentioned above. I pray for the people I know. I pray for the people I do not know. I pray for our state, our country, our world. I pray and ask, “Is there anything I can do at all?”

And I realize I can continue to love my children. I can lend support to my friends and strangers as I am able. I can attend social justice gatherings in my town. I can remember that every time one person takes a stand for good, others will join, and amazing things can happen.

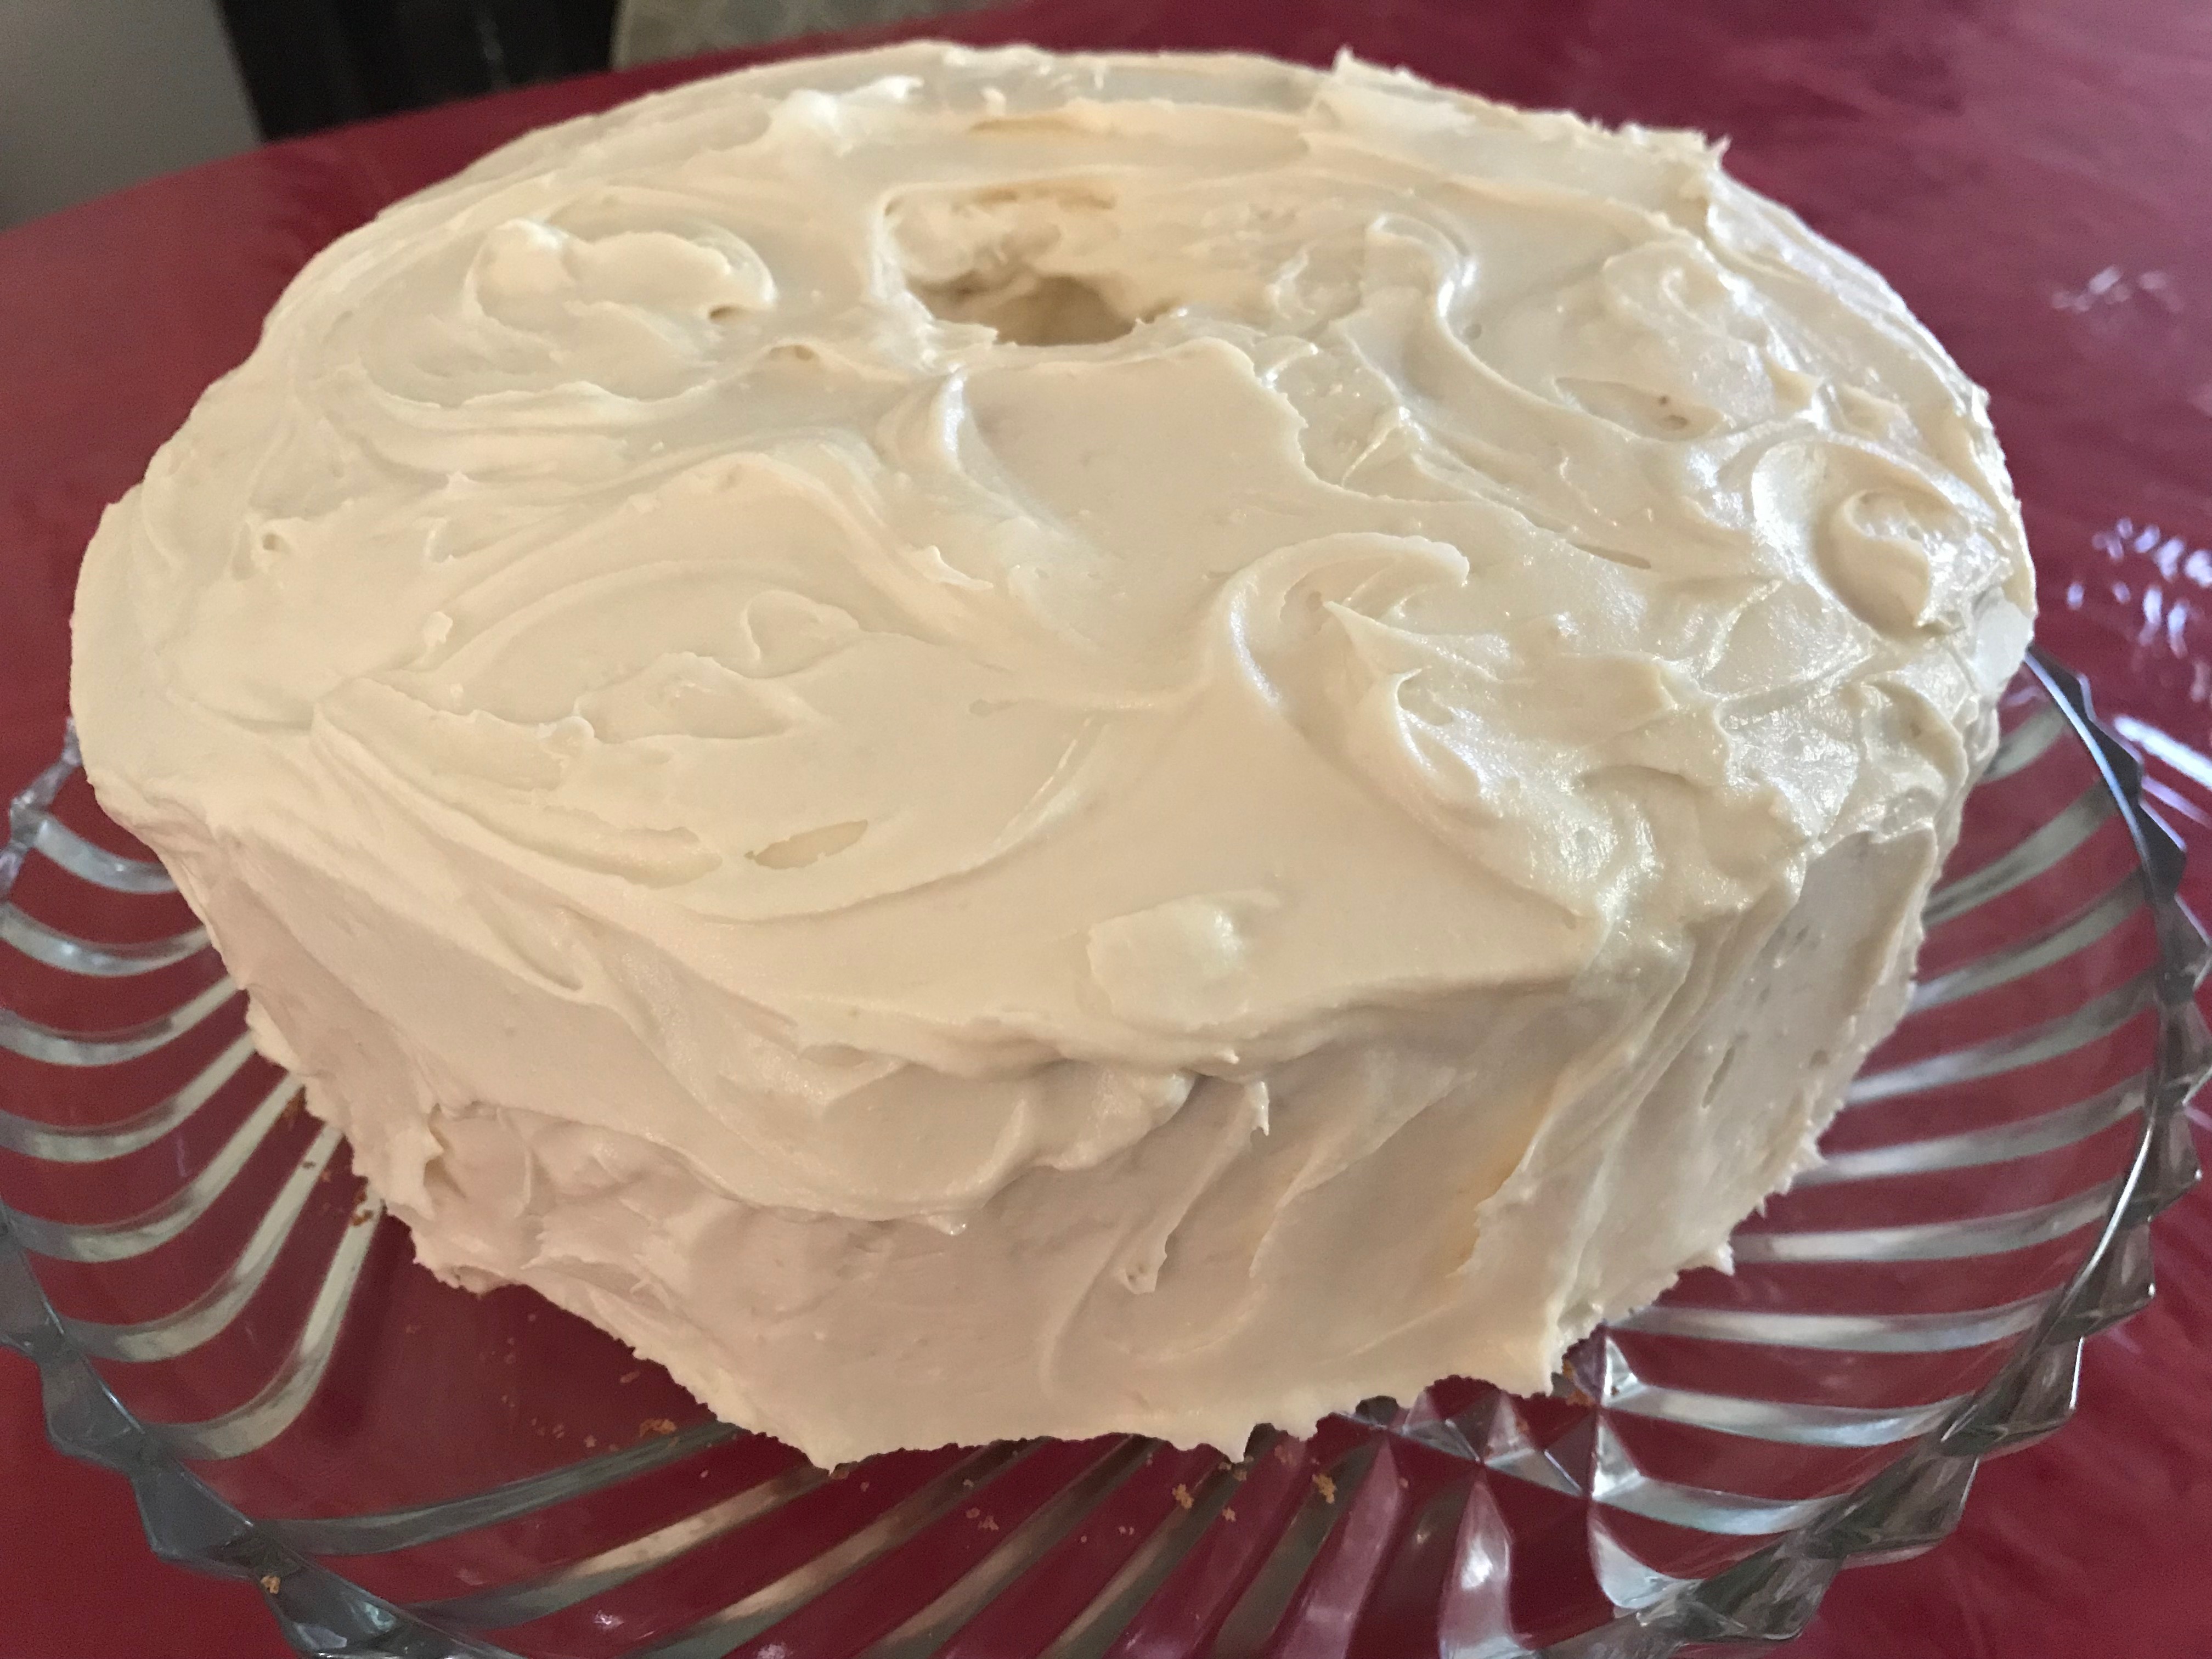
And I can share with you my thoughts and my recipes: For those days when maybe you need a little lift, try this vegan, gluten free chocolate-chocolate chip-zucchini cake the children and I made the other day. Comfort food which you can feel good about eating.

Vegan, Gluten Free Chocolate Chocolate Chip Zucchini Cake 

Ingredients:

2 tbsp ground flax seed

6 tbsp hot water

2 1/2 cup gluten free flour blend

1 cup coconut sugar (if allergic, use golden monk fruit sweetener or truvia-sugar blend)

1/4 cup Hershey Special Dark unsweetened cocoa powder

1 tsp baking soda

1 tsp baking powder

2 tsp cinnamon

1/2 tsp salt

1 cup Enjoy Life mini chocolate chips

3/4 cup plant-based oil (extra light olive oil, safflower oil, avocado oil, melted coconut oil, etc…)

2 tsp vanilla

1/2 cup dairy free milk (oat, soy, flax, etc…)

2 1/2 cups grated zucchini

Baking instructions:

  1. Preheat the oven to 350 degrees. Line an 11 x 15 pan with parchment paper.
  2. Mix the ground flax seed with the hot water and set aside to gel, stirring every once in a while.
  3. Mix together the flour with the coconut sugar, unsweetened cocoa powder, baking soda, baking powder, cinnamon and salt. Stir in the chocolate chips and set aside.
  4. Mix the flax seed gel with the oil, vanilla, and milk. Add the grated zucchini.
  5. Stir in the dry ingredients into the wet ingredients and blend until well-mixed. Batter will be thick.
  6. Spread the batter evenly into the prepared pan, and bake for 30 to 35 minutes, turning halfway through. The cake will be done when it is puffed, pulling away from the sides and firm to the touch.
  7. Put the pan on a wire cooling rack to cool. It is delicious warm and gooey from the oven, and just as good when it is cooled.
Advertisement

Happy Mothers’ Day: Layered Eggplant and Tomatoes


“It’s snowing…?”

Today is Mother’s Day, the second Sunday in May, and yet yesterday, it snowed on and off all day. When I spoke with my father about it on the phone, he said, “Maybe Mother Nature has the corona virus, and it’s affected her seasons.”

As we are all too aware, the pandemic has definitely affected our lives over the past many months, and I know that one of the ways I have been impacted is that for the first time in a long time, I find myself tired of trying to come up with dinner plans each and every day. With the virus impacting my ability to shop for groceries, our menus have been more limited, and thus has become rather boring.

However, since this is Mother’s Day weekend, the family decided to rise to the occasion. One of my daughters and my son made chocolate covered strawberries, and I decided I really wanted something summery since the weather was not cooperating on that front. Fortunately, I was able to get some eggplant and a variety pack of heirloom tomatoes. Using fresh basil and a vegan parmesan, I created a layered entree which was quite tasty and well worth the work.

I share it with you in case, you too, are looking for inspiration to liven up meal-time during the pandemic.

Layered Eggplant and Tomatoes

Ingredients: Amounts will depend on how much you are making and the size pan you are using.

eggplant

olive oil

oregano

basil

salt

pepper

pear tomatoes

grape tomatoes

cherry tomatoes

fresh basil leaves

minced garlic

vegan parmesan

Cooking Instructions:

  1. Slice washed and dried eggplant into 1/4 circles.
  2. Lay out eggplant circles on a large pan.
  3. Brush both sides of the eggplant circles with olive oil and sprinkle each side with oregano, basil, salt and pepper.
  4. Either grill or broil the eggplant a couple of minutes on both sides until browned.
  5. Preheat the oven to 350 degrees.
  6. In an oven safe dish, lay out cooked eggplant circles to cover the bottom.
  7. Slice tomatoes into halves and layer on top of the eggplant.
  8. Slice the fresh basil leaves and sprinkle on top of the tomatoes.
  9. Sprinkle minced garlic on top of the basil.
  10. Sprinkle the vegan parmesan on top of the basil.
  11. Repeat layers until you reach the top of your dish.
  12. Bake in the preheated oven for 30 minutes.
  13. Enjoy!


Corona Cooking: Cinnamon Spice Belgian Waffles

“You have to look….”

Six weeks ago, I was checking out Broadway shows for the trip I had planned almost a year ago for the family to celebrate my birthday in May. We were going to go to NYC before my my eldest moved to CA for a job, my middle child left for an internship, and my youngest busied himself with summer college classes. Six weeks later, our trip is cancelled, our oldest has no idea when she will be moving to CA, and our middle child is waiting to hear if her internship can occur virtually. Only my youngest remains undisturbed because his classes are still going to be online.

Add health issues for my husband, concern for relatives with the corona virus, and trying to adapt life and work in a virtual world, and the adage, “Count your blessings,” can become a bit difficult at times. I was recently reminded, though, by friends who live in other countries with limited access to water, shelter and food and who are struggling with disease and death in magnitude in addition to the pandemic that we must always be looking for blessings to count.

So, I listen to people talk about going for long nature walks and spending more time with their families and learning to bake bread and any number of other “didn’t have time for before” things people are now doing, and I am once again reminded that counting blessings is about looking for them in the first place. If we take the time to look for the positive, the silver lining, the pockets of sunshine, most often we will find them.

Recently our family was thankful that we have had more time for “special” breakfasts as a family. With no early morning rushes to get to school or work, breakfast has become a time for leisure together and for making pancakes or French toast or waffles.  The other day I made gluten, dairy free Belgian waffles which we topped with unsweetened dairy free vanilla yogurt and berries. It was a wonderful way to start the morning, so I share the recipe here for anyone with Belgian waffle makers. They can also be made as regular waffles in a normal waffle maker, too.

Cinnamon Spice Belgian Waffles

Ingredients:

2 cups whole grain gluten free flour blend, sifted (we used King Arthur whole grain blend)*

1/3 cup garbanzo bean gluten free flour, sifted (we used Bob’s Red Mill)*

1/3 cup ground flax seed

1 1/2 tsp ground cinnamon

1 tsp ground nutmeg

1/2 tsp ground ginger

1/2 tsp salt

1 tsp baking powder

2 cups unsweetened dairy free milk (we used soy but oat or almond or flax will work, too; don’t use rice milk)

1/4 cup plant based oil (we used extra light olive oil but any plant based oil will work)

3 eggs (if you want to use a substitute, I would recommend whisking 3/4 cup chick pea liquid)

* Note: A reminder that if the word “sifted” is after, then you measure before you sift. If you see the word “sifted” before the flour, then you sift before measuring.

Cooking Instructions:

  1. Prep your Belgian waffle maker according to instructions.
  2. Measure out the gluten free and garbanzo bean flours and sift. If you don’t have a sifter, you can sift by pushing the flour through a wire mesh basket or taking a whisk and whisking the flour until it is no longer clumped and has some air incorporated into it.
  3. To the flours, add the ground flax seed, cinnamon, nutmeg, ginger, salt and baking powder. Mix until well blended.
  4. Mix together the milk, oil and eggs.
  5. Add the wet ingredients to the dry and blend until completely smooth.
  6. Let the batter rest for 30 minutes.
  7. Use the batter to make waffles according to your waffle maker instructions.
  8. If you need to keep waffles warm, put in a single layer on a cookie sheet in the oven on your lowest heat.
  9. Serve with unsweetened yogurt and/or berries and/or maple syrup and/or jam, and enjoy!

Corona Cooking: Lentil Pancakes

Let’s be creative….

I spoke with a friend yesterday who told me she was using the forced time at home to bake bread because it helped to keep her sane. I imagine many of us can identify – not necessarily with baking homemade bread, but with needing ways to keep our sanity during the COVID-19 circumstances.

In our house, we currently have five folks living life virtually – online classes, work meetings, church activities, music lessons, writing groups  – all vying for time on our WiFi connection and requiring us to find privates spaces throughout the house where we will not bother one another.

Add to that I am cooking our meals with the staples I have on hand because we are abiding by our state governor’s “stay at home” advisory because we have a family of “at-risk” folks for whom getting the corona virus would not be good. Since I always keep a well stocked pantry, finding items to make is not the problem. The difficulty is being creative so we are not eating the same foods all the time.

A couple of days ago, I wanted to use up the leftover lentils I had in the fridge from a lentil curry I had made for dinner one night. I was “feeling like” pancakes for some reason, so I googled lentil pancakes to see if that was an actual thing. It turned out it is, but that the options weren’t quite what I wanted.  Either I could make pancakes which were simply crushed lentils and spices or I could make a basic pancake recipe which just had about 1/2 cup of lentils added.

So, I had to go to work to create something of my own – a pancake which was chock-full of lentils but was still a pancake so my youngest wouldn’t turn his nose up to the idea. The result was surprisingly good. I made up a curry sauce of tofu sour cream, curry powder and soy milk which three of the family members dolloped onto the pancakes, while the other two chose to eat the pancakes with maple syrup. The recipe follows for anyone who also might have leftover cooked lentils in need of revamping, and  as a bonus for folks who need it –  these are grain free, too.

Lentil Pancakes

Ingredients:

4 cups cooked lentils

1 cup dairy free milk (oat, flax, soy, etc….)

1/2 tsp cumin powder

1/2 tsp garlic powder

1/2 tsp onion powder

1/2 tsp curry powder

1/2 tsp salt

1/4 tsp pepper

1 cup chopped green onions

1 cup liquid egg whites (can also just use whole eggs, which would be about 4)

2 cups garbanzo bean (chickpea) flour

2 tsp baking powder

Cooking Instructions:

  1. Puree cooked lentils in a food processor until only slightly lumpy. You can puree them completely smooth, if desired, but I prefer a little texture.
  2. Add to the pureed lentils, your choice of dairy free milk, the cumin, garlic, onion, and cumin powders, salt and pepper, and green onions, and mix well.
  3. Add the liquid egg whites and mix well.
  4. Add the flour and mix until all the flour is completely mixed in.
  5. Add the baking powder and stir until completely dissolved.
  6. To cook the pancakes with a griddle, heat to 350 degrees. On the stove top, heat a skillet over medium heat. If you are not using nonstick pans, you’ll need to grease your pan in between batches with your preferred method.
  7. Use a 1/4 cup to scoop batter onto the griddle or skillet. The batter will spread. When the edges begin to look a bit dry and little air pockets surface in the middle, flip the pancake. Usually, this won’t take longer than a minute. The pancake will begin to rise. Allow it to cook until you no longer see hot air escaping and the sides are cooked through. This usually takes about a minute.
  8. When you remove the pancakes, you can put them in a single layer on a cookie sheet in the oven on your lowest heat to keep them warm or move them to a cooling rack to cool if you are cooking them to be eaten at another time.


Corona Cooking: Dark Chocolate Cupcakes

“It depends on your perspective….”

For many of us, the topsy-turvy daily changing world we are currently living in as the result of the COVID-19 pandemic is not welcomed. We fear for more than just our physical health. The closing of schools can exacerbate familial tensions. Mandated work leave may bring financial hardship. Social distancing can increase already felt isolation. Much stands to be lost, both globally and locally.

Yet, for just as many, this is an opportunity to embrace rest from the stresses of the daily grind and routine. Some see this as a time to be with family members we have too little time for in the midst of the usual “rushing here and there” lives we live. Others have been taking the unexpected time at home to spring clean or to create or to try something new. Many have been connecting more via social media, encouraging one another, even as social distancing prevents physical gatherings.

Perspective is an interesting concept. It refers to the view from which someone considers something, and recently I realized just how different my perspective is from a well-known cooking organization. “Ground-breaking recipes” in bold letters hailed my attention across the grocery aisle. I wondered what they had learned which those of us who had been cooking gluten free for years did not already know.

On the positive side, I was glad that this particular organization had created a gluten free issue of their magazine. It seemed to me, they’d been slow to do so. As I read through their recipes and suggestions, they appeared to offer good advice and had great tips, a couple of which I actually hadn’t tried myself before. They even had a short section at the end about those who are dairy sensitive as well as gluten, offering some ways to alter their recipes.

Where I took issue, though, was very bald statements they made about the fact that in order to create tasty gluten free food, only white rice flour should be used, that if you deviate from their homemade versions of flour blends you do so at your own risk, and that only a few of their recipes should be amended because the butter, whole eggs, and sugar were necessary. Since white rice flour has absolutely no nutritional value, and few people have the time to make their own homemade flour blends, and even more people are trying to eat healthier with less butter, whole eggs, and sugar, I found myself a bit put-out overall by the magazine.

And since I have a bit of time on my hands these days, I decided to see if I could literally make the magazine eat their words. I took one of their recipes for a dark chocolate cupcake and altered it to see if the difference was as stark as the magazine indicated it would be. My test-eaters agreed it was not, and that they actually preferred the version I had created. So, I share it here with you now, in case you, too, have some unexpected time to bake.

Dark Chocolate Cupcakes

Ingredients:

1 cup safflower oil

3/4 cup Enjoy Life dark chocolate chips

2/3 cup Hershey unsweetened Special Dark cocoa powder

1 1/4 cup King Arthur whole grain gluten free flour blend

1 1/2 tsp baking powder

1 tsp baking soda

1 tsp salt

1 tsp cinnamon

1/2 cup liquid egg whites

2 whole eggs

2 tsp gluten free vanilla

1 cup coconut sugar or monk fruit sweetener blend

1 cup non-dairy milk (soy or oat or flax)

Baking Instructions:

  1. Preheat the oven to 350 degrees and line 24 muffin/cupcake tins with cupcake liners.
  2. In a large microwave safe measuring cup, melt together the safflower oil, dark chocolate chips, and unsweetened cocoa powder by microwaving for a minute and stirring until everything is smooth and completely melted. Set aside to cool.
  3. Combine in a bowl, the flour, baking powder, baking soda, salt and cinnamon. Set aside.
  4. In a large bowl, mix together the egg whites, eggs, vanilla and coconut or monk fruit sugar until well mixed.
  5. To the large bowl of liquid ingredients, add the cooled chocolate and milk, blending well.
  6. Add the dry ingredients to the the liquid and stir until all ingredients are completely incorporated and mixture is smooth.
  7. Divide the batter evenly among the lined tins.
  8. Bake for 15 minutes until the cupcakes are puffed, dry and firm to the touch.
  9. Remove from the tins and allow the cupcakes to cool on wire cooling racks.
  10. Eat as is or frost with desired frosting.


Holiday Happenings: Chocolate Peppermint Drops

“It’s how you look at it….”

I am always amazed by the zeal with which folks I know begin the new year. For them, January is a time for resolutions, and if not resolutions, at least new opportunities. Since I have operated on a school year schedule for so many years, that energy tends to come to me in September. By January, I am usually tired, and after putting things on hold for the holidays in December, January is fraught with playing “catch-up” to everything I am behind with.

This year, I am so behind due to health issues my husband has been having that the Christmas gifts I received are still sitting underneath my sideboard in the dining room, waiting to be put away, along with random other Christmas items which did not get put away with the Christmas decorations.

The positive to this problem is that one of the items which my daughter found was leftover candies from the gingerbread house decorating the children did in December – peppermint candies to be specific – and the lovely thing about peppermint candies is that their red and white coloring perfectly matches a Valentine’s theme.

So, my daughter decided to use those peppermint candies to make chocolate peppermint drops which added a special treat to this new month of February and provided just enough energy that two of my Christmas presents got put away!

Chocolate Peppermint Drops

Ingredients:

1 3/4 cups gluten free flour (we used King Arthur’s whole grain blend)

1/4 cup Hershey’s unsweetened special dark cocoa powder

1 1/2 tsp baking powder

1/4 tsp salt

1/2 cup vegan butter

1 cup coconut sugar

1 tsp vanilla

1 egg (a large egg equal to 1/4 cup)

2 oz dark chocolate, melted and cooled

crushed peppermint candies

Baking Instructions:

  1. Preheat the oven to 350 degrees and line cookie sheets with parchment paper.
  2. Mix together the flour, cocoa powder, baking powder and salt, and set aside.
  3. Cream the vegan butter in a mixer and add the coconut sugar, blending well, scraping down sides as needed, until the mixture is light and fluffy.
  4. Add the vanilla, egg and cooled, melted chocolate. Blend well.
  5. Add the dry ingredients and mix on low until all the dry ingredients are incorporated into the wet.
  6. Roll level tablespoons of cookie batter in the crushed peppermints and place them on the prepared cookie sheet, about one inch apart.
  7. Bake for 8 to 10 minutes until the cookies have puffed slightly and begin to look drier and cooked.
  8. Remove the cookies to a wire cooling rack and allow them to cool.
  9. Enjoy when they are done cooling.
  10. To keep them fresh, put them in a sealed tupper ware to store.

Happy New Year: Dark Chocolate Cheesecake

“It has to be special….”

The ending of a year can generate different emotions. Sadness if the year was especially good. Relief if the year was especially difficult. Anticipation for the possibilities of a new year. Frustration about unfinished items. Guilt about lost opportunities. Joy for upcoming planned opportunities.

When the ending is also the ending of a decade (depending on how you count, that is), those emotions can sometimes be compounded because now we may be looking back at ten years instead of one and experiencing all the same emotions. For me, my husband and I celebrated a milestone this month – 25 years of marriage – so, for me, I find today holding all the joy, sadness, frustration, guilt and anticipation of and for two and a half decades.

As such, when the family talked about what food to have to celebrate tonight’s festivities, the word “special” kept coming up. A special dinner, a special dessert, special treats and snacks. The family wanted something we do not usually have and which would make tonight feel different and festive.

So, to celebrate, I made a dark chocolate cheesecake which is dairy and gluten free, and in case anyone decides they want something “special” in 2020, I am sharing it below. Happy New Year!

Dark Chocolate Cheesecake

Ingredients:

2 cups Enjoy Life dark chocolate chips

3 pkgs dairy free 8 oz cream cheese, at room temperature

3/4 cup coconut sugar or monk fruit sweetener blend

1/2 cup dairy free sour cream, at room temperature

2 tbsp unsweetened Hershey special dark cocoa powder

1 tsp vanilla

4 eggs, at room temperature

1/2 cup coconut milk

1 cup Enjoy Life dark chocolate chips

chopped Enjoy Life chocolate

Baking Instructions:

  1. Preheat oven to 350 degrees. Grease a 9 inch spring form pan with your preferred method and cover the bottom of the pan with two layers of aluminum foil. Boil water, and get out a pan large enough to fit the spring form pan inside.
  2. In a microwave safe container, melt the chocolate chips for a minute and stir until the chips are completely melted and smooth. If you need more time, microwave 15 seconds at a time until you can stir the chocolate to smoothness. Then set aside to cool.
  3. In a mixer, blend together the cream cheese until smooth.
  4. Add the coconut sugar and blend well, scraping the bowl as needed.
  5. Temper the chocolate mixture by stirring in a spoonful of the cream cheese mixture. Then add all of the chocolate into the cream cheese mixture and blend well.
  6. Mix the sour cream with the cocoa powder until completely blended. Then add the chocolate sour cream to the cream cheese batter and mix well.
  7. Add the vanilla and blend.
  8. Add the eggs, one at a time, mixing well after each addition, scraping the bowl as needed.
  9. Pour the chocolate cream cheese batter into the prepared pan and spread evenly.
  10. Place the pan into the larger pan and place into the oven, pouring the boiling water into the larger pan to cover up to at least the halfway point of the spring form pan.
  11. Reduce the heat to 325 degrees and bake the cheesecake for 50 to 65 minutes until the cheesecake is mostly firm with the center being still a bit jiggly.
  12. Turn off the heat and allow the cheesecake to finish cooking and cooling in the oven with the heat off and the door open for about an hour.
  13. Remove the spring form pan from the oven and remove the aluminum foil and put the cheesecake into the fridge to completely cool, at least four hours, preferably overnight.
  14. Put the dark chocolate chips into a microwave safe bowl with the coconut milk and microwave for a minute. Stir until the chips are completely melted and chocolate begins to glisten and become smooth.
  15. Remove the cheesecake from the spring form pan and carefully pour the chocolate ganache over the cheesecake to your liking.
  16. Sprinkle the top of the ganache with chopped chocolate and enjoy!


Recipe Revamping: Peppermint Brownies

“Holiday indulgences….”

So often, people will tell me that they’re fine with the “regular, other time of the year” desserts they eat having no sugar and being low fat and healthy but that when the holidays roll around, that seems somehow “wrong”.

I hear you.

Holidays seem like the one time when you’re allowed to indulge, and when you look at the calender, there are no less than half a dozen events in two weeks, all of which expect you to bring something holiday-ish and decadent to share.

My thoughts are that, yes, it is okay to loosen up a bit on the “health” of your holiday desserts, but at the same time, I will argue that you don’t have to necessarily add back all the sugar and fat for something to be indulgent.

Recently, someone share a recipe for peppermint brownies with me. It called for 1 1/2 cups of butter, 1 1/2 pound of chocolate, 5 eggs, 2 cups of sugar, 1 cup all purpose flour, 2 tsp peppermint extract, and six candy canes.

As you an imagine, I immediately tried to figure out if there was a way to revamp this recipe so that it would be at least a smidgeon less unhealthy and still decadently delicious. To do so, I reduced the butter by a third and replaced it with vegan butter. I reduced the chocolate to 20 oz and substituted Enjoy Life’s allergy friendly dark chocolate chips. I removed one egg, and since there was sugar in the chocolate, I reduced the sugar by three-quarters and swapped out monk fruit sweetener for the sugar. I reduced the flour by 1/4 cup and substituted a combination of cassava and garbanzo bean flours which are grain free flours. I then reduced the candy canes to four and used special brown rice syrup peppermint candy sticks instead of candy canes.

The result was a very tasty brownie which folks can feel comfortable sharing for the holidays.

Peppermint Brownies:

Ingredients:

1 cup vegan soy free butter

Two 10 oz packages Enjoy Life dark chocolate chips (divided: one pkg plus one cup; remaining chips)

4 eggs

1/2 cup golden monk fruit sweetener or coconut sugar

1/2 cup cassava flour

1/4 cup garbanzo bean flour

1/2 tsp salt

2 tsp pure peppermint extract

4 peppermint sticks (you can use regular if you can’t find the brown syrup version)

Baking Instructions:

  1. Preheat the oven to 350 degrees and line a 9 x 13 pan with parchment paper.
  2. In a microwave or over a double boiler, melt one 10 oz bag plus one cup of chocolate chips from the second bag with the vegan butter. Stir until smooth and let it sit to cool while doing the next step.
  3. In a large bowl, whisk together the eggs with the monk fruit sugar until thick and blended.
  4. Slowly whisk in the chocolate mixture into the egg mixture and blend well.
  5. Stir together the flours and salt and then stir the flour mixture into the wet ingredients until all the flour mixture is well mixed into the chocolate mixture.
  6. Melt the remaining chips, mix until smooth and add the peppermint extract.
  7. Spread the chocolate batter evenly into the prepared pan. Drop spoonfuls of the peppermint chocolate onto the batter and swirl the drops into the batter.
  8. Bake for 15 minutes. While the brownies are doing their initial bake, crush the peppermint sticks. I just put them into a heavy bag and whack them with my rolling pin. Works very well. You can find a more refined approach if you prefer.
  9. Remove the brownies from the oven, sprinkle the crushed peppermint pieces evenly over the top, and bake for an additional 10 minutes.
  10. Remove brownies from the oven and allow them to cool completely before cutting them into bite size pieces and enjoying.

Handling Holidays: Grain Free, Vegan Pumpkin Pie

“It’s just one more thing….”

The song tells us that “it is the most wonderful time of the year,” but all too often it is also the most stressful time of the year. On top of the usual routines and busyness, we add having to prepare for festive dinners and company, present shopping, holiday recitals and business gatherings, and a myriad of other events and preparations which are squashed into a six week period of time.

If you add on top of all that having to make sure that the food you prepare can accommodate Uncle Bob’s dietary restrictions and little Susan’s food allergies, it can become overwhelming – as one mom mentioned to me this week. She needed to know how to make a pumpkin pie which was grain free, vegan, and nut free. She figured the nut free part she could do, but she didn’t know what to do about the grain free and vegan parts.

So, I went to work. Instead of wheat flour and butter for the crust, I used Cassava flour and vegan butter which are grain free and vegan, but decreased the butter from 16 tbsp to 10, which was more than enough. For the pumpkin filling, I used flax milk and arrow root flour to substitute for the evaporated milk and egg, both of which are grain free and vegan. Because this would affect the silky, custardy texture, though, of the pie, I added a small amount of oil to the filling to increase the fat content but which added good fats instead of bad. For both the crust and the pie, I omitted sugar, using only a small amount of agave and some monk fruit sweetener for the filling so folks could really taste the pumpkin. For added flavor for both the crust and filling, I used spices and orange peel. The result was a tasty pie which the whole family could enjoy.

Vegan, Grain Free Pumpkin Pie

Ingredients for the crust: (will make two crusts)

2 1/2 cups cassava flour

1/8 tsp salt

1 tsp cinnamon

1/2 tsp nutmeg

1/2 tsp grated, dried orange peel

1 cup plus 2 tbsp vegan butter

1 tbsp vinegar

6 to 10 tbsp cold water

Ingredients for filling: (filling is for one pie; double for two)

2 3/4 cup cooked, pureed pumpkin

1 1/2 cup unsweetened flax milk (can use soy or almond milk if you prefer; just make sure it has no grain starches added)

1 tsp cinnamon

1/2 tsp nutmeg

1/4 tsp ginger

1/4 tsp cloves

1/4 tsp salt

1/2 tsp grated, dried orange peel

1/4 cup plus 1 tbsp agave

1/4 golden monk fruit sweetener blend

1 tbsp arrow root flour

1 tbsp extra light olive oil

Baking Instructions:

  1. Preheat the oven to 425 degrees.
  2. Combine the dry ingredients for the crust: the flour, salt, cinnamon, nutmeg and orange peel.
  3. Cut in the butter with a pastry knife or grate cold butter squares with a grater into the dry ingredients and mix well.
  4. Add the vinegar and cold water, beginning with 6 tbsp and adding one tablespoon at a time as needed until the doug is moistened and holds together well for rolling.
  5. Form the dough into two balls and then pat into disc shape. Roll one of the balls between two pieces of wax or parchment paper dusted with flour to fit 9 or 9.5 inch pie pans. (If making two pies, do the same with the other ball. If only making one pie, wrap the disc tightly in plastic wrap twice and put into the fridge. Will last for a couple of weeks. Just be sure to let it sit at room temperature before rolling for use.)
  6. Shape the crust in the pie pan and set aside.
  7. Combine the pumpkin, flax milk, cinnamon, nutmeg, ginger, cloves, orange peel, salt, agave, and monk fruit sweetener until well blended.
  8. Add the arrow root flour and olive oil. Mix well.
  9. Pour into the prepared crust.
  10. Bake in the preheated oven for 15 minutes. Then cover the edges of the crust with aluminum foil, reduce the heat to 350 and bake for another 40 minutes until the filling has puffed a bit and only jiggles in the center.
  11. Allow the pie to cool on a wire rack for 15 to 30 minutes, before placing in the fridge to cool and set completely.
  12. Enjoy!


Creative Cooking: Grain Free Spice Pancakes

“Nope, none at all….”

Whenever I lead a workshop, inevitably someone asks me my opinion about all the “diets” which are being lauded these days which advocate restricting this or that. I always tell folks that they and their doctors know best for their health, but as a general rule for many people, as long as there are no health issues, I believe in a diet which moderately mixes the food groups – healthy vegetables and fruit, lean proteins like fish, chicken, beans and tofu, and whole grains like barley, oats, and quinoa – with a healthy baked treat every so often. Add in a doctor approved exercise regiment, and you’re good to go, in my opinion.

Lately, though, I seem to be meeting more and more folks who can’t eat any grains at all for a variety of health related reasons, and they find themselves frustrated that foods they enjoyed may be a thing of the past. Fortunately, there are many grain free flours these days. The most common on the market and easily found in supermarkets are almond, coconut, bean, and cassava flours.

For cooking needs, such as breading chicken or fish or thickening a sauce, these grain free flours work the same way that regular flour does and needs no adjustments.  When using them for baking, the number one consideration is that these flours require more moisture so often you need to increase the number of eggs or the amount of liquid ingredient being used. I often just begin with 1/4 cup increase to start and experiment from there.

Almond and cassava flours tend to work best if you’re looking for a 1 to 1 substitute. Coconut flour is much more absorbent so you can usually only use up to 1/3 cup for every cup of flour you are substituting. Bean flours are heavier so you should decrease the amount to 3/4 cup for every cup of regular flour. For all the flours, they bake best in items such as pancakes, muffins, waffles, shallow quick breads, and cookies. If you want to use them in cakes, you need to mix them with lighter grain free flours like tapioca or arrowroot flours.

For this post, I made a garbanzo bean and cassava flour pancake, heavy with Autumn spices, which is filling and substantial so folks can make due with just one or two for a protein-filled breakfast. They have the added benefit of not having any sugar in them. We topped ours with sauteed, seasonal apples, and they were yummy.

Grain Free Spice Pancakes

Ingredients:

1 1/2 cup garbanzo bean flour

1/2 cup cassava flour

1 1/2 tsp baking soda

2 tsp cinnamon

1 tsp nutmeg

1/2 tsp ginger

1/2 tsp salt

1 cup unsweetened dairy free milk (we used soy but flax or oat or almond work, too)

1 tbsp lemon juice

2 eggs

1/4 plant based oil (we used safflower but extra light olive oil or avocado oil would work, too)

Cooking Instructions:

  1. Mix together the garbanzo bean and cassava flours with the baking soda, cinnamon, nutmeg, ginger and salt. Set aside.
  2. Blend together the unsweetened milk with the lemon juice, and add the eggs and oil.
  3. Combine the dry ingredients with the wet and mix until well blended.
  4. Heat a griddle at 325 to 350 degrees or a skillet on the stove on medium heat. If either is nonstick, no additional greasing is needed. If neither are nonstick, then you’ll need to grease your pan with your preferred method.
  5. Pour 1/4 cup of batter for each pancake and let it cook for a minute or two until the edges become dry. Flip and finish cooking on the other side for 30 seconds to a minute. Your pancake will rise and be golden on both side when they are done.
  6. To keep the pancakes warm, put them into a glass container with a lid and put them into a preheated oven on the lowest setting (mine is 170 degrees). To cool, put them on a wire rack, and then stack them in a container to keep in the fridge. To reheat, just popped them into the toaster or in the microwave. They freeze well, too.

Creative Cooking: Orange Chiffon Cake

“Labors of love….”

“I’m sorry, Mama,” said my son. He and I were in the car, and I was not feeling well. He was not apologizing because I didn’t feel well. He was sorry because he felt badly that I was driving him even though I was not well.

Mothers do this all the time, placing our children’s needs before our own. Most of us don’t think twice. I assured my son that he didn’t need to feel badly about anything. If I was truly unable to drive him, I would not have, but for me, being able to do things for my children brings me joy.

Recently, we celebrated a birthday in the family, and I made a chiffon cake, which was requested. I realized that I hadn’t made a chiffon cake in many, many years because it is more work than a regular cake, and I certainly hadn’t made one to accommodate food allergies.

The first thing you’ll see when you google chiffon cakes is that the recipes vary. There are what they call “easy” recipes which use very few eggs and take less time and then there are the more “complicated” recipes which I read were the better way to go. Because the cake was another “labor of love” for someone I care about very much, it was a no-brainer. Complicated it was.

As it was, chiffon cakes are not complicated, just time-consuming. Most recipes want you to bring the eggs to room temperature first, and then the eggs require several steps: separating the whites from the yolks, whipping the whites, and folding them into the batter. At the end, the chiffon cake also requires complete cooling time in an upside down position which had several recipes concocting elaborate sets with soda bottles to hold up the cake pan!

It seemed I needed to find a way to make things less complicated, so I did.

First, I simply took the eggs out as my first step and immediately separated the yolks from the whites, and I put the whites on the counter to sit while I assembled the other ingredients and got out my pan. It’s important to note that you need a tube pan for chiffon cake, and if you have a tube pan like mine where the center tube is wide and longer than the edges of the pan, you can simply turn your pan upside down on the tube to cool at the end with no elaborate strategy needed.

For substitutes, I swapped olive oil for the vegetable or canola oil used in most recipes, and I used monk fruit sugar in place of sugar, reducing the amount by 1/3. For the all purpose flour, I used King Arthur’s whole grain gluten free blend. Because I was using a gluten free flour, I wanted to make sure my eggs were well-whipped and airy, so I increased the cream of tartar to 1 tsp from the usual 1/4 tsp, and I increased the baking powder to 1 tbsp. By the time I had measured out all the other ingredients, I felt enough time had elapsed that I could whip the whites, and I was correct.

The resulting cake was light and airy and tasty, and I’m thinking I may even make it again!

Orange Chiffon Cake

Ingredients:

9 large eggs (will use 9 whites but only 7 yolks)

2 1/4 cups gluten free flour blend

1 cup monk fruit sugar blend (divided into 1/4 cup, 1/4 cup, and 1/2 cup)

1 tbsp baking powder

1/2 tsp salt

2 tsp dried orange peel

3/4 cup unsweetened orange juice

1/2 cup extra light olive oil

1 tsp cream of tartar

Baking Instructions:

  1. Preheat oven to 325 degrees and put out a tube pan. You do not grease the pan for a chiffon cake.
  2. Separate the yolks from the whites. You will use only seven yolks for the cake. (I put the extra two yolks in a bowl and added other eggs to them the next time I made a fritatta.) Let the nine egg whites sit in a bowl to be whipped, and put the seven yolks into a large bowl.
  3. Mix together, the flour, 1/2 cup of the monk fruit sugar, baking powder, salt, and orange peel. Set aside.
  4. To the bowl with the egg yolks, add 1/4 cup of the monk fruit sugar, orange juice, and olive oil and blend well. Set aside.
  5. To the egg whites, add the cream of tartar and last 1/4 cup of the monk fruit sugar, and whip until the egg whites are crayon white, doubled in size, thick and airy and when you pull the whisk up, the whites form a sturdy upside down peak.
  6. Add the dry ingredients to the wet and blend well.
  7. Using a curved spatula, gently fold the egg whites in a little at a time to the batter until all the egg whites have been incorporated. This will take time. Best not to hurry the process. Just slowly fold the whites in while you think about how lovely it will be when everyone enjoys the cake. *grin*
  8. Using the spatula carefully put the batter into the tube pan and once all the batter is in, gently tap the pan to let the batter settle.
  9. Bake in the preheated oven for about 50 minutes. The cake will be puffed and golden and a toothpick inserted in the center will come out clean.
  10. Put the tube pan upside down. If your pan is like mine, you can just set it on the center tube. If not, you want air to be able to circulate so place at least two items opposite one another so you can balance the pan upside down with space between the pan and the counter.
  11. Allow the cake to cool completely. This may take several hours, depending on how warm or cool your kitchen is.
  12. Once completely cooled, go around the edges between the cake and the pan with a butter knife to release the cake from the pan. Be sure to do the same between the cake and middle tube. When the cake releases, you will note that the cake is crummy around the sides where it stuck to the pan and tube. I use clean fingers to gently rub the excess crumbs off the sides of the cake so it will be neater.
  13. Serve the cake as is with whipped cream or ice cream or frost with your favorite frosting.
  14. Enjoy!


Creative Cooking: Free Form Tomato Vegetable Tart

“The season is ending….”

While Autumn brings the delights of apple and pumpkin season, it also means the end of the garden-fresh tomatoes, eggplants and kale, which arguably taste so much better than store-purchased varieties. To take advantage of the last of these veggies, courtesy of my sister-in-law’s and mother-in-law’s gardens, I decided I’d make a vegetable tart to go with the vegan roast I had decided to make for dinner last night.

I forewarn folks that this is not my typical recipe – it is not quick to make. It requires time but I assure you it’s so worth the effort, which is the reason I put aside my usual laziness in favor of making the tart. I also figured out how to do several of the steps at once to make the cooking more efficient, which I’ll include in the instructions.

The key to a good tart is a good crust. When I googled, though, I discovered that recipes seemed to think you needed to use no less than 1 1/2 to 2 cups of butter, eggs, white flour, and a couple of teaspoons of salt, and in some case, also sugar – all of which I didn’t agree. So, the first step was to create a tart dough which I could stand by. That meant reducing and substituting for the butter and salt, omitting eggs, and using gluten free flour. To enhance the flavor of the crust and keep the crust together without as much butter, I opted to pulse in fresh basil leaves which worked beautifully.

The second important ingredient to a good tart is the flavor from the veggies. What I found, though, is that most vegetable tart recipes seem to rely on cheese – a lot of cheese – which does give flavor but camouflages the flavor of the veggies. So, I needed to find ways to enhance the flavors so cheese would not be necessary. This meant roasting the eggplant, caramelizing onions to mix with the kale, and letting the tomatoes rest for a bit with a salt-garlic mixture.

The result was a wonderful tart which we thoroughly enjoyed with dinner and which I hope you will, too. I’m thinking it will become a go-to for holiday celebrations because it was so pretty, flavorful, and vegan.

Free Form Tomato-Vegetable Tart

Ingredients:

two small eggplants (about 4-5 inches long and 2-3 inches wide)

2 cups gluten free flour blend

1 cup packed fresh basil leaves (packed means push the leaves down; if you loosely put them in, it would be 2 cups)

1/2 tsp salt

1 cup soy free vegan butter, cut into small pieces (two 8 tbsp bars)

1 tbsp vinegar (I used apple cider vinegar but balsamic or white are good if you want a different flavor)

1/4 cup water

eight medium tomatoes (about 3 inches by 3 inches; I used two different types for color contrast)

1/2 tsp salt

2 tsp minced garlic

8 oz sliced onions (about two cups; I used sweet white onions)

olive oil

5 oz fresh kale and/or spinach leaves (about 3 cups packed down)

1/4 cup vegan parmesan

1 cup packed fresh basil leaves, sliced into thin slices

Cooking Instructions:

  1. Preheat the oven to 400 degrees and prick the eggplants several times with fork tines to release steam while they are roasting. When the oven is preheated, place the eggplants on a small cookie sheet and roast them for about 40 minutes. When they are done, remove them from the oven and allow them to cool. Do not turn off the oven, because you will be cooking the tart at the same temperature.
  2. While the oven is preheating, put the gluten free flour, the basil leaves and the salt into a food processor. Pulse until they are thoroughly mixed together and the basil leaves are small pieces incorporated into the flour. Add the vegan butter and pulse until small butter pieces are incorporated throughout the flour mixture. Mix the vinegar with the water and pour into the food processor. Pulse until you have a cohesive dough. Use a rubber scraper to remove the dough from the food processor onto a piece of saran wrap. Wrap the dough and shape into a disk. Place into the refrigerator. (If you do not have a food processor, use a pastry knife or two regular knives to chop first the basil and then the butter into the flour, and then mix the liquid into the flour with a fork until a batter forms.)
  3. After putting the eggplant into the oven and the tart dough into the fridge, slice the tomatoes into about 1/4 inch slices and put them into a large bowl. (I used two different colors of tomatoes [four of each] so that they’d look prettier in the tart, but all of the same type works, too.) To the tomatoes in the bowl, add the salt and minced garlic and gently toss to coat all the tomatoes. Then just let the tomatoes sit. While they are sitting, they will release their juices, which is what you want to happen.
  4. After getting the tomatoes ready, put the sliced onions into a shallow, wide cooking pan and mix with just enough olive oil to coat the onions. Turn the burner to low heat and allow the onions to slowly cook for about 20 minutes, stirring just every once and while. When the onions are completely caramelized, they will be a golden brown, soft, and look like they have a sticky sauce on them. When they are done, add the kale and/or spinach leaves and cook for about two minutes, just until the leaves begin to wilt and the onions and kale/spinach are well mixed together. When done, turn off the burner and let them cool.
  5. By now, your eggplants will be done and cooled a bit. Peel off the skins (this is easily done with clean fingers), chop the eggplants into small pieces, and stir the pieces into the onion-kale mixture.
  6. After that is done, drain the liquid from the tomatoes.
  7. Remove the tart dough from the fridge, and on a piece of floured parchment or directly on a cookie sheet, roll the dough into a 16 inch circle. (I used a 16 inch round pizza pan which meant simply rolling the dough out to the edges of the pan with a small roller that fit directly in the pan. If you use the parchment paper, you will need to transfer the dough to a sheet pan large enough to fit the circle of dough.)
  8. Sprinkle the vegan parmesan onto the dough, leaving a one inch margin around the edge of the dough. (The parmesan will help absorb any extra moisture from the vegetables so you do want to include it. If you would rather not for any reason, I suggest using a 1/4 cup of gluten free bread crumbs instead.)
  9. Carefully put the onion-kale-eggplant mixture on top of the sprinkled parmesan, leaving that one inch margin along the edges of the dough. Then, if using two kinds of tomatoes, alternate the tomatoes in circles on top of the onion-kale-eggplant mixture. Make sure the veggies are even all the way around.
  10. Then, using clean fingers and the help of a rubber scraper, gently push up the one inch margin of dough to form an outside crust around the vegetables. Once the crust is formed, sprinkle the sliced basil on top of the tomatoes to the edge of the crust.
  11. In the still preheated 400 degree oven, place the tart and bake for a total of 50 minutes, turning the tart around halfway through the cooking time. When the tart is done, the dough would have puffed a bit, be golden brown, and firm to the touch.
  12. Remove the tart from the oven and allow it to cool for about 10 to 15 minutes before cutting into it, so that all the juices will settle, and it will be easier to cut. Use a very sharp knife or pizza cutter to cut the tart into slices.