Cooking Techniques: Corn Beef and Cabbage

website corn beef

“But shouldn’t we be wearing orange?  And we’re not even Irish anyway!”

When your daughter is on the autism spectrum and everything always has to be precise and make sense, it’s not always easy on the parent. My oldest was five when she learned that in Ireland, Protestants wear orange on St. Patty’s day, so she wanted to know why everyone in the U.S., whether you’re Protestant, Catholic, Buddhist, etc… wore green.  She also wanted to know why we as a family would wear anything at all, given that Irish is one of the few ethnic backgrounds missing from our family heritage.

Even as bright as my daughter was at that time, trying to get her to understand the idea of a social construct evolving over time so that today basically everyone becomes Irish on St. Patty’s day, whether you are or aren’t and that wearing green is just something you do was not very easy! And to this day, she still insists on wearing orange on St. Patty’s day and explaining to people why they shouldn’t be wearing green. Fortunately, most folks extend her a lot of grace because of the autism. *grin*

This morning, however, I actually felt a kinship with my daughter when I received an emailed question about making boiled corn beef and cabbage. I was quick to point out that in Ireland folks don’t actually eat corn beef and cabbage on St. Patty’s day, that it’s something that somehow evolved as a tradition in the U.S. I also wanted her to know that folks used to boil all their meats in Ireland because of poor refrigeration and sanitation conditions. Folks wanted to make sure they wouldn’t get sick from their food, so they overcooked it.

I wouldn’t be surprised if folks are now wondering about me! Which I guess just goes to show that my daughter doesn’t fall from her mother’s tree after all!

At any rate, I started thinking about corn beef and cabbage and thought I might as well post about it on St. Patty’s Day, though I do apologize that this post most likely is not in time for today’s holiday meal.

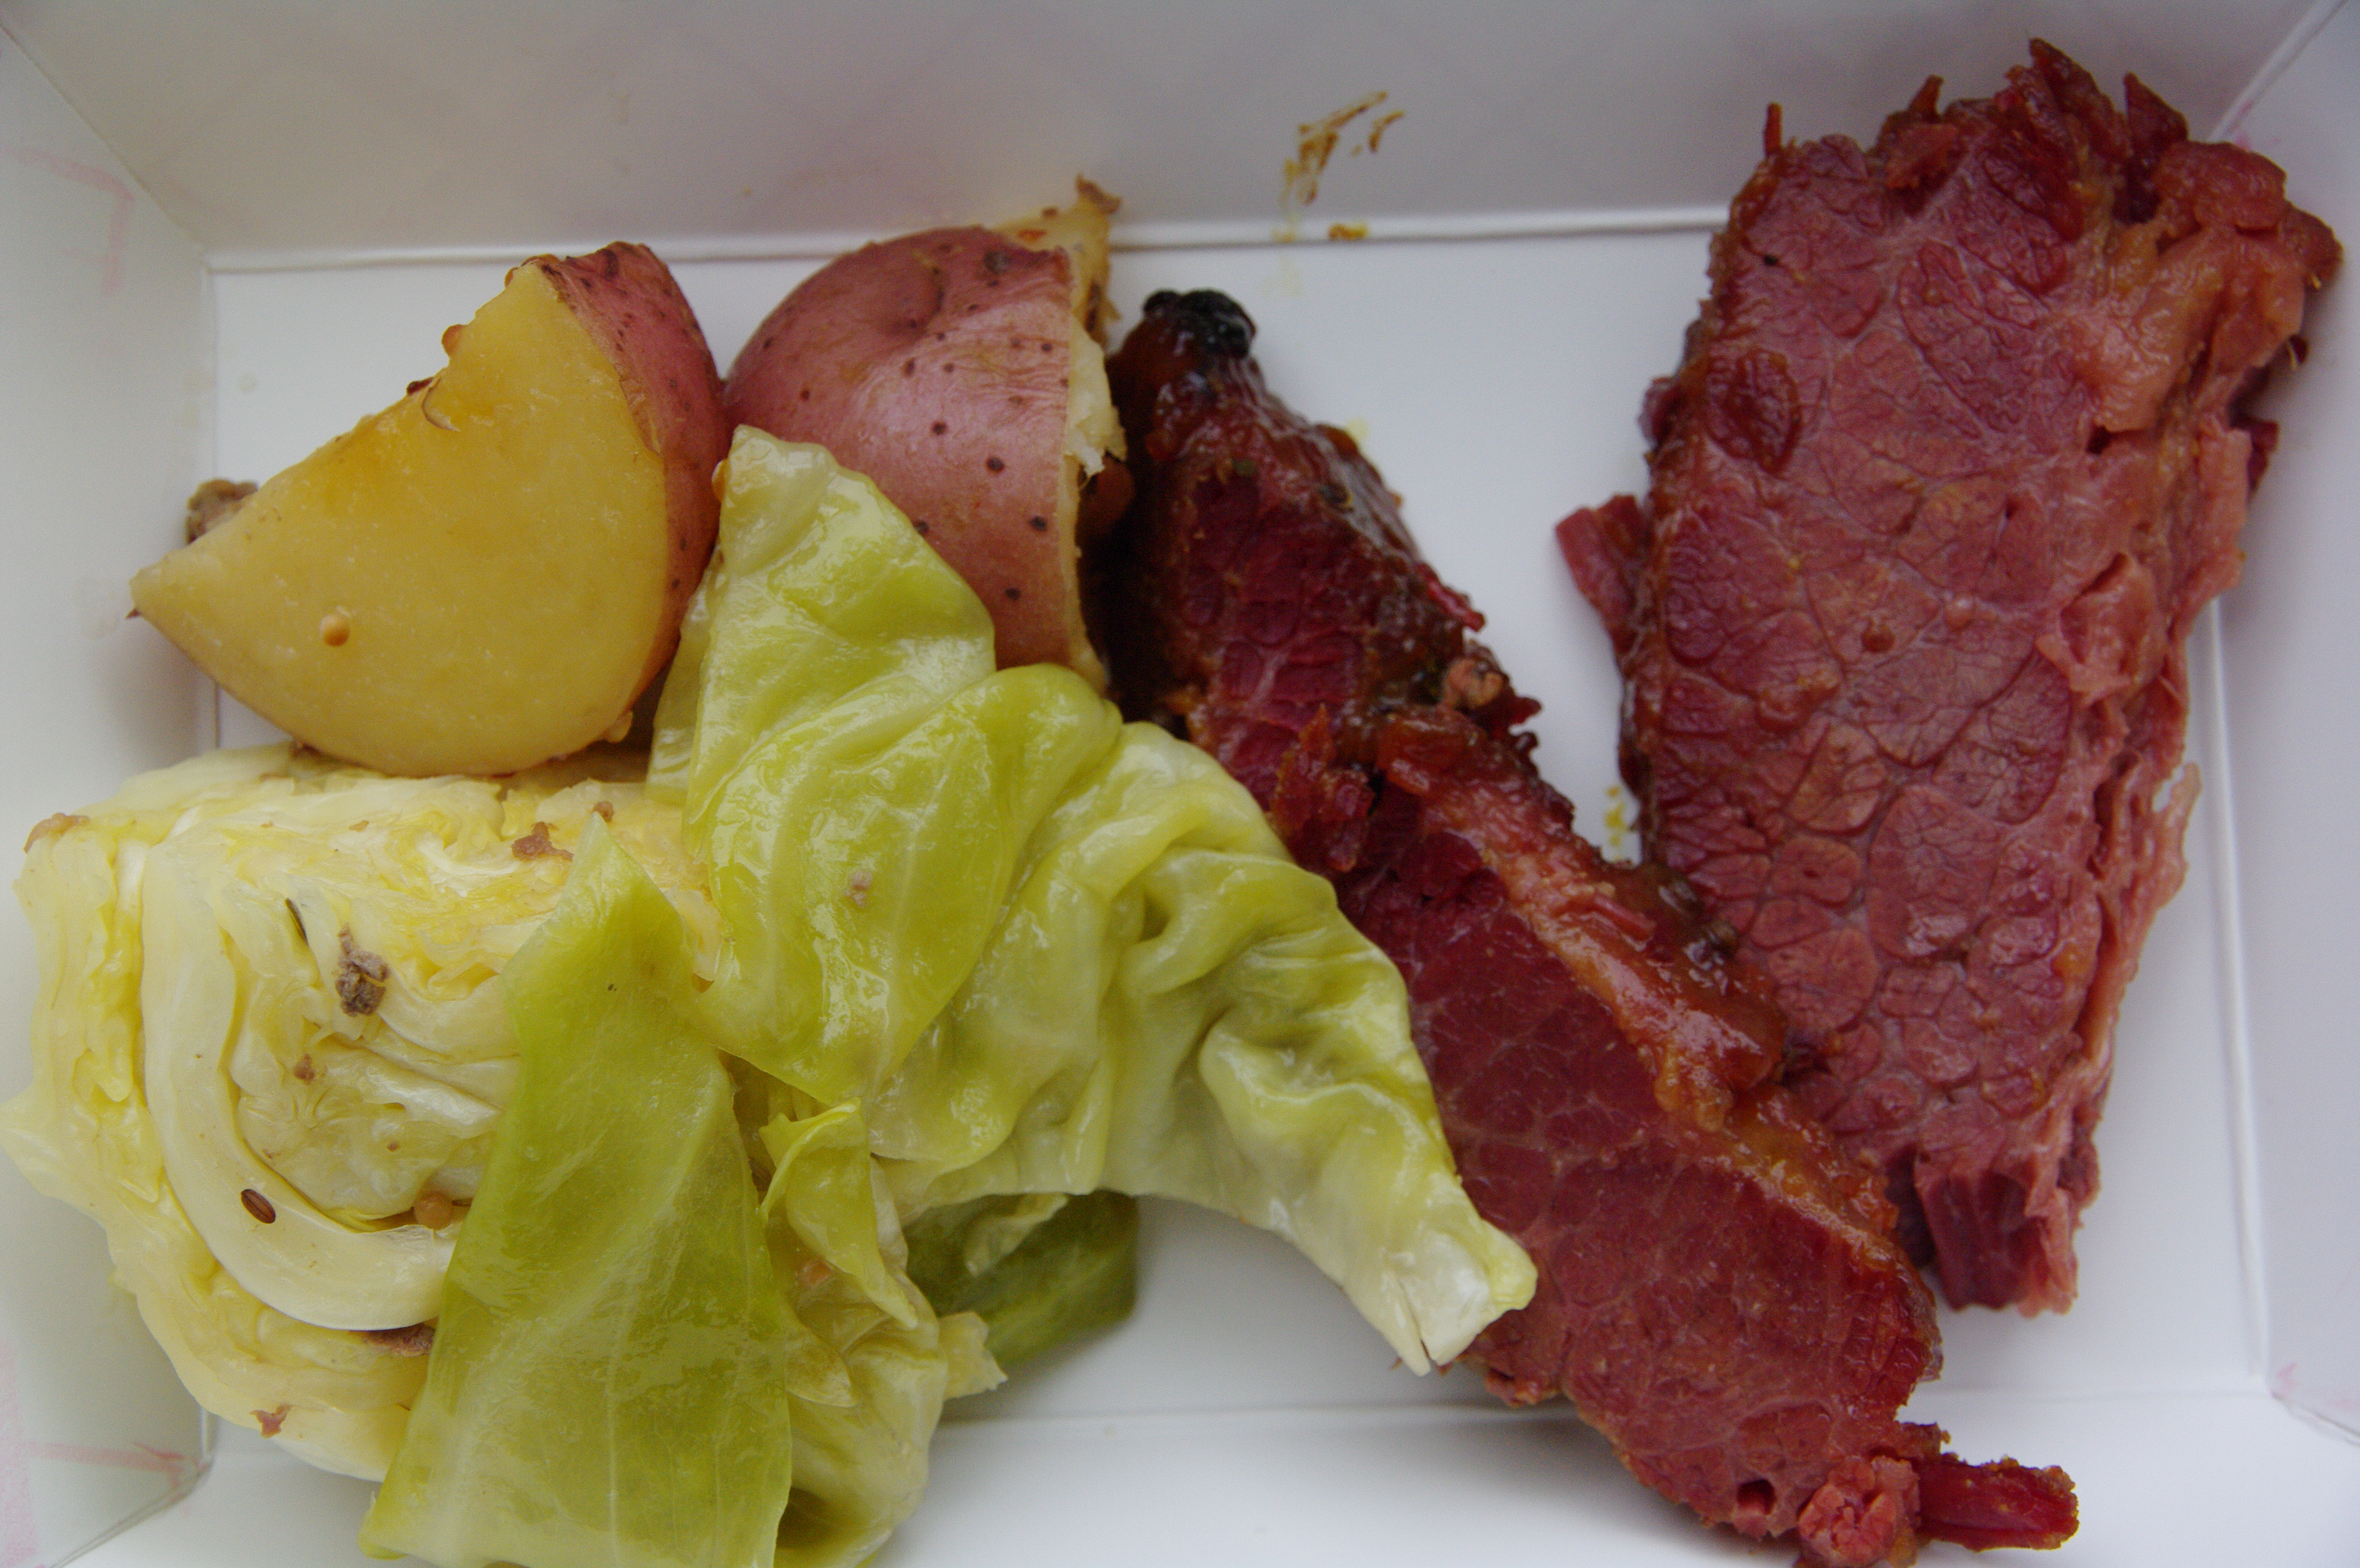
I actually love corn beef and cabbage at any time of the year. I don’t, however, ever, ever boil corn beef and cabbage.

Boiling corn beef and cabbage just makes for a greasy, unpalatable entree in my opinion. I know some may disagree with me, but boiling cabbage turns it into an ugly shade of green which no one should ever see on their food plate, and boiling the corn beef releases the fat into the cooking liquid which is quick to congeal when cooling. Definitely not my idea for ideal presentation of food! In addition the vegetables you add to corn beef and cabbage like carrots, turnips and potatoes lose much of their valuable nutrients when you boil them.

So what should you do then? Slow cook it in the oven is my advice.

Several Tips to keep in mind:

1. The pan: You want a nice large heat proof pan with a high cover. If you don’t have a cover, you can use aluminum foil, but you should double fold it and make it into more a tent shape than flat over the pan. This will allow for more space for your vegetables and cabbage as well as allowing the heat to circulate at the food cooks in the oven.

2. The corn beef: I find that a thin cut corn beef is better than a thick cut. It’s usually more symmetrical in width which allows for more even cooking. Also, because it’s thinner and flatter, though, longer, it cooks more quickly than a fatter, rounder cut.

As a rule, unless you’re single or just a couple with no children, a four pound cut of meat is best. As corn beef cooks it actually shrinks down in size considerably and by the time it’s fork tender for eating, it’s about half its original size. A 4 pound brisket is enough for dinner for our family of five with some leftovers for lunch the next day.

Also, you should always try to cut away as much of the fat as you can. One, it helps to reduce the fat and grease. Two, it means that the spices and herbs you use to season the meat will actually reach the meat and not just rest on the fat.

As well, if you have a rack that fits into your pan, you should insert it and put the meat onto the rack. It allows the heat to circulate under the meat for more even cooking and also helps to reduce any grease from sticking to the bottom of the meat.

Finally, you should season your corn beef. Most come with a seasoning packet that usually is a mixture of chopped bay leaves and mustard corns. I like to take those and add garlic, onion powder, black pepper and oregano. Then I add the smallest amount of olive oil to make a barely moist paste which I rub all over the corn beef. After I stick whole cloves into the corn beef.

3. The cabbage: Don’t just use green cabbage. I like to mix both purple/red cabbage with the green to get a melding of flavors and colors.

Also, most recipes call for simply cutting the cabbage into quarters. I find that this makes for tougher cabbage. I cut them into 16 wedges and find that this makes for a more fork tender cut of cabbage.

You don’t want to add the cabbage at the beginning. It doesn’t take as long as the meat to cook so add it more like a third or half way into the cooking.

When you add the cabbage, put the wedges carefully around the meat so the wedges stay together.

4. The vegetables: Be creative. We have added potatoes, carrots, turnips, butternut squash, beets, etc…. My kids favorites continue to be the traditional potatoes and carrots, but even with those I vary them. Nowadays you can get a variety of colored potatoes and carrots in white, red, purple, orange, pink.

What’s important to keep in mind is that with this dish, you really should stick with root vegetables. For the length of time that you need to cook the meat, vegetables which are quick cooking really don’t work well. If you do choose to use vegetables like zucchini or broccoli or mushrooms, don’t add them until the last 15 to 20 minutes of cooking time.

Another thing to keep in mind is your size. All the vegetables should be the same size for even cooking. I like to cut everything about 1 1/2 inches in length and width. I find it cooks well in the time allowed.

Also, be sure to season your vegetables before adding them to the meat pan. If you just add the vegetables as is, they will be bland. I like to use a mixture of herbs and garlic and black pepper. I don’t ever add salt because the corn beef is salty, and you want your vegetables to complement the salty meat.

Finally, like the cabbage, the vegetables don’t need as long as the meat to cook. You should add them about 1/3 to halfway through the cooking time.

5. Cooking: As I mentioned, the method I think is best for cooking corn beef and cabbage is slow roasting them in the oven. Preheat the oven to 350 degrees while prepare the corn beef.

First, wash the corn beef with cold water and pat it dry. This helps to remove some of the excess salt on the outside of the corn beef. Remove as much fat as you can and season the corn beef with a herb paste. Place the corn beef on the rack in your pan and stick the whole cloves in.

Then, add some liquid because I find that adding some liquid to the pan helps to make for a moister piece of meat. I actually make a mixture that’s about a quarter to a half cup of honey with about one cup of water that I pour over the meat. Later when the meat is done, I turn that into a gravy/sauce by making a rue of olive oil and a gluten free flour or mixing cornstarch with water to thicken the liquid.

Cover the pan with the lid and allow the corn beef to begin cooking for about an hour. You should always begin cooking the corn beef first and add the vegetables and cabbage later. The meat takes much longer to cook and you don’t want to overcook the vegetables. Also, if you begin cooking the meat, it releases some of the grease and fat which you can remove before adding your cabbage and vegetables.

As a rule, I cook the meat for about one to one and a half hours first before adding the vegetables and cabbage and cooking for another two to one and a half hours. During that hour or so, I peel, chop, and season my vegetables and cabbage.

After about an hour, remove the corn beef and strain all the grease and fat out of my liquid, being careful to do so over a bowl so you can keep the liquid for the rest of the cooking. If I need to so do, I also wash away any grease that’s accumulated on the rack, too.

Then return the rack to the pan and replace the corn beef on top of the rack. Carefully place the vegetables around the corn beef. You should be sure to put things like potatoes and carrots first on the bottom because they often need more heat to cook. Then place the cabbage wedges on top of the vegetables around the corn beef.

Pour the saved liquid over the cabbage, vegetables and meat, and cook for another two hours or so with the lid on. When your corn beef is done, it should be fork tender. The same with your vegetables.

When the corn beef, cabbage and vegetables are done, I remove them to another pan and thicken the liquid. You can do this by making a rue of olive oil and flour that you slowly add the liquid to. Or you can mix cornstarch with water and add that to the warm liquid. Either way you need to heat the liquid on the stove top, stirring frequently until it thickens.

Then pour the sauce over the corn beef and cabbage and serve.

Cooking Techniques: Allergy Friendly Lasagna

website lasagna

“You know, the lasagna song!”

Several years ago, a friend shared a funny story about her youngest. Her daughter was in preschool at the time, and one day she asked her mom to help her sing the lasagna song from church. My friend was a bit confused, and she explained to her daughter that she didn’t know what song her daughter was referring to. Her daughter got exasperated and said, “You know, the lasagna song! The one we sing every Sunday at the end.” My friend finally figured out that her daughter was talking about the “Hosannah” song which to her daughter’s young ears sounded like “lasagna”.

Ever since my friend related that story, I can’t think about, make or eat lasagna without chuckling and singing to myself, “Lasagna in the highest!”

As funny as my friend’s anecdote is, people don’t tend to laugh when they are trying to make something as wonderfully rich and gooey and tasty as traditional lasagna with substitute ingredients. Often they get frustrated because “it’s just not the same”, which is what the email I received this week said.

When it comes to substituting for anything, whether it’s lasagna or something else, the two main things people look for are whether the taste and the texture resemble the original. If one or both don’t, then folks consider it a failure. While I would argue in general against this litmus test for success, the fact remains that people continue to judge food on these two criteria. As such, if you are going to serve someone lasagna that is dairy and gluten free, you want to be sure that people will enjoy it. Below I’ll share some tips for making delicious allergy friendly lasagna. The tips are helpful for making traditional lasagna as well.

Tips for Allergy Friendly Lasagna:

1. The pan: You can make any type of lasagna in just about any size, depth or shape pan, but if you want to make your life easier, invest in a nice lasagna pan which usually is 11 by 14 x 3. This is the perfect size for lasagna noodles. They fit both width-wise and length-wise, and perfectly fits a lasagna made with two boxes of noodles. You’ll save yourself the hassle of having to cut and size your noodles which will also save time in your assembly of the lasagna.

2. The noodles: Whether you are using regular, whole wheat, or gluten free lasagna noodles, the tips remain the same.

a) For the best taste and texture, you do want to cook the noodles on the stove top first. Yes, you can use the no-cook method (which I do indeed utilize sometimes!), but the texture and the taste definitely will reap the consequences. The better method is to cook the noodles before using them.

b) Do not overcook the noodles. You want to actually under cook your noodles by two minutes. When your lasagna is cooking in the oven, the noodles will continue to cook, so if you don’t under cook your noodles on the stove top, they’ll become mushy while cooking in the oven.

c) To preserve the texture of the noodles, you should immediately rinse your lasagna noodles with cold water to stop the cooking when you’ve drained them from the stove top water. Pat them lightly dry and line the noodles on a surface for easy use when assembling the lasagna. You don’t want to leave the noodles on top of each other, because then they’ll stick to one another and you’ll have a big mess on your hands. What I do is I line one of my large cookie sheets with plastic wrap or parchment paper and line the noodles side by side on the cookie sheet so I can simply reach for them as needed.

3. The filling: Traditionally folks use ricotta cheese or cottage cheese or a combination of both as the lasagna filling. For folks who have dairy allergies, though, you can use tofu or a nut “cheese”. I like to use the silken tofu, because when I mash it with my potato masher, the silken tofu has as similar texture as the ricotta and cottage cheese. Also, I’m allergic to nuts. If you aren’t allergic to nuts, though, and are allergic instead to soy, there are some good recipes online for nut “ricotta cheeses” which are basically pureeing soaked nuts such as cashews, almonds and walnuts (about 1 1/2 to 2 cups) with water (1/2 cup), lemon juice (1tbsp) and garlic and herbs.

Regardless of whether you’re using real ricotta or tofu or a nut cheese, the hint for creating delicious lasagna is to flavor the “cheese”. I cook up a small amount of Italian chicken sausage and make a paste in my food processor with fresh basil, oregano, garlic, black pepper, and onions. I add both the sausage and the herb paste to the tofu and let it sit covered in the fridge while I’m working on the noodles, vegetables and sauce, so the flavors can meld.

If you’re like me and want something a little more to your lasagna, you can also add vegetables to the “cheese” before you assemble your lasagna. I like to roast vegetables like zucchini, squash and eggplant or saute spinach and mushrooms. After the flavors have had a chance to meld in the tofu, I gently mix the vegetables into the tofu. If I want a meat lasagna, then I cook up more than just a small amount of chicken sausage or some ground turkey and add that instead of the vegetables. For both the meat and vegetables, you should be sure to season and flavor them with spices, herbs, garlic or onions and black pepper as you cook them. Even though your “cheese” has flavor, adding bland vegetables and meat to the cheese will simply dilute the flavor you worked to incorporate.

Finally, if you are not allergic to eggs or are not vegan, if you mix up a couple of eggs with a fork and then blend it well with the tofu or nut cheese mixture, it will make your filling a bit creamier like ricotta as well as lend some stability to the lasagna.

4. The sauce: I like to make my own tomato sauce when I can, but I also use a no-sugar added jar sauce on occasion, too. The important tip to keep in mind for a good lasagna is to make sure your sauce is a thick sauce. A thin, runny spaghetti sauce is a definite no-no for lasagna. Since I’m of the opinion that more vegetables are always better, I tend to keep aside some of the lovely roasted or sauteed vegetables I made for the cheese, chop it more finely, and add it to the sauce as well. This not only adds more texture, but more taste — especially if you’re using a jarred sauce.

If you are making your own sauce, be sure to cool it before assembling your lasagna. Since we don’t want to affect the texture of our cooled noodles, we want all our ingredients to be at least at room temp before assembling so that the only additional cooking of the noodles will occur in the oven.

5. The assembling process: It’s important to “build” your lasagna so it’ll be stable for eating. The best way to do this is to alternately lay each layer of noodles opposing to one another. So, if you put all your noodles width-wise the first time, then layer them length-wise the second and so on. I find that the best lasagnas follow the pattern of sauce, noodles, sauce, noodles, then half of the filling, noodles, second half of filling, noodles, sauce, cheese.

For the sauce, it’s important that you completely cover the bottom layer of the lasagna pan with sauce before laying down your first set of noodles. Whether you want to have sauce on top of your cheese filling or not is up to you. If you don’t add sauce on top of the cheese filling, you’ll have a drier lasagna, which a lot of people prefer. If you want a moister lasagna or like the flavor of the tomato sauce melding with your cheese filling, which is the way I like it, then you should layer the tomato sauce on top of the filling before layering another set of noodles.

It’s also important to put sauce on top of the last layer of noodles. You can certainly simply put your cheese on top, but then the top layer of noodles will cook into a crispy top layer instead of being moist and soft for eating.

6. The cheese: Most people put mozzarella on top of the last layer of noodles and sauce. For folks with dairy allergies, Daiya makes a mozzarella which tends to melt almost like mozzarella. Taste-wise, though, it can have a little off-flavor which puts people off. So, what I do is I flavor the Daiya cheese with the same herb paste I used for the filling. I puree a blend of fresh basil, oregano, garlic, onions, and black pepper and mix it in well with the “mozzarella” cheese. I put it in the fridge while I’m working on the other parts of the lasagna, so that when I’m ready, I have a nice flavored cheese for the top of my lasagna.

The tip for the top layer of cheese is to put the cheese on when you’re done assembling your lasagna so it can be melting while the lasagna cooks, but to be sure to grease the aluminium foil before placing it down on the lasagna. This will prevent the mozzarella from sticking to the foil when you remove it.

After you’ve cooked your lasagna, if you’re using the Daiya cheese, you should broil it for 2 to 4 minutes, watching it closely, because this will give your “cheese” that golden brown toasty top that you would normally get from mozzarella cheese.

7. Cooking the lasagna: Most lasagnas will cook for about 45 minutes in a 350 degree oven. You should double-fold a piece of aluminium foil and cover your lasagna, being sure to grease the underside before putting it on top of your mozzarella. This will insulate your lasagna more evenly by matching the sides and bottom of your pan in width. After 45 minutes, you should remove the foil and cook the lasagna for another ten minutes to help the cheese brown. If you are using the Daiya cheese, be sure to broil it after those 10 minutes.

When your lasagna is done, it’s important to let it sit for ten to 15 minutes before serving. You can absolutely serve it immediately if you want, but be warned that your pieces will fall apart as you remove them from the pan. If you let the lasagna sit before serving, however, you’ll be able to cut nice solidified squares or rectangle pieces.

Cooking Techniques: Roasting Meats and Chicken

website roasting

“There was this little black bowl sitting on my plate.”

As unique as every family is, families are similar where story-telling is concerned. All families have those stories which they tell over and over again about some member of the family or something that happened which gets passed down from parent to child to grandchild. Some stories are sentimental, meant to be remembered for as a truth. Others are funny and told to elicit laughter time and time again. All become a part of what makes your particular family special.

In our family, my parents love to tell the tale of my mom’s first time cooking my dad a steak. Being Korean and only eating kalbi (kind of like Korean ribs) and bulgogi (think cooked stir fry size beef strips) on special occasions, my mom hadn’t cooked a steak before. Since Korean meat is always cooked until it was well-done, that’s exactly what my mom did. She cooked that steak until it was so well-done it curled up on itself, and when she served it to my dad, as he puts it, “There was a little black bowl sitting on my plate.”

Since my dad actually likes his meat rare, only love could have made him eat that steak. I, however, would have been just fine eating it, because I’m not much of a meat person in general and when I do eat it, I like it to be as my husband and dad call it “shoe leather” texture.

Just like people have different preferences for eating meat, people have different ways of cooking it. The most traditionally agreed up method for the most flavor, though, tends to be roasting, and for this post we will look at roasting both meat and poultry since the methods are similar. I will focus on the questions people have recently asked me.

Questions about Roasting Meat and Poultry:

1. Does my roast or chicken need come to room temperature first? The answer is, “No.” One, unless it’s a hot day, it’ll take a long time for your meat or chicken to come to room temperature, and if it is a hot day, leaving the meat or chicken out will increase your risk of bacterial growth. Two, better folks than I who run test kitchens all the time have run experiments, cooking both a room temp piece of meat and one straight from the fridge, with no difference. In the end, though, folks are going to do what they want, and I know many people who would never dare to roast a piece of meat or a turkey without letting it sit out for at least half an hour first. To date, they are all alive and well and enjoying their meat and poultry, so in the end, it’s your prerogative.

2. Should I season before or after? If you were to google this question, you’d find a variety of conflicting answers. What I’ve found in my years of cooking is that you should really do both. Seasoning rubbed onto the roast or chicken before it’s cooking helps to imbue the meat or chicken with flavor, but adding some fresh herbs or spices before serving adds a little spark to the flavors which become a bit stale from cooking in the oven for so long.

The corollary question which folks have asked is about salting meat or chicken. Some folks swear by the brining method of salting a day or two ahead of time. Others say to salt just before cooking. I personally stay away from salt use at all and allow people to salt their meat or chicken on their own when it’s on their plates. For people who want to use salt, though, the answer is that it depends on your taste preference and the type of meat you are cooking. Test kitchen cooks have determined that salting or brining poultry ahead of time really does make for a tastier chicken or turkey. For meats, though, with the exception of lamb, pork and beef don’t receive any benefit from salting ahead of time and often actually makes for a drier piece of meat.

3. What is the best way to season my meat or poultry? Again, you’ll find differing opinions, and in reality, most methods will give you a nice tasting chicken or roast beef. What I have found to be the most flavorful, though, is to make a nice dry rub of seasonings – usually herbs like thyme, oregano, marjoram, basil, rosemary, etc… mixed with black pepper and ground onion and/or garlic powder – and to mix it with just enough olive oil to make a paste and then rub it completely over the roast or chicken.

For a roast beef, I increase the flavor by cutting little slits into the meat and inserting slivers of garlic and/or onion into the slits. This adds flavor inside the meat instead of just outside.

For chicken, I loosen the skin away from the breast and legs and rub the seasoning rub inside the skin as well directly on top of the breast and legs, and I put onions, garlic, and herbs inside the cavity of the chicken. This way you get flavor all around and not just on the skin of the chicken.

A corollary question folks have asked is about butter verse oil: I always use olive oil. One, for folks with dairy allergies, it removes that worry. Two, it’s a healthier oil. Three, you can make a nice rub with it using less than what you’d need for butter.

Having said that, test kitchens have found that using butter can help to keep a chicken moist without the need for basting because it melts as it cooks and seals in the liquids. So, if you don’t have any health or allergy issues keeping you from using butter and like the taste of it, go for it.

4. What type of pan should I use to roast my meat or chicken? The best pan to use for roasting is one that can withstand high and lengthy heat and which just fits your roast or chicken. You don’t want to have a lot of space around what you’re cooking.

People differ on whether you should use a rack or not. I’m a rack person. I have found that if I put my roast on a flat rack and my poultry on a v-rack that the bottoms of the meat and chicken cook more evenly. I do find that I need to grease the racks, though, to make sure the roast or chicken doesn’t stick.

5. What is the best method for roasting meat or poultry? Okay, this is where it gets tricky. The consensus is that there isn’t any consensus. Well-known chefs and test kitchen cooks all differ. Some say you should cook at low heat to keep the meat or poultry from drying out and to keep it moist. Some say you should cook it at a high temperature to cook it more quickly which will prevent it from drying out and will keep it moist. Others say you should do a combination of both.

The fact is that all methods work. It really comes down to the type of texture and flavor you’re looking for. Slow roasting meat or chicken at 275 degrees for several hours gives you a more evenly cooked through piece of meat or chicken with a softer, more falling apart texture. This is a good method is you’re cooking larger, more uneven, tougher cuts of meat or a more mature bird.

Cooking the meat or chicken at 350 degrees for 20 minutes per pound for poultry and pork or 15 to 30 minutes per pound for beef, depending on how rare to well done you like it, gives you a nice flavorful piece of meat or chicken without having to do too much work. This is a good method if you don’t particularly want a crispy outside.

Cooking the meat or poultry at a high temperature of 450 degrees for 45 minutes will cook your roast or chicken quickly and give it it a nice crispy exterior.  This method is particularly nice if you don’t have a lot of time.

Finally, the method which I like best is that you cook your roast or poultry at a high heat of 450, 475 or 500 degrees first and then lower the heat for the rest of the cooking time.  If cooking at 450 degrees, you’ll cook your chicken for 35 minutes or your roast for about 15 minutes and then you’ll lower the temperature to 350 degrees. For a roast, cook the meat 12 to 18 minutes per pound, depending on how rare or well done you like. For poultry, cook for about 8-10 minutes per pound until the chicken is done.

Just an FYI about internal temperatures for poultry and meat: If you want your roast or poultry to be at the correct temperature for eating, you cook them in the oven to a temperature that’s about five to ten degrees lower than the temperature you want because even when you take the meat or chicken out of the oven, it will continue to cook.

6. Should I baste my roast or poultry? That’s really up to you. Basting does help to keep roasting meat and poultry from drying out, but there are pros and cons. On the pro side by basting you ensure that your roast or chicken won’t dry out, it adds to the juices you’ll have for making a nice gravy in the end, and it prevents anything from burning on the bottom of your pan. On the con side, every time you open the oven to baste, you’re letting heat escape which might mess with your cooking, and by keeping the exterior of the meat or poultry moist, it won’t crisp up. As well, basting then requires you to do more because you have to baste every fifteen minutes or so.

I personally add liquid to the bottom of my roasting pan, beef or chicken broth, at the beginning and then halfway through cooking. The broth slowly evaporates as the roast or poultry cooks, allowing some moisture to accumulate in the oven and preventing the roast or chicken from drying out without me having to continually baste. Then just before I’m ready to take the roast or chicken out of the oven, I turn the heat back up to 500 degrees for a couple of minutes to re-crisp the exterior of the meat or poultry.

7. Is there anything special I should do to my roast or poultry before putting it into the oven? That depends on you really. I usually try to cut off some of the fat from my roasts. While it’s true that the fat adds flavor, too much of it isn’t good, so I remove as much as I can and rely on my seasonings for flavor instead.

For chicken, there are differing thoughts. Some folks say you absolutely must truss up the bird by tying the legs together. Others say that allowing the legs to be free helps them to cook more evenly and quickly in time with the breast portion. I’ve done both and haven’t found too much of a difference.

The other part of the bird folks worry about is the wings. Because they’re so small the tips can burn. If you’re cooking with any of the high heat methods, you’re definitely better off turning the tips of the wings underneath the bird so they won’t burn. If you’re slow roasting with the very low heat, I’ve not noticed much of an issue.

8. Should I turn my roast or chicken while it’s cooking? The fact is that rotating your chicken or roast will ensure more even cooking. It allows heat to reach all sides of your meat or poultry and it allows the juices to run from one side to the other. That’s why those spit roasted pigs and grocery store rotisserie chickens taste so good. So, if you are inclined to put in the effort, cooking your chicken breast side down and then flipping it is fine. Turning your roast so all sides face the top at some point in the cooking is fine. The effort will be worth it, but not necessarily so much so that you’ll want to put in the effort.

9. How do I know when my roast or chicken is done? The best method is to invest in a meat thermometer. Poultry should be at an internal temperature of 165 when you insert the thermometer into the breast near the bone. When it’s done the juices should be running clear not tinged with pink, and the legs should be easy to pull away from the breast.

Roasts vary depending on how you like your meat cooked. Most meats are said to be rare when they’re about 120 to 125 degrees in temperature and the temperature goes up by five to ten degree increments for medium rare, medium, medium well and well-done which is about 160 degrees.

10. Should my meat or poultry sit after it’s come out of the oven before serving? The answer to this is an unqualified, “Yes.”  One, it is true that the liquid which has been drawn out to the surface of the roast or chicken while it was cooking will resettle to the center of the meat or chicken as it cools which makes for a moister dish. Two, your roast or poultry will still be finishing cooking, so you want to make sure it does and gets to the proper temperature. If you didn’t pull your roast or chicken out of the oven a little early and let it get to the temperature you wanted for eating, well, then your dish will be overcooked by the time you serve it. So, in that case you may want to start cutting immediately, but remember that it’ll be a bit dryer then.

Cooking Techniques: Custard

website custard

“I want to be custard for Halloween.”

This was my first daughter’s announcement to me one day when she was four.

“Custard?” I said. “I’m not sure if I know how to make a custard costume.” I tried to imagine a bowl around her body and her being the custard, but it wasn’t working.

“It’s easy, mommy. I just need a long tail and spikes and purple wings.”

You can imagine the confused look I had on my face as I processed my daughter’s response. I hadn’t eaten a lot of custards in my lifetime, but I knew they didn’t include tails, spikes and wings.

It took a few minutes of sorting, but I finally figured out that my daughter wanted to be Custard from the Custard, the Cowardly Dragon book. Ironically, making a dragon costume ended up being much easier than trying to construct a bowl of custard for a costume.

When I received a question this week from someone who had read my pudding post, asking about tips for custard, I was reminded of that confusing conversation I had with my daughter so many years ago.

When it comes to custard, there can be just as much confusion, because there can be a  Crème brûlée custard, a pot de crème custard, or finally, crème caramel custard, more traditionally thought of as flan. Crème brûlée is a very rich custard. You use heavy cream and only egg yolks, and you top it with caramelized sugar. Pot de crème usually uses both cream and milk with more egg yolks, making it more eggy than other custards.  Crème caramel is a lighter custard, using whole eggs and in most flan recipes, sweetened condensed milk and evaporated milk mixed together. Flan is usually inverted so the caramel sauce can be on top.

Custard, like pudding, is not difficult to make, but folks don’t usually do so. I don’t make much custard myself but I did make custard with one restaurant I worked for many years ago, and I learned some tips and useful information which are helpful to keep in mind no matter what recipe you find and decide to use for making custard.

Tips for Making Custard

1.  Deciding on the type of custard you want: All custard is delicious, but you need to decide how rich you want it to be. The thicker your “milk” product, the richer your custard, so a soy or coconut creamer works well as a substitute for heavy cream. If you’re going for a lighter custard, you can use “milk” like soy, flax, coconut or rice milk. If you want to make your own sweetened condensed milk, you simply mix about 1/2 cup of a sweetener (sugar, honey, Agave, coconut sugar, etc…) with about 3 cups of coconut or soy or flax milk with a dash of salt and let it gently cook for a long time until the mixture has thickened and reduced in amount. You’ll want to be sure to stir it every so often so it doesn’t stick to the pan and burn.

The other consideration besides richness is how tender you want the custard to be. Generally the greater amount egg yolks you use, the more tender the custard will be. A crème caramel or flan is able to be inverted because it’s a very sturdy custard due to the use of egg whites in addition to the yolks. If you use only egg yolks, your custard will definitely be a bowl-type of dish. If you are allergic to eggs, you should make pudding instead. You’ll find recipes which say they are “eggless custard”, but eggless custard is basically pudding.

The final consideration is what type of sweetness you want to your custard. A crème brûlée is the sweetest to taste because you caramelize the sugar into a crisp coating on top which tingles the taste buds as you bite into the custard. A pot de crème’s sweetness is in the custard itself, and the flan gets a light sweetness from the caramel sauce.

2. Deciding how to make the custard: There are basically two methods to making custard. The first is thickening the custard on the stove-top and then solidifying it in the refrigerator, similar to the method used for pudding. The second is to bake the custard in the oven before cooling it in the refrigerator.

If you make the custard on the stove, you should use a double boiler or stack one pan on top of another. By cooking the custard over boiling water, you eliminate the threats of burning and curdling and allow the custard the time it needs to thicken slowly.

Some good tips: If you warm your “milk” or “cream” in the microwave for a minute or two before beginning to cook your custard, you’ll greatly decrease the amount of time you need to thicken the custard. This is similar to what older custard recipes are calling for when they tell you to “scald the milk”.

When your recipe tells you to add your “sugar” to the egg yolks, whether you use sugar, agave, honey, coconut sugar or whatever, be sure to add the sugar slowly while you are constantly stirring the yolks. If you don’t, the sugar will clump up into your yolks and not be smooth.

When your recipe tells you to add the eggs to the hot milk mixture, always, always temper the eggs first. This means that you take a little bit of your hot milk mixture and slowly whisk it into your eggs first. Then you add the eggs slowly, whisking all the time, back into the milk mixture. By tempering you help to even the temperatures between the eggs and the hot milk so your eggs don’t start to cook when you add them to the milk.

If you decided to bake your custard, you should do so in a warm water bath. This means putting your custard dish into a larger pan with warm water so the custard will cook more evenly.

There are a couple of methods for doing a water bath. You can bring water to a boil, let it cool slightly and add it to your pan around the custard dish, or you can fill your pan with water and put it into the oven when you’re preheating it so it’ll be warm by the time you put your custard dish into it. I prefer the second method because you reduce your risk of spilling hot water on you because you aren’t pouring boiling water or moving a pan with hot water into the oven. The pan is already on the rack, so you’re simply placing the custard dish down into the water filled pan.

A tip for baked custard: I have found that even though most baked custards simply have you mixing the ingredients and then baking, I’ve learned that if you follow the stove top method of thickening the custard before you put the custard into the oven to bake, you get a tastier, creamier baked custard.

Also, if you’re looking for a smoother custard, straining the custard through a sieve before putting it into your pan to bake will help.

Finally, as with pudding, if you put a layer of plastic wrap directly on top of your custard while it’s cooling in the fridge, it prevents that little layer of thickening skin on top.

Pumpkin Custard

Because I was talking about the custard email with my family, my middle child asked if I could make pumpkin custard. Below is the recipe I created. Since I didn’t want to use sugar, I created a topping that has some fiber but also the sweetness you’d get from a caramelized sugar. The hardened topping makes a nice contrast to the soft custard.

Ingredients:

8 eggs

1/2 cup coconut sugar

1/2 cup agave

4 cups pureed cooked pumpkin (canned is fine)

1 tsp dried orange peel

2 tsp cinnamon

1 tsp nutmeg

1/2 tsp ginger

1/4 tsp cloves

1/4 tsp salt

3 cups “milk” (flax, soy, rice, etc…. for richer custard use soy or coconut creamer)

4 tbsp “butter” (I use Earth Balance soy free version)

2 cups gluten free quick oats

1 1/2 tsp cinnamon

1 tsp nutmeg

1/2 tsp ground coriander

1/2 cup agave

Cooking Instructions:

1. Fill a 4 inch high pan with tap water about half filled.  Put the pan into the oven and preheat the oven to 300 degrees.

2. Fill a pot half full of water and bring to a boil. Be sure you can safely place another pot snugly on top of this pot to act as a double boiler.

3. Beat the eggs well. While whisking continually, add the coconut sugar and agave.

4. Mix the pumpkin, the eggs, orange peel, cinnamon, ginger, nutmeg, cloves and salt. Set aside.

5. In a microwave safe bowl, heat the milk one minute. Stir. Then heat another minute.

6. Pour the milk into the top pan of the double boiler, and cook until the milk begins to bubble slightly around the edges, stirring occasionally. This should only take a couple of minutes since you’ve pre-warmed the milk.

7. Slowly pour 1/2 cup of the hot milk into the pumpkin-egg mixture, whisking constantly. Do the same with a second 1/2 cup of milk.

8. While stirring with a whisk, slowly add the pumpkin-egg mixture into the remaining hot milk. Stirring continually, cook until the custard begins to thicken. This should only take another couple of minutes. When it’s thick, the custard will stick to the back of a wooden spoon.

9. If desired, strain the custard through a sieve or simply pour into a 2 quart heatproof casserole dish.

10. Gently and carefully place the custard dish into the hot pan of water and bake for 50 minutes.

11. While the custard is baking, make the topping by melting the “butter” in a saucepan and adding the oats. Stir well and cook for 5 minutes, being sure to stir every once a while.

12. Add the agave and cinnamon, nutmeg and coriander, and cook another 5 minutes, stirring frequently. The topping will darken and begin to clump together.

13. After the custard has baked 50 minutes. use two spoons to gently drop spoonfuls of the topping onto the top of the custard. Bake for another 10 minutes.

14. Turn the oven to broil and broil for 2 to 4 minutes, watching so that your topping doesn’t burn. You just want to harden it a bit to a dark golden brown.

15. Cool the custard for at least 15 minutes on a cooling rack before putting into the refrigerator to solidify.

16. To serve, bring the custard to room temperature or slightly warm it in the oven at low temperature.


Cooking Techniques: Stuffed Cabbage

OLYMPUS DIGITAL CAMERA

How do you feel about cabbage?

I was a Freshman at Amherst College, speaking on the phone with the mother of a host family who had invited me to dinner. Since I had never met her, I wasn’t sure if she was asking me if I liked to eat cabbage or whether she was waiting to deliver the punchline for a joke.

“Um…,” I said.

Apparently she was skilled at interpreting monosyllabic responses, because she replied, “Oh, sorry. You’re probably wondering if this is a joke, but we like cabbage, and I was thinking you might because you’re Korean, but I didn’t want to presume.”

I was able to assure her, that yes, I did indeed eat and like cabbage, and I went on to have a very lovely dinner at their home later in the week which included a wonderful cabbage soup as the part of the meal.

I was reminded of this experience early this week when I received an email on my pajama living gmail account: “How do you feel about cabbage for company?”

Cabbage is one of those foods which people seem to either love or hate, like brussel sprouts. There’s something about the smell and color (regardless of which variety – green, purple, white) which tends to put some people off. Cabbage, however, is a wonderful vegetable to incorporate into one’s diet, rich in vitamins, folates, and fiber, but also extremely versatile.

I’ve noticed that here in the United States people think of cabbage only in relation to cole slaw, Chinese egg rolls or corned beef and cabbage, but there are many, many ways to eat and prepare cabbage, including soups, entrees, salads, and sautes.

So, I responded to the email in the affirmative: “Cabbage is lovely to serve to company.” I did, however, indicate caution: “Just make sure whomever you’re serving either likes to eat or is willing to try cabbage.” I then sent a recipe for stuffed cabbage which my family likes to eat, which I’m going to talk about below.

If you’ve never had stuffed cabbage, you really ought to try it. Not only is it delicious, but you can change it up to fit whatever you actually have in your fridge.

Some tips:

1. Choosing cabbage: Don’t limit yourself to just the standard green head of cabbage. Try red, Napa, Savoy, Bok choy, etc…. Napa and Savoy have milder, sweeter flavors and are a more tender leaf cabbage. Bok choy and red cabbage have slightly thicker stems and a heartier flavor. All are wonderful for stuffing.

2. Preparing the cabbage: There are a variety of ways to prepare your cabbage for stuffing. It really comes down to preference, I think.

Some chefs recommend wrapping your cabbage in plastic and microwaving it in a bowl until the outer leaves are soft and pliable. I’m not so fond of the idea of cooking anything in plastic, though, and it means you have to keep removing the outer leaves and repeating the process several times to get all the leaves you want.

Others recommend removing the leaves you want to cook and cooking them in boiling water until they’re soft and pliable. This method is actually fine, but I find that the leaves get a little water-logged and I have to then dry them which takes time and uses up my paper towels or adds more kitchen towels to my laundry for the week.

So, the method I prefer is: I bring a pot of water to boiling. Then I core a cabbage but keep it whole and put the entire cabbage into the pot of boiling water. I boil it for six to eight minutes with the lid on and then remove the entire cabbage to a strainer to drain and cool for a few minutes. Then I’m able to simply peel off the leaves one at a time as I need them, and whatever is leftover is still intact for me to use for another recipe.

One final method that people sometimes use: Wrap the cabbage tightly and freeze for a day. Defrost it. The leaves will be soft and pliable.

3. Preparing a filling: Fillings are fun. You can do whatever you want. Do you like ground meat? Only vegetables? Rice? Bread crumbs? Chicken? Ham? Sausage? Anything and everything can be a filling for stuffed cabbage. You can suit the stuffing to your taste, or like me, it simply depends on what is in the house on hand for me to use.

The key thing to remember is that whatever you use should be cooked first, though. Don’t put raw ground beef or raw vegetables into the filling. Brown or cook your meats, and saute your vegetables. If you want rice, use cooked leftover rice from another meal. I’ve seen recipes which tell you to use converted rice or raw vegetables, and they really don’t cook up well in my experience. Some recipes even use raw meat, which does cook but then the juices from the raw meat run out of the cabbage into the sauce, leaving something to be desired for the texture and the taste.

The second thing to keep in mind is the seasoning. How you season it will depend on what flavor you have in mind. Do you want an Italian style stuffed cabbage with ground meat? Then you’ll want to use garlic and onions and herbs like oregano and basil. Do you want an Asian style stuffed cabbage with rice? You might then prefer to use coriander and ginger. Do simply want the taste of your filling to come through? Just use some salt and pepper.

4. Preparing a sauce: Stuffed cabbage can be prepared with a variety of sauces – a tomato sauce, a sweet and sour sauce, a lemon-egg sauce, a soy sauce. The list is endless. It depends on the taste you’re going for – Asian, Greek, Italian, etc….

What you should keep in mind is that no matter what type of sauce you use, it’s always best to coat the bottom of your pan with some as well as pouring the sauce over the top.  That way the flavor seeps from both sides into the cabbage rolls. I also usually use some of the sauce in the filling mixture as my moist binder.

5. Cooking the cabbage rolls: You’ll find a variety of ways to cook the cabbage rolls. You can cook them on the stove top in a single layer, but you need to make sure to watch them carefully so they don’t burn and stick to the bottom of the pan. You’ll need to keep the pot covered for even cooking.

You can cook them in a slow cooker over the entire day, which is something I like to do. Just be sure to layer the rolls alternately in your layers so there are good gaps for the heat to generate around all the rolls and so the sauce can seep down between the layers.

You can bake them in the oven, which I also like to do. Just be sure to cook them first covered with foil for about 45 minutes so the cabbage leaves will soften. Then remove the foil for the last little bit of cooking so your sauce will thicken a bit.

Sweet and Sour Stuffed Cabbage

Ingredients:

Head of cabbage, 18 leaves

Two 14.5 oz cans of no salt, no sugar diced tomatoes

One 6 oz can of tomato paste

3 tbsp apple cider vinegar

1/3 cup coconut sugar

2 tsp olive oil

3 cups finely diced or 2 cups pureed vegetables (zucchini, squash, carrots, peppers, mushrooms, your choice)

1/4 cup chopped onions

2 tsp minced garlic

1/2 tsp ground black pepper

1 tsp ground ginger

1 tsp roasted or regular ground coriander

1 tsp cinnamon

2 packed cups of finely diced ham (1/4 inch) (16 oz)

3 loosely filled or 2 packed cups of cooked brown and wild rice (16 oz)

Cooking Instructions:

1. Bring a pot filled with enough water to cover the cabbage head to boil.

2. Core the cabbage and put the whole head into the boiling water. Cover and boil for six to eight minutes.

3. Remove the head of cabbage to a strainer and allow it to drain and cool.

4. In a food processor, puree the diced tomatoes with the tomato paste, cider vinegar and coconut sugar.  Remove one cup to use in the filling. Set the rest aside.

5. Heat the olive oil in a  pan over medium-low heat. Saute the vegetables with the onions, garlic, pepper, ginger, coriander, and cinnamon until they are soft and most of the water has evaporated off, about three to five minutes.

6. Put the vegetables into a bowl and mix well with the chopped ham, rice, and one cup of sweet and sour sauce.

7. Remove 18 leaves from the cabbage, and trim the thick part of the center ribs so the cabbage leaves are flatter all around.

8. Preheat the oven to 350 degrees.  Put about one cup of your sweet and sour sauce on the bottom of a 9 x 13 pan.

9. Scoop 1/3 cup of the filling into each leaf. Pull the edge of the cabbage leaf that was closest to the core over the filling and wrap the sides in over the edge. Then pull the opposite edge of the leaf over the sides. Essentially you’re making an envelope for the filling.

10. Place the cabbage roll seam side down into the prepared pan. You can make three rows of six in a 9 x 13 pan.

11. When all 18 cabbage rolls are completed, cover the rolls with the remaining sauce and cover the pan tightly with foil.

12. Bake the rolls in the oven for 45 minutes. Remove the foil, and finish cooking for another 15 minutes.

Cooking Techniques: Leftover Makeovers

website leftovers

There are risks, and then there are risks.

I recently read an article about people who like to ski on mountains with risks of avalanches. The article detailed the number of deaths from such risky skiing but then went on to talk about the numerous devices now available to skiers in the event of an avalanche. I couldn’t help but wonder about the type of people who would willingly ski on a mountain that requires you to carry a tracker in your pack in case someone needs to locate you underneath a mound of snow; to carry special poles which allow you to dig in case a friend is trapped underneath snow; and to strap an inflatable device to your backside with the hopes that in the event of an avalanche, you might be able to “ride” the avalanche out instead of being killed by it.

It occurred to me, though, that several friends have made similar comments about me with respect to my cooking. They have wondered aloud to me about what type of person willingly makes recipes up on the spur of the moment for company, using whatever leftovers she has in her fridge and not knowing whether the food will actually be edible or not. For some of them, that is risky behavior they are not inclined to follow.  When a friend asked such a question of me the other day, I knew it would have to be a topic for our series on cooking techniques.

The fact is that turning leftovers into a scrumptious meal for company or the family is not risky behavior. It’s being creative, and being creative is easy if you know where and how to begin.

Techniques for utilizing leftovers:

1. Make soup: Meat, beans, vegetables, fish, pasta, rice, potatoes, anything actually, can be turned into a good soup. If you have leftover vegetables, puree them with garlic, onions, black pepper, and herbs of your choosing, and add a fat free, no salt broth of your choosing to the consistency you like. Warm, and serve with assorted garnishes of choice like shredded low fat cheese or crushed croutons or chopped chives or sliced turkey bacon. Your guests will never know you were using leftovers.

If you have a little of this and a little of that leftover from a variety of meals, chop everything into bite size pieces and throw it all into a slow cooker. Don’t worry that you’re mixing a Mexican dish with an Italian one. Add a can of no salt, no sugar diced tomatoes and broth of your choosing with dried herbs and black pepper, and let it cook all day. You’ll be surprised at how tasty the soup is. If you don’t have quite enough leftovers, you can always add some thawed, frozen vegetables or a can of no salt, no sugar beans. Your soup will be a minestrone of sorts which your guests will thoroughly enjoy.

2. Make egg dishes: If you have a small amount of leftovers, you can chop your leftovers, place them into a greased pan, mix eggs with some “milk”, herbs, onions, and black pepper, pour over the chopped leftovers, and bake for a straightforward egg bake. For an egg bake, your eggs to leftover ratio is such that you have more eggs than leftovers.

If you have a large amount of leftovers, you can make a timbale or souffle. A timbale is similar to an egg bake because you use beaten eggs and milk, but your ratio of eggs to leftovers is such that you have more leftovers than egg mixture. Instead of pouring the mixture over your leftovers, you want to puree the leftovers and mix your egg mixture into your leftovers before spreading the mixture into a greased pan.

For a souffle, you separate the eggs, mixing the egg yolks into the pureed leftovers.  You then whip the egg whites until they are stiff and gently fold them into the leftovers before putting them in a pan to cook. I’ll be doing a post on souffles soon since people seem to think they’re difficult when they’re really not, and they’re wonderful to serve for company.

3.  Make enchiladas: Just about any type of meat, bean, fish, quinoa, or vegetable can become a filling for enchiladas. Simply finely chop your leftovers, add cumin and cilantro and salsa, add your type of “cheese” and scoop the mixture into your favorite wrap, whether it’s a corn, whole wheat, gluten free spinach or other type of tortilla. I make an enchilada sauce by combining tomato soup, salsa, garlic and cumin which I pour over the top of the enchiladas and then cover with “cheese”. One of my kids favorites is when I use leftover quinoa mixed with leftover black beans and vegetables.

4.  Make pasta salad: Any leftover meats, beans and vegetables go well with pasta. Just decide whether you want a cold salad or a warm one. If going with cold, make a marinade of olive oil, lemon juice, garlic, onions, black pepper, and ground mustard where the lemon juice is half your amount of olive oil and the rest is to your taste preference. Mix your leftover with your pasta of choice and blend well with the marinade. The salad should be in the fridge for at least an hour or two for the flavors to meld, but then let it sit for 30 minutes to come to room temperature for serving.

If making a hot pasta salad, decide on the type of sauce you’d like. A white sauce? A tomato sauce? A pesto sauce? A cheesy sauce? It depends on the type of leftovers you have. If it’s just vegetables leftover, any type will go well. Anything with ground meat or beef or pasta tends to go well with a tomato sauce. Chicken and turkey or ham goes well with a white or cheese sauce. Make your chosen sauce, mix your leftovers with your pasta and the sauce and pop the entree into the oven to warm, usually about thirty minutes.

5.  Make rice dishes: Leftover meat, vegetables, fish and beans are great with rice. If you have meat like sausage, chicken, seafood and vegetables leftover, make a jambalaya or paella.  Both are simply rice, broth, tomatoes and spices mixed with meats, seafood and vegetables, so they’re a great way to utilize leftovers.

You can also make a stir fried rice. Take whatever leftovers you have, chop them into bite size pieces, and stir fry them in a little sesame oil just until warm. Add them to cooked rice and stir fry a little more with garlic, soy sauce to taste and onions.

Or you can make a rice casserole. Two types I like to make are a rice parmagiana where I mix the leftover meats and vegetables with rice and beaten eggs and layer the rice mixture alternately with slices of tomatoes and mozzarella “cheese” and bake in a greased pan until golden brown and crispy around the edges, about thirty minutes.

The other way is to make a nice “cheesy” white sauce or a curried white sauce which I mix into rice and the leftover meat or seafood and vegetables and bake in the oven until warm. The curried rice dish is always especially well-liked.

The final way to utilize leftover rice and meat or seafood and vegetables is to make rice muffins. Mix everything up with herbs and black pepper. Beat some eggs and mix them into the rice and leftover mixture, and evenly distribute them among greased muffin tins.  Bake until warm and browned.

6. Make pies: Pot pies and shepherd’s pies are great ways to revamp leftovers. Chop leftover meats and vegetables into bite size pieces. For a pot pie, heat two tbsp of olive oil and stir in 1/4 cup of chosen flour.  Slowly add 2 cups of a chosen broth, and stir until the broth thickens. Add herbs and black pepper and pour over the leftover meat and vegetables. Spread into a pan and top with a biscuit or crust recipe of your choosing. and bake until the biscuits or crust are golden and the pot pie is bubbly.

For a shepherd’s pie, chop the leftovers into bite size pieces and mix them with your favorite tomato soup. Spread into a greased pan and top with mashed potatoes (shepherd’s pie is great to make when you already have leftover mashed potatoes) and a layer of cheddar “cheese”.  Bake until warm and bubbly.

7. Make chili: Throw all the leftover meat and vegetables and beans into a slow cooker. Add tomatoes and chili peppers or spices and garlic and onions and more beans if needed, and just let it simmer all day.

8. Stuff something: If you puree leftover meats and vegetables and beans and add “cheese” and sauteed bread crumbs of your choosing, along with herbs, garlic, and onions, you have a wonderful filling for stuffing mushrooms or eggplants or zucchinis or peppers or squash or anything else you can stuff.

9. Make “cakes”: Finely chopped leftovers mixed with bread crumbs, spices, and beat eggs can be made into seafood or meat and vegetable cakes. Let the mixture meld in the fridge for half an hour, and then form into little patties which you can bake in the oven or fry on the stove top.

10. Make mac and cheese: When all else fails, make your favorite baked macaroni and cheese but add chopped up leftover meat and vegetables before baking. It adds a little something to your mac and cheese as well as extending the amount to accommodate a lot of guests.

Luncheon Rice Dish (made with leftovers)

Ingredients:

2 tbsp olive oil

1/4 cup flour of choice

1 1/4 cup milk of choice

1/2 cup fat free reduced salt chicken broth

1/4 cup white cooking wine

1/2 to 2 tsp curry powder, depending on how much you like curry

1/2 tsp black pepper

2 1/2 cups finely chopped leftover ham, chicken and vegetables

2 to 3 cups cooked brown rice, depending on the ratio of rice to leftovers you want

Optional: cheddar “cheese” of choice

Cooking Instructions:

1. Preheat the oven to 350 degrees. Lightly grease a casserole dish.

2. Heat the olive oil in a saucepan over medium-low heat. Whisk in the flour and brown for a minute.

3. Slowly add the milk and broth. Whisk until the flour is completely mixed in, and cook, stirring constantly, until the mixture has thickened.

4. Add the wine, curry powder and black pepper.

5. Mix the chopped leftovers with the rice and the sauce.

6. Pour into the prepared pan and if using, top with the cheddar “cheese”. Bake for thirty minutes until the entree is warm and bubbly.

Cooking Techniques: Omelets

OLYMPUS DIGITAL CAMERA

“Do I look like a ma’am to you?”

I was 15 and working at a military base Burger King.  I asked a woman, “Ma’am, would you like cream and sugar in your coffee?”

“Ma’am?” she asked. “Ma’am? Do I look like a ma’am to you?”

At 15 I didn’t understand what I had said to make her so upset, but fast forward fifteen years later….

I had been out shopping, using the gift cards I had received for my 30th birthday.  Arriving home, I dropped my bags on the floor and slumped into the nearest kitchen chair.

“What’s wrong?” asked my husband.

“What’s wrong? I’ll tell you what’s wrong.  Pimply-faced teenage clerks kept calling me ma’am.  Do I look like a ma’am to you?”

As the words slipped from my mouth, that woman’s face from fifteen years earlier swam before my face. I had one of those “ah-ha” moments where everything is so clear that you wonder how you hadn’t realized it before.

Those ah-ha moments come in all sorts of situations. I still remember my first cooking “ah-ha” moment. I had taught myself at a young age to make omelettes. I had the basic principles down – mixed eggs; setting the eggs to form a base for the meat and/or cheese and/or vegetables; and folding. My omelets, however, lacked a certain something. They were flat, and quite often they broke when I folded them over. I wanted thick, fluffy omelettes which would hold the filling and provide a good  egg to filling ratio.

One weekend, as a teenager, my parents took me to a conference where the breakfast buffet included the chef making fresh omelettes for the guests right at the table. As I watched him, everything I had been doing wrong became clear.

I was reminded of this particular ah-ha moment this past week when my middle child wanted me to teach her how to make omelettes, so for this post, we’ll look at omelette technique.

Figuring Out Omelettes:

1. Eggs alone verses eggs and liquid: My grandmother always told me that she put water into her eggs because they made them fluffier than putting milk, and if you google omelettes and scrambled eggs, you’ll find “advice” on all sides of the issue. After experimenting, I have not found that adding milk or water affects the fluffy factor at all. Adding any type of liquid simply makes your eggs more “liquidy” and less “eggy”. Whether you add liquid or not is really a taste preference: Eggs blended on their own will be a little dryer. Water added will make for thinner but slightly moister eggs. Milk adds some flavor as well as moisture. Cream makes for a richer omelette. If you do add water or milk or cream, though, don’t add more than 1 tbsp per egg, because too much liquid will only cause liquid to separate out from your eggs.

2. Low heat heat verse higher heat: I always cooked my omelettes over low heat because I feared burning them while I was waiting for them to set, but the chef I watched made his omelettes over a medium-high heat. If you google the subject, you’ll once again find many differing opinions. The one consensus among the opinions and my own experience is that you shouldn’t ever cook eggs over high heat. It doesn’t give the eggs time to set properly, and if you’re not watching like a hawk, they will burn. After experimenting, I’ve found that starting the omelettes on a medium-low heat and turning down the heat to low actually works best for cooking an omelette more quickly while also setting it without burning it.

3. Setting the eggs: I had always set my omelettes by cooking the blended eggs over low heat with a lid on top. This worked well, but it made for a very flat omelette which wasn’t very solid nor was it fluffy. Watching the chef that day, however I realized that he knew the secret. You have to create layers to your egg. To do so, you bring the liquid egg sitting on the top to the more solid bottom part of your egg.

How do you do this? When you pour your egg mixture into your pan, within a minute, it will start to set around the edges. Just it begins to set, you gently lift a sold edge of the omelette and tilt your pan so that the egg that hasn’t solidified can run underneath your omelette. You keep doing this around different parts of your edge until no more eggs will run down underneath. What this does is to create depth to your omelette which makes the omelette thicker and fluffier and more stable for your filling.

4. Pan size and type: Once again, people have a lot of opinions about what you should use for cooking omelettes. The only two things you really need to know are: 1) No matter what type of pan you use, it should be one that your eggs won’t stick to. That doesn’t necessarily mean a nonstick pan. It just means that you need to grease your pan well. I normally put a tsp of olive oil into my pan and make sure I spread it all around the pan, including up the sides. 2) Your pan should be properly sized. A omelette made with two eggs or equivalent should not be cooked in a pan larger than 6 to 8 inches wide. The larger the pan, the more your eggs will spread, and the thinner the omelette will be. Similarly, if you’re making an omelette to share and are using four eggs, you want your pan to be 9 to 10 inches wide so you’ll have proper heat distribution and enough egg space for your filling.

5. Fillings: Few people make omelettes plain with nothing in them. If they want their eggs plain, they simply scramble them. Omelettes are specifically designed for filling, even if it’s simply with cheese. A couple of tips for really good omelettes: 1) Since an omelette usually cooks in about 3 to 5 minutes, if you want your filling to be warm, you should saute them first. I like to saute chopped mushrooms, broccoli, peppers and spinach. My husband likes to saute chopped ham. Whatever you prefer, if you saute the meat or veggies for a minute or two, they’ll be warm and you can season them with the spices and herbs you like for added flavor. 2) If using cheese, shredded is always best. You want something that will melt quickly just from the heat of the folded over egg. About a tablespoon of shredded cheese or cheese substitute for a two egg or equivalent omelette is good.

6. Flavoring: Most recipes for omelettes simply use salt and pepper, but for really good omelettes you should always consider adding herbs or spices, and for health reasons, omit the salt. I make my omelettes with black pepper, chopped chives and paprika. My oldest likes to make hers with cumin. One friend of mine swears by thyme. Another believes only oregano and basil should allowed in an omelette. Experiment and see what flavors you prefer.

Okay, for a recipe. Here’s how I make my omelettes these days:

Omelette

Ingredients:

olive oil (2 tsp, divided)

fillings (meats and/or veggies), about 1/4 to 1/2 cup worth, chopped

seasonings for the filling (pepper, herbs, spices)

two egg whites or 1/4 cup liquid egg whites

one whole egg

1 tbsp flax milk (or whatever you prefer)

ground black pepper (a pinch, about 1/8 tsp)

chopped chives (a good sprinkle, about 1 tsp)

paprika (a dash, about 1/4 tsp)

1 tbsp of shredded Daiya cheddar “cheese”

Cooking Instructions:

1. Spread 1 tsp olive oil in a pan and heat on medium-low.

2. Chop vegetables and meat into small pieces and saute in the pan with seasonings like pepper, oregano, basil, onion powder, whatever, just until the vegetables begin to soften and meats are warm.  Remove from the pan and set aside.

3. Re-coat the pan with another 1 tsp olive oil and warm over medium-low heat.

4. Whisk with a fork: the egg whites, whole egg, flax milk, pepper, chives, and paprika until well blended.

5. Pour the eggs onto the hot pan and let the edges begin to set. Should do so pretty quickly. Once setting begins, lower the heat to low.

6. Using your spatula, gently lift a solidified edge and tilt your pan so some of the liquid egg runs down underneath. Do the same with an edge side opposite the one you just did and continue until your liquid eggs are gone. This will only take a minute.

7. Add your filling to one side of the omelette, and add the shredded cheese on top.  Using a spatula fold the empty side of the egg on top of the filling. Turn the heat off and cover the omelette with a lid for about 30 to 60 seconds.

8. Remove the lid and slide the omelette onto a plate to enjoy.

*NOTE:  If I’m serving omelettes for company, I make three to four, but instead of putting all the cheese and meats into the omelettes, I keep some back for the top. I make the omelettes and then lay them side by side in an ovenproof dish. Then, I sprinkle the remaining cheese and meat on top of the omelettes, sometimes adding thinly sliced tomatoes and spinach leaves on top as well. After I put the dish into the oven at 170 degrees which not only melts the cheese but keeps the omelettes warm until we’re ready to eat.

Cooking Techniques: Crab Cakes

website crab cakes

Proceed to Rte 2.  Proceed to Rte 2.

Until recently, I had traveled the old-fashioned way: Jotting down directions on a piece of paper which I figured out using a map. This past year, however, my father gave us a GPS, which I have been using whenever I’m going someplace new.

For the most part, the GPS has been very helpful. I enjoy no longer trying to look at written directions and drive at the same time.  I appreciate that the “woman who lives in the GPS” tells me exactly when to turn and in which direction.  I have fun with the kids as we laugh when the GPS tries to phonetically pronounce New England towns which are never pronounced as they are spelled.

The other day, though, I was driving to a new destination which I knew I’d need to take Rte 2 to find.  The GPS, however, seemed to believe I wasn’t actually on Rte 2 itself.  The little arrow which indicates where you are had me off to the side of Rte 2.  So, for the next ten minutes, I listened as the poor woman in the GPS valiantly tried to get me onto Rte 2.  At every intersecting road, she would tell me to turn in a direction which would supposedly get me back to Rte 2.  Finally, as those intersections ceased to exist, the poor GPS simply continued to say over and over again, “Proceed to Rte 2.  Proceed to Rte 2.”

I confess, I was torn between feeling quite sorry for the machine and being frustrated with the absurdity of technology.  On the one hand, the machine was only doing what it was programmed to do – get me onto the correct route. On the other hand, with all our technological advances, someone hasn’t figured out how to correctly input the longitude and latitude of Rte 2?

These similar feelings were aroused when a friend of mine called last week about her crab cakes. She wanted to impress some dinner company, and the recipe she had found online wasn’t working.  On the one hand, I felt terrible for my friend who was doing her best to make a nice dinner.  On the other hand, I was frustrated by the number of recipes which are published which don’t actually work well.

So, for this post of our continuing adventures in cooking techniques, we are going to focus on crab cakes. I realize some folks will have shellfish allergies and never actually make crab cakes, but the fundamental principles also apply if you want to make a vegetable panccake instead.

Some problems with crab cakes:

1. If you try to make crab cakes, you quickly realize that trying to keep the crab in an actual cake or patty shape without the crab cakes falling apart as they cook can be difficult.  So, the key to helping with this problem is in how you make the crab cakes.

I have found that doing two things in conjunction with each other works best. First, mix all your binding ingredients together before adding them to the crab. Whatever you’re using – cracker crumbs, bread crumbs, cornmeal – mix that up with your eggs and herbs and liquids first and let it sit for a few minutes.  Then, mix the binder into your crab pieces.  You’ll need to take a few minutes to incorporate the binder well, but it’s worth those few extra minutes to do so.

The second thing to be done is to chill your crab cake mixture before forming the crab cake patties.  Chilling allows the ingredients to better meld with another so that when you form the patties, they’ll hold together better. So, after you make your crab cake mixture, cover it well with plastic wrap or foil and let it rest in the fridge for a little bit.  I find that fifteen minutes is really the minimum you should keep it in the fridge.  I usually opt for about 30 minutes.  You will find recipes that suggest an hour or two.

2. Another potential problem with crab cakes is the taste. People differ on their expectations about crab cakes. Some folks like the cakes to have a strong flavor of something other than crab so you’ll find recipes which use mayonnaise and mustard which make for a heavier taste. Other folks prefer the taste of the crab to come through and would rather use just some herbs. For my friend, the recipe she found was heavy on the mayonnaise, and she didn’t really like it. If you’re trying to compromise, you can do what I do which is to make a lighter crab cake with lemon juice and herbs and accompany it with a nice remoulade sauce which is essentially mayonnaise with herbs and seasonings.

Folks also differ about the type of crab to use. Fresh is said to be the best, and I would agree. Unfortunately budget limitations and availability of fresh crab can limit the opportunity to use fresh. I personally use frozen or canned crab meat. This time of year (winter) it’s usually canned. While you lose some of the texture and taste of fresh crab, you can still have great tasting crab cakes, so do what works for your budget and what’s available for you to purchase.

If using frozen, though, make sure thaw the crab pieces first, and if using canned, be sure to drain the crab pieces.

3. The final potential issue with making crab cakes is how you cook them. Recipes vary from deep frying to cooking them in the oven. It really comes down to preference and health issues. If you are trying to eat healthy, then baking the cakes in the oven is the best, but you will find that the flavor is lacking a bit. What I do is to put a teaspoon or two of olive oil in a bowl and lightly brush the olive oil on the top of the crab cake; then halfway through the cooking time, flip the cakes and do the same with the other side.

For my preference for cooking crab cakes, I cook them on top of the stove in a pan lightly coated with olive oil. This works well and is quicker than cooking the crab cakes in the oven.

If you do choose to deep fry the crab cakes, the key is to have hot oil, 350 to 375 degrees, so you can fry them quickly which reduces the amount of oil the cakes absorb.

So, for a recipe that I use:

Crab Cakes

Ingredients:

1 tbsp dried dill

2 tbsp chopped chives (dried or fresh)

2 tbsp lemon juice

1/2 tsp ground black pepper

1/2 cup liquid egg whites

3/4 cup gluten free bread crumbs (whatever you’d prefer)

24 ounces of crabmeat (six 6 oz cans will give you 24 oz of meat)

Cooking Instructions:

1. Whisk the dill, chives, lemon juice, black pepper and egg whites together.

2. Add the bread crumbs and mix well.  Let sit for a few minutes.

3. Drain the crabmeat and put into a bowl.  Add the breadcrumb mixture and combine well.

4. Cover the crabmeat and refrigerate for at least 15 minutes, 30 if you have the time.

5. Form the crabmeat mixture into patties. (I use a 1/4 cup measuring cup to scoop out the crabmeat so my patties are uniform.) Loosely and lightly pat the crab cakes into shape.

6. Coat the bottom of a nonstick skillet with about 1 tsp of olive oil. Heat to medium-low.

7. Place the patties onto the skillet and slightly flatten them. Cook for 4 to 5 minutes until the side is browned.

8. Flip the crab cakes and again slightly flatten. Cook for 4 to 5 minutes until the second side is browned.

9. Serve with remoulade sauce.

Remoulade sauce: Mix 1/2 cup mayonnaise (I like to use a reduce fat olive oil mayonnaise.) with 2 tbsp finely chopped green onions, 1/2 tsp ground mustard, and 1/2 tsp Old Bay seasoning.  Add lemon juice until the sauce is at the consistancy and lemony flavor you like. (I usually use about 3 tbsp.) Put it into the fridge for the flavors to meld while you’re cooking the crab cakes.

Cooking Techniques: Puddings

website pudding

Diaper boxes.

When my oldest was a toddler, she loved to play with other people’s toy kitchen sets. I wanted her to have one of her own, but all our money was going toward our first home and diapers.

One day I looked at the number of Costco diaper boxes piling up in the basement and realized just how sturdy those boxes actually were. I had a brainstorm. Maybe I could make a kitchen set using those boxes.

If you had asked me before that day whether I was capable of even thinking up such an idea, let alone following through with it, I would have said, “No way!” Growing up, my best friend was the artsy, creative one. I was the math and science nerd. I didn’t “do” crafts.

As life often proves, though, necessity can breed skill. My daughter loved to play “cook”, and I was going to make it happen for her. Using the diaper boxes, duct tape, and contact paper, I created a complete kitchen for her which included a stove, a fridge, and cabinets. I even added a diner style counter with a cash register to go with it.

That kitchen set lasted us for years, and my daughter loved it. And other people loved it, too. I got so many compliments on that set that, to this day, I am still amazed by what I accomplished.

I share this because recently folks have been telling me that they’re not capable of revamping their recipes like I do; but if I can create a kitchen set out of diaper boxes, folks can most definitely learn how to accommodate their food needs. And I’m going to help folks do it!

For the next several posts, I’m going to focus on technique, specifically the “how-to’s” of certain dishes with special reference to making them healthier and allergy friendly. For today’s post, we’ll look at puddings, because someone recently wanted to know how to make it.

Puddings are ridiculously simple, but people rarely make it homemade. They think it’ll take too much time or that they’ll mess it up. Neither is true. There are, however, some tips to keep in mind.

1. Make sure your recipe is a good one. Don’t just presume that because it is online or in a recipe book that it actually is correct. For some reason there are a lot online and in books that tell you to do things incorrectly like add the cornstarch by itself to the mixture, which leads me to point two.

2. Cornstarch (or another thickener like arrowroot or tapioca starch):  The key to pudding is how you thicken it. Cornstarch is the traditional thickener used, but it should never, ever be added to pudding by itself. Doing so will simply “gummy up” your pudding. Cornstarch is always to be mixed with your sugar (if you’re using it) and salt before adding it to your liquid or it needs to be mixed with liquid before adding it to the rest of your pudding mixture. The same should be kept in mind if you use arrowroot or tapioca starch.

Cornstarch also thickens best when your cooking temperature is even, so a stainless steel pan or enamel covered is best which leads us to point three.

3. Cooking Method: The best way to make pudding is to use a double boiler. I don’t own one so I simply put one pan on top of another. There are two ways of doing so: put a smaller pot filled halfway with water on the bottom and a slightly larger one on top or put water halfway in a pot that another pot will fit snugly into without touching the water below.

Whichever method you use, you want to bring your water to a boil before you begin making your pudding, because the heat from the boiled water is necessary for thickening your pudding.

When you do begin making your pudding, it’s important to stir the mixture well in the beginning so all ingredients are evenly mixed and there are no lumps.  Then, after your mixture has come to a boil, when you’ve added your thickener, it’s important to continually stir the mixture so it doesn’t burn on the bottom, which brings us to point four.

4. Patience: Pudding doesn’t actually take all that long, maybe fifteen minutes or so to completely cook, but when you’re standing over it, stirring constantly, fifteen minutes begins to feel like a long time. When it does, do not be tempted to try to speed things up or to stop stirring. Use the time to relax. Allow yourself the luxury of not being rushed and being able to reflect. Before you know it, the pudding will have thickened, and you’ll have a nice treat.

Okay, for a recipe: I have a chocolate recipe that is simple to make. If you are simply trying to lower your fat intake, use skim milk. The pudding won’t be as rich and thick, but it’ll still be delicious. If you have food allergies, I’ve successfully made this with flax milk, soy milk, almond milk, coconut milk, and rice milk. If you actually use sugar, then use 1/2 cup of sugar instead of the 1/4 Agave. You can also use 1/4 cup Stevia instead or 1/2 cup coconut sugar instead. If you want a really rich pudding, use soy or coconut creamer (or heavy cream if you don’t need to worry about milk allergies or fat intake.)

Chocolate Pudding

Ingredients:

1/4 cup Agave

1 3/4 cup “milk” (whichever type you want to use)

1/8 tsp salt

3 tbsp cornstarch

1/4 cup “milk”

1 oz unsweetened chocolate*

1 tsp vanilla

Cooking Instructions:

1. Bring water to a boil in a double boiler or makeshift boiler.

2. Mix together the agave, 1 3/4 cup milk, and salt. Set aside.

3.  Mix together the cornstarch and the remaining 1/4 cup milk. Set aside.

4. Stirring continually, melt the unsweetened chocolate.

5. Slowly, while continuing to stir, add the agave-milk mixture.

6. Bring the mixture to a boiling point. (Little bubbles will begin to appear at the top. You don’t need to continually stir here, but you’ll want to occasionally stir it until it begins to boil. Usually it’s less than five minutes to bring the chocolate liquid to a boil.)

7. When the mixture begins to boil, re-stir the cornstarch mixture and slowly pour it into the hot chocolate liquid, stirring continually.

8. Continue to stir the pudding until it begins to thicken.  (It’s okay to stop stirring for a few seconds at a time, but not for minutes, because once the pudding begins to thicken, it’ll thicken quickly. Usually it takes less than ten minutes for the cornstarch to thicken the pudding. You’ll know when it’s thickening because it’ll go from its liquid state to more of a solid.)

9. When the pudding thickens, remove it from the heat and stir in the vanilla until well blended.

10. Scrape the pudding into a shallow bowl and press a piece of plastic wrap directly against the top of the pudding. (This keeps that “skin” from “growing” on top of your pudding as it cools.)

11. Cool the pudding completely in the fridge before eating. If you put it into a shallow dish, you can usually eat the pudding within half an hour.

*Chocolate Note: If you don’t have unsweetened chocolate on hand, you can make your own.  Three tablespoons of unsweetened cocoa powder mixed with one tablespoon of shortening or oil is equivalent to one ounce of unsweetened chocolate.

You can also substitute an ounce of chocolate chips which is one tablespoon of chips. This will make for a sweeter pudding so if you don’t want it that sweet, simply reduce the agave by half.

If you like to use carob powder instead, 3 tablespoons of carob powder mixed with 2 tablespoons of water is equivalent to one ounce of unsweetened chocolate.

Also, if you don’t have allergies to it, you can use one of those pre-melted chocolate packages they make these days.

Finally, if you want, you can also just use chocolate flavored soy or rice or almond or coconut milk and skip the chocolate step and leave out the Agave.  I often use unsweetened chocolate soy milk with the Agave so I can control the amount of sweetener.

New Year’s Food Resolutions

website tempura

New Year’s Resolutions.

I was 12 years old when I made my first New Year’s resolution to be better behaved. That was the summer I spent two months grounded for recurring infractions. When I was 15 I decided to give up on boys. I had three different boyfriends before the year was out. At 18, I resolved to watch my weight better. I started college and gained 15 pounds. When my husband and I got married (in December), we decided (in January) that we’d finish grad school before starting a family. We became pregnant with our oldest despite three different forms of birth control, and I never attended grad school. After she was born, my husband and I resolved to give up making resolutions, and we’ve been faithful to that for almost 18 years.

For many people, the new year is a time for making changes to their lives, especially health-related ones. Studies, though, reveal that less than 10% of people always succeed in keeping their New Year’s resolutions. I believe it.

Interestingly enough, however, studies say that folks who continue to make New Year’s resolutions are 10 times more likely to succeed with their goals than those who don’t. So, I have to wonder….

Maybe resolutions aren’t such a bad thing.

How to keep them, however, requires making resolutions wisely, especially when it comes to food related ones.

Some thoughts I have, not as someone who’s actually made and kept resolutions, but as someone who’s had to make and keep lifestyle changes because life required it:

1. Don’t resolve to change everything: If you’re shooting for healthier eating, just resolve to do one thing better this year. Maybe you’ll try incorporating more vegetables into your diet. Or this could be the year you daily drink your eight glasses of hydrating fluids. Or how about simply adding a walk three times a week for half an hour each time.

2. Do resolve to try something different: Often we make resolutions about a habit we need to change by simply trying to stop the habit. When it comes to food, eating something healthier and different in place of what you’re trying to quit works much better. If you’re a chocoholic, try eating a piece of fruit when the craving hits or drink a glass of a fat-free “milk” that you’ve added dark cocoa powder to with a tiny bit of sweetener.  If you love sandwiches, try making an open-faced sandwich on one whole grain piece of bread. If you always take the elevator, take the stairs at least once each day.

3. Don’t go it alone: Friends and family are wonderful for this. If you’re going to start walking, ask a friend to if she wants to join you a couple times a week. If you’re starting to eat gluten free, don’t just cook for yourself – make it a family affair. If you know you won’t be able to resist that piece of chocolate, phone a friend and chat.

4. Do try to be fun and creative: If your resolution is to exercise and you’re doing so reluctantly, put on your favorite fast beat music and dance around your living room instead. If you don’t like vegetables, don’t eat them plain. Make tempura (recipe will follow below) or a stir fry where you experiment with different spices and herbs to see what flavors you like best. If you have to change your diet, find ways to “jazz” up the meal – peel your carrots into spirals (one of my kids’ favorites); stuff the zucchini with sauteed vegetables and herbs which you stir a little bit of real or tofu cream cheese into to make creamy; toast some gluten free bread crumbs with herbs and sprinkle it onto your fish.

5. Don’t set unrealistic expectations: If you need to lose weight, you’re generally not going to lose 30 lbs in six months. Shoot for ten lbs over 12 months, and you’ll be more likely to achieve your goal. If you’ve eaten white flour your whole life, it may take trying a few different types of whole grains before you find one that you actually like. If you always reach for junk food when you’re stressed, expect to slide occasionally, even if you’ve been doing well for a while.   

6. Do search out help: If you need to eat differently, read some magazines about allergy free or healthy eating to learn tips which can help you. If you want to exercise, ask your doctor the best way to begin. If you crave everything all the time, search online for tips for how to curb cravings.

7. Don’t be hard on yourself: Remember the statistics. If you fail at keeping your resolution, you won’t be the only one. And if you aren’t successful this time, it doesn’t mean you can’t be. Again, remember the studies – just make a new resolution, and you’ll improve your chances of success next time simply by continuing to make the resolutions.

So, now for that tempura. My children love my mother’s tempura, but of course, it’s made with wheat. I wanted to make something which could compete in taste and crispiness, and after a couple of different versions, I finally came upon one that is absolutely delicious and works well. The bonus: My children eat tons of veggies! And if you keep your heat high and use a heart healthy oil, it’s been shown that your veggies don’t absorb a lot of oil.

Tempura

Ingredients:

Heart healthy oil (I like to use Smart Balance for this)

Bob’s Red Mill Gluten Free Pie Crust (Make sure it’s the “pie crust” only mix, not the “biscuit and baking mix” or the gluten free “baking flour”)

ground black pepper

cold water

ice cubes

Quinoa flour

Veggies (broccoli, petite baby carrots, green beans, mushrooms, zucchini, etc…)

Cooking Instructions:

1. Heat your oil to about 375 degrees in a pan suited for doing so. (I actually own a fryer which the only two things I ever fry are tempura and mandu, which is a Korean dumpling.) 

2. Put some of the pie crust mix into a bowl. How much depends on how much you’re making. I always start with at least two cups.

3. Add some black pepper to taste. I usually use 1/2 tsp per 2 cups of crust mix.

4. Fill a large measuring cup half-filled with ice cubes and add cold water. Slowly add water and ice cubes to your flour mix, whisking as you do so, until the batter is just about to the consistency you want. (I test it by pulling up my whisk. If the batter easily flows off the whisk like water, it’s good.) You’ll have some unmelted ice cubes in the batter.  That’s perfect. Those will continue to melt and keep your batter cold while you turn your attention to the veggies.

5. Put some quinoa flour in a bowl and dip your veggies into the flour to coat them.  Shake off any excess.

6. Dip the floured veggies into the tempura batter and shake off any excess.

7. Put just enough veggies into your oil as the pan can accommodate. You don’t want to overfill the pan because the tempura batter will expand. You want to put the veggies in as quickly as you can and then cover the pan. Immediately put two minutes on your timer.

8. When two minutes are up, remove the veggies, making sure to lightly shake off any excess oil. Put the veggies into a pan lined with paper towels to absorb any excess oil.

9. Tempura is best eaten while still warm. Eat plain or with soy sauce or a sauce of your own choosing.

Handling Holidays: Serving the Meal

website serving meal

“Umm… did you just use my scoop?”

We were having a lovely gathering at our home of friends over the summer, complete with ice cream sundaes, when I realized that one of our guest’s children was using my scoop to get herself some ice cream.

For most folks, using another person’s scoop doesn’t seem like a big deal, but when you have a serious allergy to dairy and cross-contamination can potentially kill you, you tend to be a bit less friendly about “sharing”. Fortunately, I caught the “sharing” in action and was able to wash the scoop before using it for myself.

Holiday meals can be a bear when it comes to potential cross-contamination.  Even if you’ve planned ahead as I had that summer evening with a different scoop for my nondairy frozen dessert which was sitting off to the side of everyone else’s “real” ice cream, you never know when someone might accidentally upset your best laid plans.

So, what can you do?  Some suggestions:

1.  Definitely do plan ahead:  If you’re hosting, decide whether you’re going to avoid cross-contamination by simply making everything allergen friendly.  When I’m entertaining in my own home, I usually just make foods which I can eat which everyone else will enjoy, too.  Then I don’t need to worry.

If there are some foods, however, that you do want to make for your guests which you can’t eat or vice versa, then decide how many of those you’ll make and plan how you’ll separate them from the rest of the food.  Some options:

a. Put allergen free food in similar dishes and the other food in different dishes so you can point out to folks which are which.  I have round and rectangular dishes so it’s easy for folks to know which foods they should be careful to avoid contaminating.

b. Label the food.  Put little index cards in front of the food which tells folks what the dish is free of or contains.  The additional advantage to this is that if you have folks with a variety of allergies, they can see with a quick glance what they can and can’t eat.

c.  Put the food on different tables.  If you have available table space, put allergen free food on one table and the rest on another so folks can go to both tables separately to get their food.

2.  Educate:  Sometimes folks just don’t know how dangerous it can be for them to switch the serving spoons on you.  Take a minute to just explain that folks need to be careful to put the same spoon back into each dish because it would be a great service to your health for them to do so. I’ve found that folks are understanding once they know the potential consequences and take better care about how they serve themselves.

3.  If you’re going to someone else’s home for the holidays, be pro-active: Find out if the host is going to be making food you can eat, and if so, ask them if they could follow some of the above suggestions for your and the other guests’ benefit.

If you’re going to contribute a dish of your own, make sure to both label it and point out to folks at the dinner that it is a special dish made to be allergy friendly, and bring a serving utensil that is “different” to go with it. Maybe it’s an unusual color or a non-traditional size or one that matches the serving dish.  Give folks a way to recognize that that particular serving utensil needs to be used with your particular dish only.

4. Watch the children: In most cases, as with my summer gathering, it’s the little ones who don’t realize, because they are after all just little. So be sure to keep an eye on them. Enlist the help of the other adults to help serve the children and to watch the children who can serve themselves. At a certain age, the children can be told, too, about being careful, because if the food allergy is explained, children tend to be rather caring about not wanting to hurt anyone.

5. Practice avoidance in the absence of information:  Many times folks will bring a dish or purchase a dish and not know exactly what specific ingredients are, but they’ll tell you generally that it is something you can eat.  Don’t.  It’s as simple as that.   I’ve had times when folks have actually fished out an ingredient label from the trash for me and discovered that, yes, five of the six ingredients are fine, but there was that last ingredient that was deadly.

6. Be prepared:  Sometimes, because you’re in your own home or because you’re going to a trusted home which you’ve been to many times, you don’t necessarily think about keeping your Epi-Pen close by.  You just never know.  As with the little incident at my house over the summer, accidents happen.  Always be prepared and keep whatever you need, whether it’s the Epi-Pen or benadryl or the emergency phone number, close by within easy reach.  Better to be prepared than sorry.

Berry Oat Bars

These are favorite with folks I know.  I can’t make enough of them, they get eaten so quickly!

Ingredients:

2 cups gluten free whole grain oats

2 cups gluten free flour blend (I use garbanzo bean and brown rice flour)

1 tsp cinnamon

1/2 tsp salt

1/3 cup Truvia or coconut sugar

3/4 cup vegan “butter”

3 tbsp Agave divided

15 oz Polaner All Fruit with Fiber (your choice of flavor)

Baking Instructions:

1.  Line a 9 x 13 pan with parchment paper so there are “wings” hanging over the edges, and preheat the oven to 325 degrees.

2.  Mix together the oats, flour, cinnamon, salt and Truvia or coconut sugar in a large bowl.

3.  Put the “butter” into the oat mixture in pieces and use a pastry blender to cut the butter into the oat mixture until it’s crumbly and the butter is incorporated into the mixture.

4.  Remove about 1/3 of the mixture and put it aside for the topping.

5.  To the remaining 2/3 of the oat mixture, add 2 tbsp of Agave and mix it well.  Pat this into the bottom of the 9 x 13 pan to form a crust.

6.  Spread the Polaner All Fruit carefully over the crust.  (We’ve made raspberry, strawberry, apricot, blueberry, etc….) 

7.  Add the remaining 1 tbsp of Agave to the remaining 1/3 oat mixture and mix it up until the mixture is moist but still crumbly.  Evenly distribute the mixture over the top of the all fruit.  You will have open spots of jam showing.  This is fine.

8.  Bake in the preheated oven for about 30-40 minutes.  The oats will be golden brown and the jam bubbly.

9.  Remove from the oven and put the pan onto a wire cooling rack.  It’s very important that you allow the bars to completely cool.

10.  Once the bars are completely cooled, you can carefully remove them from the pan using the parchment paper and cut them into the desired size, or you can cut them directly in the pan and remove them one by one.

Handling Holidays: Truffles and Fudge

website fudge

“You’re a chink!”

I was sitting by myself at recess on my first day at a school in the United States when a older middle school, Caucasian boy welcomed me with those words. It was the aftermath of the the Vietnam War, and though the gene pool had actually given me more of my father’s Caucasian features than my mother’s Asian ones, folks back then were more cognizant of facial differences than today. (Today, no one believes me when I say I’m Korean. I have to show them pictures of my mom. So, times do change!)

Unfortunately for that gentleman, though I was  younger than he, I wasn’t so easily intimidated, and he didn’t expect my response. “Shows how much you know,” I said. “Chink is a derogatory term for Chinese people, not Korean. I believe you meant to call me a ‘Gook’, but instead you’ve only revealed just how ignorant you are. So, please just go away and leave me alone.” To his credit, he walked away as the crowd around him snickered.

My victory didn’t make me feel any better, though, about such a “welcome” to my “home” country and new school, and at the end of recess my new teacher, Mrs. Petruska found me sitting in the corner of the yard, crying. She didn’t ask me what was wrong, so I presumed she must have heard from one of the other students. Instead, she handed me a small piece of chocolate (this was long before the day of food allergy awareness), patted my back, and said,”Take your time eating this, and when you’re done, I’ll see you back at class.”

Now, some may wonder what sort of teacher would handle such a situation by giving a child a piece of chocolate, but whether you agree or disagree with her actions, I have to say that I learned that day that if savoring a piece of chocolate can make you feel better, than life is not going to end from whatever situation you feel devastated by.

And strangely enough, as I’ve grown into adulthood, the only time I even eat a piece of chocolate (allergen free variety, of course!) is when I need a reminder that I will survive whatever “mess” I’m currently dealing with in life, and the only time I make chocolate truffles and fudge is for the holidays – and it’s always for giving away.

Chocolate, though, is one of those ingredients that can be deadly if you’re severely allergic to dairy or nuts. Fortunately for me, however, Enjoy Life makes wonderful chips, chunks, and bars which are everything free, so I can continue to make, give away and enjoy chocolate truffles and fudge when I want – and so can you.

Chocolate Truffles

Ingredients:
1 cup Enjoy Life mini chocolate chips
2 tbsp Polaner’s all fruit of choice*
Cocoa powder/coconut flakes/chopped nuts/crushed candies/dried chopped fruit

Cooking Instructions:

1.  Melt the chocolate with the all-fruit over a double boiler, stirring constantly. (I put a small pan filled with water halfway on the burner and then stack a larger pan on top.)

2.  Pour the melted mixture into a shallow pan and cool in the fridge until the chocolate is solid enough to shape. (It needs to be a rollable, fudgy consistency, not hard.)

3.  Use a teaspoon sized amount of chocolate and roll into a ball. Roll the chocolate ball in cocoa or flaked coconut or chopped nuts (if you’re not allergic) or crushed candies or dried fruit and stored in a covered container in fridge.

4.  Serve at room temperature.

*Note: You can omit the all-fruit flavoring and just make the chocolate plain. You can also substitute flavoring like mint extract (use a small amount like 1/8 tsp first and taste; add in increments to the strength of flavor you want).

Chocolate Marshmallow Fudge

Ingredients:

3 cups Enjoy Life mini chocolate chips

Equivalent to 14 oz can of sweetened condensed milk*

1/8 tsp salt

2 tsp vanilla

3 cups mini marshmallows

2 tbsp melted vegan “butter”

Cooking Instructions:

1. Line a pan with aluminium foil or parchment paper or wax paper, leaving flaps overhanging on all four sides so you can pull out the fudge.

2.  Mix the chocolate chips with the sweetened condensed milk and the salt. Melt slowly over low heat, stirring constantly, until all the chips are melted.

3.  Stir in the melted “butter” and one cup of the marshmallows.  Stir until those have melted into the chocolate.

4.  Remove from the heat and add the vanilla and the remaining two cups of marshmallows.  Stir just until the marshmallows are incorporated but still firm.

5.  Scrape the fudge into the prepared pan with a rubber scraper and smooth the top of the fudge flat.

6.  Cool in the fridge for several hours until hardened.

7.  Use the flaps to remove the fudge from the pan, turn it over onto a cutting board, and peel away the foil or parchment paper or wax paper.

8. Cut the fudge into size and shape wanted and store in a container or individually wrapped in the fridge.

*If you don’t have milk allergies, use the canned sweetened condensed milk, but if you do:  You can also try making homemade sweetened condensed milk by mixing about 2 1/2 cups of your type of “milk” (rice, nut, coconut, soy) with 8 tbsp sugar or agave.  Stir well and simmer over low heat until the “milk” has reduced and thickened.  This will take a couple of hours.  Keep the heat low and stir frequently.  When it’s thickened, you can add 1/8 tsp of salt and/or 1/2 tsp vanilla, if you’d like. Put a clear plastic wrap up against the mixture before cooling in the fridge to prevent a “skin” from forming. When you need it, use the sweetened condensed milk to substitute for a 14 oz can.