Menu Munching: Avocados

KONICA MINOLTA DIGITAL CAMERA

“The best is an orchestra.”

At a recent event for writers, a gentleman shared a story about his grandfather who said that people should be like an orchestra, each complementing one another in harmony to make the world a better place for everyone.

I thought about this when I received an email this week asking me about the hype around super foods. If you look at the list of super foods, you’ll see that they’re fruits, nuts, veggies, beans, whole grains, fish, and spices – essentially and simply an orchestra of naturally existing, non-processed, complementary foods which when eaten make for better health.

It’s not that they’re super. It’s that we unfortunately have fallen away from eating them, and our bodies are craving them. For some folks, it’s the cost. The fact is that the natural foods are a lot more expensive than processed. For others it’s the maintenance. Fresh foods don’t last as long, so they need to be eaten quickly and replaced more regularly which requires more trips to the store. For many it’s that our lives are busy, and we need food which have longer shelf-lives because we’re simply not home to eat the fresh food in the fridge.

The fact, though, is that our bodies need certain vitamins and nutrients to function optimally, and eating a wide variety of fruits, veggies, nuts, whole grains, beans, fish and spices provides what our bodies need in ways that processed foods simply cannot.

In the email, the question was specifically about avocados and why the hype and how to incorporate it into one’s diet.

Avocados are high in fiber, nutrients like potassium, vitamin K and folate, and the good monounsaturated fats our bodies need, so yes, people are advocating it as a super food. Like all the foods on the list, though, it needs to be a part of a healthy varied diet to have any benefit. If you’re eating unhealthy all the time, simply adding avocado to your menu isn’t going to make your body super.

As an addition to a healthy diet, though, avocados can add variety if you’re in a food rut. You can add them onto salads and sandwiches, make soups with them, stuff them, put them into smoothies, and you can even add them to cake recipes. For most folks, avocados mean guacamole, though, so I’m going to focus on that today.

Guacamole often gets a bad rap because it’s most always associated with the tortilla chips people tend to eat with them. It’s the tortilla chips that are unhealthy; not the guacamole. Guacamole is actually a combination of super foods: avocado, garlic, onions, citrus juice, jalapeno peppers, and sometime tomatoes. So, eating it is a good thing, though one should eat it as a veggie dip or a sandwich spread as opposed to a tortilla chip dip.

Making Guacamole:

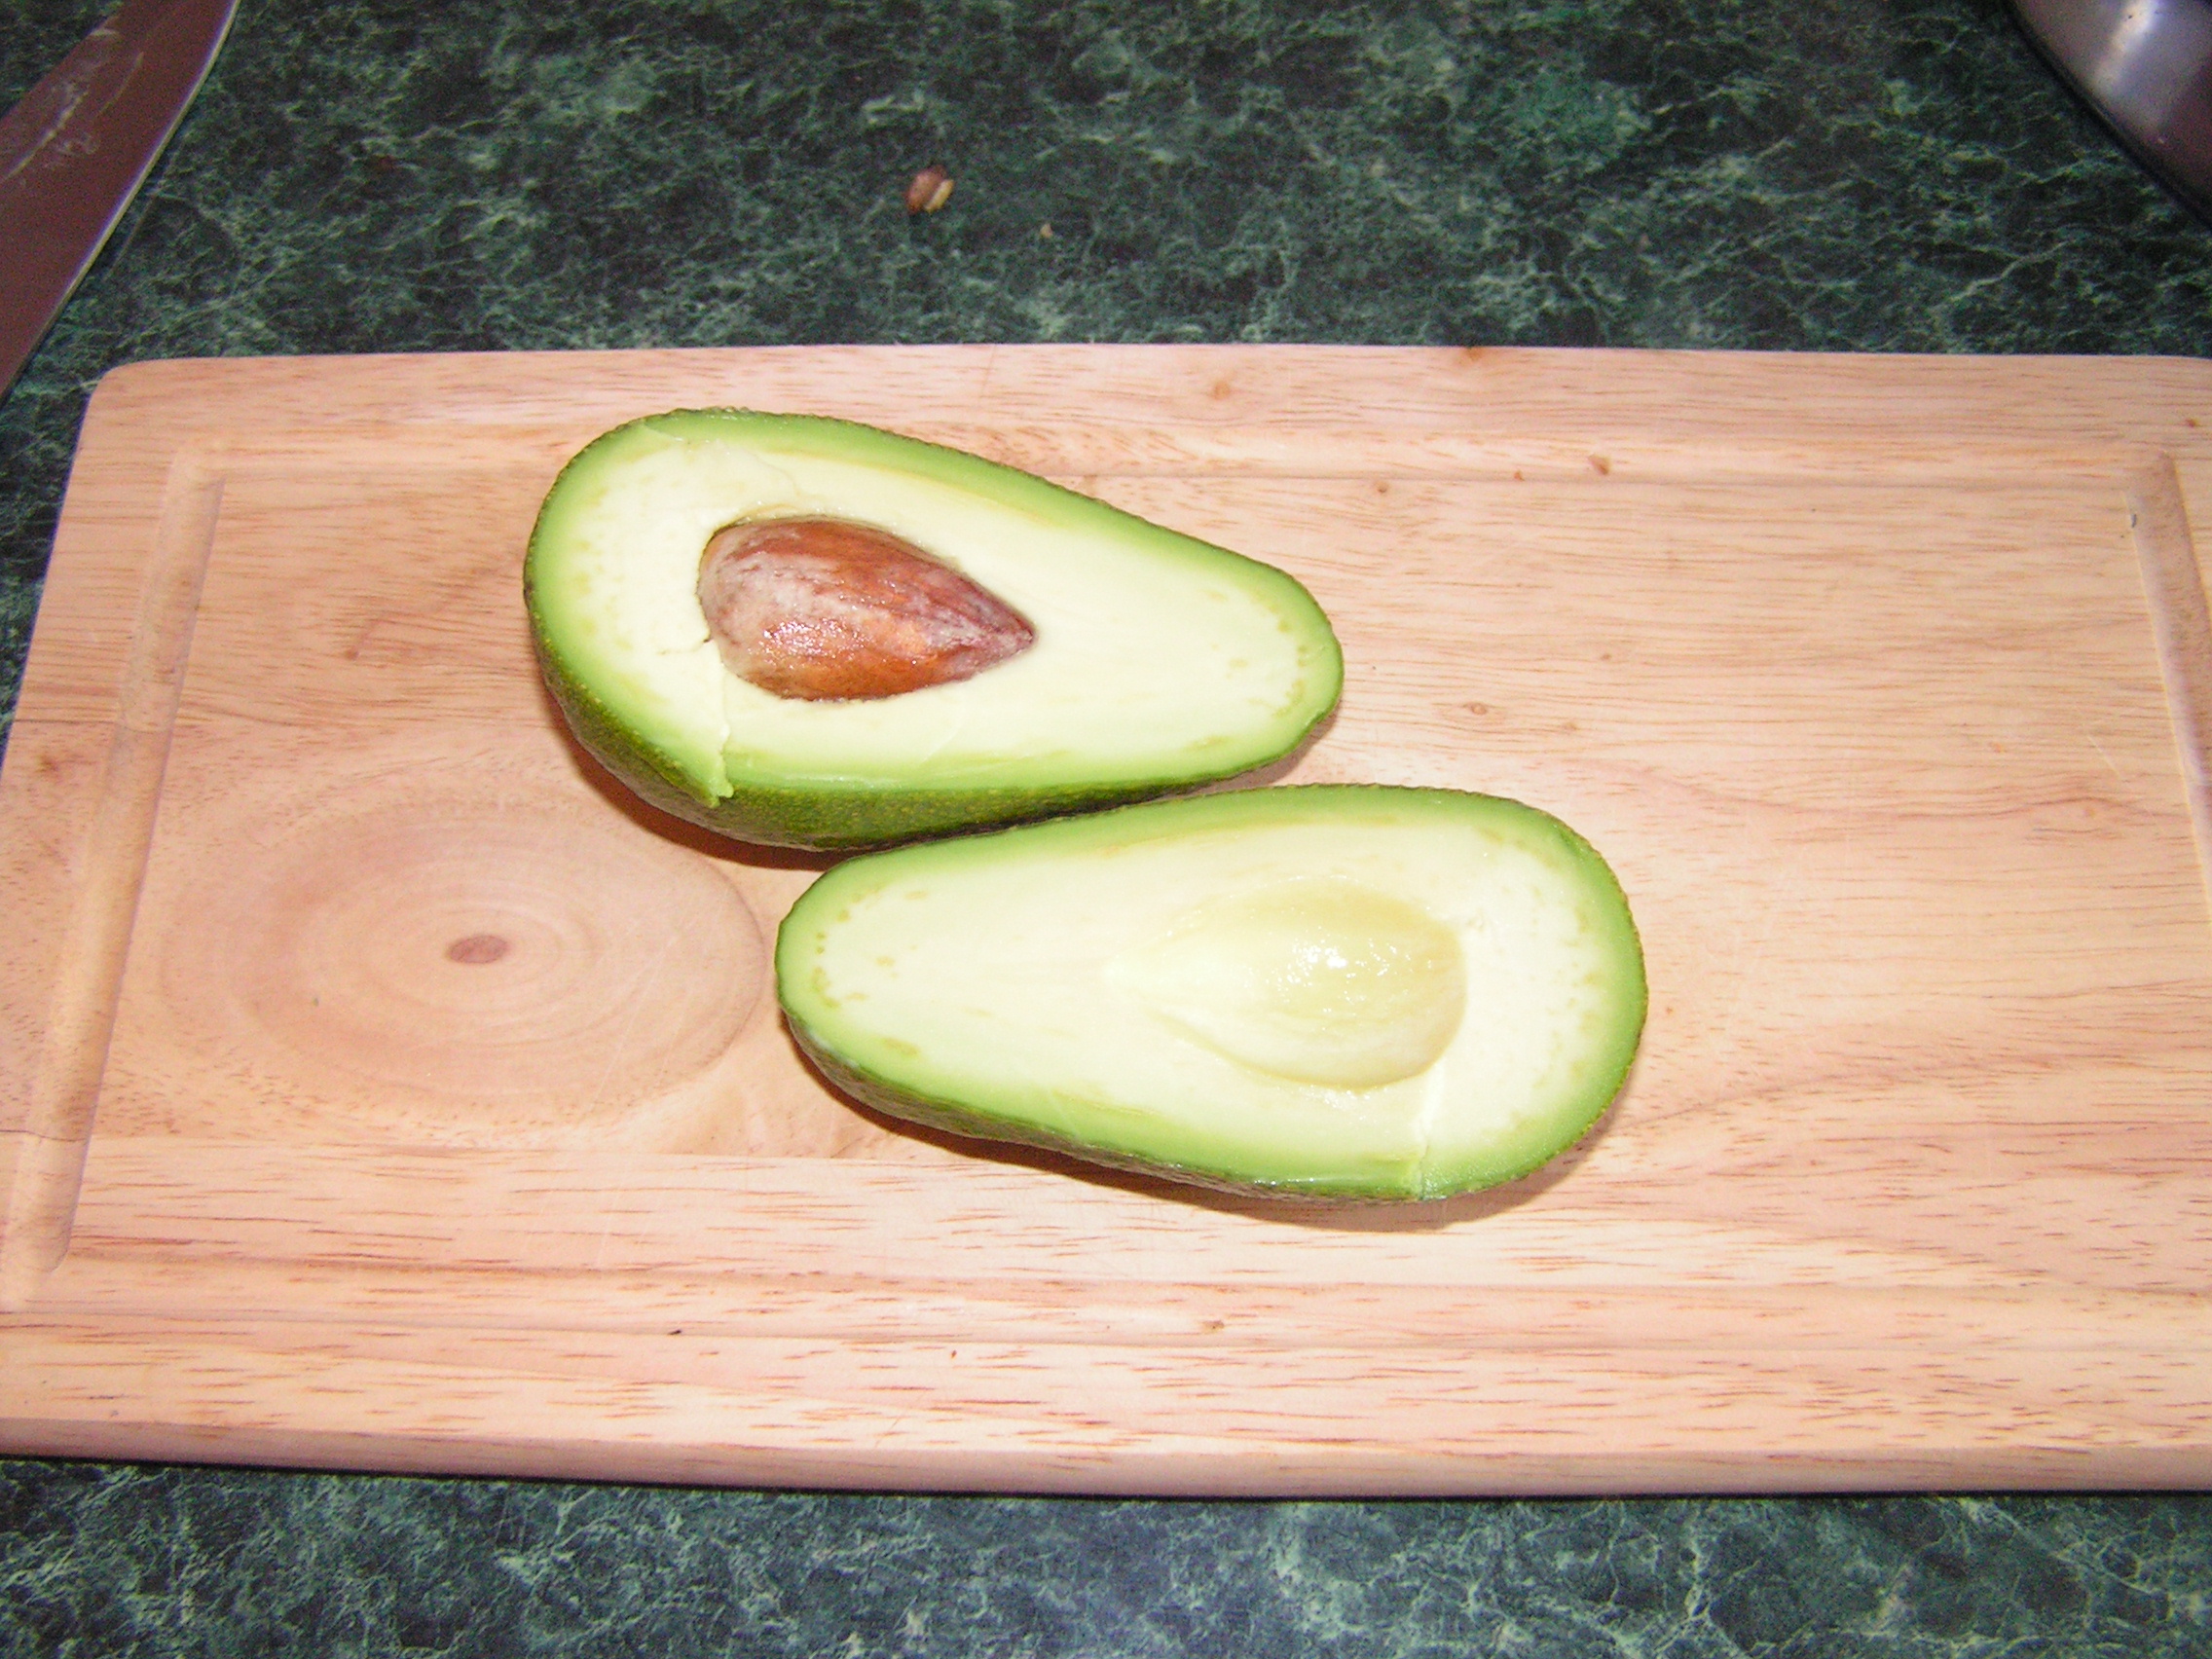
1. Purchase good avocados: You want avocados which are dark green, soft to your touch, but without any brown, overly soft spots. When you go to the store, though, the avocados are almost always unripe. So, look for ones which are green with no brown and/or soft spots in them, firm to the touch and heavy in your hand. When you bring them home, put them into a paper bag, and check them after a day or so. When they’re ripe, they’ll be soft when you press into the skin with your finger. If you have the time to wait, you can also simply leave the avocados in a bowl on your counter, and they’ll ripen over time.

2. Prepare the avocados: Avocados are easy to cut. You simply cut in half around the pit and twist. When the avocado is ripe, the seed will simply slip out with very little aid from a spoon or knife. If the pit is sticking to the avocado flesh, it’s a clear sign that the avocado isn’t ripe. When avocados are ripe, you can put a spoon around the edge between the skin and the flesh and the avocado flesh will simply fall out of the skin. If the flesh is sticking to the skin, it’s either unripe or overly ripe.

3. Decide on the ingredients: Guacamole is usually a combination of avocados, citrus juice, garlic, onions, and jalapeno peppers with folks sometimes adding tomatoes, too. You can decide what you want to use. Since I don’t always have fresh jalapeno peppers and onions in the house, I often use dried red pepper flakes and onion powder. I also prefer to use Meyer lemons over lime juice, and since my children don’t like tomatoes in their guacamole, I don’t include it. You can decide whether you want to use all fresh ingredients or some dried like me. You can choose whether you prefer the taste of lime or lemon juice. You can decide whether to be a purist or to add tomatoes or even experiment with other additions. Some folks like to add herbs like basil to their guacamole. Most add salt and pepper to taste.

4. Begin with a basic recipe: A basic recipe I follow is:  Put the flesh of two avocados into a large bowl. Begin with 2 tablespoons of squeezed citrus juice, 2 tsp of minced garlic, and 1/8 tsp each of onion powder, black pepper, salt, and red pepper flakes. Mash the ingredients into the avocados so everything is combined but the avocados are still chunky. Taste and see what you need to add more of to your liking. If you’re using all fresh ingredents, start with 2 tsp of minced onions and seeded, jalapeno peppers and then see if you need to add more or not.


Cooking Techniques: Popovers

“But that’s not appropriate.”

A friend from the city was visiting and heard my son hysterically laughing while reading our local newspaper. She commented that he must really enjoy the comics.

“Oh, he’s not laughing over the funnies,” I said. “He’s reading the police log.”

The look on my friend’s face was priceless! She clearly was wondering whether she had misjudged me as being a sound parent and how best to tell me that my son was going to grow up to be a psychopath if he found the police log funny!

So, I showed her the paper. Examples of true police log reports from papers in my local area:

“Goat running loose ate a pair of pants. Owner of pants declined pressing charges against goat.”

“Man waiting in line for Cabela’s to open cut in line. He was spoken to. All was well.”

“Report of annoying phone call. Mother-in-law was calling. Police explained they could do nothing about it.”

“Road blocked by 14 chickens. Traffic was backed up for 20 minutes until chickens finished sunbathing.”

“Unsecured trash barrel taken. Discovered in back yard of a neighbor. Child using it as a horse.”

“Back porch light went out. Al Qaeda suspected.”

Once my friend read that week’s police log, she understood why my son was laughing, and we had an interesting discussion afterwards about the difference between “crime” in the city and where I live.

I was reminded of this conversation recently as my son and I made popovers this weekend. Popovers are a wonderful addition to meals which people don’t often think about, because their perceptions of them aren’t always in line with reality.

There’s a myth out there that popovers are difficult to make, and if you google popovers, many sites talk about the “secrets” to making perfect popovers. This, I believe, feeds into the perceptions that people hold, so then folks opt to make muffins instead or to purchase bread from the store.

The truth is that popovers are ridiculously simple to make, and you can adapt them to make a variety of popovers for any occasion. Plus they’re fun. Children love them because they literally pop-over from the pan.

What’s important to know about popovers:

1. Cooking: You want a hot oven temperature so I always preheat the oven to 450 degrees. Once you put the popovers into the oven, you don’t want to open the oven until they are done which is always 30 minutes in a regular sized muffin tin. When they’re done, just remove the popovers from the tin and if not eating immediately put them onto a cooling rack so moisture won’t condense on them. If eating immediately, you can put them into a nice bowl lined with a pretty towel.

2. Mixing: You want to mix the eggs together before adding the other ingredients, but you simply blend them with a fork for a minute or less until the eggs are mixed. No need to make them fluffy or frothy or airy. Just a nice uniform color to the eggs, and then you add the rest of the ingredients.

3. Measuring: I find the best way  to make popovers is to transfer the batter into a large spouted measuring cup so I can easily pour the batter equally among the muffin tins.

4.  Ingredients: A popover is just eggs, milk and flour. For a muffin tin that makes 12 popovers, you’ll always use an equivalent to one cup of eggs, 2 cups of milk, and 2 cups of flour. Since I like to be a bit healthier, instead of 4 large eggs (which should yield a cup) I opt to use half whole eggs and then add enough liquid egg whites to make a full cup. For the milk I’ve used soy, flax, and rice milk without any issues. For the flour, to be gluten free, I either use sorghum flour, arrowroot flour, or a mixture of both. For seasoning, I use 1/2 tsp of salt and then depending on the type of popover, an additional herb or spice.

5. Pan: A simple muffin tin is all you need whether it’s a 12 muffin one or two six muffin ones. It’s important to grease the muffin tins. You can use butter, oil, spray, shortening – it doesn’t matter what, but you must grease the pan so the popovers can rise and pop without sticking to the pan.

6. Variety: Popovers can be adapted. You can add any herb or spice. You can add cheese. You can add finely grated vegetables. My kids really like it when I make the popovers with pureed vegetables or fruit. I used puree squash or pumpkin or applesauce or bananas in place of some of the milk, and they come out quite delicious.

For eating, you can top the popovers with butter or jam or fruit butters. You can also cut them open and fill them with food like chicken salad which is incredibly tasty in a popover!

Below I’ll include two recipes I make often for the family. Enjoy!

Squash Popovers

Instructions:

1. Preheat the oven to 450 degrees and grease either a 12 muffin tin or two six muffin tins.

2. Whisk 2 cups of flour of choice (I like 1 cup of sorghum flour with 1 cup of arrowroot flour) with 1/2 tsp salt and 1/2 tsp cardamom. Set aside.

3. Using a fork mix the equivalent of 1 cup of eggs (4 large whole eggs, 1, 2, or 3 whole eggs plus enough liquid egg whites to make 1 cup) just until the eggs are light and uniform in color.

4. Add 1 1/4 cup milk (I prefer flax or soy milk) and 3/4 cup cooked, pureed squash to the eggs. Whisk just until blended. There will be lumps, and that is how you want it.

5. Transfer the batter (which will be thin and runny) to a spouted measuring cup large enough to hold all the batter. Evenly divide the batter among 12 muffin tins.

6. Put the muffin tin into the oven and bake for 30 minutes. Do not open the oven door at any time during the 30 minutes. After 30 minutes, you can pierce the popovers to release the steam and then remove the popovers to a wire cooling rack or towel-lined bowl or directly to the plates.

Tarragon Popovers

Instructions:

1. Preheat the oven to 450 degrees and grease either a 12 muffin tin or two six muffin tins.

2. Whisk 2 cups of flour of choice (I like to use 2 cups of sorghum flour for this recipe, but mixing half sorghum and half arrowroot or using all arrowroot is fine, too) with 1/2 tsp salt and 1 tsp dried tarragon. Set aside.

3. Using a fork mix the equivalent of 1 cup of eggs (4 large whole eggs, 1, 2, or 3 whole eggs plus enough liquid egg whites to make 1 cup) just until the eggs are light and uniform in color.

4. Add 2 cups milk (I prefer flax or soy milk) to the eggs. Whisk just until blended. There will be lumps, and that is how you want it.

5. Transfer the batter (which will be thin and runny) to a spouted measuring cup large enough to hold all the batter. Evenly divide the batter among 12 muffin tins.

6. Put the muffin tin into the oven and bake for 30 minutes. Do not open the oven door at any time during the 30 minutes. After 30 minutes, you can pierce the popovers to release steam and then remove the popovers to a wire cooling rack or towel-lined bowl or directly to the plates.


Cooking Techniques: Entree Souffles

website souffles

“I’m afraid I’ll make it and it will deflate.”

I’ve never quite understood the fear and awe people have about and for souffles. One, a souffle is simply an egg bake. It’s a vertical, airy one, but it’s an egg bake nonetheless, which if you think about it, isn’t really all that special. Yes, it looks pretty when it’s puffed, but if I had a dime for the number of times people have eaten a souffle for the first time and been disappointed because it’s just an airy egg bake, I’d be quite wealthy.

Two, somewhere along the line the myth arose and has been perpetuated that only the best of the best can keep a souffle from deflating and that if your souffle deflates, you are somehow a failure as a cook. The factual truth is that a souffle is going to deflate, no matter what you do or how good a cook you are. Julia Child’s souffles deflated. Really, they did. You can’t defy gravity, especially if you’re making an egg bake vertical instead of horizontal. You just can’t.

Why do you think the restaurants always bring souffles out immediately, straight from the oven and make the first cut into it within literal seconds of presenting the dish? Because they know it’s going to deflate, and they only have a few minutes to showcase it! I know, because I worked in restaurants and brought out those souffles!

Honestly, souffles are not difficult to make. They simply require some time and patience. A couple of hints to help with the cooking process, though:

1. Having your ingredients at room temperature: The airy texture of a souffle is achieved through the use of whipped egg whites, and egg whites whipped the best when they are warm, and the whipped eggs incorporate better into the other ingredients when they are warmer as opposed to cold.

2. Use the right baking dish: In order for a souffle to rise, a round, glass casserole dish which has a good depth to it with a straight edge is the best. Your souffle needs to rise upwards, so you don’t want to use a dish that is shallow or too long in diameter; and you want the dish to have a straight edge so the souffle has the support it needs while it rises. If you have a dish which is the right dimensions but doesn’t have a straight edge, you can insert parchment paper into the dish to create the straight edge you need.

I use a casserole dish which is 7 inches in diameter and 3 inches in depth/height to make a souffle which feeds a family of four to five. Often you’ll find that recipes call for you to use individual dishes, 6 or 8 ounces in size, because the smaller the souffle, the easier it is to rise. If you have enough little dishes, then by all means, use them. If you don’t, though, using a dish like the above works well.

3. Be sure to prepare your pan as needed: Because a souffle needs to rise, it is important that you provide something for the souffle to stick to as it rises. Most of the time, your recipe will call for you to grease the pan and then coat it with an ingredient like bread crumbs. This is because the bread crumbs are coarse enough to provide texture for the souffle to cling to as it rises.

4. Keep your ingredients lightweight, small and dry: If you are making a vegetable souffle, it is best to finely chop your ingredients so they can easily incorporate into the eggs without weighing them down. I often make a souffle when I have leftover cooked vegetables and/or meats I want to use up. I simply plop the leftovers into my food processor and chop them into small pieces for use. If your ingredients are excessively wet, squeeze the liquid out, because wet ingredients are heavier than dry.

5. Be creative with your spices and herbs: Souffles are simply eggs mixed with whatever your filling is, so any flavor you want will come from the spices and herbs you add. Sometimes people are hesitant to try something besides salt and pepper with their eggs, but the addition of chives or tarragon or nutmeg or thyme creates a savory taste which complements eggs really well.

6. Use cream of tartar: When whipping egg whites, a little bit of cream of tartar goes a long way. Cream of tartar is an acid which helps your whipped egg whites to hold their proper form and shape as needed. Many times if folks have a problem with their souffles it is because they overwhipped their eggs, and the eggs began to lose their hold. The cream of tartar helps to prevent that loss of hold if you do accidentally overwhip. If cream of tartar isn’t something you have on hand, lemon juice or vinegar will do the same trick.

7. Use equipment properly: When whisking egg whites, you need to make sure your bowl is absolutely clean and dry. Even a tiny amount of water or stuck on food can make a difference in how well your eggs beat up. Also, if your mixer has a special wire whisk attachment for eggs, use that instead of the regular beater. The wire whisk allows for more air to be incorporated into the egg whites.

8. Know when to stop: When you begin whisking egg whites, they will be liquidy and clear. As the eggs begin to incorporate air and the protein strands begin to uncoil, your eggs will turn white and foamy, will double in size and will become stiffer. When you can lift your whisk and the egg whites stick out at a 45 degree angle like a little wave, your eggs are done.

9. Be patient with the egg whites: When you incorporate the egg whites into your vegetable mixture, you want to take your time. Add the egg whites a little at a time, and gently fold the whites into the mixture, using a simple S method: You gently run a curved spatula around the sides of the bowl, gathering up a bit of the egg whites and gently scoop down the center to mix the egg whites into the mixture. You repeat this slowly until all the egg whites are incorporated into the mixture.

10. Think lighter: The one thing about souffles is that they often use a lot of eggs, and as we all know, too many yolks are not always the healthiest for us to eat. I usually use just a couple of whole eggs and the rest is liquid egg whites, and the result is still a nice souffle which has less cholesterol and calories and fat.

11. Don’t skip the sauce: Most souffle recipes require that you mix your vegetable and/or meat ingredients into a cream sauce. Folks can be tempted to skip this to save on calories or because of worry about allergies. Don’t. The sauce coats the vegetables and allows it to incorporate more easily into the egg mixture. I have found that you can use any type of milk that works for you and that you can lighten the sauce by omitting the use of oil.

12. Be realistic: If you follow all the tips, your souffle will puff up beautifully while cooking and will come out of the oven nice and tall, but know that within minutes, gravity will take over and slowly the souffle will fall. Just enjoy those few moments and the taste of the dish itself as you eat!

Vegetable Souffle

Ingredients:

1 cup cooked, finely chopped mixed vegetables, drained or squeezed of any excess liquid (I use leftovers from other meals like spinach, zucchini, mushrooms, etc…)

1 tbsp minced onions

2 eggs, at room temperature

1/2 cup liquid egg whites, at room temperature

1 cup “milk” (soy, flax, rice, cow: all work)

2 tbsp “flour” (sorghum, oat, garbanzo bean, whole wheat, etc…)

1 tsp mixed herbs and spices (I like to mix tarragon, thyme, black pepper, and nutmeg – 1/4 tsp of each)

1/4 tsp cream of tartar

Cooking Instructions:

1. Preheat the oven to 350 degrees. Grease a casserole dish 7 inch in diameter and 3 inch in height with your favorite method (olive oil, vegan butter, etc…) and coat the dish well with bread crumbs. (I use Ian’s gluten free bread crumbs or make my own in the food processor with Udi’s gluten free bread.)

2.  Mix the finely chopped vegetables with the minced onions and set aside. (Be sure to squeeze out any excess liquid from the vegetables.)

3. Separate the yolks from the whites of the two whole eggs, and add the yolks to the vegetable mixture.  Add the whites to the liquid egg whites. You should have 3/4 cup of egg whites for your use.

4.  In a large, shallow pan, mix the milk with the flour and herbs and/or spice choices, whisking well to incorporate the flour and seasonings into the milk.

4. Cook the milk mixture over medium low heat, stirring continually, until the mixture begins to thicken.  Should only take about five minutes in a large, shallow pan.

5. Stir the vegetable mixture into the sauce and allow the mixture to cool slightly.

6. Put the liquid egg whites into a clean mixing bowl and stir in the cream of tartar. Using the wire whisk attachment to your mixer, whisk your eggs until the whites  double in size, are foamy and white, and when you pick up the whisk, the eggs are stiff, tilting to a 45 degree angle.

7. Slowly add the egg whites to the vegetable mixture, incorporating a little at a time, using a curve spatula and moving gently in an S motion, around the edge, down the center, until all the egg white is mixed into the vegetables.

8. Gently spoon the souffle mixture into your prepared dish, and carefully tap the dish once or time to level it.

9. Bake in the preheated oven for about 40 minutes. The souffle will have risen and be puffed, dry and firm, no longer wet.

10. Remove and serve immediately.


Simple Pleasures: Chocolate Chip Muffins

website choc chip muffins

“Well, can you make it a junky, healthy snack, then?”

My son has a sweet tooth – there is no doubt about that – and every day he looks for a way to finagle a treat. For a mom who’s trying to feed her children healthy foods, it can become tiresome to always be “fighting” about what is good and what it isn’t. So, I’m always creating recipes which can be a compromise between what my son considers a treat and what I think is healthy.

The other day, my son really wanted something “junky” as he called it, and I advocated for something healthy. When he asked me for a “junky, healthy snack” I laughed, but then I got to work. After all, if I could create something he thought was “junky” but it really wasn’t, then we’d both be happy.

I asked my son what he wanted, and he replied that he wanted a chocolate chip muffin. He, of course, meant one of those monstrosities they sell at the store which is all white flour and butter and huge chocolate chips, a lot of them. I wasn’t going for that, but it did give me an idea, and the result was a low fat chocolate chip muffin which was full of potassium from bananas, antioxidants and fiber from dates, and protein (and fiber) from oat and garbanzo bean flour – plus the muffins were free of dairy, soy, gluten, eggs, nuts, and refined sugar. What more could a mother ask?

And my son plus my daughters, and later, my writing group, all enjoyed the muffins immensely.

Chocolate Chip Muffins

Ingredients:

8 ounces of pitted, chopped dates

1 cup gluten free rolled whole oats

1 cup boiling water

2 tbsp ground golden flaxseed

6 tbsp water

1 cup gluten free oat flour

1 cup garbanzo bean flour

2/3 cup potato starch

1/3 cup arrowroot starch

2 tsp baking powder

1 tsp baking soda

1/2 tsp salt

2 tsp cinnamon

1 tsp nutmeg

1 tsp ginger

1 cup Enjoy Life mini chocolate chips

Four 6 inch bananas (comes to about 1 1/4 cups mashed)

1/4 cup safflower oil

2 tbsp apple cider vinegar

Baking Instructions:

1. Preheat the oven to 400 degrees and line 24 muffin cups with cupcake liners or grease them so the muffins won’t stick to your pan.

2.  Use a food processor to finely chop your dates into tiny pieces. (This will distribute the dates throughout your batter.)

3. Mix the finely chopped dates with the oats in a bowl, and pour the boiling water over them, pushing the dates and oats down into the water so they are covered. Let sit.

4. Whisk together the flaxmeal with the water, and set aside.

5. Whisk together the oat flour, garbanzo bean flour, potato starch, arrowroot starch, baking powder, baking soda, salt, cinnamon, nutmeg, and ginger.  Stir in the chocolate chips and set aside.

6. Mash the bananas and mix with the oil and the dates and oatmeal mixture and the flaxmeal mixture.

7. Make a hole in the center of the dry ingredients and pour in the wet ingredients along with the apple cider vinegar. Mix up quickly just until the dry ingredients are moist.

8. Evenly scoop the muffin batter among the 24 muffin cups and bake for 15 minutes or until the cupcakes are golden and puffed and a toothpick inserted in the center comes out clean.

9. Remove the muffins to a wire rack and cool completely.  These keep well in a tightly covered tupper ware container.


Simple Pleasures: Blondies

“I’d rather be a stromboli.”

My son loves pizza, and if he had his way, he’d eat pizza morning, noon, and night, seven days a week. His great sadness in life is that he only gets pizza every couple of months. The nice thing is that he doesn’t care what type of pizza it is – whether it’s frozen from the grocery store or fresh from a pizza parlor or homemade; so occasionally I’ll also make a pizza stromboli where I roll the dough like a cinnamon bun with the tomato sauce and cheese and filling wrapped up inside.

The other day I was teasing him that he’d turn into a pizza if he wasn’t careful, and he responded by saying that he’d rather be a stromboli because it’s neater, easier to pack for his lunches at school, and that people ask questions about it.

As I thought about our conversation, I started thinking about blondies. Blondies are to brownies what stromboli is to pizza. It’s similar but different enough that people don’t often associate the two. Simply put, blondies are brownies which aren’t chocolate. They have the same fudgy texture and are made just like brownies, and if you’re feeling like something just a little bit different, these are just the thing.

My family loves them, and when I make them for company, they love them, too. When it came to revamping a recipe, though, it took a little bit of creativity because blondies usually get their rich, caramel and butter taste from butter and sugar, both of which we don’t use, plus we were making them gluten and egg free. We found a recipe on the back of an Enjoy Life package, and after tweaking it a bit, we were able to create a recipe that is quick and easy to make and delicious.

Blondies

Ingredients:

1/4 cup ground golden flaxseed

3/4 cup water

2/3 cup safflower oil

1 tbsp gluten free vanilla

2 cups coconut sugar

1 cup Gluten Free flour blend (we use Authentic Foods brown rice version)

1 cup sorghum flour

1/4 cup gluten free oat flour

1 tsp baking soda

1/2 tsp baking powder

1/2 tsp salt

2 cups allergen free chocolate chunks (we use Enjoy Life)

Baking Instructions:

1. Preheat the oven to 350 degrees and lightly grease an 11 x 15 pan. (Can use whatever you prefer.)

2.  Mix the flaxseed with the water and let it sit while mixing the other ingredients.

3. Mix the oil, vanilla and coconut sugar. Stir the flaxseed mixture to be sure it’s thickened and looks like beaten eggs, and add it to the we ingredients.

4. Whisk together the gluten free flour blend, the sorghum flour, the oat flour, the baking soda, the baking powder, and the salt.

5. Add the dry ingredients into the wet ingredients, along with the chocolate chunks, and mix quickly until the batter is well mixed.

6. Spread the batter evenly into the prepared pan and bake for 20 to 25 minutes until the blondies are a golden brown. The batter will have puffed and be slightly firm to the touch.

7. Cool completely on a wire rack before cutting into pieces to be eaten. (You can certainly cut them while warm, but like brownies they won’t cut as well.)

Simple Pleasures: Oatmeal Raisin Cookies

website oatmeal cookies

“It’s a peanut!”

Of all the gifts we received as the family, the one which gave the children most delight was one of the simplest gifts given. A neighbor and her children had gotten the idea from Pinterest to paint peanuts in their shells, attach acorn caps to the top, and turn them into ornaments by attaching little hooks. The effect was absolutely adorable, and it was a gift made with love as well as enjoyment.

In much the same way, oatmeal raisin cookies are a simple pleasure in life one can enjoy. While chocolate chip cookies make one think of mom, oatmeal raisin cookies usually bring images of grandma. They’re made with simple ingredients people usually have on hand, oats and raisins, and biting into the crunchy sweetness is like receiving a little hug in a hectic day.

My children and I created a dairy, gluten and soy free recipe last week which we really liked which I’ll share below.

Oatmeal Raisin Cookies

Ingredients:

1 1/2 cup Bob Red Mill Gluten Free Flour (the one made with garbanzo bean, not brown rice flour)

1/2 tsp baking soda

1/2 tsp baking powder

1/2 tsp salt

1/2 tsp cinnamon

1/2 tsp cardamom (optional: only use this if you like unusual spices, which we do)

1 1/2 cup whole grain gluten free rolled oats (you really want the whole rolled oats, not the flaked, instant oats)

1 to 2 cups raisins (if you like more cookie to raisin ratio, use the lesser amount; if you prefer a raisin in every bite, use the larger amount)

1/2 cup vegan soy free butter (we used an Earth Balance variety)

1/2 cup coconut sugar

1/4 cup Agave

1 egg

1/2 tbsp gluten free vanilla

1 tbsp flax milk

Baking Instructions:

1. Line cookie sheets with parchment paper and preheat the oven to 350 degrees.

2. Whisk together the gluten free flour, baking soda, baking powder, salt, cinnamon and cardamom, if using. Add the whole oats and raisins, and set aside.

3. Cream the vegan butter in a mixer until light and fluffy. Add the coconut sugar and mix well.

4. Slowly pour in the agave while the mixer is churning on low and incorporate all of the agave. Add the egg and vanilla and mix well.

5. Add the dry ingredients along with the flax milk and mix just until the dry ingredients are incorporated into the moist.

6. Use a tablespoon to drop level tablespoon sized amounts of dough onto the lined cookie sheets. Be sure to leave at least an inch between the cookies because the cookie dough will spread while cooking.

7. Bake for six minutes and then turn the cookie sheet around. Bake for another six minutes and remove the cookies. They will larger, golden brown and mostly hardened but soft to the touch.

8. Let the cookies cool for a minute or two on the cookie sheet. Carefully remove them to a wire cooling rack. The cookies will continue to harden a bit as they cool completely.

9. These cookies store well. Simply put them into a tupper ware container lined with a paper towel and keep the container tightly closed when not eating the cookies.


Holiday Traditions: Revamping Gingerbread

“Your daughter made the entire class cry.”

My oldest was in Kindergarten when I received a phone call from her teacher who was concerned about the fallout of my daughter having caused distress to all her little classmates.

The evening before we had spoken with our children, only the two daughters at the time, about Saint Nicholas, about the real person who had cared deeply for the poor children of his country at the time, and how he had died but that his spirit lived on in the modern version of Santa Claus.  Apparently, the next day, when my daughter’s classmates were talking about Santa Claus, her little truthful autistic self felt compelled to let her classmates know that Saint Nicholas was dead,which her classmates interpreted as Santa Claus having just died and that there’d be no Christmas that year.

We had to have a nice long chat with our daughter about what exactly one can share with other people and exactly how one should go about sharing even if “it’s the truth” as she kept insisting.

What I remember clearly from the incident, though, was the surprise of the teacher when we explained that the issue arose because we didn’t actually encourage a belief in a current active Santa Claus, that we wanted our children to learn compassion and care for people around them by understanding what the real Saint Nicholas did because of his faith in God and that our children and we, too, could care for the people around us and take care of the poor because of our faith.

At the time, she seemed to think that we were somehow depriving our children of “imagination” as she put it. We argued that our children had plenty of that without any extra help from Santa Claus and that while we didn’t push a belief in Santa Claus, our children did believe in the Tooth Fairy and Leprechauns so they weren’t completely without a fairy world.

I doubt we convinced her, though, and I find that the same thing happens when it comes to food traditions for the holiday. Too often people tell me that they don’t want to try my holiday goodies because “it won’t be the same”. My argument is that it’s not supposed to be the same. Traditions are wonderful, and our family has boatloads of them, but change is good, too, and sometimes, something new can be even better than the original tradition, especially if it means that you can include the members of your family who otherwise would have to miss out on the food tradition because of their food allergies or restrictions.

One of the holiday food traditions in the States is the making of gingerbread. Last year, I shared how we had revamped a roll-out ginger cookie recipe. This year, I’m going to share a gingerbread recipe. We made this for my in-laws over Thanksgiving, and we tweaked it a bit to make it even better for Christmas.

Upside Down Pear Gingerbread

Ingredients:

2  15 ounce cans pears in 100% pear juice

1 1/4 cup sorghum flour

1 1/4 cup cornstarch

2 tsp baking soda

1 tbsp ground ginger powder

1 tsp ground cinnamon

1/4 tsp ground cloves

1 cup warmed pear juice from the canned pears

1/2 cup coconut sugar or regular sugar

1 cup date molasses or regular molasses

1/2 cup vegan soy free butter

2 beaten eggs

Baking Instructions:

1. Preheat the oven to 325 degrees.

2. Grease the bottom of a glass pan. You can use vegan butter or shortening or a plant based oil of your choosing. You can use a 9 x 9 x 2 square pan or an 11 x 8 x 2 rectangular pan. Which type of pan you choose will slightly affect the baking time and how thick your gingerbread is.

3. Drain the pears from their cans, reserving the liquid for use as part of the wet ingredients.

4. Slice the pear halves into thin strips and arrange them on the bottom of your chosen pan. They will need to overlap with one another to create a nice thick layer of pears.

5. Whisk together the sorghum flour, cornstarch, baking soda, ginger, cinnamon, and cloves. Set aside.

6. Warm a cup of the leftover pear juice in the microwave until the juice is boiling. Microwaves may vary, but mine usually just needs about 45 seconds to a minute.

7. To the boiling pear juice add the sugar, molasses, and butter. Stir until everything is dissolved and well combined.

8. Mix together the dry ingredients with the wet ingredients with the beaten eggs, just until everything is combined and the dry ingredients are wet.

9. Carefully spread the gingerbread batter evenly over the pears and bake in the preheated oven until a toothpick inserted in the center comes out clean. Depending on which size pan you use and whether it’s a glass pan or aluminum will affect the baking time, so set your time for 30 minutes and check from there. I make mine in an 11 x 8 x 2 glass pan which takes about 40 minutes. A 9 x 9 x 2 will probably take closer to 50 minutes. Aluminum pans may cook more quickly.

10. When the gingerbread is done, you can serve it as is, which is what I did for my in-laws and cut out pieces with the pears on the bottom, or if you want to do what I did for a party I hosted last week, you can carefully turn the pan onto a platter and serve the cake with the pear-side up which is very pretty.


Creative Cooking: Chocolate Raspberry Cupcakes

“Can we make something chocolate?”

My few weeks have been beyond crazy.  On top of our usual busyness of school, work, and activities, we’ve continued to deal with my oldest’s recovery from being hit by a car, we’ve grieved the death of a friend’s daughter, we’ve agonized over a loved one being in the hospital in an induced coma, and we added rehearsals for my son to be in “It’s A Wonderful Life” and auditions for a play I’m directing.

So, it’s now just a few days before Thanksgiving, and I’m finally turning my attention to the menu for that day and returning to this blog which I have ignored for these past three weeks. When I asked my children what we should have my middle child responded with the question:  “Can we make something chocolate?”

Now, two of my three children are well-rounded dessert lovers. When presented with choices, they may choose a slice of apple pie or a piece of zucchini cake or a ginger cookie or a slice of pumpkin cheesecake. My middle child, however, when given options to choose from, will opt for the chocolate cream pie or the chocolate fudge cake or the double chocolate cookie or the chocolate cheesecake.

So, I wasn’t surprised when she asked if we could make something chocolatey. She always does, and I always suggest that we stick to the traditional pies for Thanksgiving and make something chocolate for another time. I surprised myself yesterday, though, by actually contemplating the idea of making chocolate cupcakes.

Why? Three reasons: One, I just had a really, really long week and the thought of something comforting like chocolate cupcakes was enticing; two, with the death of my friend’s daughter at such a young age (20’s) and my own daughter being alive after being hit by a car, I’m realizing that life’s too short to NOT have chocolate, no matter the season; and three, we just watched my son’s performance in “It’s A Wonderful Life” where I was reminded that it’s all really about family and friends and time together and not the menu.

So, if you need assistance in revamping your holiday menu to fit allergy or health needs, please read my posts from last year (Nov and Dec 2013) where you’ll learn all sorts of lessons for how to do so; but for this Thanksgiving, I’m offering a creative addition to the Thanksgiving menu:  Chocolate Raspberry Cupcakes which are gluten, dairy, nut, soy, peanut, and egg free. Enjoy and have a most Happy Thanksgiving!

Chocolate Raspberry Cupcakes

Ingredients:

3 1/2 cups gluten free flour (I used Authentic Foods Multi-Blend)

1/2 tsp salt

2 tsp baking soda

1 cup Enjoy Life allergen free mini chocolate chips

1/2 cup Hershey’s dark unsweetened cocoa powder

3/4 cup oil (I used safflower)

1 cup Agave

2 tsp vanilla

2 cups water

2 tbsp vinegar (I used raspberry but apple cider or white will do)

Polaner’s Raspberry All-Fruit

Baking Instructions:

1. Preheat the oven to 350 degrees and line 24 muffin cups with cupcake liners.

2. Whisk together the flour, salt, baking soda and cocoa powder. Add the chocolate chips and set aside.

3. Whisk together the oil, agave, vanilla, and water.

4. Mix the dry ingredients into the wet, adding the vinegar.

5. Divide half of the batter evenly among the muffin cups. I usually put about 1 1/2 tbsp of batter into each.

6. Carefully put one teaspoon of raspberry all fruit into the center of the batter.

7. Evenly distribute the remaining batter among the muffin tins, carefully putting the batter over the raspberry all fruit.  Again, this is usually about another 1 1/2 tbsp.

8. Bake the cupcakes until a toothpick inserted in the center comes out clean, about 15 to 20 minutes.

9. Cool in the muffin tins on a wire rack for about five minutes before removing them from the tins and completely cooling them on a wire rack.

10. For a festive touch, put the cupcake into a bowl with a scoop of vanilla ice cream or nondairy frozen dessert next to it with a raspberry and mint leaf on top.


Creative Cooking: Using Baby Food

“If you could choose one superpower, Mommy, what would it be?”

My son is always asking me questions which cause me to think. When he asked me about which superpower I’d like to have, I had to take few minutes to consider my answer. I finally said, it would be difficult for me to choose between supersonic hearing so I could catch what my children were whispering about and the ability to fly, just because, well, that would be cool.

In response, my son said that he would choose the ability to change into different animals because then he’d have lots of powers. If he wanted to fly, he’d become a bird; if he wanted to be invisible, he’d become a chameleon; if he wanted to be fast, he’d become a cheetah; if he wanted to be strong, he’d become an elephant. (These are the examples he gave me.)

I have to say that I was quite impressed. My limited linear thinking brought a quandry, forcing me to have to choose between superpowers I wanted.  My son, however, had thought outside the box and found an answer which would give him the opportunity to have all the possible powers he could want.

When it comes to cooking, I think we can sometimes get caught in the same trap. We think about how to cook and what to cook in only one way, whether it’s only cooking the way we were taught or sticking to only traditional methods and ingredients or  being afraid to ever experiment. We don’t consider that maybe there’s an “outside of the box” approach we can take to both ingredients and process.

Recently I received a question from a mother which made me think about an “outside the box” cooking option which I use. Baby food. A mom wanted to use bananas in muffins but her daughter didn’t like the chunkiness of the banana, which is the consistency she got when she mashed them, or the little black specks, which showed up if she pureed them in her food processor. (It occurred to me that this mother must have children on the spectrum like I do!)

My response to her was to use baby food. Nowadays, at least at my grocery store, you can get all natural (only fruit or vegetables and water), jarred baby food, and there are many benefits to using the baby food: 1) They keep well in your pantry so they’ll be on hand when you need them; 2) when on sale, you can get them at a really low price which is more affordable than fresh fruit and vegetables; 3) they provide a concentrated flavor without the work; and 4) the jars are wonderful to have on hand for those craft projects your kids are required to do for school or for those cute little holiday gifts you always see in the “make your own” magazines but which you never do because you don’t have those little jars!

Some uses for baby food:

1. To make muffins, breads, pancakes, waffles, cakes, etc…: Use the baby food version in your recipes instead of having to cook and puree or mash the fresh equivalent.

2. As a thickener: Vegetable baby food is great for thickening your gravies, soups, pasta sauce, casseroles, stews, etc…. They add flavor and thickness without adding anything else.

3.  To add nutrients to your recipes: Add vegetable baby foods to your meatloaf instead of that sugary condensed tomato soup. Make a glaze for your chicken with a fruit baby food. Use baby food as a binder for your bread crumb coated baked fish or for your meatballs. Create your own fruit or vegetable butter for spreading onto toast.

4.  As a mix-in: Mix in baby food to store bought yogurt or cream cheese or cottage cheese to create a flavorful treat. Add baby food to the smoothie you make for breakfast. Mix in baby food to your favorite dipping sauce to create a new flavor.

Chocolate Chip Muffins

(makes 24)

Ingredients:

3 1/2 cups gluten free flour blend

4 tsp baking powder

1 tsp baking soda

1/2 tsp salt

2 tsp cinnamon

1/2 tsp nutmeg

1/4 tsp cloves

1 cup Enjoy Life mini chocolate chips

Four 6 0z jar containers of banana baby food

3/4 cup liquid egg whites

1/2 cup Agave

1/2 cup safflower oil

Baking Instructions:

1. Preheat the oven to 400 degrees and line 24 muffin cups with cupcake liners.

2. Mix the flour, powder, soda, salt, cinnamon, nutmeg, and cloves together. Stir in the chocolate chips. Set aside.

3. Mix the baby food, egg whites, agave, and oil together.

4. Add the dry ingredients to the wet and very quickly mix the batter up just until the dry ingredients are moist.

5. Divide the batter evenly among the 24 cups. The cups will be filled to the top.

6. Bake for 15 minutes or until a toothpick in the center comes out clean. Cool in the muffin tins for five minutes. Remove the muffins to a wire cooling rack to cool completely.


Menu Suggestion: Bread Pudding

“Um… you don’t know me but your daughter has been run over by a car.”

Last week, one of my worst fears as a mother came true. My husband and I received THAT phone call. You know, the one where you’re told that something horrible has happened to your child while you were not with them to prevent it.

We were very fortunate that our daughter survived being hit by a car while she was crossing the street at a crosswalk, but there’s nothing which can erase the agony of those first few hours as the doctors ran tests and our daughter was in and out of consciousness.

Even when we knew she was going to be okay, though, and the world was once again filled with the light of what would eventually be, there was still this need for comfort, and while most of my comfort came through prayers and the support of friends and family, I came to a place one day where I knew I simply had to cook something, because, for me, cooking is soothing to my soul, and being able to cook something special for my daughter brought a different type of  solace.

As I thought about what to make, the first thing which came to my mind was bread pudding. Now, bread pudding isn’t something which folks in my part of the United States make much these days, and that’s such a shame, because folks don’t realize what they’re missing. Bread pudding is a delicious, homey sort of dish which is also extremely versatile and easily adaptable for a lot of food allergies. It’s also a great way to use up leftovers of any type of bread product like loaf bread, muffins, bagels, croissants, or quick breads. Plus it can be anything from a sweet dessert to a savory side dish to a breakfast entree.

I happened to have some allergy friendly pumpkin muffins leftover (free of gluten, dairy, nuts, eggs, and sugar) so I decided to chop those up and mix it up with eggs, chocolate soy milk and chopped pears. It was so delicious! And I confess, I ate it for breakfast, too, since you know — eggs, pumpkin, fruit, milk — all good things to start your day, right? *grin*

There’s some general information, though, which you should know for making bread pudding, and I’ll share them below:

1. The egg to milk ratio: Search for bread pudding recipes in cookbooks and online, and you’ll find that people differ on the ratio of milk to eggs. For myself using at least 1/2 cup of milk per egg is the lowest ratio I use; using 1 cup of milk per egg is the most I’d suggest you’d use. You’re essentially making a custard for the bread to soak up. The milk contributes to the creaminess; the eggs bind it together. The more eggs, the firmer the custard; the more milk, the softer the custard.

2. The milk: The thicker your milk, the more rich your bread pudding, so heavy cream obviously makes for a richer bread pudding than skim milk. You can, however, use any type of milk you want, from skim to heavy cream, from cow milk to coconut, soy, almond, rice or flax milk. Since we have dairy and nut allergies, I use either soy milk or flax milk. Flax milk is thicker so it mimics more the consistency of whipping cream, and it has the added bonus of those omega 3s. Soy milk is nice because it adds some more protein. In addition you are not limited to plain milk. Flavored milks, of any type, are a great way to change up the bread pudding you’re making.

3. The eggs: Using whole eggs with both the whites and yolks makes for a creamier pudding, but you can also make bread pudding with only egg whites, with Eggbeaters, and even without eggs. While eggs do bind, simply using milk alone will work, too. You just need to remember that your liquid to bread ratio has to account for the loss in eggs, which requires using more milk.

4. The liquid to bread ratio: How much liquid you need really depends on your bread. Denser whole grain breads or leftover bagels or muffins will require more liquid than an airy French or Challah bread. As a general rule, though, a one to one ratio works well — one cup of liquid for every one cup of bread. So, for example, 4 cups of bread could be mixed with 4 eggs (which would equal one cup) and 3 cups of milk which would give you a four cup liquid yield to the 4 cups of bread. If you’re uncertain, start with half the amount you think you might need and then add more if necessary.

If you’re making a bread pudding in a 9 x 13 pan, usually you’ll be using at least 3 cups of bread for a shallower bread pudding and up to 6 cups for a thicker bread pudding.

5. Mixing the custard: If you are using both eggs and milk, it’s really important to mix them together before pouring the liquids onto the bread. You’ll sometimes find a recipe that soaks the bread with milk and then mixes in the eggs. You really don’t want to follow that recipe. The key to a good bread pudding is the bread evenly soaking up the liquid, so be sure to whisk your eggs and milk together before pouring them over the bread. Obviously if you’re only using milk, you have no issues.

It’s important that any flavorings or sweeteners or aromatics you use for your bread pudding, whether sweet or savory, are mixed into your custard so that the flavors will soak into the bread along with the custard liquid.

6. The bread: What’s lovely about bread pudding is that most anything will work. Any type of sliced bread, whether wheat based or gluten free, and any type of leftover muffins, bagels, cake pieces, scones, croissants, donuts, etc…. The advantages to using leftover baked products is that you’re using up something you might otherwise throw out and usually those products are already flavored so you don’t need to add any to the custard.

If you are using bread, though, you’ll note that people will say that it should be stale bread or they’ll have you toast the bread in the oven or lightly cook it on the stovetop. This is because the drier your bread, the more obviously it’ll soak up liquid. You don’t, however, need to wait until you have stale bread to make bread pudding. If using fresh bread, simply let the bread soak longer before you put it into the oven. The effect will be the same.

7. The bread shape: Here again you will find that people’s preferences vary. Some will say use cubed bread; others say to keep it sliced; a few will argue for large hunks; many suggest small pieces. Really, it’s all about what you’re looking for as the end product. When I made the chocolate pumpkin pear bread pudding, I actually crumbled the muffins because I wanted a smoother, creamier texture. If you keep the bread in slices, it’ll make for a denser, crispier texture. Bread chunks give you something to bite into. Small cubes make for a chewier texture. So, you decide.

8. The flavorings: Bread pudding can be both sweet or savory. If you want the bread pudding for a dessert, use cinnamon, nutmeg, cardamom, cloves, ginger or vanilla or fruit peels. If you want a savory side dish or something for breakfast use herbs like thyme, rosemary, oregano, marjoram or basil and/or aromatics like onions, garlic or celery.

9. The sweetener (for dessert puddings): If you’re making a sweet bread pudding, you can sweeten it with sugar, honey, maple syrup, molasses, agave, stevia, or coconut sugar. How much you add to your custard mixture really depends on your sweet tooth. Recipes vary from 1/4 cup to 2 cups for a 4 to 6 cups of cubed bread. I personally add chopped or pureed fruit or some mini chocolate chips if I’m making a sweet bread pudding and omit any other added sweetener.

10. The additions: Okay, the best part of bread pudding is that you can create whatever you want. As I mentioned, this time around I took leftover pumpkin muffins and added chopped up pears and used chocolate soy milk to make a chocolate-pumpkin-pear bread pudding.

You can add anything you like to a bread pudding. For sweet puddings add chopped or pureed fruits or chocolate chips or coconut flakes or dried chopped fruits. For savory puddings add chopped vegetables or pureed pumpkin or squash or sauteed vegetable aromatics like mushrooms and celery or add cheeses like romano or parmesan or even chopped up chicken or sausage.

What’s important is that you either mix the additions with the bread or sprinkle them onto the bread before you add the custard mixture. The custard mixture is always last.

11. Assembling a bread pudding: We’ve basically gone over this in pieces-parts: Prepare your bread, whatever it is, the way you want, whether crumbling, cubes, chunks or slices. If you’re going to mix in any additions, do so. Grease a pan with your preferred method of greasing. Spread the bread mixture evenly in the pan. Mix together your custard, whether it’s eggs and milk or just milk, with your flavorings. Pour the mixture over the bread. Let the bread soak up some of the custard before baking (This can be anything from 15 minutes to overnight.)

12. Cooking the bread pudding: Okay, this is where you decide what type of pudding you want. I like my bread puddings to be soft and creamy in texture. So, for my bread puddings I use a pan with a large overhanging edge and place that pan into a larger pan. Then I put the larger pan, holding the smaller pan, into the oven. Slowly I pour hot water from my tea kettle into the larger pan until the water comes up just under the overhanging edge of the smaller pan. As the pudding cooks and solidifies, the hot water bath more evenly cooks the pudding and the moisture keeps the pudding soft and creamy. If you prefer a heartier texture to your pudding, you can simply bake the bread pudding in the oven in its pan without any hot water bath.

Most bread puddings in a 9 x 13 pan will cook in about an hour at 350 degrees. You’ll know it’s done because the bread pudding won’t be liquidy but puffed and solid.

And bread puddings last for days and days in the fridge without going bad so you can go ahead and make that big 9 x 13 batch instead of the 8 x 8 which many recipes these days make!


Cooking Techniques: Allergy Friendly Pie Crusts

website crusts

“Yay! Thanksgiving in October!”

My ninth grade daughter is taking French this year for the first time, and the high school she is at hosts an exchange program with another high school in France. We were asked to host a French student for two weeks, and one of the suggestions for entertainment was to have a Thanksgiving meal with them, since that would be a different experience for them.

We were happy to oblige, as you can tell by my son’s response above.

As we prepared, we explained to our French student that no matter what people say about the Turkey and the side dishes and the rolls, that Thanksgiving really is all about the pies: apple pie, pumpkin pie, mincemeat pie, cranberry pie, pecan pie, sweet potato pie, pear pie, buttermilk pie, and every possible variation of these pies which exist.

For folks with food allergies, though, pies can be tricky. May people struggle with pie-making in general, even when you’re able to use white flour, butter, and salt. The thought of trying to make a pie crust with substitutions is something a lot of folks simply just don’t want to consider.

The good news, though, is that making a gluten, dairy, soy, salt free pie crust is actually easier than making a traditional pie crust. You just need to know a few things, and you’ll be on your way to a great Thanksgiving dessert buffet!

Tips for Allergy Friendly Pie Crusts:

1. It’s just a simple swap: Because pie crusts don’t need to rise the way breads and cakes do, you can simply substitute your favorite gluten free flour for the all purpose flour. No need to make up any special flour blends at all. If you want a flakier, crispier, closer to traditional pie crust, opt for flours like brown rice or sorghum. If you want a more substantive crust with flavor, protein and fiber, try garbanzo bean or gluten free oat flour. If you have a gluten free flour blend sitting around in your closet, you can by all means use, too.

2. Cold is best all the way around: All pie crust recipes call for cold butter or shortening, cold ice water, and to put the made crust in the fridge for a little while. Why? Because warm pie crust dough sticks and won’t roll very well. Warm pie crust dough makes for a denser, less flaky crust.

What I find works wonderfully is to stick your measured butter and/or shortening into the freezer for five 10 minutes or so before using, to put ice cubes into your water, and to put your prepared pie crust dough into the fridge for a minimum of thirty minutes, an hour at the most.

3. “Fat” substitutions work: I use soy free vegan butter and shortening in my pie crusts all the time without any difference. So you can simply use what works for you without worry. It’s a straight one to one substitution ratio. What you should know, though, is that the allergy friendly versions tend to be softer than regular butter and shortening so sometimes I freeze them a little longer more like 10 to 15 minutes.

4. Work around and with the rolling: When it comes to pie crusts, the rolling out of the dough is what usually causes issues for people. I’ve learned a couple of things:

One, you don’t have to roll the bottom crust. I shape my dough into a slightly flattened disk (about an inch high) which I cool in the fridge for my 30-60 minutes, and then I simply use my fingers to push the dough outward from the center to the edges. It takes less than five minutes and actually makes for a more even crust.

Two, when I do have to roll the crust for the top part of a pie, I’ve found that putting the dough between two pieces of wax paper which I’ve also lightly greased is the best approach. The dough rolls easily, doesn’t stick, and comes off when I go to put it on top of the pie.

5. Be creative with the flavoring: Salt is the go-to for pie crusts, but it doesn’t have to be. If you’re making an apple pie, add some cardamom to complement the cinnamon in the pie. If you’re making a pumpkin pie, add grated orange peel as a contrast to the pumpkin. If you’re making a sweet potato pie, add grated nutmeg to intensify the sweet potato taste. You simply add the spices to the dry ingredients of the pie dough before cutting in the fat.

6. Know the effects of the process: Another issue people often have problems with is making their dough too dry or too wet. It’s important to understand the dynamics of the different ways you process the dough:

If you use a food processor which is what many recipes say to do nowadays, the dynamics of the food processing blade means the water is incorporated quickly and efficiently. If you have cut the fat in yourself with a hand pastry blender of two knives and are adding the water by stirring the dough with a fork, the water will drain into different parts of your dough more quickly than you can stir it. As a result you will often need more water for hand processing than when using a food processor.

Also, a food processor will draw the dough naturally into a ball which makes it easy for you to see that you have enough water. When you stir the dough by hand, the dough will usually not form a ball unless you’ve added too much water.

So, a tip: If a recipe calls for a certain tbsp amount of ice water for use in a food processor, it will normally mean you’ll need about two tablespoons more for hand stirring, so if my dough looks dry after the amount specified, I will go ahead and add two more tablespoons, and then even if it looks dry still, I will push the dough together with my hands to form two disks. If the dough will stick together, it’s fine, if there are dry pieces falling off, I simply wet my hands with the ice water and incorporate those dry pieces into the disks.

Struesel Pear Cranberry Pie

(This recipe makes two pies)

Ingredients:

Pie crust, prepare enough for two bottoms only

1 cup agave

1/4 cup water

one 12 oz package of fresh cranberries (be sure to check for stems)

8 pears, washed, cored and sliced into 12-16 slices each

3 tbsp cornstarch

3 tbsp water

2 cups gluten free whole oats

1/2 cup sorghum flour

1 tsp cinnamon

1/2 tsp nutmeg

1/4 tsp ground cloves

1/2 cup vegan soy free butter*

Baking Instructions:

1. Prepare your favorite pie crust recipe. If you don’t have one, Bob’s Red Mill pie crust mix works very well. Would recommend adding some spices to jazz it up a bit, though.  Line the bottoms of two 9.5 inch pie pans with the crusts.

2. Mix agave with water and put into a stove top pan large enough to hold all the pears.

3. Add the cranberries and bring to a boil. Cook for a minute or two until the cranberries begin to pop.

4. When the majority of cranberries have popped, add the pears, stirring to coat with the cranberries. Cook for 3-5 minutes until pears have softened.

5. Mix the cornstarch with the water, and making a well in the center of the pear mixtures, slowly add the cornstarch, stirring continually. Mix the cornstarch syrup thoroughly with the pear-cranberry mixture, cooking for a minute or two to make sure the syrup has thickened.

6. Evenly divide the pear-cranberry mixture between the two pie crusts.

7. In a food processor, add the oats, sorghum flour, cinnamon, nutmeg, cloves and butter.  Process until the mixture is a nice crumbly topping.

8. Evenly distribute the topping over both pies to completely cover them.

9. Bake in a preheated 375 degree oven for about 40-45 minutes until the pie is bubbling and the streusel is golden brown.

10.  Cool completely before serving.

* This makes for a savory topping which contrasts with the sweetness of the pear-cranberry mixture. If you happen to like your toppings sweet, you should add a tbsp or two of Agave with the butter.


Recipe Experiment: Sorghum Quick Bread

“Well, can’t you make some healthy junk food for me to have as a snack?”

If my son was growing up in what the surveys say is a typical American home, he’d be a junk food junkie. Given the choice, cookies, ice cream, cake, chocolate, candy, would always win. As it is, though, he was born into our family so he is more of a junkie wannabe, constantly nagging me for all those things and resigning himself to a banana when the answer is, “No.”

The other day, though, he had a particularly rough day, and he really wanted something sweet but a banana wasn’t cutting it. (Yes, he must be my son, since he’s already learned that food can sometimes provide solace in the face of difficult days! No, I do not approve of folks “feeding” their problems, but face it, sometimes you just need some comfort food!)

One look at his little sad face, and I caved. Since I still have all that sorghum flour I mentioned in the sorghum pancake post, I decided I’d try experimenting. Maybe I could make a quick bread which would be a good healthy snack but provide that little sweet solace my son craved.

Since sorghum flour is so high in fiber, it seemed it would make a great base for a banana bread where ripe bananas would help to cut down on the need for sugar and the fiber in the sorghum flour would counter any spike in blood sugar levels from all the fructose. I didn’t want the bread to be too heavy, though, so I mixed a bit of brown rice flour, and then, because you know how much I like that protein-full garbanzo bean flour, I added that, too.

Because I wanted to steer clear of egg, dairy, and soy allergies, I used ground flaxseed and flax milk, using lemon to make a “buttermilk” and adding vinegar at the end to help the eggless, gluten free breads to rise.

I had wanted to use a little bit of safflower oil, but since the cupboards were bare of that, I opted for a coconut oil and used some coconut sugar, figuring any residual coconut taste would complement the bananas. To add other flavor, I decided this would be a spice bread and incorporated some cinnamon, nutmeg, ginger, allspice and cardamom. Then because this was supposed to be “medicinal” bread, I added mini Enjoy Life chocolate chips, and the results were two loaves of delicious, healthy snacking bread.

My son was happy that he got to eat a “healthy junky snack”, and I was happy that I was able to bring a smile to his face without compromising my principles surrounding junk food.

Sorghum Banana Quick Bread

Ingredients:

2 tbsp golden ground flaxseed mixed with 6 tbsp of water

1/2 cup flax milk* mixed with 1/2 tbsp lemon juice

2 cups mashed very ripe bananas

1/2 cup melted coconut oil**

1/4 cup Agave

2 cups sorghum flour

1/2 cup brown rice flour

1/2 cup garbanzo bean flour***

1/2 cup coconut sugar

1 1/2 tsp baking soda

1/2 tsp sea salt

2 tsp ground cinnamon

1 tsp ground cardamom

1/2 tsp ground ginger

1/2 tsp ground nutmeg

1/2 tsp allspice

1 1/2 cups Enjoy Life allergen free mini chocolate chips****

2 tbsp apple cider vinegar*****

Baking Instructions:

1. Line two 9 x 5 loaf pans with parchment paper so there are wings hanging over the sides of the pan for lifting the bread out, and preheat the oven to 350 degrees.

2. Mix together the flaxseed and water and let it sit for five minutes to thicken.

3. Mix together the milk and lemon juice and let that sit for five minutes to thicken.

4. Mix together the flaxseed mixture, the milk mixture, the mashed bananas, coconut oil and agave. Set aside.

5. Whisk together the sorghum, brown rice and garbanzo bean flours with the coconut sugar, cinnamon, cardamom, ginger, nutmeg, and allspice.

6. Add the chocolate chips to the dry mixture, and then add the dry mixture to the wet ingredients with the apple cider vinegar.  Mix quickly and well.

7. Evenly divide the batter between the two loaf pans.

8. Bake for 40 minutes until the bread is golden brown and a toothpick in the center comes out mostly clean.

9. Cool the bread for 10 minutes in the pan. Then remove the bread, using the parchment paper wings to a wire cooling rack. Cool another ten minutes, and then carefully slide the loaves off the parchment paper onto the wire rack.

10. Cool completely, slice and enjoy.  Or eat it while it’s still warm, if you can’t wait!

* You can use any other type of milk, too.

** Try it with safflower oil or vegan melted butter instead of coconut oil if you have a tree nut allergy.

*** If you have a legume allergy, just double the brown rice flour or opt for another type altogether.

**** If you want to mix it up, omit the chocolate chips and try using chopped dried plums or apricots or dates instead.

*****If you don’t have apple cider vinegar, white distilled is fine.

Final Note: If you don’t want to use all those spices, don’t. Feel free to omit any of them or experiment with your own flavors.