Recipe Revamping: Lemon Bundt

“The world as best as I remember it….”

A musician named, Rich Mullins, released an album years ago titled, “The World As Best As I Remember It.” The songs in the album challenged folks to think about what they thought they knew, to consider how our current perceptions can affect memories and views of “history,” to understand that much is simply “as best as we remember it.”

Food memories are often “as best as we remember it” because the emotions around them can cloud or enhance what we remember. For example, when I was pregnant with my second child, I simply could not eat iceberg lettuce. It made me so sick that to this day I cannot eat it. What’s interesting is that when I think about iceberg lettuce now, I don’t seem to have memories of eating it ever, though my parents will tell you that I most definitely did, and for a time, wouldn’t eat any other type of lettuce as a child.

Another example is a friend whose mother always made cake from a box for his birthday which was the only time his mother ever baked, so in his memory, his mother made the best cakes ever. As a grown up, after eating one of my homemade cakes, his mother made him a cake from a box, and he couldn’t believe the difference in taste because he was sure his mother’s cake would win the “best ever” taste test over my homemade cake, which he had to admit, it didn’t.

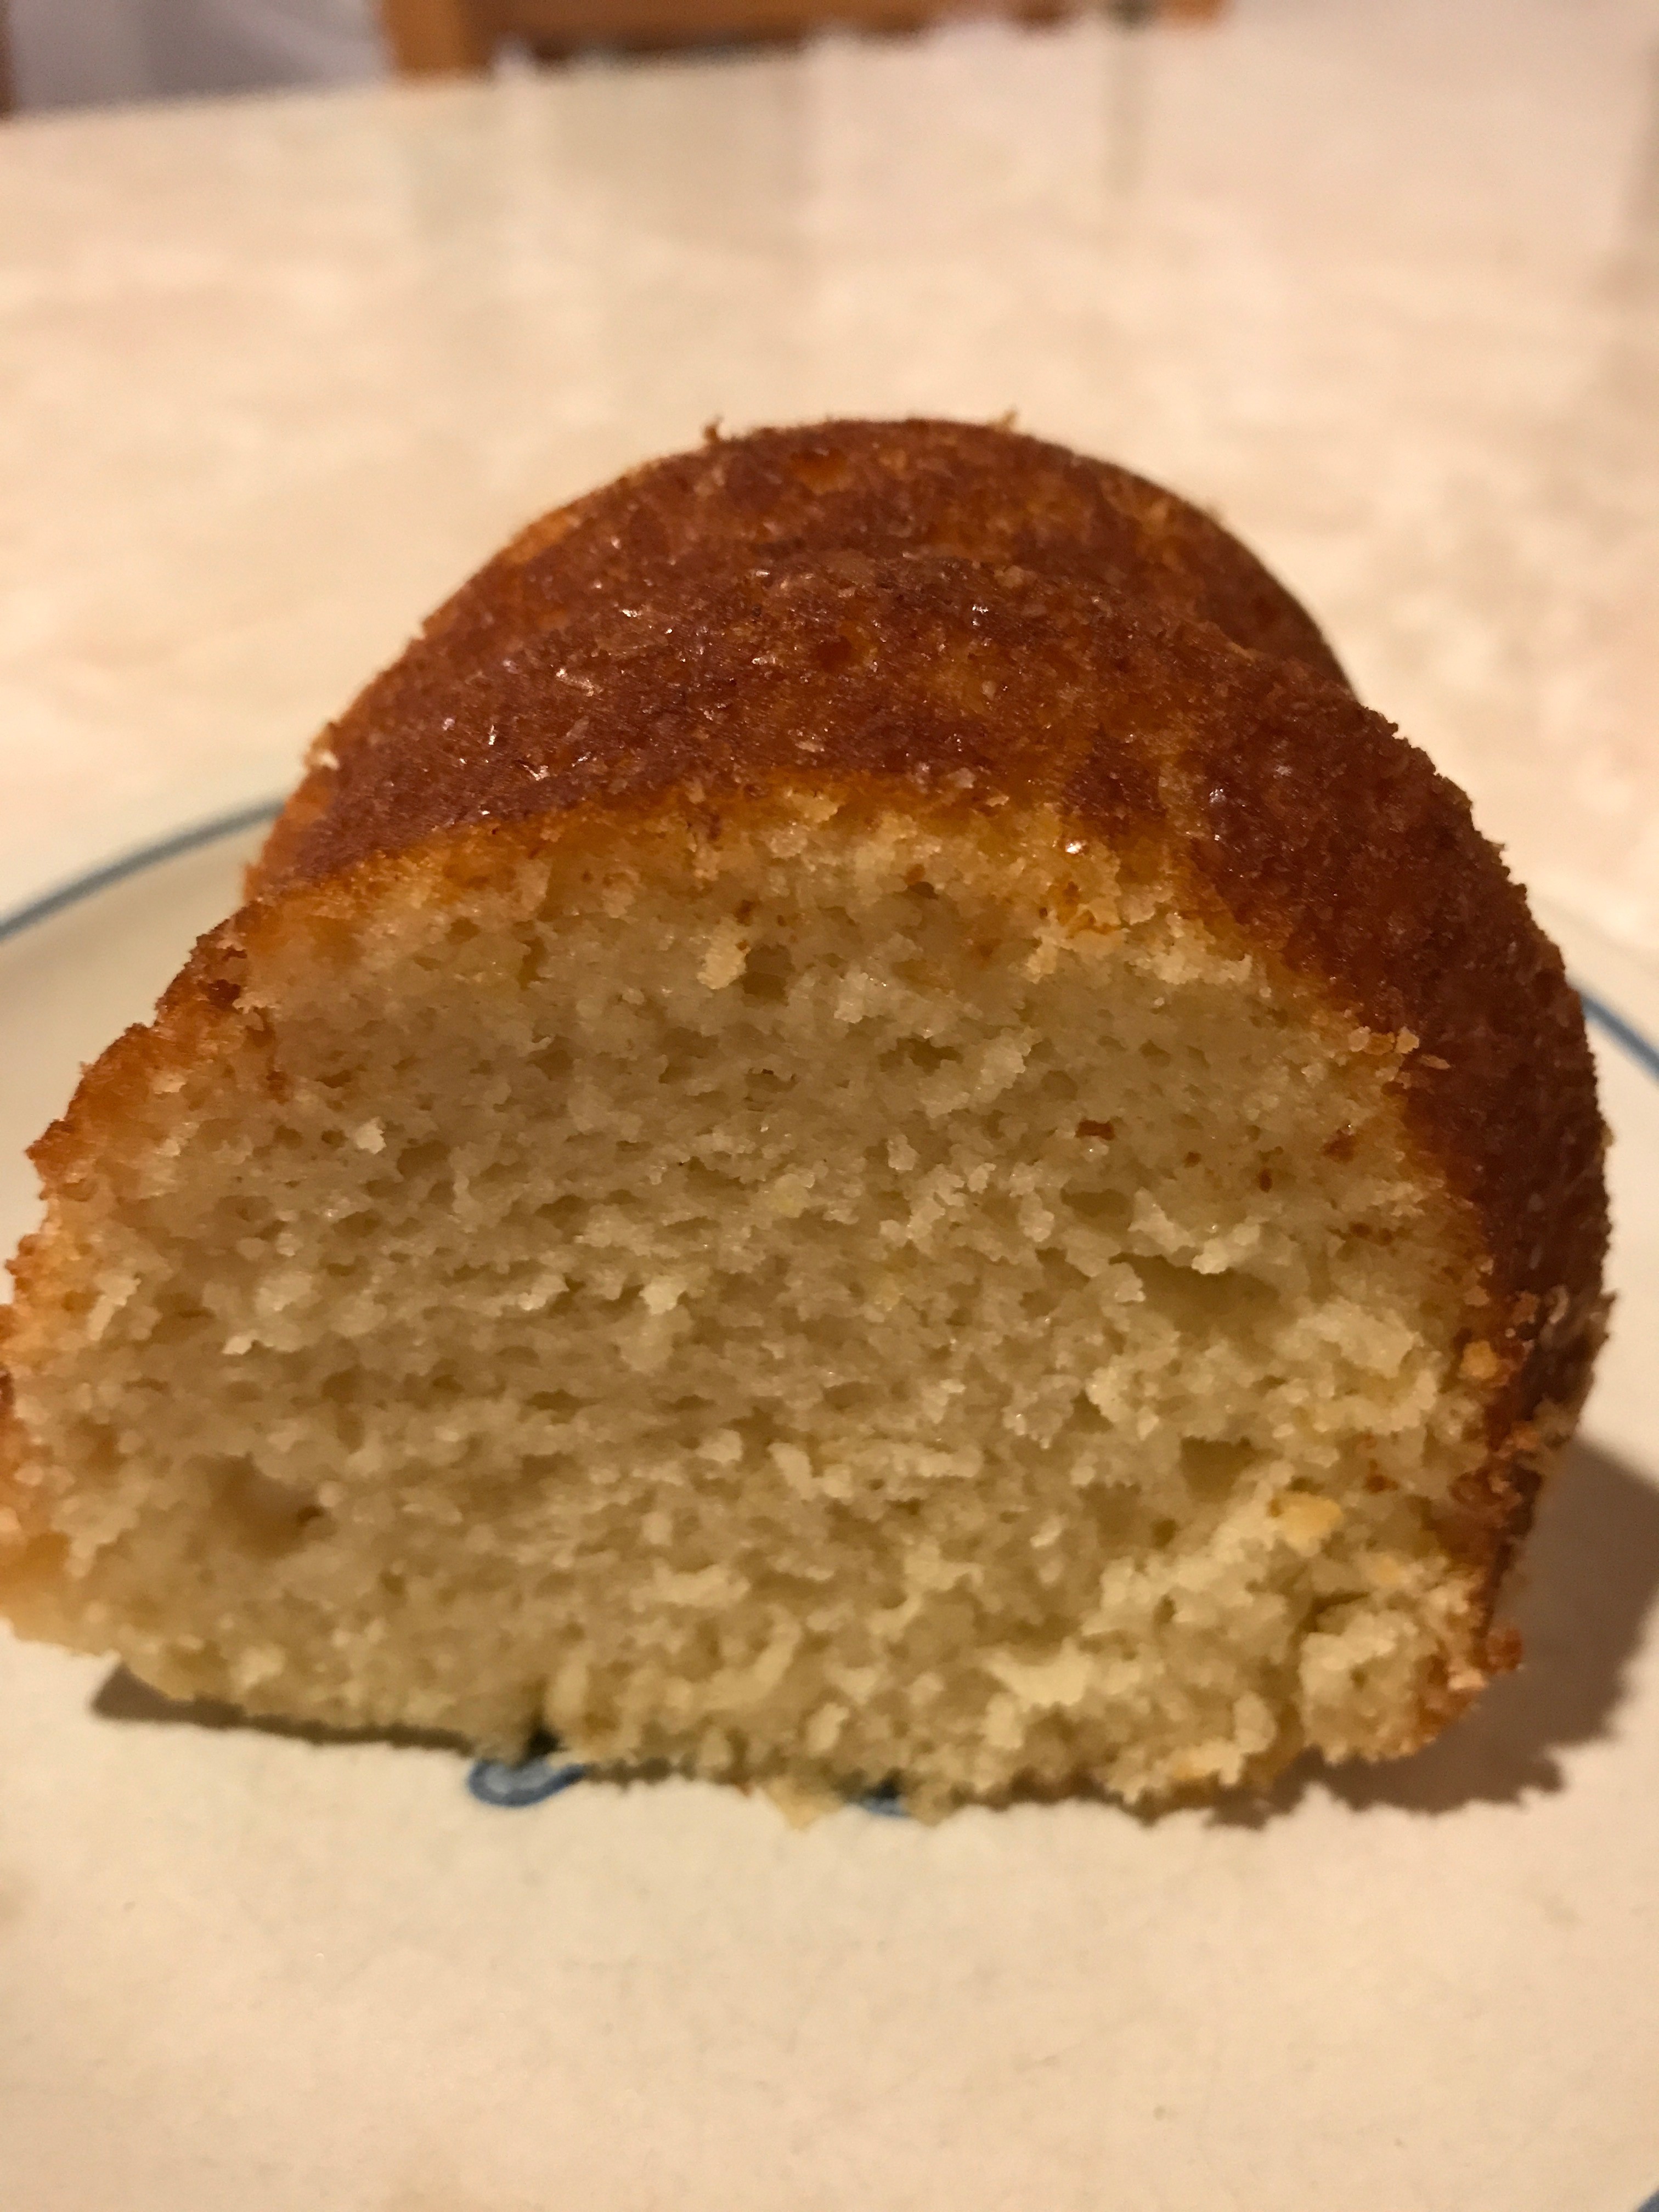
This week I received an email from someone whose grandmother used to make a lemon bundt cake that held fond memories for her. She wanted to be make the cake for her granddaughter but realized that with all her granddaughter’s food allergies she couldn’t. So, she asked if I might help her find a way to recreate the cake so that it tasted and looked just like her own grandmother’s recipe.

Her grandmother’s recipe called for 3 cups of all purpose flour, 1 cup of butter, 2 1/2 cups of sugar, 6 eggs, and 1 cup of sour cream in addition to the salt, baking soda and lemon juice. When I read the recipe, I realized that in addition to the allergy substitutions, the cake needed a health-makeover as well!

Substituting and recreating the lemon bundt cake:

The Flour: Since the granddaughter needed to be gluten free I opted to use King Arthur’s gluten free blend, but to make the cake a bit healthier, I chose the whole grain blend instead of the straight rice flour blend and reduced the flour to 2 1/2 cups.

The butter: The granddaughter’s dairy allergy meant substituting the butter with something else, but to make it healthier as well, I decided to use olive oil which has good fats and to reduce the amount to 2/3 of a cup. Because I didn’t want a heavy olive oil flavor, I used the extra light version.

The sugar: 2 1/2 cups of sugar is a lot! My friend didn’t ask me to do anything about the sugar, but I couldn’t help myself. I opted to use a combination of agave and truvia. To create the exact same sweetness as the original cake, I used 2/3 cup agave with 1/2 cup truvia. To make the came so I’d like it, which meant it being much less sweet, I reduced both amounts by half. So, folks can choose what they’d prefer.

The eggs: Six eggs is a lot! I reduced the amount by half and added some water to help fill out the liquid ingredients. Since I was using the agave which is a liquid, between the agave and the added water, the reduction in eggs was fine.

The sour cream: Since the granddaughter had a dairy allergy, I couldn’t use the sour cream, so I opted to make a buttermilk from soy milk and lemon juice but I reduced the amount to 1/2 since it was a liquid as opposed to the solid sour cream, which reduced the amount of fat in the cake.

The flavoring and leavening: I added baking powder to the baking soda since it was a gluten free cake and I used fresh lemons to achieve the most lemony taste by grating the peel and then squeezing the juice.

The cake came out amazing! When I served it to company, which included my friend, she said it tasted just like her grandmother’s. So, now she had her grandmother’s cake to serve only allergy friendly and as a much healthier version!

Lemon Bundt Cake

Ingredients:

2 ½ cups Gluten Free Flour blend (I used King Arthur’s whole grain blend)

2 tsp gluten free baking powder

1/2 tsp baking soda

1/2 tsp salt

1 tbsp freshly grated lemon peel (from fresh lemons is the best way to go)

2/3 cup extra light olive oil

1/3 to 2/3 cup Agave (use higher amount if you like a sweet cake)

1/4 to ½ cup Truvia (use higher amount if you like a sweet cake)

½ cup “buttermilk” (I used soy milk mixed with 1/2 tbsp lemon juice)

3 large eggs

1/2 cup freshly squeezed lemon juice (depending on size of lemons, you will need anywhere from 4 to 6 lemons)

1/4 cup plain water

Baking Instructions:

1. Preheat oven to 350 degrees.  Prepare a bundt pan for use.  (I coated the pan with vegan butter, and then I sprinkled the pan with ground flaxseed.)

2.  Mix the flour with baking powder, baking soda, and salt.  Add the lemon peel and mix well. Set aside.

3.  Mix oil, Agave, Truvia, buttermilk, eggs, lemon juice and water.

4.  Mix the dry ingredients into the wet ingredients. Combine well until the dry ingredients are completely moistened.  Batter will be thick.

5.  Evenly spread batter into bundt pan and bake for 35-40 minutes until a toothpick inserted into the cake comes out clean.

6.  Cool on wire rack for at least 15 minutes before removing from the pan and cooling completely.

Creative Cooking: Dried Plum Muffins

“It’s the bacon song….”

Last night we discovered that our fridge is not working as it ought. Specifically, the refrigerator part (but not the freezer) is not staying as cold as it needs to be to keep meat from being spoiled, and when I went to start dinner, I learned that the ground turkey I had bought had gone bad. Since it was close to dinner time, I opted to do what I usually do in a crunch… we had breakfast for dinner.

The children love when we have breakfast for dinner. Pancakes, waffles, sausages, bacon, eggs… these are some of their favorite foods. Given what we had in the pantry and the freezer, last night ended up being pumpkin pancakes and turkey bacon with salad as our veggies. This, of course, meant there were pancakes and bacon available for the children to eat again this morning for breakfast.

When our son went to get bacon to eat, he began to sing. It turned out it was the “bacon song” he was making up and singing. When we laughed, he switched to the “apple doesn’t fall far from the tree” and reminded my husband and me that we do strange things all the time!

In fact, I was just accused of oddness last week when I made dried plum muffins. Someone thought it weird that I would even use dried plums. Another wondered why I did not call them prunes. I explained that dried plums have a lot of fiber, potassium, good vitamins like K, A and B, and are naturally sweet so you don’t need to add sugar. The reason I call them dried plums is because that is what prunes are, and I find people react oddly when you say you’ve made something with prunes. Of course, I discovered that dried plum muffins received the same reaction, so it may not be the name!

The fact, though, is that the muffins I made are healthier muffins with rolled oats and flax seed and garbanzo bean flour, so in addition to having no sugar, they are higher in fiber and protein. The version below have mini chocolate chips because I was making them for a children’s party, but you can omit the chocolate chips and then serve them as a breakfast muffin!

Dried Plum Muffins

Ingredients:

7 ounces of pitted, chopped dried plums (prunes)

1 cup gluten free rolled whole oats

1 1/2 cup boiling water

2 tbsp ground golden flaxseed

6 tbsp water

1 cup gluten free oat flour

1 cup garbanzo bean flour

1/3 cup potato starch

2/3 cup arrowroot starch

2 tsp baking powder

1 tsp baking soda

1/2 tsp salt

2 tsp cinnamon

1 tsp nutmeg

1 cup Enjoy Life mini chocolate chips

1 cup mashed, ripe bananas

1/2 cup safflower oil

1/2 cup water

2 tbsp apple cider vinegar

Baking Instructions:

1. Preheat the oven to 350 degrees and line 24 muffin cups with cupcake liners or grease them so the muffins won’t stick to your pan.

2. Mix the chopped dried plums with the oats in a bowl, and pour the boiling water over them, pushing the dried plums and oats down into the water so they are covered. Let sit.

4. Whisk together the ground flaxseed with the water, and set aside.

5. Whisk together the oat flour, garbanzo bean flour, potato starch, arrowroot starch, baking powder, baking soda, salt, cinnamon, and nutmeg.  Stir in the chocolate chips and set aside.

6. Mash the bananas and mix with the oil and the dried plums and oatmeal mixture and the flaxseed mixture.

7. Make a hole in the center of the dry ingredients and pour in the wet ingredients along with the apple cider vinegar. Mix up quickly just until the dry ingredients are moist.

8. Evenly scoop the muffin batter among the 24 muffin cups and bake for 15 minutes or until the cupcakes are golden and puffed and a toothpick inserted in the center comes out clean.

9. Remove the muffins to a wire rack and cool completely.  These keep well in a tightly covered tupper ware container.

Autumn Appetites: Pumpkin Bundt Cake

“But I really don’t have anything to complain about, though….”

I ran into a friend today who asked how I and the family were doing. Because he was a friend, I felt comfortable telling him about the emotional roller coaster the family has been on since May with two children being in car accidents, my husband’s father dying, trying to figure out what caused a seizure for my middle child, our oldest in angst about what to do next year after her senior year of college, our youngest camping in our bedroom since May, suddenly not wanting to sleep alone, health issues I have been having, a cousin’s wife struggling with a recurrence of cancer, and the transition to another full school year of responsibilities for both my husband and myself.

After briefing him on all that, he asked how in the world we were holding up, and I told him that we were actually doing okay because we continually and daily reminded ourselves about the many things we have to be grateful for in comparison to other things happening in the world. We aren’t living in any of the places which have been devastated by the recent onslaught of hurricanes. All our children are alive and well physically. We have jobs, a home, provisions. Our friends and family are numerous and great supports to us. My husband’s mom is not alone as she copes with the death of my father-in-law. My own parents are holding their own despite setbacks here and there.

Our gratitude list can go on and on, and some days we just sit and speak that list as a way of thanksgiving for all we do have, even in the midst of these more emotionally taxing times. For us, it really is the only way to live when life gets tougher than we’d like.

Sometimes, food allergies and health issues can be taxing and make us weary, too. We wish we didn’t have to eat a certain way. We miss and crave foods we used to be able to eat. We are frustrated by the time and energy and costs it takes to eat non-traditionally. We don’t like being the odd people out. We want to complain. We want to shake our fists at the universe.

I felt this the other day when the only options for food at a church gathering were ones I couldn’t eat, despite the number of times I have tried to make the church aware of just how many people with food allergies attend the church.

In these situations, though, I once again find myself thinking about the ways I am blessed. For those of us with food issues, we live currently in a time when options for alternative foods exist. Many of us also live in countries where we have access to nontraditional ingredients and food. More and more restaurants are offering options to meet dietary needs. Blogs and cookbooks are focusing on our health issues. Schools and hospitals are enacting changes to better help care for folks with allergies. Stores like BJs and Costco are selling nontraditional ingredients for cheaper. Those of us with food issues provide an opportunity for others to learn and to show compassion and understanding. Those of us with food issues have an opportunity to practice compassion and understanding when folks don’t learn and show compassion.

Again, the list of things to be grateful for about food issues can go on and on, if we truly consider them.

The other day, I was grateful for pumpkin. Pureed pumpkin is awesome for food issues because it is a healthy, vitamin-filled vegetable which can be used as a substitute for eggs as well as fats. Plus its orange hue makes food pretty, and it tastes yummy.

So, I decided I would make three pumpkin bundt cakes for some upcoming weekend events. For one, we ate the cake topped with an apple compote I made in the crockpot as a snack. For the other, folks put vanilla ice cream on top for a dessert. For the third, people just ate it as is for breakfast.

Pumpkin Bundt Cake

Ingredients:

1 1/2 cup mashed ripe bananas

2 cups cooked, pureed pumpkin

3 eggs

3/4 cup extra light olive oil

1 tbsp minced ginger paste

1 cup agave

3 cups gluten free flour blend (I used King Arthur’s whole grain blend)

2 1/2 tsp baking soda

1/2 tsp salt

2 tsp ground cinnamon

1/2 tsp ground nutmeg

2 tbsp apple cider vinegar

Baking Instructions:

  1. Preheat the oven to 350 degrees. Grease a bundt pan with vegan butter and coat with golden ground flaxseed.
  2. Blend together the bananas, pumpkin, eggs, oil ginger paste and agave. Set aside.
  3. Mix together the flour, baking soda, salt, cinnamon and nutmeg.
  4. Add the dry ingredients to the wet, along with the apple cider vinegar, and mix quickly just until the dry ingredients are moistened and incorporated.
  5. Evenly spread the batter into the prepare bundt pan.
  6. Bake for 50 to 60 minutes until the cake is puffed, golden and a toothpick inserted comes out with only a few crumbs sticking to it.
  7. Cool in the bundt pan on a wiring cooling rack for at 15 to 25 minutes. Turn the cake upside down onto the wire cooling rack, removing the pan, and allowing the cake to cool completely.

Creative Cooking: Gingerbread Cupcakes

“It’s about coming together as a community….”

Some friends of mine decided recently that we should put all the walking we have been doing to good use, specifically, I walked my first 5K last weekend, and we did another this weekend.  The first supported community living in general and raised funds for a local community initiative; the second was to help raise awareness and aid for cancer research and care for children.

Not having done a 5K before, I did not know what to expect, and I was surprised by the diversity that one finds at such events. Race, politics, religion, lifestyles, level of health, even reasons for doing each of these particular 5K races varied from person to person. Something about participating in a 5K transcends everything other than the fact that everyone is there, which seems to make you automatically a part of a special group.

I was also marked by the optimism and positive vibes which steep such events. People cheer you on from the get-go and continue to encourage you the entire way, and even if you are last, you receive the same accolades as the person who was first, sometimes even more so! Whether you run, walk or are in a wheelchair, you are accepted and permitted to do the race at your own pace in the manner which works best for you. Best of all, though, is that you become a part of a community as opposed to being alone.

People I did not know felt comfortable chatting with me before, during and at the end of the races because of that common bond, which was that we were all participating in the 5K. We were all part of “the group”.

I thought about this yesterday as a mom told me about her worries for her middle child who just started her first year of college. The daughter has a lot of food issues but has difficulty watching what she eats because she does not want to be different from her friends; she does not want to miss out on the foods they are eating… pizza, pasta, desserts. She just wants to “be a part of the group,” as she tells her mother quite frequently.

We all want to be a part of something bigger than just ourselves. Being a part of a community that runs and walks and wheels together for the good of community and humanity is a good thing to be a part of. Being a part of a close-knit group of friends is also a good thing. Sometimes, however, that community we are choosing to join needs some education, and sometimes we have to remember that we can be a part of community life and still be different, and more than that, our differences are what most of the time make for a more vibrant community life. As with the 5K, we should be able to be accepted and permitted to do the same thing differently.

This week, I had a workshop with a very large group of much older folks who had never considered trying to eat healthier or allergy friendly… ever. They wondered, as they rightly should have, whether it was even possible to make the foods they loved in the manner which I promised them they could. As such, I had my work cut out for me to create desserts which fit their expectations. To that end, one of the items I made was gingerbread cupcakes.

The folks had indicated that they loved gingerbread, and how could I possibly make gingerbread without using at least two cups each of molasses and sugar and without white flour and butter. It simply would not be the same! Well, I am happy to say that they loved the gingerbread cupcakes so much that they took all my leftovers home, leaving nothing for me to share with the family after! Fortunately, the family had been able to taste test a couple before!

So, below is a recipe for gingerbread cupcakes which is dairy, gluten, soy, and egg free. I did opt to use coconut sugar to get the texture that I needed for the gingerbread but any folks with a coconut allergy can feel free to use the traditional brown sugar or substitute agave, using half the amount you would for the coconut sugar. The coconut milk can also be changed to any type of milk that best suits one’s food needs. I also used date molasses instead of regular molasses which is made entirely from dates but if you cannot find that, you can use regular molasses.

Gingerbread Cupcakes

Ingredients:

3 cups gluten free flour blend (I used King Arthur’s Whole Grain version)

1 cup coconut sugar

2 tsp baking soda

2 tsp cinnamon

2 tsp ginger

1 tsp nutmeg

1 tsp salt

1/2 tsp cloves

1 cup date molasses

1 cup coconut milk

1 cup safflower oil

2 tbsp apple cider vinegar

Baking Instructions:

  1. Preheat the oven to 350 degrees and line 24 muffin tins with cupcake liners
  2. Mix together the flour, coconut sugar, baking soda, cinnamon, ginger, salt, nutmeg and cloves. Set aside.
  3. Blend together the date molasses, coconut milk, and oil.
  4. Add the dry ingredients to the wet with the apple cider vinegar. Blend quickly just until the dry ingredients are moistened.
  5. Divide the batter evenly among the cupcake tins.
  6. Bake for 20 to 25 minutes until the cupcakes are puffed and dark golden and a toothpick inserted in the center comes out clean.
  7. Allow the cupcakes to sit for five minutes and then remove them to a wire cooling rack to cool completely.
  8. These cupcakes are extremely flavorful and need no frosting at all. If you would like to frost them, though, as I did for the workshop, the frosting I used is below.

“Cream Cheese” Frosting

Ingredients:

1/4 to 1/2 cup vegan butter (how much you choose to use depends on how buttery tasting you want your frosting versus cream cheese tasting)

agave (I suggest starting with one tablespoon and tasting to see if you need more sweetness)

4 oz to 8 oz tofu cream cheese (how much depends on how much butter you used, how much of a cream cheese taste you want and how thick you want the frosting; if you don’t have a dairy allergy and want to use real cream cheese instead of the tofu version, you may)

cinnamon, nutmeg, ginger and/or cloves (add to your tastes, starting with 1/4 tsp of your choice or choices.

Frosting Instructions:

  1. In a mixer, mix the butter until smooth.
  2. Slowly drizzle in the agave with the mixer on low to blend the agave in with the butter until creamy. Taste to see if you need to add any more agave.
  3. Add the tofu cream cheese and blend well until the frosting is to the desired thickness for easy spreading.
  4. Add the spices to your liking. I use all four for a nice spice frosting.
  5. If the frosting is too thick, you can thin it with milk of your choice. If it is too runny, thicken it with a little powdered sugar, using only 1 tsp at at time.

Savoring Summer: Summer Squash Bread

“I’m only one person….”

Since we were away for most of August, we had asked someone to pick our garden for us, not wanting the vegetables to go to waste. Unfortunately for our friend, her singleness prevented an ability to keep up with the glut of summer squash and zucchini that our garden tends to yield this time of year. When I am home, I pick these vegetables while they are still small and tender and use them in salads or sautes. When I want to make stuffed zucchini or squash, I allow them to grow to a larger size for adequate stuffing. When one returns home from over three weeks away and finds summer squash the size of a baseball bat, well, there’s really only two things one can do… make soup and bake!

So, I chopped up much of the summer squash and zucchini and made a delicious soup in my largest crockpot of summer squash, zucchini, kale and tomatoes, but I still had enough summer squash left to create 4 grated cups worth, so I went to work creating a recipe around the four cups of summer squash.

I wanted something that would go with the soup so I opted to make a cornbread type dish, only a summer squash bread. I didn’t want it to be sweet like a cake but I also didn’t want it to be too dry. Like a cornbread, I wanted it to be something we could lather some vegan butter on and have with the soup as something a bit more filling, since the soup would be all vegetables, but I also wanted it to be something that could be eaten on its own, since I presumed there would be leftovers.

As I worked on the recipe, I needed to keep in mind that I had four cups of the summer squash to use, so I decided it would need an 11 by 15 pan, which I lined with parchment paper. Then I opted to use a combination of a gluten free flour blend with another gluten free flour to combine the lightness of a rice flour blend with the hardiness of a straight gluten free flour. For the liquid, I used eggs and safflower oil but I also added unsweetened orange juice to react with the orange juice for rising and also to add some additional flavor. For the sweetener I used Agave because I could use a lot less than sugar, and I added some spice for the final touch.

The result was a bread that the family enjoyed with the soup and which friends enjoyed the next day on its own.

Summer Squash Bread

Ingredients:

2 cups gluten free flour blend

1 cup sorghum or millet flour

1 tsp baking powder

2 tsp baking soda

1/2 tsp sea salt

2 tsp pumpkin pie spice (or you can use any combination of cinnamon, nutmeg, ginger, and allspice)

4 cups shredded, loosely packed summer squash

1/2 cup beaten eggs (usually two large eggs; can also just use egg whites)

3/4 cup safflower oil

3/4 cup unsweetened orange juice

3/4 cup agave

Baking Instructions:

  1. Line a 9 x 15 pan with parchment paper and preheat the oven to 350 degrees.
  2. Mix the gluten free flour blend with the sorghum OR millet flour, the baking powder, the baking soda, the salt and pumpkin pie spice. Set aside.
  3. Mix the grated squash with the beaten eggs, oil, unsweetened orange juice, and agave.
  4. Mix the dry ingredients into the wet and blend well.
  5. Pour into the prepared pan and bake for 30 to 35 minutes until the bread has puffed and is golden, pulling away from the edges and a toothpick inserted in the center comes out clean.


Fancy Fruits: Upside Down Peach Cake

“I don’t want it to end…”

Every summer for the past decade our family has spent a couple of weeks in the Adirondack mountains, helping with my husband’s family forest. This year, because of the timing of two additional events, our time in the mountains was sandwiched by a mini-vacation as an immediate family and then a 50th anniversary celebration with extended family. The result was that almost the entire month of August was time away from home, being with people we loved, doing many fun things, in addition to working in the forest.

When all this special time was coming to an end yesterday, I found my youngest crying on the second floor of the lodge my mother-in-law had rented. I asked what was wrong, and he said, “I don’t want it to end. I want it to be like this forever.”

I understood how he felt because I feel the same way every year as summer closes and the new school year begins. Summertime, with less hustle and bustle and relaxed rules, is a happy time for me with the children, simply being a family. So, as the days draw near for school to resume, I find myself saying the same thing my son did, “I don’t want it to end. I want it to be like this forever.”

Life and time don’t stand still, though, and we leave summer days behind in favor of autumnal comings. For me, I always know that summer is ending when the farm stand up the road from us starts slowing down on the peaches they are able to pick and sell. It is always around now, and I am glad each year that I arrive home from the mountains with just enough time for one more batch of fresh peach shopping.

Because we had company coming over tonight, I used some of the peaches to make an upside down peach cake, and I thought I would share the recipe with folks since it has been a few weeks since my last post (for the reasons cited above!). Since fresh peaches aren’t always available, I included the amount I use for when I make the cake with frozen peaches.

Upside Down Peach Cake

Ingredients:

two cups sliced fresh peaches or one 16 oz bag frozen peaches, no sugar added

2 tbsp dairy free butter

2 tbsp Agave

2 cups gluten free brown rice flour blend

1 cup sorghum flour (can also substitute oat or millet flour)

2 tsp baking powder

1 tsp baking soda

3/4 tsp salt

2 tsp cinnamon

1 cup Tofutti sour cream (you can also substitute mayonnaise or dairy free yogurt)

2/3 cup safflower oil

2 eggs

2/3 cup Agave

1 tbsp vinegar

Instructions:

In a shallow, large pan, melt the 2 tbsp “butter” (I use Earth Balance soy-free, vegan butter) with the 2 tbsp of Agave. Add the frozen peaches and cook for about 4-5 minutes, flipping them after about 2 to 2 1/2 minutes. Remove the peach slices, putting them onto the bottom of a well greased or parchment paper lined 9 x 13 pan. Cook the butter mixture another minute until it’s thickened, and then evenly pour it over the peach slices.

Mix the gluten free flour blend with the sorghum flour, the baking powder, baking soda, salt, and cinnamon. Set aside.

Mix the Toffuti sour cream with the safflower oil, eggs, and Agave.

Add the dry ingredients to the wet, along with the vinegar, and quickly mix them together just until the dry ingredients are moistened. Carefully spread the batter over the peaches.

Bake in a preheated 350 degree oven for about 25 to 30 minutes. The cake will be golden brown and a toothpick inserted in the center will come out clean. When you take the cake out of the oven, you should cool it on a wire cooling rack for at least ten minutes and then flip it onto a platter which you can then put onto the cooling rack so the cake and cool completely. Be sure to flip it onto a pretty platter which has a rim for catching any of the syrup. If a peach is stuck on the bottom of the pan, just pull it off and insert it back into its missing space.

When you serve the cake, you can serve it with whipped cream or ice cream (or their substitute counterparts) or plain.

Fruitful Flavors: Peach Pie

“It won’t come off the pit….”

One of the many enjoyments of summer is eating a freshly picked, sweet and juicy peach. We have a farm down the road which grows peaches, and it is always a highlight of our summer when the peaches are ripe and ready for us to purchase and eat. The other day, though, someone asked me how I get peaches off their pits for making pies and cobblers, and I explained that I didn’t.

Peaches come in two varieties, clingstone and freestone. Both yellow and white peaches can be either. The irony is that the variety which is most difficult to remove from the pit, the clingstone, is the sweeter and juicier of the peach varieties. The peaches which fall off their pits, the freestone, are not as sweet and juicy. Most of the peaches one finds at the grocery stores are the clingstone variety because they are sold for taste. Hence, my friend’s frustration with removing the peach slices for baking.

If folks want to make peach pie or cobbler or crisp or muffin or cake using fresh peaches, the best option is to purchase freestone peaches which easily twist off the pits if the peach is ripe. If using clingstone peaches, then folks need to resign themselves to cutting the peach slices off the pit which means the slices won’t be pretty.

I don’t tend to do either, because as anyone who has followed my blog for a while knows, I am lazy and like to cook food as easily and quickly as possible. So I keep frozen, no sugar added peaches in my freezer and just pull them out when I have a hankering to bake with peaches. The fresh peaches, I just eat as a snack, enjoying their flavor as is.

The conversation with my friend of course gave me a craving for peach pie, so I went ahead and baked one yesterday which I’ll share below. You’ll note that there’s no sugar and very little sweetener at all because the flavor and sweetness comes from sauteing the peaches to concentrate the flavor and sweetness. Folks can also switch up the spices to your own tastes. Sometimes I like to use cardamom and ginger instead of cinnamon and nutmeg.

Some thoughts on pie crusts, too.  I made my own, but folks can use a store bought pie crust, whether gluten free or wheat. If you choose to make your own, you can follow a favorite recipe. Otherwise, some information for your use to to make your own pie crust.

Pie crusts are basically flour, fat and water. For every one cup of flour, whether wheat or gluten free, you will usually use 3 to 6 tbsp of a fat, whether butter, shortening or oil, or a combination of the three, and for every cup of flour you usually need 1 to 3 tbsp of water. Depending on tastes, some recipes call for a little bit of salt; others call for the addition of a little bit of sugar. I tend to use neither, opting instead to flavor my crust with spices like cinnamon, cardamom, nutmeg, ginger, cloves, etc….

Tips for making “from scratch” crusts:

  1. If using solid fats, the colder the better: Put your butter and/or shortening into the freezer for ten minutes before cutting it into your flour. This is especially good for dairy free versions of butter which tend to be softer in texture. You want the fats to slowly melt in the oven while cooking, not become soft while you’re still preparing the crust.
  2. If using oil, the milder the better: Plant oils are great for crusts because they have healthy fats and you don’t have to cut the fat into the flour. You can simply stir the fat into the flour. You want, however, to use mild tasting oils like safflower, sunflower, canola, etc… because otherwise the oil flavor overpowers everything else. If you are using an oil for the fat, be sure to decrease the amount of water because you only want enough liquid to moisten the crust enough to hold together.
  3. The colder the better for the water: Recipes for crusts will call for ice water. This means literally putting ice into the water, because you want to prohibit gluten development. Now, if you’re making a gluten free crust, that isn’t an issue but if you’re using solid fats, the cold water will help keep the fats cold until the pie goes into the oven. Use just enough water, though, to moisten the flour enough to hold together.
  4. If you want tender, flakier crusts, use acids or alcohol: Acids like lemon juice or vinegar or an alcohol like vodka cook off in the baking process but react with the other ingredients to make for a flakier crust by tenderizing the dough. You only need to replace one to two tablespoons of the ice water.
  5. If want tender, flakier crusts, use lower protein flours: The lower the protein, the flakier the crust, but of course, that makes for a more delicate crust and one which is more carb intense. Find a balance. For example, use a whole wheat pastry flour which has less protein than 100% whole wheat flour but which is a sturdier flour than all purpose white flour. If using gluten free blends, choose a combination of brown rice flour and sorghum or oat which combines a lighter flour with a protein flour.
  6. If you want a crust that is easier to handle: Adding an egg yolks makes for a more pliable, sturdier dough to work with. It also makes for a richer tasting crust.
  7. For easier rolling and handling, cold is better: It is a good rule of thumb to put your crust into the fridge for half an hour to an hour because rolling soft dough makes it more likely that the dough will stick, causes the fats to melt before their time, and will be harder to transfer to the pie plate.
  8. For easier rolling and handling, paper is better: When rolling out the dough, if you don’t want the crust to stick and want an easier way to transfer the crust, use wax paper or parchment paper which you sprinkle flour onto. After putting the dough down, sprinkle it with flour and top with a second piece of wax or parchment paper. Then roll. The papers prevent sticking, and when you’re ready to transfer the crust, you can just pick up the paper and flip it onto the pie plate.

Peach Pie

Ingredients:

3 pkg 16 oz thawed frozen peaches, no sugar added or 6 to 7 cups sliced fresh peaches

1/2 cup water

1/4 cup agave

1 to 2 tsp cinnamon

1/2 to 1 tsp nutmeg

3 tbsp cornstarch or arrowroot starch or tapioca starch

Pie Crusts

Cooking Instructions:

  1. Preheat the oven to 400 degrees.
  2. In a shallow pan mix the water with the agave, cinnamon, nutmeg and starch.
  3. Add the peaches and stir to coat well.
  4. Continue to stir as the mixture comes to a slow boil and begins to thicken.
  5. When the mixture has become glutinous and is sticking to the peaches, turn off the heat and let the peaches cool.
  6. Line the bottom of a 9.5 inch glass pie plate with a pie crust.
  7. Fill the crust with the peaches, layering the peaches individually into the crust, using your clean fingers.
  8. Top the peaches with the top crust and make slits or create a lattice crust to cover the peaches.
  9. Bake for 15 minutes. Cover the entire pie with aluminium foil and bake for 20-25 minutes. Remove the foil and bake for another 10-15 minutes until the crust is golden brown and the peaches are bubbling.
  10. Remove the pie from the oven to a cooling rack and allow it to cool at least an hour before slicing into it.


Recipe Makeover: Butter Birthday Cake

“I just want to make her happy.”

Many of my friends are in what folks refer to as the sandwich generation. They’re “young” enough that they still have children at home but they’re “old” enough that their parents are aging and in need of care. One of my friend’s mother has begun experiencing dementia symptoms which complicates my friend’s care of her mom because the mother keeps forgetting she has diabetes and that she now has adverse reactions to gluten and dairy.

The mother’s 80th birthday is coming up, and she apparently is fixated on having a butter birthday cake with chocolate frosting the way her mother (my friend’s grandmother) used to make. So, my friend reached out to me, asking if I might be willing to play around with the recipe which her mother had written down in an old journal of recipes.

The original recipe called for 1 cup of butter, 2 cups of sugar, 3 eggs, 1 tsp vanilla, 3 cups all purpose flour, 3 1/4 tsp baking powder, 1 tsp salt, and 1 1/4 cup whole milk.

The butter: Substituting for the butter is easy. I simply used Earth Balance’s vegan butter. I did cut the amount to 3/4, though, which would cut some of the fat and calories but not diminish the butter taste.

The sugar: Since there were no nut allergies present, I opted to switch out the sugar in favor of a one to one ratio of coconut sugar. With diabetes, one has to be careful not to have too much sugar. While coconut sugar will still affect the system as a sweetener, it has a lower glycemic index than white refined sugar. If I had been making it for myself, I would have used one cup of coconut sugar, but I figured the mom would want a sweeter cake like the one of her memories.

The eggs: Three eggs are a lot, so I chose to decrease the eggs to two eggs and increased the milk by 1/4 cup to make up for the loss in liquid ingredients by the one egg. I could have used just egg whites but then it would have been a white cake we were making and not the traditional yellowy butter cake, which again, I figured would be what the mom remembered.

The vanilla: Since I reduced the butter and eggs, I increased the vanilla to 2 tsp to enhance the flavor and give the cake more of that browned butter taste.

The flour: With diabetes, one has to be careful about carbs, too. Cake is going to have a lot of carbs no matter what you do, but I tried to make them healthier carbs. I decided to use a Krusteaz gluten free blend which is a blend of sorghum, millet, and quinoa flours with brown rice flour which added a bit more protein and fiber than one would find in just a white rice flour blend.

The baking powder: Because we were making a gluten free cake, I needed to increase the leavener a bit. Instead of just adding more baking powder, though, which could give the cake a metallic flavor, I decreased the baking powder to 3 tsp and added 3/4 tsp of baking soda.

The salt: The mom has a bit of hypertension, so I decreased the salt to 1/2 tsp.

The milk: Since the mom couldn’t have milk, we needed to substitute. The recipe called for whole milk, though, which means we needed the milk to be thick. I opted to make a homemade butter milk, using soy milk and vinegar. Another good substitute would have been flax milk which has the texture of a whole milk, but flax milk doesn’t have any protein which I wanted to make sure was in the cake. Since I had reduced the eggs by one, I increased the milk to compensate not just for the egg but for the fact that gluten free flours can make for a drier cake.

The frosting: The recipe in the mother’s journal called for 1½ cups butter (3 sticks), softened, 1 cup unsweetened cocoa, 5 cups confectioner’s sugar, ½ cup milk, and 2 teaspoons vanilla extract… which was a lot of sugar and butter and also contained the milk the mother could no longer have. As such, I decided to make the frosting which my family loves because of it’s creaminess, which is just a combination of Enjoy Life chocolate chips and avocado oil and vanilla.

Butter Birthday Cake with Chocolate Frosting

Ingredients:

3/4 cup Earth Balance vegan soy free butter

2 cups coconut sugar

2 eggs

2 tsp vanilla

3 cups gluten free flour

3 tsp baking powder

3/4 tsp baking soda

1/2 tsp salt

2 cups “milk” of choice (soy, flax, almond, etc…)

2 tbsp white vinegar

2 cups Enjoy Life chocolate chips

1 cup avocado oil

1 tsp vanilla

Baking Instructions:

  1. Preheat oven to 350 degrees.
  2. Prepare three 9 inch cake pans by lining them with parchment paper.
  3. In a mixer cream together the butter and coconut sugar until a paste forms. Only takes a minute or so.
  4. Mix in the eggs, one at a time.
  5. Add vanilla. Set aside.
  6. In a bowl mix together the flour, baking powder, baking soda, and salt. Set aside.
  7. Stir the milk and vinegar together and let sit for a couple of minutes to thicken.
  8. Add the dry ingredients to the creamed butter mixture alternately with the milk, beginning and ending with the flour mixture. Mix well.
  9. Divide the batter evening among the three cake pans.
  10. Bake in the preheated oven for about 20 minutes until the cake is puffed and golden, pulling from the sides, and a toothpick inserted in the center comes out clean.
  11. Put the pans onto a wire rack to cool for ten minutes. Then remove the cake layers from the pans and allow them to cool completely on the wire racks.
  12. In a large microwave safe bowl put the chocolate chips with the avocado oil. Heat for a minute. Then stir until the chips have completely melted and the mixture is smooth.
  13. Add the vanilla and mix well.
  14. Pour the mixture into a mixing bowl and put into the freezer for 15 minutes.
  15. Check the chocolate. It should have begun to harden around the sides but still be sloshy in the middle. Scraped down the sides and put the mixture back into the freezer for 10 more minutes. (If your pan is very shallow and the mixture is hardening in the center already, then you don’t need to put it back into the freezer.  Just scrape down and follow the next step. My bowl is deep and requires almost 25 minutes in the freezer.)
  16. After the second time in the freezer, if needed, pull out the bowl, and scrape down the sides. The middle should no longer be sloshy but a soft hardening, not a completely solid hardening. Use the mixer to begin to whip the chocolate.
  17. Begin on low speed and slowly go to a higher speed, making sure to occasionally scrape down the sides. The chocolate mixture will become lighter in color and fluffy and creamy in texture.
  18. When the cake layers are completely cooled, frost the cake in between the layers and around the sides and top, and enjoy!


Recipe Makeover: Hummingbird Cake

website Hummingbird cake

“Do you know what a hummingbird cake is?”

If it weren’t for the fact that I had just learned about the hummingbird cake a few months ago, I might have answered my friend with, “Huh?”

As it was, though, Southern Living had just included that cake in a special collections magazine last Spring which I had read, so I responded with a more intellectual, “Actually, yes, I do. Why do you ask?”

Apparently my friend needed to make a hummingbird cake for a reception, but it needed to be dairy, gluten, and nut free, and she needed it for the evening of her phone call to me.

For anyone not familiar with this delectable cake, it is essentially a banana-pineapple cake, first introduced in 1978 by a Mrs. L.H. Wiggins who had sent it to Southern Living. The original recipe called for 3 cups of flour, 2 cups of sugar, 1 tsp baking soda, 1 tsp salt, 1 tsp cinnamon, 3 beaten eggs, 1 1/2 cup salad oil, 1 1/2 tsp vanilla, one 8 oz can of crushed undrained pineapples, 2 cups chopped pecans or walnuts, and 2 cups bananas.

Southern Living recently posted the recipe again in the special collections magazine I mentioned where they made two versions: A layer cake recipe which was the same as the above only they decreased both the nuts and oil to one cup; and a bundt cake recipe which cut the oil from the original recipe in half but only reduced the nuts by 1/2 cup and interestingly decreased the bananas by 1/4 cup and the salt by 1/2.

My friend wanted to make the new bundt cake version, only allergy friendly. Since I happened to have ripe bananas which I’d been hoping to use anyway, I set to work creating a cake for her to use.

Original Hummingbird Bundt Cake from Southern Living

1 1/2 cup chopped pecans, 3 cups all purpose flour, 2 cups sugar, 1 tsp baking soda, 1 tsp cinnamon, 1/2 tsp salt, 3 large beaten eggs, 1 3/4 cups mashed bananas, one 8 0z can crushed undrained pineapples, 3/4 cup canola oil, and 1 1/2 tsp vanilla.

Hummingbird Cake Makeover:

1. Pecans: Since this version needed to be nut free, I opted to use Enjoy Life’s allergen free mini chocolate chips. It seemed like the recipe needed something to add, and my personal theory is that you can’t go wrong with chocolate chips. If folks don’t want chocolate, I would suggest chopped dates which would give the cake the same texture as if adding nuts.

2. Flour: Since the cake needed to be gluten free, the question was what type of flour. For a bundt cake, you don’t want a flour which is too heavy, but at the same time you need some structure to the batter, so I opted to use half of the Authentic Foods gluten free blend which is made of brown and sweet rice flours and half Bob’s Red Mill gluten free blend which is made of garbanzo and fava bean flours. Folks can use whichever gluten free flour blend most liked, though. Next time I might try Cup4Cup’s whole grain blend which I like for a flour blend which I haven’t made myself.

3. Sugar: My friend didn’t say anything about sugar, but since I don’t even have sugar in the house usually, except just enough for my husband’s coffee, I chose to use Agave, half the amount needed of sugar. Since I was using the Agave, I knew that I’d need to think about a way to balance the wet and dry ingredients so I reduced the oil which I’ll talk about in a moment. For folks who would rather use something similar to sugar, I’d recommend coconut sugar, if there are no coconut allergies, but then folks should keep the oil as is and not decrease it.

4. Oil: It was a great relief to see that Southern Living had decreased the original 1 1/2 cups of oil to 3/4 cup, but I was thinking we could do even better. Since I was using the Agave, I decreased the oil to 1/2 cup, and instead of using a canola oil, I opted for safflower oil.

5. Eggs: Since three whole eggs are a lot, I used one whole egg mixed with 1/2 cup of liquid egg whites. For folks who may need this recipe to be free of eggs, I suggest mixing 3 tbsp of golden ground flax seed with 9 tbsp of water and letting it sit for five minutes to thicken. Since the flaxseed won’t provide the rising eggs afford a recipe, I would also add 1 tbsp of apple cider vinegar to the recipe to create a chemical reaction with the baking soda.

6. Bananas and Pineapple: Because both bananas and pineapples have good nutrients, I simply kept those as they were in the original recipe.

7. Flavorings (salt, cinnamon, vanilla): Since Southern Living had decreased the salt already to 1/2 tsp, I kept that as is, but I added ground ginger and nutmeg to the cinnamon for added flavor, decreasing the vanilla by 1/2 tsp so the flavors wouldn’t be competing but complementing.

8. Baking soda: Since the cake would be a gluten free cake, I increased the baking soda by 1/2 tsp to make sure the bundt cake wouldn’t be too heavy and dense, and I added vinegar to create a chemical reaction to help with the rising of the cake.

Hummingbird Bundt Cake

Ingredients:

1 whole egg with 1/2 cup liquid egg whites or 3 tbsp golden ground flax seed mixed with 9 tbsp water

1 3/4 cups mashed ripe bananas (about four medium bananas)

8 oz can crushed pineapple, not drained

1/2 cup safflower oil (if using Agave; 3/4 cup if using coconut sugar)

1 cup Agave or 1 cup coconut sugar (can use up to 2 cup coconut sugar if someone has a sweet tooth)

1 tsp vanilla

3 cups gluten free flour blend

1 1/2 tsp baking soda

1 tsp cinnamon

1/2 tsp nutmeg

1/2 tsp ground ginger

1/2 tsp salt

1 cup Enjoy Life mini chocolate chips or 1 cup chopped dates

1 tbsp apple cider vinegar

Baking Instructions:

1. Preheat the oven to 350 degrees. Grease and flour a bundt pan.

2. Whisk the ground flax seed with the water and set aside if using that. Otherwise, follow the next step with eggs.

3. Mix the bananas, pureed pineapple, oil, agave and vanilla. Add the egg mixture or flax seed mixture, and blend well.

4. Whisk together the flour, baking soda, cinnamon, nutmeg, ginger, and salt. Add the chocolate chips.

5. Add the dry mixture to the wet ingredients with the tablespoon of vinegar, and whisk well.

6. Scoop the batter carefully into the prepared pan. Tap the pan on the counter to even the batter out.

7. Bake for 60-70 minutes until golden brown and a toothpick in the center comes out clean. I would suggest checking the cake around 45-50 minutes and then gauging how much more time is needed.

8. Cool for 15 to 25 minutes in the pan before removing to a wire cooling rack to cool completely.

9. After the cake has cooled, drizzle your favorite topping over it to make it pretty. Southern Living used a glaze of cream cheese, powdered sugar, vanilla and milk. I opted to keep the cake plain but my children suggested that next time I drizzle it with melted Enjoy Life chocolate chips.


Shortcut Cooking: Oatmeal Date Cookies

“We haven’t made cookies in a while….”

My husband had some errands to run, and my high school daughter was playing with the band at an event. So, this left my son and I to occupy our time together. Since I had a workshop coming up, I suggested that we do some baking.

The problem was deciding what to bake. I’d had a series of workshops recently and done a lot of baking so I was a bit tired of the same ol’, same ol’, which were a stock series of recipes which I usually make for the workshops because they’re quick and easy in addition to representing the various different substitutions I teach about in the workshops.

My son’s suggestion was that we make cookies because we hadn’t made them in a long, long time.

There was a reason for that…. I have found that cookies take longer to make, both in the assembling and in the baking. But my son was correct, that we hadn’t made any in a while, and they would be something different. So, we went to work creating a recipe.

I decided that if we were going to bake cookies, I wanted to make something that would be quick. This meant beginning with what we had in the pantry and not creating everything from scratch. So, we opted to use a gluten free flour blend that I had already made up for another item and had leftovers of in the pantry. We also decided to use pre-chopped, store-bought dates which we found in the pantry as well. Because I’m always trying to be healthy, we chose to make oatmeal cookies with whole rolled oats, also in in the pantry, and to use coconut sugar instead of white sugar so I could use half the amount I’d have to use of white sugar.

Using the mixer sped the assembling process up, and because we decided to make oatmeal cookies, we could simply drop the batter onto the parchment paper and flatten them without any rolling or forming. By using vegan butter, I minimized the spreading so I could put 16 cookies (the 1 tbsp size) instead of 12 to a cookie sheet which meant all the cookies fit onto just four cookie sheets, so I could bake two sheets at a time in the oven, resulting in only 20 minutes of baking time.

The result was that from when we started rummaging in the pantry to when the second batch of two cookie sheets came out, it was less than 45 minutes. Now, those are cookies worth making!

Oatmeal Date Cookies

(These make about 60 small cookies or 30 large cookies.)

Ingredients:

1 1/2 cup Gluten Free flour blend (I used a homemade blend of garbanzo bean and sorghum flours mixed with tapioca and potato starch)

3 cups Gluten Free whole rolled oats

1 tsp salt

2 tsp baking powder

2 tsp cinnamon

8 oz pkg pitted, dried, chopped dates

1 cup vegan soy free butter or coconut oil or natural shortening

1 cup coconut sugar

2 tbsp ground flaxseed mixed with 6 tbsp water (Mix ahead of time and let it sit)

2 tbsp additional water

Baking Instructions:

  1. Preheat the oven to 350 degrees and line cookie sheets with parchment paper.
  2. Mix together in a bowl the flour, oats, salt, baking powder and cinnamon. Stir in the dates. Set aside
  3. In a mixer, cream the butter with the coconut sugar.
  4. Add the flaxseed mixture with the dry ingredients and the additional water. Mix until well combined.
  5. On the prepared cookie sheets, drop the cookie batter by 1 tablespoon-full for smaller cookies (2 inch diameter) or 2 tablespoons-full for larger cookies (4 inch diameter). Leave about an inch in between the cookies.
  6. Press the dough down with a fork in both directions and bake in the preheated oven for 8-10 minutes for the small cookies until the cookies are puffed, golden and stiff to the tough. For the larger cookies, turn the pan around after 8-10 minutes and bake for another 8-10 minutes.
  7. Allow the cookies to cool for a couple of minutes on the cookies sheets before moving them to a wire cooling rack with a spatula to cool completely.

Healthy Habits: Quinoa Black Bean Salad

“It’s a bit difficult to avoid all of nature….”

Recently my health insurance provider decided that they wouldn’t cover allergy medications any more which is a big blow to my health. When one goes to an allergist for the first time, the allergist will test you for 80 most common allergens. I am allergic to 78. Have been since I was a child, and they haven’t changed in over 40 years, despite repeated testing every seven years.

For the first thirty years of my life, I coughed, hacked, and sniffled my way through life, never without huge wads of tissues in hand and rarely able to breathe through my nose. The advent of new medications, specifically nose sprays, seemed an opportunity for relief. True to my life, though, it turned out I was allergic to most of the new medications. Go figure! But there was one which actually worked, and for the past 15 years, I was able to breathe through my nose, divest down to one tissue a day, and only hack, cough and sniffle two or three times a year when the allergy seasons were at their worst.

Now, though, I’ve slowly begun a descent back to what I had forgotten, not being able to breathe unless completely upright, blowing my nose so often that it’s red and raw, once again needing to invest in my own tissue company, and finding myself at the doctor’s more than I’d like to be for antibiotics for sinus infections.

On the plus side, I’ve been so sick at times that I’ve been forced to stay at home which is an unusual opportunity for me because I suddenly have time which I wouldn’t have had if I were out at my usual meetings and running of errands. It has also meant I can see firsthand which parts of my life really must be attended to and which can survive without me.

On the downside, feeling unwell makes me tired which stimulates cravings for food which aren’t always the healthiest of choices. Since I always have to watch my weight and my sugars, I have been trying to create comfort foods which curb my cravings but which are healthy.

One such recipe is for a quinoa salad. If you are unfamiliar with quinoa, it is essentially a seed which is a good protein source.  Because it cooks similarly to rice, folks tend to eat it like a grain, and folks who are diabetic or needing to watch carbs should know that quinoa is high in carbohydrates. Since quinoa is also high in protein and fiber, though, eaten judiciously, quinoa is a great comfort food.

I make a quinoa salad which I and my family really likes which uses multi-colored quinoa, black beans, kale and carrots. The quinoa and black beans provide the carbs which are filling but also fiber and protein. The kale and carrots provide nutrients gained from vegetables and cuts the amount of quinoa (and hence the carbs) in a cup serving.

Quinoa Black Bean Salad

Ingredients:

2 cups water

1 cup multi-colored quinoa

2 cups frozen, chopped kale

1 cup thinly sliced baby carrots

16 oz can of no salt, no sugar added black beans, rinsed well and drained completely of all water

3 tbsp olive oil

1 tbsp apple cider vinegar

1/4 tsp salt

1/4 tsp black pepper

3/4 tsp ground cinnamon

3/4 tsp ground cardamom

1-3 tsp honey (optional; use desired amount of sweetness if using; if making for just the family, I omit; if making for company, I use 2 tsp)

Cooking Instructions:

  1. In a medium saucepan, pour the water and add the quinoa. Bring the water to a boil, then lower the heat and simmer until the quinoa has plumped, is showing white rings, and has absorbed all the water. This will take anywhere from five to 15 minutes, depending on how vigorously you are simmering the water. I find that it’s helpful to stir the quinoa every so often.
  2. Once the water is absorbed, remove the pan from the heat, cover the quinoa and let it sit. You want the quinoa to be completely dry before you mix it with other ingredients. This can take anywhere from 10 to 30 minutes, depending on how much of the water was actually absorbed into the quinoa before you removed it from the heat.  When it’s completely dry, you will be able to fluff the quinoa with a fork. If the quinoa clumps together when you try to stir it, then it’s still a bit damp.
  3. While the quinoa is drying, thinly slice baby carrots to make a cup. You can use regular sized peeled carrots but then you’ll want to cut the thin slices in half because you are only cooking the carrots a short amount of time in the microwave with the kale, and you don’t want the carrots to be hard. Once you have a cup’s worth chopped, put it aside for the moment.
  4. Put 2 cups of frozen, chopped kale into a microwave safe bowl.  Follow the instructions for cooking, only halfway during the cooking time, remove the bowl, stir the kale and add the cup of chopped carrots. Finish cooking the kale in the microwave.
  5. Add the kale, carrots and black beans to the quinoa and mix well.
  6. In a measuring cup, whisk together the olive oil, apple cider vinegar, salt, pepper, cinnamon and cumin and honey, if using.
  7. Drizzle the dressing onto the quinoa salad and use a spoon to incorporate the dressing into the quinoa salad.
  8. Salad can be served warm or cold. Can store in the fridge for a long time.

Changing Tradition: Dairy Free Pumpkin Cheesecake

“What exactly is traditional?”

This year, for the first time in eight years, I did not coordinate the parades and barbecue for the high school band which signifies the end of a “tradition” for our family. Every Memorial Day for these past few years, we’ve woken up early as a family and headed to the high school to drop off a high school child and to receive all the food parents were donating to the barbecue. Then, my remaining children, husband and I would head over to the local camp to set up for the barbecue. After cooking and serving hamburgers, hot dogs and veggie burgers to 70 people, we’d clean everything up, unload at home, and head back to the high school to pick up our child from the second of the two parades marched in on Memorial Day.

What’s varied over the years is the number of my children who helped at the barbecue. First there were two while my eldest marched with the high school band; then there was one as my middle child marched. What didn’t change was the fun we had serving as a family, and the expectations of my youngest who from his youngest years loved going to the camp on Memorial Day. Last year, however, I resigned from 15 years of school volunteer work to focus more on other opportunities.

For my youngest, who is on the autism spectrum, he was torn between wanting to support his mother and what he saw as a loss from participating in our “traditions” for Memorial Day. As it is, this year would have marked a change whether I had continued or not because my husband’s father passed away a couple of weeks ago, and though we spent a week with my mother-in-law for the funeral, my husband and youngest went back this weekend to help her sort through my father-in-law’s office materials.

Before my father-in-law passed away, though, I reminded my son that traditions are what we make, not what make us and that this could be a year to do something slightly different. For some of us, our foods are very traditional… foods we’ve always had and therefore must continue to have. This can make it difficult if we’re trying to eat healthier or suddenly have food allergies altering our food needs.

This week I received an email from someone who has always loved pumpkin cheesecake. It’s apparently been a “tradition” to make it for Memorial Day, a tradition that dates back to his childhood when he wanted pumpkin pie for Memorial Day and his mom wanted to make a cheesecake, and they compromised. This year, however, his mother can no longer eat dairy and has to be careful of her total carb intake due to diabetes, and he feared their tradition would have to end. Instead, he learned that the tradition simply need to be modified.

I used tofu versions of the dairy for the cheesecake, reduced the “sugars” by using a smaller amount of agave instead of a larger amount of sugar, and reduced overall carbs by opting to not have a crust for the cheesecake. The gentleman said his mother enjoyed the cheesecake immensely, so for those of us wondering if change can be good, this cheesecake says, “Yes.”

Pumpkin Cheesecake

Ingredients:

3 (8-ounce) packages tofu cream cheese, at room temperature
¾ cup Agave (If you like your cheesecake sweet, you may want to increase this to one cup)
1 (15-ounce) can pureed pumpkin or two cups cooked, pureed pumpkin
1/4 cup tofu sour cream, at room temperature
2 teaspoons ground cinnamon
1 teaspoon fresh ground ginger
¼ teaspoon ground cloves
4 eggs, at room temperature

Topping: 12 ounce tofu sour cream, 2 tsp agave, 1 tsp vanilla

Cinnamon

Cooking Instructions:
Preheat oven to 350 degrees F. and wrap a 10 inch springform pan with aluminum foil around the bottom. Line the bottom of the pan with parchment paper.

In a mixer, beat tofu cream cheese until smooth. Slowly add the agave with the mixer on low, scraping down the sides as needed. Add the pumpkin puree, sour cream, and the spices. Beat together until well combined. Add the eggs, one at a time, mixing well in between each addition.

Pour into the prepared pan. Spread out evenly and place in a large pan that will hold the springform pan and water. Pour boiling water into the larger pan until it’s about halfway up the springform pan. Bake the cheesecake in the oven for about an 1 hour or so. The cheesecake will be slightly jiggly in the center but a knife inserted near the edge should come out mostly clean.  Mine took an hour and ten minutes. This made a creamy, less dense cheesecake. If you like your cheesecake to be more solid, bake longer until the center is more firm.

Mix the sour cream with the agave and vanilla and spread over the top of the cheesecake. Bake for about another ten minutes. You just want the topping to solidify a bit.

Remove from the oven and let sit for 15 to 30 minutes. Cover with plastic wrap and refrigerate for at least 4 hours until the cheesecake is set. Remove from the springform pan and sprinkle with cinnamon on top before serving.