Creative Cooking: Vegan Chocolate Chip Muffins

“Yes, a pick me up….”

When I was a younger mom with younger children, no one told me that I should consider those the “easier” years of being a mom. Perpetually exhausted from lack of sleep, newly learning how to be a parent, mentally and emotionally perplexed by each new developmental-stage challenge, it can seem like those parenting years are the most difficult.

Today, as an older mom of both grown and teenage children, I sometimes yearn for those- what I know now to be – “easier” days of parenting. Back then, there were challenges but most everything was within our control as parents. We could enforce bed times, make rules for behavior, put the children in car seats and strollers to keep them safe, and find a myriad of books which told us how to toilet train, get them to sleep in their own beds, and encourage their emotional abilities to interact with the world around them.

With older children, the challenges are much more challenging and mostly out of our control to fix, the children are not bound by anything we say or offer, and the few books which are out there agree that all we can do is be there for our children and hope and pray for the best.

So, some days, I just need a little pick-me-up, a treat, to keep me going in the middle of a long day of driving between colleges and home or helping with a problem long-distance by phone. If you’ve followed my blog for a while, you already know that I fully believe in comfort eating now and then. Obviously, you don’t want to overindulge all the time in too many “not as good for you” foods, nor do you want to use food as a way of dealing with your problems, because it doesn’t work. At the same time, a well-timed small treat once in a while when you’re in need of something to give you a bit of energy – physically, mentally, and emotionally – is not necessarily a bad thing.

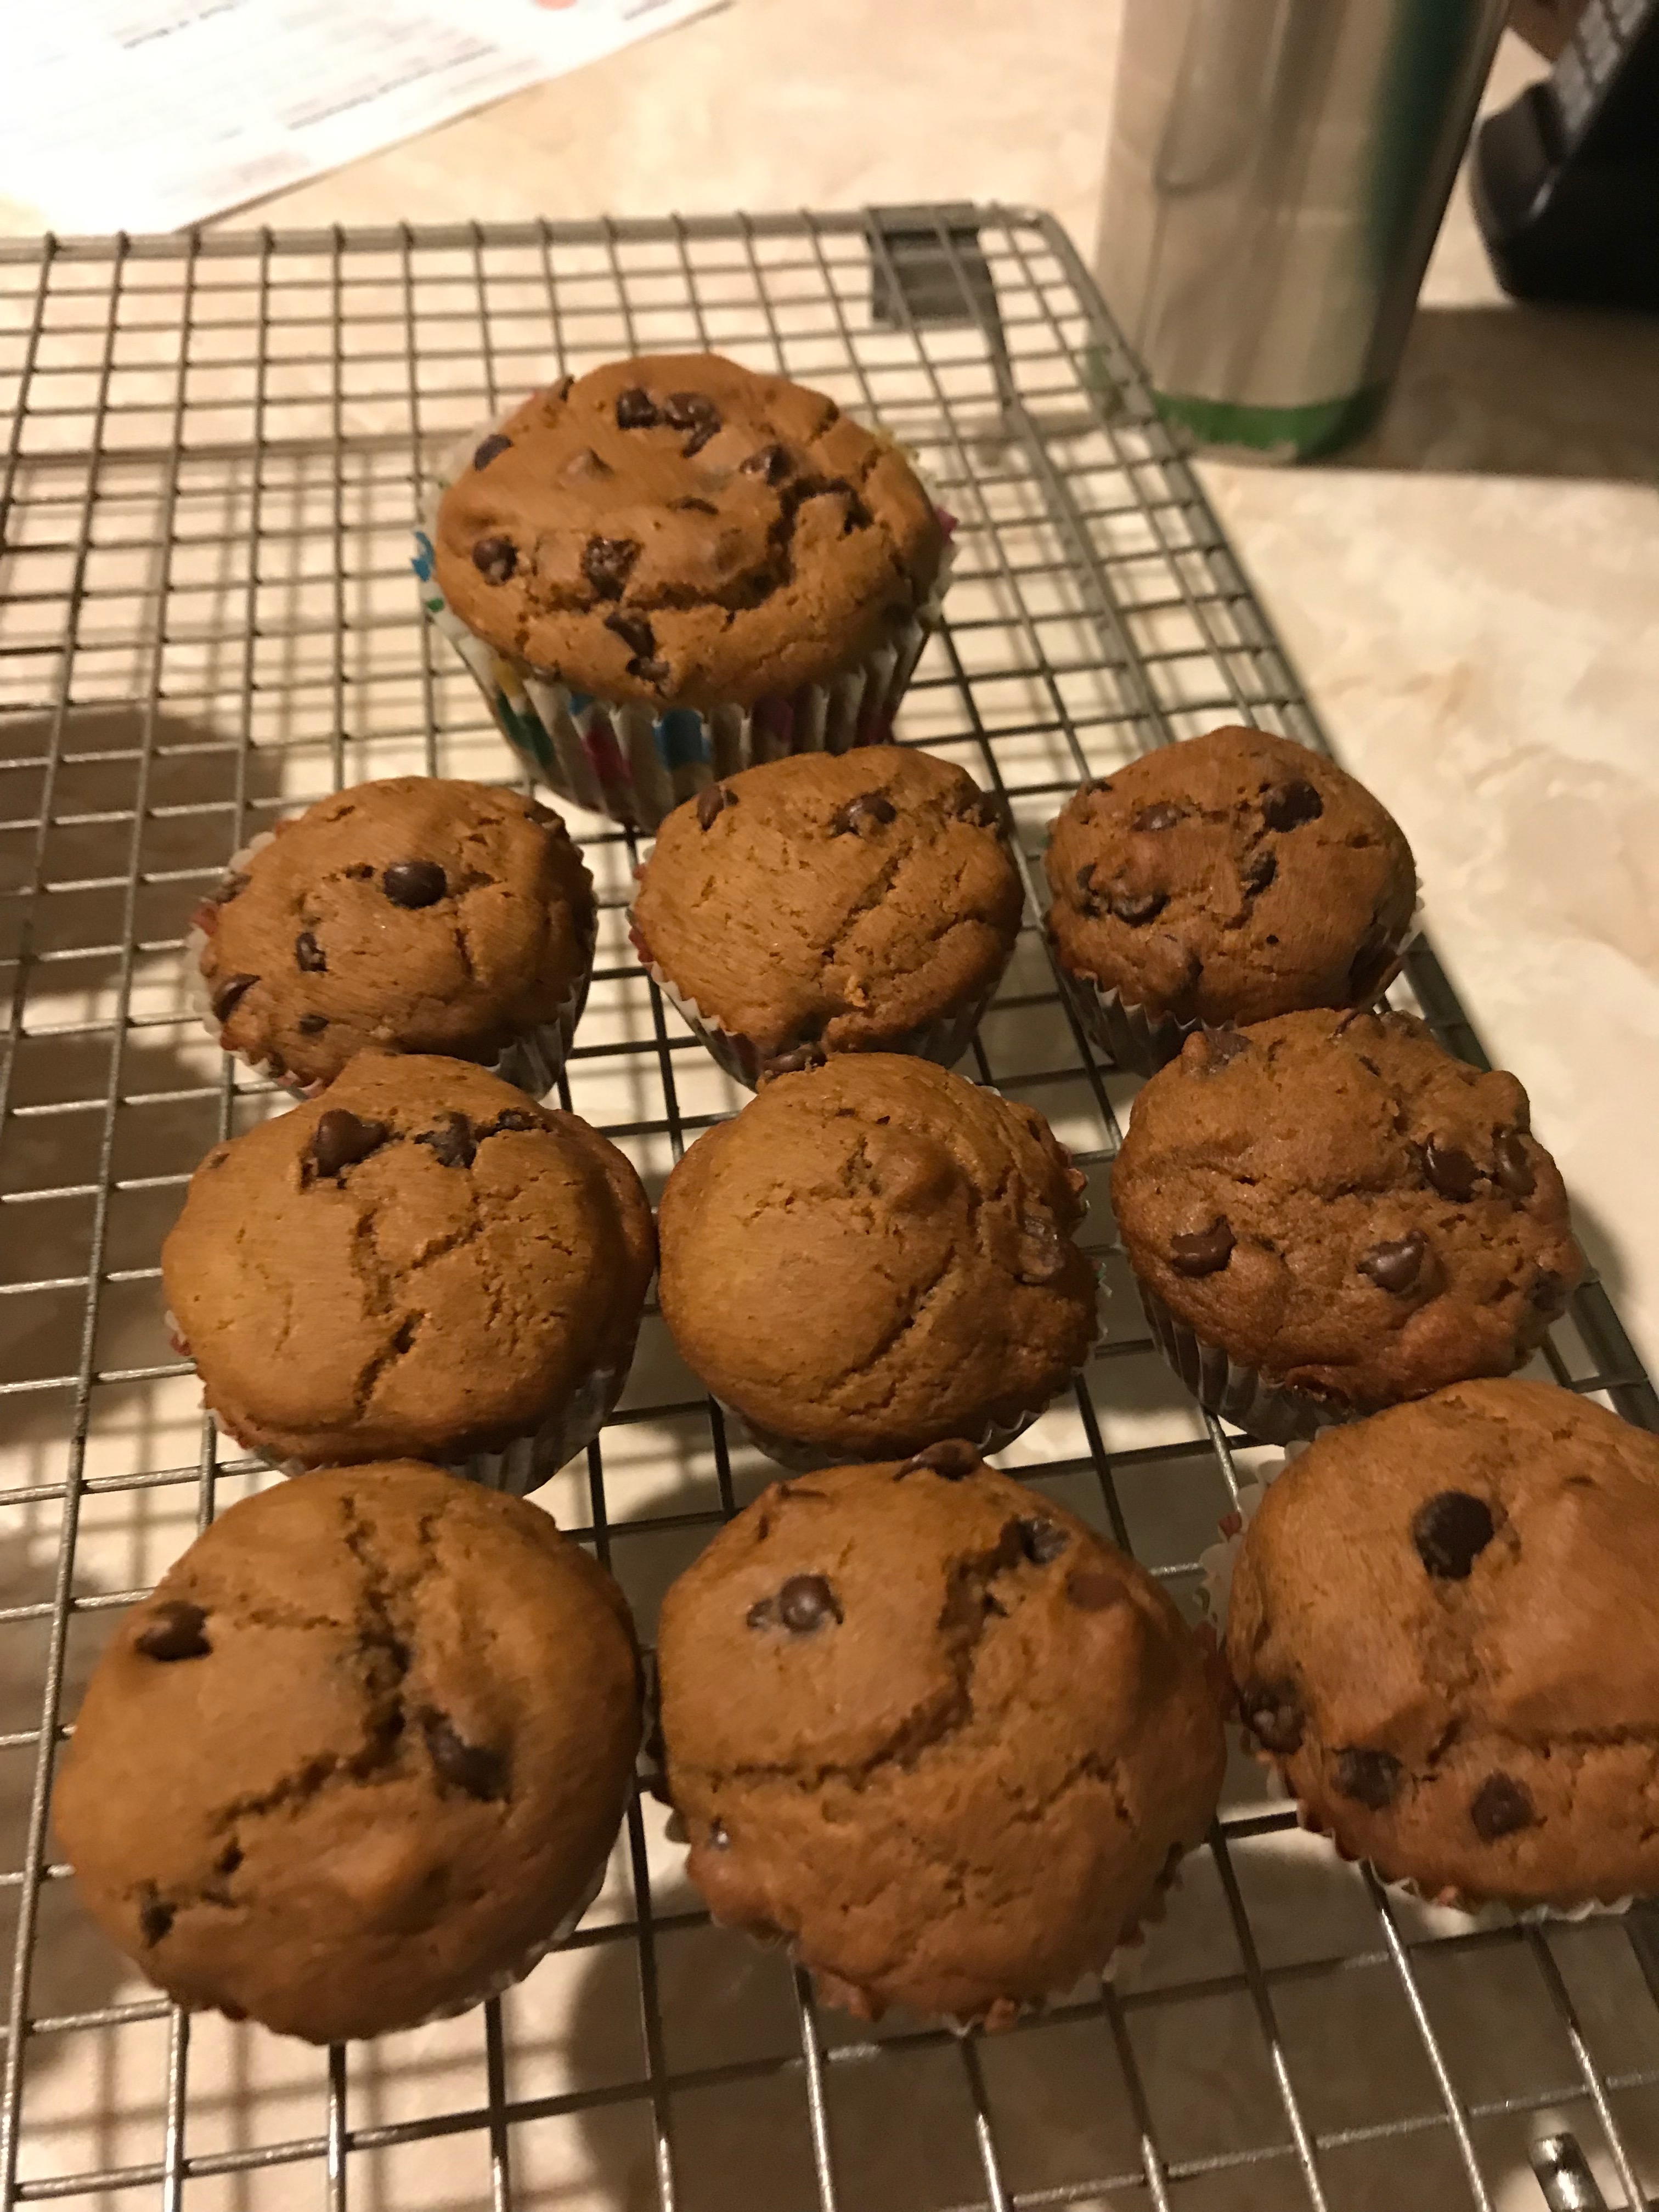
Hence, this week’s post on vegan, gluten free chocolate chip muffins. They hit the spot, as they say. I like to make them as mini muffins because just one mini muffin usually does the trick for me, but the children prefer them regular size because otherwise they’d be likely to eat three or four of the little ones.

Vegan Chocolate Chip Muffins

Ingredients

1 cup unsweetened vegan/plant based milk (we use soy or flax or oat)

1 tbsp vinegar (choose white, apple cider, or raspberry)

2 cups your favorite gluten free flour blend (I like King Arthur’s whole grain blend)

2 1/2 tsp baking powder

1/2 tsp baking soda

2 tsp ground cinnamon

1/2 tsp nutmeg

1/2 tsp salt

1 cup Enjoy Life mini chocolate chips

1/2 cup coconut sugar or monk fruit golden sweetener

6 tbsp plant oil (we use safflower or avocado or extra light olive oil)

2 tsp gluten free vanilla extract

Baking Instructions:
    1. Preheat the oven to 350 degrees. Line a 12 regular-sized muffin tin or 24 mini-muffin tin with appropriately sized cupcake liners or grease the tins with your preferred method, and set aside.
    2. Mix together the “milk” and vinegar to make a “buttermilk”. Allow it to thicken.
    3. Combine together the flour, baking powder, baking soda, cinnamon, nutmeg, salt and chocolate chips.
    4. Add to the “buttermilk”, the coconut sugar, oil, and vanilla extract.
    5. Add the dry ingredients to the wet and mix until all dry ingredients are moistened.
    6. Evenly divide the batter among the muffin tins of choice.
    7. Bake in the preheated oven until puffed, golden and a toothpick inserted in the center comes out clean. Larger muffins will take about 20-25 minutes. Mini muffins will take 10-15 minutes.
    8. Let the muffins cool in the tins for 5 minutes; then remove them to a wire cooling rack to cool completely.
Advertisement

Healthy Habits: Pumpkin Oat Bundt Cake

“Have you ever tried….?”

I am continually amazed by just how many items there are on the market these days for folks trying to eat healthier and/or allergy friendly. Just a decade ago, I was driving distances to little, out of the way, specialty stores to try to find this or that. Now, I walk into the grocery store, ten minutes down the road, and every week, something new is on the shelf.

Recently, a friend asked me if I had ever tried monk fruit sweeteners since she knew I didn’t bake with sugar. Since I had not actually tried it, I thought I’d research it and give it a try.

Some things for you to know about monk fruit sweeteners:

  1. Research seems to indicate that monk fruit as a fruit does not increase blood sugar levels in diabetics, but always check the sweetener blends to make sure there are not other added sugars which may increase blood sugar levels.
  2. As a substitute for sugar, monk fruit and monk fruit sweetener blends are more expensive than even other substitutes on the market (like agave or coconut sugar or truvia). So, if finances are tight, it may not be your first option.
  3. Also, as a substitute, monk fruit sugar blends are not as easy to find in your local supermarkets as other options. I could only find it at one grocery store a couple of towns over.
  4. Monk fruit sweeteners can have a bit of an after taste, which some folks may like but some really don’t.
  5. Monk fruit sweeteners come in “classic” and “golden”. Classic is supposed to be similar to white sugar. Golden mimics brown sugar.
  6. The monk fruit sweetener packages say, “1 to 1,” for use. I would strongly discourage folks from doing so. It is really, really sweet. In the recipes I tried, using half or less worked just fine.
  7. I also discovered that, despite instructions, the monk fruit sweetener blend tended to work better in baked goods if you mixed them with the wet ingredients instead of the dry. The monk fruit sweetener mixed with the dry ingredients in brownies rose to the top during cooking, mottling the appearance and affecting the brownie texture. Dissolving the sweetener with the wet ingredients, however, alleviated both issues.

In the midst of my experiments with the monk fruit sweeteners, I needed to make a cake for a friend with diabetes who also needs to add more fiber into his diet. I decided to create an oat-filled pumpkin bundt cake, using the monk fruit sweetener. The result was a moist, tasty cake.

Pumpkin Oat Bundt Cake

Ingredients:

For the pan and streusel:

vegan soy free butter

1/4 cup ground flax seed

1/4 cup quick cooking gluten free rolled oats

1 tsp cinnamon

1 tsp nutmeg

1 tsp golden monk fruit sweetener

1/4 cup quick cooking gluten free rolled oats

1/2 tsp cinnamon

1/2 tsp monk fruit sweetener

1 tbsp melted vegan soy free butter

For the batter:

2 cups cooked, pureed pumpkin

1 tbsp minced ginger/ginger paste

1 cup extra light olive oil

1 cup golden monk fruit sweetener

3/4 liquid egg whites

2 cups gluten free high fiber/high protein flour blend (I used Bob’s garbanzo bean blend)

1 cup gluten free brown rice flour blend

2 1/2 tsp baking soda

2 tsp cinnamon

1 tsp nutmeg

1/2 tsp ground ginger

1/4 tsp cloves

2 tbsp vinegar

Baking Instructions:

  1. Preheat the oven to 350 degrees.
  2. Prepare a bundt pan by greasing it with vegan soy free butter.
  3. Then, mix the ground flax seed, oats, cinnamon, nutmeg and monk fruit sweetener. Carefully coat the inside of the bundt pan with the mixture. At least a quarter of the mixture should be left over when you are done.
  4. To the leftover mixture add the additional oats, cinnamon, and monk fruit sweetener. Combine and then mix in the melted butter. Mix until all dry ingredients are moistened. Set aside.
  5. Combine together the pumpkin, ginger, oil oil, monk fruit sweetener, and egg whites. Set aside.
  6. Mix together the garbanzo bean flour blend, the brown rice flour blend, baking soda, cinnamon, nutmeg, ginger, and cloves.
  7. Add the dry ingredients to the wet and mix well, adding the vinegar.
  8. Carefully spoon about 1/3 of the batter into the bundt pan.
  9. Sprinkle the oat mixture over the batter.
  10. Then, carefully spoon the remaining 2/3 of the batter over the oat mixture.
  11. Bake in the preheated oven for 30 to 35 minutes until the cake is puffed, golden, and a toothpick inserted into it comes out clean.
  12. Allow the cake to cool in the pan for at a minimum of 15 to 25 minutes.
  13. Remove the cake from the pan and allow it to cool completely on a wire rack.
  14. Enjoy!

Healthy Habits: Baked Pears

“He has to be careful about his levels….”

Every summer, we head to the Adirondack mountains to work at the family forest my husband’s family has run for over 60 years. Since I am allergic to everything God has created in nature, I act as the chief cook as opposed to wandering around in the woods, measuring and counting trees. As the chef, I am often cooking meals for anywhere between eight to 20 people for any given meal. This means often taking into account not just my own food allergies but other people’s food restrictions as well.

This year, I needed to be careful about foods which would spike glucose levels for diabetics, so I was trying to avoid making a lot of cakes and cookies, and I opted instead for fruit desserts like a blueberry cobbler which I made with oat biscuits which used no sugar for either the blueberries or the biscuits.

This morning, however, I needed a dessert for a brunch and wanted something healthy but not necessarily a lot of work. At the store, I noticed that they had ripe Bartlett pears on sale, so I purchased those and set about making something for the brunch. As I googled, I noticed that the most common pear dessert is to poach them, but that required watching them on the stove and thickening syrups and such, all of which was too much work.

So, I decided that I’d simply bake them with a little bit of cinnamon and honey and whole rolled oats.  The result was a nice, light dessert, which was perfect for the brunch and well received. One person said that she didn’t usually like pears but liked the dessert. So, I call that a success.

Baked Pears

Ingredients:

8 ripe Bartlett pears

2 tbsp honey

2 tbsp hot water

1/2 tsp cinnamon

1/2 tsp nutmeg

1/2 tsp very finely chopped ginger, almost like a paste

1/2 cup gluten free whole rolled oats

1/2 tsp cinnamon

1/4 tsp cloves

1 tbsp vegan soy free butter, melted

Baking Instructions:

  1. Preheat the oven to 350 degrees.
  2. Cut pears in half, remove stems by pulling them down the middle to remove the hard core, and then core out the center seeds. (I just use a small spoon.)
  3. Lay the pears in one or two pans, which are large enough to hold them.
  4. Mix together the honey, hot water, cinnamon, nutmeg and ginger until well blended. Drizzle over the pears.
  5. Combine the oats with the cinnamon, cloves and melted vegan butter. Spoon them evenly into the holes left by coring out the seeds.
  6. Bake in the preheated oven for 15 to 30 minutes (will depend on the ripeness of your pears) until the pears are golden and warm.
  7. You can eat them as is or serve them with ice cream or whipped cream.

Healthy Habits: Oatmeal Chocolate, Chocolate Chip Cookies

“It’s been soooo long….”

If you were to peruse the recipes on this site, you would notice that the cake recipes far outnumber cookie recipes. There are several reasons for that. The first is that cookies require so much more time than cakes. When one is pressed for time to make a dessert, cookies are not the most efficient to make.

The second is that “healthy” cookies are trickier to make. Adding fruits and vegetables to cakes is easy. Using them in cookies usually just means a really soft cookie which won’t keep for more than a couple of days. Swapping whole grain flours adds some protein and fiber but if you want a cookie which isn’t dry and crumbly, you still need a substantial amount of fat because cookies don’t usually require much in the way of liquid ingredients, which precludes using liquid plant oils, which affects the taste and texture of cookies anyway. And while there are many options on the market to substitute for the sugar, the fact is that they do affect the texture and taste of cookies.

The third is that I find that folks have a way of eating a whole lot of cookies in a sitting because their size and lack of filling makes eating many easy to do. This, of course, is not healthy eating, so it is easier to make cakes and control the portions.

This week, however, my son asked if I would make cookies. As he reminded me, I haven’t made any since Christmas which is when I usually spend weeks making many different type of holiday cookies for the season.

I wanted to make a cookie which I would feel good about my son eating, and of course, I also wanted it to taste good, because it’s not worth eating something that doesn’t, in my opinion. And I wanted it to be a cookie where one would fill him and not make him want a second or third or more in one sitting.

After some thinking I decided that I’d make an oatmeal cookie because oats have protein, fiber, antioxidants, vitamins and minerals. I also decided I’d make them with chocolate chips so I could use the sugar from the chips as opposed to adding sugar, and I would use dark chocolate chips because dark chocolate chips would have less sugar and more beneficial flavonoids. I also opted to make them vegan so that I could make them in the future for the vegan side of the family. Finally I added some chopped non-crystalized, candied ginger for a special flavor.

The cookies came out great and fit all my parameters. They had healthy oats, less sugar, a great taste, and eating just one was satisfying.

Oatmeal Chocolate, Chocolate Chip Cookies

Ingredients:

1 cup gluten free whole rolled oats, processed into oat flour

1 1/2 cup gluten free whole rolled oats, as is

1 1/2 cup whole grain gluten free flour blend

2 tsp cinnamon

1 tsp nutmeg

1 tsp baking soda

1 tsp baking powder

1 cup dark chocolate chips (I used Enjoy Life’s 69% dark chocolate chips)

2 to 4 tbsp non-crystalized, candied ginger (use less if you just want a hint; more if you want a more pronounced ginger taste)

1 cup dark chocolate chips (I used Enjoy Life’s 69% dark chocolate chips)

3/4 cup vegan, soy free butter

1/4 cup applesauce

1/4 cup honey

Baking Instructions:

  1. You will wait to preheat the oven because the dough needs to be refrigerated first.
  2. In a food processor, process the one cup of oats until you have something resembling flour. To the oat “flour” add the whole rolled oats, gluten free flour, cinnamon, nutmeg, baking soda and baking powder. Set aside.
  3. In a food processor, process the one cup of dark chocolate chips with the candied ginger until you have small, fine pieces. Add it to the dry ingredients and mix well.
  4. Stir in the remaining one cup of dark chocolate chips.
  5. In a mixer, cream the vegan butter. Add the applesauce and honey and mix well, scraping down the sides as needed.
  6. Add the dry ingredients to the wet and mix until the dough is well blended.
  7. Cover the bowl and put the dough into the fridge for at least one hour and no more than 24.
  8. When ready to bake the cookies, preheat the oven to 350 degrees and cover cookies sheets with parchment paper.
  9. Using a quarter cup scoop, place level, quarter cup portions of the dough onto the cookies sheets with space in between to spread. Use a fork to crisscross the dough into a slightly flatter circle.
  10. Bake for 20 to 22 minutes, rotating the pan halfway through, until the cookies are browned, larger, and slightly stiff to the touch.
  11. Put the cookie sheet on a wire rack to cool for a couple of minutes. Remove the cookies to the wire cooling rack and allow them to cool completely.
  12. They can be stored in an airtight container for several days.

NOTE: These are large cookies because I always keep in mind that summer is a good time to make ice cream cookie sandwiches. *grin*  You can halve the size by using 2 level tablespoons instead and reducing the cooking time.


Recipe Revamping: Coffee Cake Muffins

“Be prepared….”

Being of a certain age and generation, I always had a bag in the car which contained a blanket, a flashlight with extra batteries, water, and extra socks, and I had been taught by my dad how to change a flat tire. Now, with the prevalence of cell phones, folks believe they are just a phone call away from help. That is, until we read the news story like the one about the couple who broke down in the middle of a snowstorm with stalled cell coverage and died from exposure.

So, being a bit OCD, I tend to err on the side of preparation rather than not, when I am travelling, and I acted no differently when I recently attended a college reunion. My husband chuckled at one of my bags. It was a large bag of allergy friendly snack items, filled completely to the top. “You do know they’re feeding you, right?” he said.

“Yes,” but I don’t know if I will be able to eat any of it,” I replied.

As it turned out, I was able to eat, but as expected, my choices were limited. One buffet of a dozen items had three side dishes which I could eat but no main entree, and at another meal, even the salad had cheese, nuts and croutons already on it, though this time I had a nicely grilled piece of chicken to make up for the missing entree the night before.

Though I didn’t need all that I had packed to eat, my daughter and I did gratefully dig into the dairy, nut, and wheat free package of double chocolate cookies I had thought to throw into the bag and which called to us after we spent two meals watching others eat decadent desserts which would kill us.

So, when I had to attend a brunch this past week, I thought it best to go ahead and bring something to contribute to the food options. I wanted to make muffins because they’d go with anything else that was offered but I wanted something “breakfasty”. In my search I discovered coffee cake muffins, but of course, the recipes were not allergy friendly and had more butter and sugar than I cared to use.

The original recipe for just a dozen muffins called for 1 1/2 cup all purpose flour, 1/2 cup brown sugar, 1/4 cup white sugar, 2 tsp baking powder, 1 tsp cinnamon, 1/4 tsp baking soda, 1/2 tsp salt, 3/4 cup milk, 1/3 cup melted butter, and 2 eggs for the batter. Then it called for 1/3 cup white sugar, 1/3 cup brown sugar, 1 tsp cinnamon, 1/2 tsp salt, 1/2 cup butter, and 1 1/2 cup all purpose flour for the streusel, as well as 1/4 cup powdered sugar with 1/2 tsp vanilla and 1 tsp of milk for a drizzle.

The first thing I decided was that all that sugar and butter had to be dealt with. I switched the melted butter in the batter to extra light olive oil, and I decided to omit sugar altogether from the batter. For the milk, I used a gluten free oat milk, and for the flour, I chose a whole grain gluten free blend. I omitted the salt and added nutmeg to complement the cinnamon. For the streusel, I reduced the sweetener to 1/2 cup and used coconut sugar instead, and I cut the butter to 1/4 cup, using a vegan soy free butter in its place. I omitted the salt from the streusel, too, adding in nutmeg to the streusel as well, and I used a gluten free oat flour for the flour to add protein and fiber, reducing the amount to 1 cup. The drizzle, I omitted altogether.

Since I have no issues with eggs, I didn’t make any substitutions but folks can always use all egg whites or flaxseed mixed with water or aquafaba or egg replacer, if need be. Also, because I switched to gluten free flour, I increased the baking soda by 1/4 tsp to help the batter rise.

Because I knew the batter wouldn’t be sweet, I poured half the batter into the muffin tins and layered a streusel topping in the middle of the muffin as well as on top. The result was a tasty, healthier version, which the folks at the brunch enjoyed as much as my family.

Coffee Cake Muffins

Ingredients:

Batter:

1 1/2 cups whole grain gluten free flour blend of choice

1 tsp cinnamon

1 tsp nutmeg

1 tsp baking powder

1/2 tsp baking soda

3/4 cup favorite plant based milk (I used a gluten free oat milk)

1/3 cup extra light olive oil

2 eggs

Streusel:

1/2 cup coconut sugar

1 cup gluten free oat flour

1 tsp cinnamon

1 tsp nutmeg

1/4 cup vegan soy free butter

Baking Instructions:

  1. Preheat the oven to 375 degrees and line a muffin tin with 12 cupcake liners.
  2. Mix together the flour, cinnamon, nutmeg, baking powder and baking soda for the batter. Set aside.
  3. Whisk together the “milk”, oil, and eggs. Add to the dry ingredients and blend well until smooth. Let it sit while you make the streusel.
  4. Mix together the coconut sugar, oat flour, cinnamon and nutmeg. Using clean hands, mix in the vegan butter until you have large crumbs and no leftover dry ingredients.
  5. Divide half the batter among the 12 muffin cups. Sprinkle the batter with half of the streusel topping.
  6. Top off the muffin cups with the rest of the batter, and sprinkle the remaining streusel topping on all the muffins.
  7. Bake in the preheated oven for 15 minutes. The muffins will have puffed, be golden and a toothpick inserted in the center will come out clean.
  8. Let the muffins cool for at least a few moments before digging in.


Recipe Revamping: Lemon Berry Tart

“It’s for Mothers’ Day….”

I confess: I’m not fond of Mothers’ Day. Not because I don’t believe mothers should be appreciated, but because the way it’s celebrated in the U.S., Mothers’ Day seems to be about getting my children to take me out to a restaurant where I can’t eat the food, buy me flowers and chocolate which I’m allergic to, and/or make one more thing for me in school for me to find someplace to put and then dust for years to come.

It’s true that it’s nice to receive a card in which each of my children have written in their own hand how much they appreciate me, but even that, I also confess, is a bit tainted because I’ve caught them too many times hastily writing the script the morning of Mothers’ Day on a card which one of them quickly made because they forgot to do anything ahead of time.

To be completely honest, the best gift I could receive on Mothers’ Day is that the family would resolve to clean up after themselves the other 364 days of the year.

Since that’s not likely to happen any time soon, though, instead, I’ve made Mothers’ Day a time when the family has to what I’d like, whether they like it or not. So, one year I dragged them to an art museum. Another time, we saw a “mama” movie. This year, I decided it would about food I enjoy, so I spent the day making a number of items the family doesn’t consider a “favorite” – foods like grilled eggplant and roasted asparagus and baked tofu in white wine sauce.

Since I spend the other 364 days of the year catering to the family’s food tastes, I figure the Mothers’ Day meal can be about me for a change. So, for dessert, I made a lemon berry tart instead of what the children wanted, which was cake, which frankly I’m quite tired of eating. I wanted something that tasted like Spring.

Most of the recipes I found, though, seemed to use a lot of sugar and heavy cream, and of course, the tart crust was all white flour with lots of butter. So, I did a little bit of revamping. Instead of white flour, I mixed gluten free oat flour with whole rolled oats, added orange peel and nutmeg, and used just a bit of honey and vegan butter for a nice whole grain, protein filled crust. Then for the filling, I combined some tofu cream cheese with freshly squeezed lemon juice and again, a bit of honey. I arranged fresh berries in a pretty arrangement and topped it with sliced mint leaves.

It is everything I could wish for Mothers’ Day this year.

Lemon Berry Tart

Ingredients:

1 cup gluten free whole rolled oats

1 cup gluten free oat flour

1 tsp dried orange peel

1 tsp nutmeg

4 tbsp vegan butter

1/4 cup honey

one 8 oz tofu cream cheese

2 tbsp honey

2 tbsp freshly squeezed Meyer lemon juice

blueberries

raspberries

blackberries

mint leaves, thinly sliced

1 tbsp Polaner Raspberry All-Fruit

Cooking Instructions:

  1. Preheat the oven to 350 degrees. Grease a 9 or 9.5 inch pie pan with your preferred method.
  2. In a food processor, combine the oats, oat flour, orange peel and nutmeg and zoop until crumbly.
  3. Add the vegan butter and zoop until well combined.
  4. Add the honey and zoop until a small dough ball forms.
  5. Using your clean hands, shape the dough to match the shape of the pie pan.
  6. Bake in the preheated oven for 15 minutes. Then remove the crust and let it cool completely.
  7. In a mixer, whip the tofu cream cheese until it is smooth.
  8. Add the honey and lemon juice and mix until everything is well combined.
  9. Spread the filling into the prepared crust and top with the berries.
  10. Sprinkle the top with the sliced mint leaves.
  11. Melt the Polaner All Fruit and drizzle over the leaves and berries.
  12. Refrigerate the tart until you are ready to eat it.


Healthy Habits: Easy Allergy Friendly Company Meal

Help….

This past weekend, my family traveled to New Jersey to celebrate my niece’s First Communion. The reception afterwards was at a beautiful, well-reputed restaurant where my brother had rented a room, complete with a buffet of assorted options from seafood, beef, and chicken to pasta and rice to salads and roasted vegetables. Of the ten items to choose from, I could eat three. The rest were all cooked in butter.

Fortunately, my brother had arranged for a special plate to be made for me, but it can be sad to be the odd person out, watching folks enjoy food you can’t have. This experience was fresh in my mind when a friend called to ask if there was something quick and easy she could make that would also be a “nice, company meal” because she was hosting a dinner where one person had severe food allergies. No wheat, eggs, dairy, nut, soy, or citrus foods could be served.

I applauded her desire to make something which everyone could eat and immediately thought of one of my go-to meals, chicken and vegetables. This may seem like a ho-hum meal to serve company, but if you roast whole carrots with sliced zucchini and bake tender, seasoned chicken breasts and serve both with a beet sauce, the experience becomes more than ho-hum, and if you look at the pictures, the food looks pretty, too, which enhances the appetite.

What’s even better, is that the entire meal takes only about 45 minutes from beginning to end to make, which gives you plenty of time to hang with your guests. While the veggies roast, you work on the chicken, and while the chicken cooks, you work on the sauce.

Company Baked Chicken Breasts and Roasted Vegetables

Ingredients:

2 lb bag of whole carrots, peeled (normal size, not crazy, huge ones)

Zucchini, sliced lengthwise into quarters, about size to eight medium-sized ones

6 chicken breasts, 4 ounces each (palm size portion, not crazy, hormone-induced size)

olive oil

onion powder

garlic powder

oregano

thyme

tarragon

red pepper flakes

black pepper

1 1/2 cups cooked beets (I buy precooked, ready to go ones in the vegetable section)

1 cup unsalted, no sugar chicken bone broth (I find this at my local grocery store)

1 tsp minced garlic

2 tbsp chopped onion

1/4 tsp ground cumin

1/4 tsp ground ginger

Cooking Instructions:

  1. Preheat the oven to 500 degrees.
  2. Lightly coat the carrots with olive oil and place into a large oven proof pan which will hold the carrots in a single layer with space left for the zucchini to be added.
  3. Roast for 10-15 minutes, depending on the thickness of the carrots.
  4. Remove the pan, stir the carrots, lightly coat the zucchini quarters in olive oil, and add them to the pan.
  5. Roast for 5 minutes, remove the pan and stir, adding onion powder, garlic powder, oregano, thyme, tarragon, red pepper flakes and black pepper – all to your liking.
  6. Roast for another 5 minutes and arrange the vegetables on an oven safe, serving platter, and set aside. Turn the heat down to 450 degrees.
  7. While the vegetables are roasting in the oven, line a 9 x 13 pan with parchment paper and lightly brush olive oil on both sides of the chicken breasts. Sprinkle both sides of the chicken breasts with the onion powder, garlic powder, oregano, thyme, tarragon, red pepper flakes and black pepper – to your taste and liking.
  8. Cover the chicken breasts with another piece of parchment paper, tucking the ends in around the chicken into the pan.
  9. Bake the chicken for 15 minutes.
  10. Remove the chicken from the oven and let it sit, exactly as it is with the parchment covering it, and turn down the heat to 300 degrees. Let the chicken sit for 10 minutes to reabsorb its juices.
  11. Put the veggies which have been transferred to an oven safe serving platter into the oven to finish cooking while the chicken sits for the 10 minutes.
  12. While the chicken breasts are resting and the veggies are finishing, put the cooked beets into a blender with the bone broth, garlic, onions, cumin and ginger, and puree until completely smooth.
  13. Pour the sauce into a microwave safe, serving pitcher, and microwave for a minute at a time until the sauce is warm.
  14. After the 10 minute resting time, remove the parchment paper from the chicken, remove the veggie platter from the oven, and serve both with the warmed beet sauce.


Healthy Habits: Broccoli Muffins

“He won’t eat vegetables….”

A friend with a young son who is a picky eater reached out to me a few weeks ago. I was in the midst of the busiest time of my drama season but I wanted to help her anyway. Her son’s pediatrician had said she needed to get more green vegetables into his diet, but he refused to eat vegetables. Since he has had food allergies for most of his young life, he has adapted to being picky about what he eats.

As I mentioned, I was in a rather busy time of life so trying to figure out a recipe he would eat was not high on my ideal list of using my time, so I decided that I’d consider a muffin recipe to make. One, muffins are quick and easy. Two, we could eat them with most anything as I was experimenting. Three, children like muffins, and adults can hide most anything in a muffin.

In the end I worked out a savory broccoli muffin which my family really liked and which my friend’s son ended up liking, too. He apparently never even realized it had broccoli in it! So, I share it here for you to try for yourself.

Broccoli Muffins

Ingredients:

2 cups whole grain gluten free flour blend

2 1/2 tsp baking powder

1 tsp dried oregano

1/2 tsp dried basil

1/4 tsp black pepper

1/4 tsp ground onion powder

1/4 tsp ground thyme powder

1 cup chopped broccoli florets

2 slices vegan cheese (I used Chao cheddar)

1 cup liquid egg whites

1 cup unsweetened oat milk

1/2 cup extra light olive oil

Baking Instructions:

  1. Preheat the oven to 350 degrees. Line a muffin tin with 12 cupcake liners.
  2. Combine the flour, baking powder, oregano, basil, pepper, ground onion, and ground thyme, and set aside.
  3. In a food processor, pulse the broccoli florets with the vegan cheese slices into you have well blended small pieces.
  4. Mix the broccoli and cheese mixture into the dry ingredients.
  5. Add to the dry ingredients the egg whites, oat milk, and olive oil, and mix quickly, just until the dry ingredients are incorporated into the wet and well blended.
  6. Divide the batter among the muffin tins and bake for 15 to 20 minutes until puffed, golden, and a toothpick inserted in the center comes out clean.


Healthy Habits: Most Everything Free Blackberry Filled Mini Sponge Cakes

“You won’t be left out….”

So, what do you do when Valentine’s Day is approaching, and you cannot have eggs, dairy, wheat, soy, nuts, peanuts, chocolate/cocoa powder, sesame, coconut, or any non-fruit sweeteners, whether sugar or natural? Then, even planning for a nice dessert after dinner seems to out of the question, too.

This was the problem presented to me this week, and I had to really think about how to make something which was free of everything but would somehow seem a bit special at the same time. Removing every other ingredient except for sweeteners would not actually be a problem. Removing all sweeteners, however, becomes a bit more problematic.

Removing sugar from a cake means removing the ingredient which absorbs the moisture from the protein and carbs and which helps with the leavening process. This means your baked good will be more moist and dense simply by virtue of removing the sugar. Sugar substitutes like coconut sugar or agave, while not as efficient as sugar, can still do the same job. Once you are limited to only fruit, however, there’s not much you can do, other than to increase your dry ingredients and decrease the liquid but then the result may be a very dry dessert.

As I considered options, I realized that sponge cakes are actually cakes which are made to be more dense on purpose and that maybe I could use the lack of a sugary sweetener to my advantage. In the end I created blackberry filled mini sponge cakes, using Polaner’s Blackberry All Fruit. While not chocolate, it is a different, which could be therefore be considered special.

Blackberry Filled Mini Sponge Cakes

Ingredients:

3 cups whole grain gluten free flour blend

2 tsp baking powder

1 tsp baking soda

2 tsp cinnamon

1 tsp nutmeg

1/2 tsp nutmeg

1/2 tsp ginger

1/4 tsp cloves

1/2 tsp salt

2 tbsp ground flax seed

6 tbsp hot water

1/3 cup Polaner All Fruit

1/2 cup hot water

2 cups mashed ripe bananas

1/2 cup safflower oil

2 tsp vanilla

1 tbsp apple cider vinegar

Polaner Blackberry All Fruit

Baking Instructions:

  1. Preheat the oven to 350 degrees and line 24 muffin cups with cupcake liners
  2. In a bowl, mix together the flour, baking powder, baking soda, cinnamon, nutmeg, ginger, cloves and salt. Set aside.
  3. Mix the ground flax seed with the hot water, and let it thicken.
  4. In a large bowl mix together the blackberry all fruit with the hot water and add to it the mashed bananas, oil, and vanilla.
  5. Add the thickened flax seed to the wet ingredients.
  6. Add the dry ingredients to the wet ingredients with the vinegar and mix just until blended.
  7. Evenly divide the batter among the muffin cups.
  8. Bake in the preheated oven for 20 minutes until the cakes puff and a toothpick inserted in the center comes out clean.
  9. Remove the mini cakes to a cooling rack and allow them to cool.
  10. After the cakes are cooled, fill a pastry bag with a round tip with blackberry all fruit, insert the tip into each cake until the tip is hidden by the cake, and then slowly squeeze the all fruit into the cake until the cake puffs. Slowly pull the cake tip out and fill in the remaining space with all fruit, just ’til a little bit of the all fruit is peeking out of the top of the cake.


Healthy Habits: Vegan Dark Chocolate No Added Sugar Cupcakes

“No sweeteners except fruit are allowed….”

This past weekend, I was tasked with figuring out how to make a chocolate cupcake which would not only be dairy, egg, soy, gluten, and nut/peanut free but which also could not include any sweeteners like sugar, agave, honey, molasses, maple syrup, stevia, etc…. And of course, the recipient wanted the cupcakes to be fudgy and “healthy” as well.

Folks who have food allergies know how difficult it can be to find and/or make desserts which are free of whatever one can’t eat. When you add to that difficulty, though, that it has to be vegan and have absolutely no sweetener other than fruit, things become exponentially more complicated for ensuring the baked product tastes good.

Not one to give up, however, I figured out a way to make exactly what was ordered… a fudgy, dark chocolate cupcake which had some healthy greens mixed in and which used only fruit sweeteners. What came to my rescue was an apple butter pure fruit spread – apple butter sweetened only by fruit and no sugar. The result was quite tasty, even though it wasn’t sweet.

Vegan Dark Chocolate No Sugar Cupcakes 

(makes one dozen)

Ingredients:

1 1/2 cup gluten free flour (I used King Arthur’s whole grain version)

1/2 cup Country Farms Super Greens powder (you can omit this and just substitute another cup of gluten free flour, if you’re not interested in adding “healthy greens”)

1/2 cup Hershey’s Special Dark unsweetened cocoa powder

1 tsp baking soda

1/2 tsp baking powder

1/4 tsp salt

3/4 cup water

1/2 cup plant based milk (I used unsweetened gluten free oat milk)

1/2 cup plant based oil (I used avocado oil because it brings out chocolate flavors well)

1 cup apple butter pure fruit spread (I found this at a local store; made with only fruit)

1 1/2 tsp gluten free vanilla

1 tbsp apple cider vinegar

Baking Instructions:

  1. Preheat the oven to 350 degrees and line a muffin tin with 12 cupcake liners.
  2. Mix together the gluten free flour, greens, cocoa powder, baking soda, baking powder, and salt. Set aside.
  3. Mix together the water, oat milk, avocado oil, apple butter, and vanilla.
  4. Add the dry ingredients to the wet ingredients, along with the vinegar and whisk together until well blended.
  5. Divide the batter evening among the twelve cups. The cupcake liners will be filled almost to the top.
  6. Bake in the preheated oven until the cupcakes puff and a toothpick in the center comes out clean. Mine took 20 minutes.
  7. Remove the muffin tin to a wire cooling rack and allow the cupcakes to cool about five to ten minutes in the tin before removing them. They will collapse a bit, but that is what makes them fudgy.
  8. Remove the cupcakes from the tin and cool completely. They keep well in a covered tupper ware.


Healthy Habits: Vegan Protein Waffles

“I did well… lasted two days….”

Happy New Year! We are two and a half weeks into 2019, and the question, of course, is how we are all doing with any resolutions we’ve made. As someone who does not make resolutions in January, I am fascinated by people who do. I understand how and why the beginning of a new year prompts us to “want to do better”. What I don’t understand is why folks want to start in the dead of winter when it’s dark and cold, and we are too depressed to sustain changes (for those of us who live in the northeast part of the United States, that is!).

I spoke with a friend recently who had decided she’d incorporate walking every morning as a new routine. The problem, of course, is that after the first two days, the weather became frigid, and the sidewalks were too icy, and she didn’t want to leave the comfort of her warm bed. As we chatted, I suggested that maybe she needed to make an attainable goal for herself instead, like occasional outdoor afternoon walks, weather permitting, which supplement indoor exercise, maybe a home video or taking a class at a gym once or twice a week.

Too often, the reason we cannot sustain New Year’s resolutions is simply that they’re too lofty. I counsel folks in my baking workshops to make little changes, one at a time, which over extended time become habits and lead to overall better healthy eating in the long run, as opposed to changing everything at once and finding it to be too overwhelming and unsustainable.

So, in that vein, the next few posts will simply be some healthy recipes which folks can incorporate as you choose into your diet, and today’s recipe is for a vegan protein waffle. Homemade waffles are great because you can control what goes into them. Since waffles can be full of carbs, though, I wanted to find a way to add some protein. Also, with so many folks going vegan these days or having food allergies, I wanted waffles which most anyone could eat. We had them as a family last weekend, and they were delicious!

Vegan Protein Waffles

Ingredients:

1 1/4 cup whole grain gluten free flour blend (you can use a rice flour blend but it won’t have fiber and protein)

1 cup ground golden flaxseed

1/4 cup hemp protein powder (if you have a favorite protein powder, you can use that instead)

2 tbsp egg replacer (just put in the powder as is without mixing it with any liquid)

1 tbsp baking powder

1 tsp cinnamon

1/2 tsp baking soda

1/4 tsp salt

2 cups high protein “milk” (I like to use a GF soy or oat milk)

2 tbsp lemon juice

1/2 cup plant based oil (oils like an extra light olive oil, safflower, avocado, etc…)

1 tbsp maple syrup

1/4 cup water

1 tbsp apple cider vinegar

Cooking Instructions:

  1. Prepare and preheat your waffle maker as instructed.
  2. Mix together in a large bowl the GF flour, ground flaxseed, protein powder, egg replacer powder, baking powder, cinnamon, baking soda and salt. Set aside.
  3. Whisk the milk with the lemon juice, and set aside.
  4. Mix together the oil, maple syrup and water. Add to the milk mixture.
  5. Pour the liquid ingredients into the dry and add the vinegar. Whisk well until all the dry ingredients are fully incorporated.
  6. Cook waffles in your waffle maker as instructed.
  7. Enjoy!

NOTE: My niece told me that every time she tried to make vegan waffles they stuck to the waffle maker. I had no such issues with either of my waffle makers when we made these waffles. If you find that the waffles stick, it may simply be that your waffle maker has not been “seasoned” enough. Brushing the waffle maker with oil or spraying it with a non-propellant olive oil spray, as I do, tends to work.

Thanksgiving Thoughts: Vegan Pumpkin Pie, Two Ways

“But pie….”

After posting the black bean-kale soup recipe, I received a question about pies. More than any other holiday, Thanksgiving tends to be about the pies. Pumpkin, apple, cranberry-pear, and mince meat tend to be the more traditional pies associated with Thanksgiving, but I have seen people put out other types like lemon meringue and chocolate pies as well. For today’s post, I’ll focus on the question asked which was for a vegan pumpkin pie, but below are links to other pies I’ve posted about in the past.

Apple Pies

Struesel Cranberry Pear Pies

Peach Pies

Chocolate Pies

Making a pumpkin pie vegan is easy. For the crust, folks can simply substitute vegan butter, vegan shortening or coconut oil for the butter or shortening in any pie crust recipe without anything else needing to be done to the recipe.

For the pumpkin filling, the first ingredient which makes pumpkin pie non-vegan is the eggs, and in pumpkin pie, the eggs simply act as a binder, which is simple to replace. To make a pumpkin pie which is just like regular egg-filled pumpkin pie, the easiest substitute for the eggs is a flour or a starch. Most recipes you’ll find use cornstarch. Many folks, however, are allergic to corn, and I personally like to add protein and/or fiber if possible when I can, so I opt to use a gluten free flour like oat or millet or sorghum.

The other ingredient in pumpkin pie which is dairy is the milk, whether it’s evaporated milk or heavy cream which is used. To substitute for milk in a pumpkin pie, one can choose a plant based “milk” like almond or soy or hemp or flax or any other type on the market which you prefer.  Usually 1 1/2 cups of a “milk” is equivalent to a can of evaporated milk.

For folks who might want a slightly different pumpkin pie and who are not allergic to soy, I also make a pie using tofu which tends to be a heartier, more protein filled pie. Pureed tofu then acts as the binder which eliminates the need for flour, and the pie also does not require any “milk” at all.

For both types of pumpkin pie, I reduce the “sugar” amount substantially and use an alternative to refined white sugar – coconut sugar for the more traditional type of pumpkin pie and agave for the tofu pumpkin pie. Folks who have eaten my pies never say it’s not sweet enough and always comment on how the pumpkin flavor really shines.

Below are recipes for both versions.

Pumpkin Pie Recipes

Ingredients:

Pie crusts (click the link for tips on making Allergy Friendly Pie Crusts)

Version 1 Filling:

2 cups cooked, pureed pumpkin (canned works, too)

1/2 cup coconut sugar

2 tsp spices (I use a mixture of cinnamon, nutmeg, ginger, allspice, cloves and/or cardamom)

I 1/2 cup plant based “milk” (I prefer to use flax or soy milk)

1/4 to 1/2 cup gluten free flour (use the lower amount for a more silky pie; the higher amount for a sturdier pie; I like to use millet or sorghum or GF oat flour to add some protein and fiber)

Version 2 Filling:

2 cups cooked, pureed pumpkin (canned works too)

1/2 cup agave (I like to use the maple flavor agave for this pie; if you can’t find it, you can mix 2 tbsp of maple syrup with enough agave to make 1/2 cup – this gives you the flavor but substantially reduces the amount of calories you’d get from using 1/2 cup of maple syrup)

2 tsp spices (I use a mixture of cinnamon, nutmeg, ginger, allspice, cloves and/or cardamom)

16 oz silken tofu, pureed to be smooth and creamy

Baking Instructions:

  1. Preheat the oven to 350 degrees.
  2. Prepare the pie crust and put into a 9.5 inch glass pie pan. Set aside.
  3. Choose which pumpkin pie filling to make, and mix all the ingredients until well blended.
  4. Pour into the prepared pie crust.
  5. Cover the edges of the pie crust with aluminium foil, leaving the center of the pie uncovered.
  6. Bake for 60 to 65 minutes until the pie is set and the center only jiggles a bit.
  7. Put into the fridge to completely cool. Best to cool overnight but at the very least, several hours. Without the eggs, the cooling is what solidifies the pie.