Happy New Year: Chocolate Torte

mint-torte

“It’s great! You get to choose….”

When I was a child in the ’70s, a new type of story was filling the market. It was a story book where you got to choose what happened. You’d be introduced to the characters and a situation but then you’d reach the end of the first chapter where you were told to choose which action then would happen. If you chose one, you’d be sent to a certain page. If you chose the other, you’d turn to another page. When you had finished whichever chapter you chose, you were given another set of choices, and this continued until you reached the end of the book.

For a young reader it was a fun way to extend the adventures in the book because you could keep reading the same book over and over, making different choices each time for a completely new story.

As an adult, I love the complexities of life which are subtly shown by this “pick the next action” type of storytelling. Our lives are made up of little daily decisions which lead to other little decisions, to regrets, to rewards, to joys, to sorrows, to bigger choices, to serious consequences, to surprises… and there are times when we wish we could go back and make another choice, and other times when we are grateful we made the choices we did.

New Year’s is usually a time when we find ourselves thinking back upon the choices of the year which just passed and thinking about the decisions we’ll need to make for the new year to come. For most, our years are a mixture of both good and bad, and New Year’s is when we think about how to make more good in the year to come. The truth, though, is that every minute of every day, all year long, is an opportunity because we continually are writing our life stories with every decision, every thought, every word, every action we pursue.

So, as we begin 2017, I invite and encourage you to consider the choices you’ll make for a healthier, happier you. Whatever the choices you make in 2017, my hope and prayer for you is that the new year will be filled with much light, much love, and much laughter.

And in the spirit of choices, I give you a recipe for a chocolate torte which allows you to choose how you want to make it to fit your particular dietary needs and preferences. You can make the cake layers plain chocolate, minty chocolate, almond chocolate or fruity chocolate. You can make the filling any of the same flavors and in a variety of ways. You can top it any way that you want.  You can make it gluten, dairy, nut, soy, egg or all of the above free. It’s your choice!

Happy New Year!

Chocolate Torte

Cake Layer Ingredients for You to Choose:

2 cups flour (favorite gluten free blend or whole wheat)

1 cup unsweetened cocoa powder (natural unsweetened or special dark)

1 to 2 cups sweetener (2 cups sugar or 2 cups coconut sugar or 1 cup agave)

3 tsp leavener (2 tsp baking soda and 1 tsp baking powder for gluten free flour or 1 1/2 tsp baking soda and 1 1/2 tsp baking powder for wheat flour)

1 tsp salt

1/2 cup binder (2 whole eggs or 1/2 cup liquid egg whites or 2 tbsp ground golden flaxseed mixed with 6 tbsp of water or 6 tbsp aquafaba**)

1 cup “milk” (if using wheat flour, any type of milk such as cow, soy, flax, oat, hemp, almond or if using gluten free flour any type of milk such as cow, soy, flax, oat, hemp, almond mixed with 1 tbsp either lemon juice or vinegar to make a buttermilk)

1/2 cup plant oil (safflower or sunflower or grapeseed or canola or light olive oil or a nut oil)

2 tsp extract ( 2 tsp vanilla or 1 tsp vanilla and 1 tsp mint or 1 tsp vanilla and 1 tsp almond or 1 tsp vanilla and 1 tsp orange extract)

1 cup boiling water

1 tbsp vinegar or lemon juice (white distilled vinegar or apple cider vinegar or raspberry vinegar or lemon juice)

Caking Baking Instructions:

  1. Preheat oven to 350 degrees and prepare four 9 inch cake pans by either lining them with parchment paper or greasing and flouring them or spraying them with Pam spray. Move the racks in your oven so they are evening spaced for putting two cake pans on each rack.
  2. Mix together the flour, cocoa powder, sweetener (if using sugar or coconut sugar), baking soda, baking powder and salt. Set aside.
  3. Mix together the binder, “milk”, oil, extract and sweetener (if using agave).
  4. Add the wet ingredients to the dry with the boiling water and the vinegar or lemon juice. Blend just until dry ingredients are moistened.
  5. Divide the batter evening among the four prepared pans. Bake in the oven for 15 minutes, switching the cake pans between the two racks halfway through. Cakes will be slightly puffed, pulling away from the edges, and a toothpick inserted in the center will come out clean.
  6. Leave the cake layers in the their pans and allow them to cool on a wire cooling rack.

Note: ** Aquafaba is the liquid from a can of chickpeas. To substitute for eggs, use 1/4 cup per egg and whisk until frothy (foamy but still clear and not white like a meringue.)

Torte Fillings for You to Choose:

Option One Ingredients: A Light Dairy and Egg Free Mousse-like Filling

Liquid from one 15 ounce can of chickpeas

1/4 tsp cream of tartar

1/4 cup powdered sugar

1/2 cup dark chocolate or semi sweet chocolate (regular type or Enjoy Life allergen free type)

1 tsp vanilla extract or 1 tsp mint extract or 1 tsp almond extract

Cooking Instructions:

  1. If you have a Kitchen Aid or other heavy duty mixer, use it. Drain the liquid from the can of chickpeas into the mixing bowl. (Use the chickpeas for making hummus or a curry dinner entree or in your salad or for a roasted snack.)
  2. Add the cream of tartar and begin mixing the liquid on low speed, slowly increasing to the highest. As the liquid begins to become frothy and foamy, add the powdered sugar, one tablespoon at a time. Mix until the liquid becomes thick white peaks like an egg meringue.
  3. Put the chocolate pieces into a microwave safe dish for a minute and stir until the pieces are all melted or put the chocolate pieces in a pan over another pan filled with boiling water and heat and stir until the chocolate is all melted.
  4. Add the extract of choice to the chocolate and mix well.
  5. Add a little bit of the chickpea meringue to the chocolate mixture and gently fold it into the chocolate. Then add the chocolate mixture to the bowl of meringue, folding in just a little at a time until all the chocolate has been added and folded into the meringue. Transfer to the fridge to thicken until needed to fill the torte cake layers.

Option Two Ingredients: A Heavier Mousse-like Filling (can be made dairy free)

2 cups of heavy cream or cold coconut cream (put coconut cream into the fridge to cool overnight, turn the can over and open so that the liquid is at the bottom, drain the liquid, and use the cold cream in place of the heavy cream)

1 1/2 tsp vanilla extract or mint or almond or orange

1/4 cup sugar or 1/4 cup powdered sugar or 1/4 cup coconut sugar or 2 tbsp agave

Cooking Instructions:

  1. Mix the cream with the extract and beat at a high speed until soft peaks begin to form. Add the sweetener of choice, a little at a time, and continue beating until stiff peaks form. Put the whipped filling in the fridge until needed to assemble the torte cake layers.

Option Three Ingredients: A Creamier Filling

5 ounces chocolate pieces (dark or semi-sweet, regular or Enjoy Life)

12 ounce whipped topping, thawed (regular or dairy free coconut version)

8 ounce cream cheese (regular or dairy free soy version)

1 tsp vanilla extract or mint or almond or orange

Cooking Instructions:

  1. Mix the chocolate pieces with 1/2 cup of the whipped topping and microwave 30 to 60 seconds until melted and smooth. (Stir after 30 seconds to see if you need more time.)
  2. In a mixer, whisk the cream cheese until smooth. Add the chocolate mixture and beat well.
  3. Add the remaining whipped topping and blend well. Put into the fridge until needed to assemble the torte cake layers.

Options Four and Five: Thicker Fillings

Make your favorite mousse recipe as a filling or simply your favorite frosting recipe as the filling.

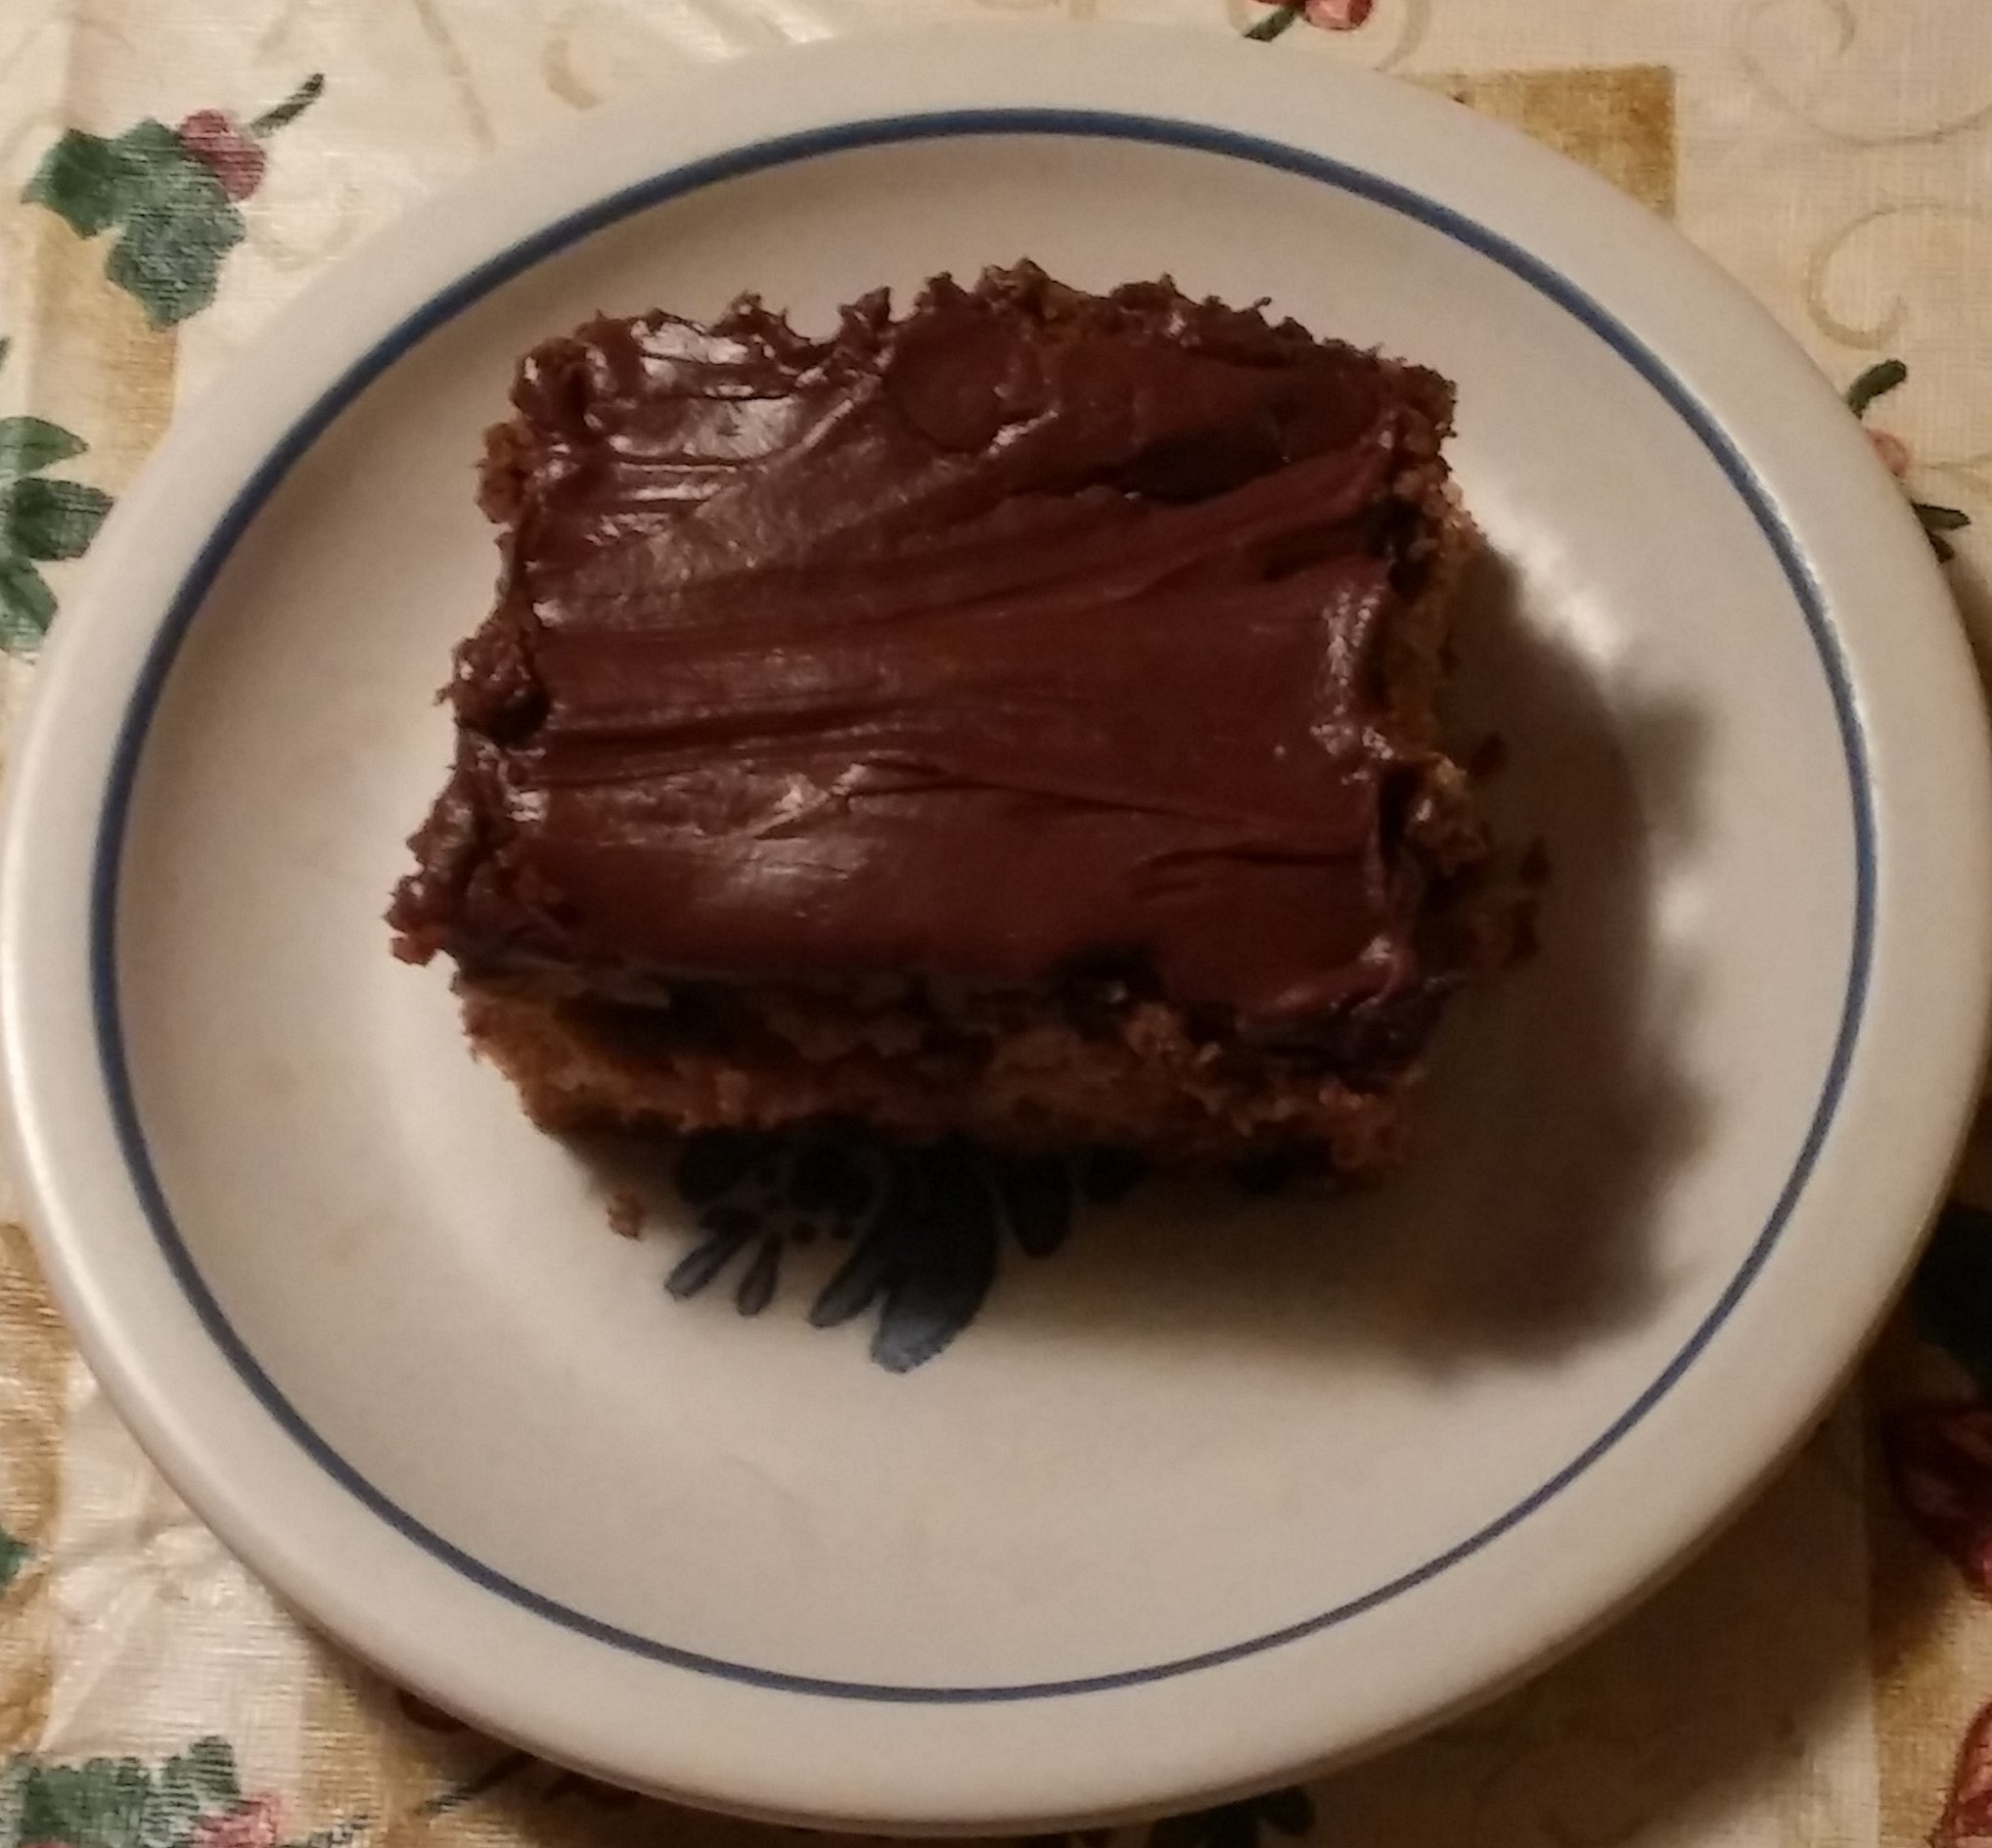
Assembling the Torte:

  1. On a cake platter lay the first cake layer. Spread one third of the filling you chose to make.
  2. Top the filling with the second cake layer and spread the second third of the filling.
  3. Top the filling with the third cake layer and spread the last of the filling.
  4. Place the last cake layer on top.
  5. Choose a topping option to cover the sides and top of the torte.

Topping the Torte:

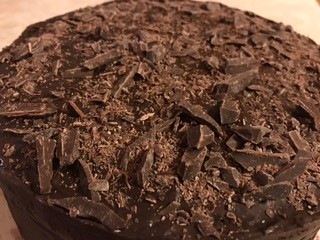
Option One (which is pictured at the beginning of this post):

Melt dark chocolate or semisweet chocolate chips (regular or Enjoy Life variety) in your microwave and stir until smooth. using a frosting spreader, coat the sides and top of the cake with the melted chocolate in a very think layer. Before the chocolate solidifies, sprinkle the top with chopped chocolate pieces.

Option Two:

Make your favorite frosting recipe and frost the sides and top of the torte.

Option Three:

Make a ganache: Warm 1 cup heavy cream or coconut cream in a microwave just until hot to the touch. Pour over 8 ounces of dark chocolate or semisweet or bittersweet chocolate pieces (regular or Enjoy Life variety) and stir until completely smooth and silky. Allow ganache to cool to a spreadable consistency.


Creative Cooking: Brussel Sprout Chocolate Chip Cake

brussel-sprout-cake

“The secret ingredient is what?”

After one day of Thanksgiving leftovers, my husband is usually ready for something different. So, over the past few days we’ve had a turkey shepherds’ pie (using leftover turkey, some of the roasted carrots and cauliflower, and the mashed potato timbale), turkey-vegetable soup (using leftover turkey, the rest of the roasted carrots and cauliflower, and the leek gravy), stuffing muffins (using leftover stuffing and some of the leftover turkey sausage stuffed mushrooms), cranberry waffles (using leftover whole berry cranberry sauce), cranberry muffins (using leftover cranberry-orange relish), and quiche (using the rest of the leftover turkey sausage stuffed mushrooms).

Yesterday as I was rummaging through the fridge to see what we still had leftover, I found the roasted brussel sprouts which I hadn’t used in any of the above meals. While searching online to see if there might be anything interesting I could use them for, I found a recipe for brussel sprout cake. I was intrigued but a closer look at the multitude of recipes — which I discovered to actually be the same two recipes just remade by many, many people — revealed a lot which I didn’t like about the cake.

One was simply that the cake seemed to be a variation of a fruit cake recipe, only with vegetables added, so the bake time was lengthy and the cake, more dense than I’d like. Two, the recipes called for two cups of sugar and two cups of oil.  Third, all the extras which make the cake more like a fruit cake — the raisins, walnuts or pecans, shredded coconut, etc… — were not ingredients my children would like in a cake. Four, the recipes, were of course, not allergy friendly for wheat, dairy and nuts.

So, I decided I’d create my own brussel sprout cake which used gluten free flour in place of the wheat, agave instead of sugar and in half the amount, applesauce for some of the oil, and a small amount of mini chocolate chips in place of the original “extras”. When the cake was done, we topped it with a dark chocolate frosting, and the result was an extremely tasty cake which now contained the health benefits of brussel sprouts which includes being high in protein and vitamins C and K.

Brussel Sprout Chocolate Chip Cake

Ingredients:

2 cups roasted brussel sprouts

1/2 cup safflower oil

1/2 cup unsweetened applesauce

1 cup agave

1 tbsp vanilla

4 eggs (if you are watching cholesterol, use 1 cup liquid egg whites instead)

2 cups gluten free flour blend (I used Pillsbury brand for this cake)

1 cup gluten free oat flour

2 tsp baking powder

1 1/2 tsp baking soda

1 tsp salt (you can reduce this if you are watching sodium intake)

2 tsp ground cinnamon

1 tsp ground nutmeg

1/2 tsp ground ginger

1/2 tsp ground cloves

1 cup Enjoy Life allergen free mini chocolate chips

2 tbsp apple cider vinegar

Baking Instructions:

  1. Preheat the oven to 350 degrees and line an 11 x 15 pan with parchment paper.
  2. Coarsely chop up the brussel sprouts in a food processor for a few seconds or with a knife on a cutting board.
  3. In a large bowl, combine the brussel sprouts with the oil, applesauce, agave and vanilla.
  4. Beat the eggs and add them to the brussel sprout bowl. Set aside.
  5. Combine the gluten free flour with the oat flour, baking powder, baking soda, salt, cinnamon, nutmeg, ginger and cloves.
  6. Stir in the mini chocolate chips.
  7. Add the dry ingredients to the wet ingredients, along with the cider vinegar, and mix just until the dry ingredients are moistened.
  8. Pour into the prepared pan and bake for 30 to 35 minutes until the cake has puffed, is golden, and a toothpick inserted in the center comes out clean.
  9. Cool on a wire rack.
  10. Frost with favorite frosting recipe. (We made dark chocolate but I think a cream cheese frosting or vanilla or cinnamon frosting would be equally tasty.)


Holiday Happenings: Cranberry Sauce

bags-of-cranberries

“Apparently cranberry sauce is underappreciated….”

My husband came home the other day and told me about a news story on the radio. The topic was cranberry sauce and how it was not as appreciated as other foods eaten during the Thanksgiving meal. This, of course, spurred discussion among our family about our own cranberry preferences. My son will only eat jellied cranberry sauce with no chunks. My oldest, my husband and I love cranberry sauce in any form. My other daughter won’t eat it, no matter the texture.

Cranberries, however, are very good for your health, containing antioxidants, fiber, and many nutrients needed by the body. What I find, though, is that because they have such a tart flavor, folks use way too much sugar when cooking with them. So, I like to make my own cranberry sauce instead of purchasing it from the store.

When I tell folks that I make cranberry sauce, they always seemed to be surprised, which I find surprising since cranberry sauce is the easiest food to make. You simply put cranberries into a pot with water and sweetener and let it cook down. The entire process takes about 10-15 minutes, at the most.

Where the creativity comes in is deciding what type of cranberry sauce you’d like for Thanksgiving. You can add other fruits to the cranberries like pears or apples or tangerines or oranges or apricots or cherries to add a contrasting fruity flavor to the cranberries. You can add red wine or port or bourban if you’d like a more complex flavor. You can add ginger or maple or anise or jalapeno if you’re looking to try something a little different this year. You can use water, orange juice, apple cider or any other liquid you can imagine to change the flavor. You can add nuts or dried fruits to add crunch and texture. You can even change up the texture of the sauce, making it chunky, relish-style or jellied.

And after Thanksgiving the cranberry sauce can be “recycled” in many ways. Swirl it into your favorite cheesecake recipe. Add the sauce as a fixing for your favorite sandwich. Mix it into a muffin recipe. Top pancakes or waffles with it. Combine it with another fruit to make the filling for a pie. Stir it into your breakfast oatmeal. Use it as a spread for a slice of quick bread like banana or zucchini. Combine it with cream cheese for a dip. Top vanilla ice cream with it. The ideas are endless.

A food as versatile as cranberry sauce is truly just begging for you to experiment this year. And what’s great is that unless you’re allergic to cranberries, people with food allergies can eat it!

Some tips:

  1. The cranberries: It doesn’t matter whether you use fresh or frozen cranberries. The general rule of thumb is that about 12 ounces of cranberries requires about 1 cup of liquid.
  2. The sweetener: For most recipes, for 12 ounces of cranberries, they’ll call for 1 cup of sugar. I’d suggest you cut that in half and save your health or use 1/4 cup Agave or 1/2 cup of coconut sugar or 1/3 cup truvia.
  3. The add-ins: Decide what type of cranberry sauce you’d like to make and add the ingredients in with the cranberries so that they all cook together and the flavors meld.
  4. Traditional Style: To make traditional cranberry sauce, simply put all your ingredients into a pot, bring the liquid to a boil, let it simmer for about 5-10 minutes until the cranberries pop and are the texture you’d like, remove from the heat, let it cool, and then refrigerate until you’re ready to use it.
  5. Relish Style: Simply use your food processor to chop up the cranberries, sweetener and additions and refrigerate. You should decrease the liquid, though, and only add just enough to moisten the relish.
  6. Jellied Style: Prepare the sauce as you would for the traditional but then push everything through a strainer, mashing the ingredients as much as you can to get as much as you can into the sauce and then refrigerate what you’ve pushed through the strainer.


Recipe Revamping: Tiramisu

website-tiramisu

“But you don’t like coffee….”

When we came to the States from Japan, we lived on a military base just outside of New York City which meant I had access to all the city had to offer such as Little Italy where you could go to a restaurant and get tiramisu freshly made with chef-made whipped cream.

For folks who know me, they are confused by my love for tiramisu because I am not a coffee drinker. I like to smell everyone’s coffee but I never drink it. I prefer tea. Coffee has a bitterness to it which I have never had an appreciation for. I do, however, like coffee flavored foods. Before I developed my dairy allergy, coffee ice cream was one of my favorites, and tiramisu was my favorite dessert splurge.

For folks unfamiliar with tiramisu, it’s an Italian dessert which layers sponge cake dipped in coffee between a mixture of mascarpone cheese and whipped cream or mascarpone cheese and egg yolks. Most recipes make it “mocha” style and call for sprinkling cocoa powder in between the layers and on top. You can also make cinnamon tiramisu which sprinkles cinnamon instead of the cocoa powder.

If you have gluten and dairy allergies, though, tiramisu can be a thing of the past for you… made the traditional way, that is. I’ve come up with a way to make it for me, though, which is not only tasty but just as creamy. It does, however, use coconut whipped cream, so if you have an allergy to coconut, I’m afraid my recipe won’t work for you.

I have learned, though, from folks that you can make whipped cream from canned chickpea liquid which I haven’t personally tried in tiramisu yet but I’m thinking I’ll experiment in the future with it. The recipes I’ve found say that you take the liquid from 2 cans of chickpeas, mix it with ¼ teaspoon of cream of tartar, 2 teaspoons vanilla and 1 cup of sugar, and then whip it all up into whipped cream. It may be that this version can be used as a substitute for the coconut whipped cream if legume aren’t an issue for you.

Tiramisu

Ingredients:

Two containers Tofutti dairy free cream cheese, at room temperature

One container So Delicious dairy free coconut whipped cream, partially thawed (I usually just take it out of the freezer and let it sit while I’m pulling together everything else)

Two containers Schar’s gluten free ladyfingers

4 cups strong coffee (I use double the coffee called for per cup)

unsweetened cocoa powder or ground cinnamon

Optional: shaved chocolate or cinnamon sticks

Assembling Instructions:

  1. Use a 8 x 11 rectangular glass pan. It perfectly fits the two boxes worth of ladyfingers.
  2. Using a mixer, whip the cream cheese until light and fluffy. Scrape down the sides.
  3. Mix in the coconut whipped cream until well blended and creamy.
  4. Open one of the packages of ladyfingers and dip both sides of each ladyfinger into the prepared coffee. Layer the ladyfingers in the pan.
  5. Spread half of the whipped cream cheese/cream mixture over the ladyfingers and sprinkle either unsweetened cocoa powder or ground cinnamon over the top.
  6. Open the second box of ladyfingers, dip both sides of each into the coffee and layer the ladyfingers on top of the whipped cream cheese/cream mixture.
  7. Spread the remaining half of the whipped cream cheese/cream mixture over the ladyfingers and sprinkle either unsweetened cocoa powder or ground cinnamon on top. If you like, you can decorate it with shaved dairy free chocolate pieces or cinnamon stick shavings.
  8. Refrigerate for at least several hours. (This is one of those desserts which tastes even better the second day when everything has “settled” well.)

Autumn Appetites: Winter Squash-Kale-Bean Soup

“Grandma’s wisdom….”

Last week I read that the folks at America’s Test Kitchen learned something which my grandmother had taught me 30 years ago and which she had known for many more years than that before she taught me. Not for the first time, I was surprised that those culinary “experts” hadn’t known something which I had figured was known by many.

As I thought more about it, though, I realized that there’s a difference between folks who have culinary jobs and people who have years and years of cooking experience. My grandmother raised eleven children and had to find ways to stretch food as much as she could, and she learned the best ways to make food and how to keep things as simple as possible whenever she could.

What I had learned from my grandmother, which America’s Test Kitchen apparently just learned this month according to their magazine, is that you never boil corn on the cob. You bring water to a boil and then you let the ears of corn sit in the hot water for a set time, depending on the amount of corn. This is how I’ve made corn on the cob ever since my grandmother showed me as a teenager. I had taken it for granted that others knew, too.

I figured my grandmother had learned it from someone before her, but she may also have simply figured it out on her own after cooking for so many for so long. I started thinking about the many other tips my grandmother had given me over the years when I was younger before she passed away, and I realized a lot of my cooking depends on things I learned from her. Just this past weekend, I made one of my family’s favorite soups, which uses tips I learned specifically from my grandmother.

My grandmother rarely had “fresh” food in the house. Dependent on food from local farms, which tended to be seasonal, certain foods simply weren’t accessible year round. So, she always had meat and vegetables frozen in a big freezer and jars of canned beans, jellies, sauces, and fruits in the “pantry” which was the walk-through area between the garage and their double-wide trailer. From her, I learned how to create foods which use staples from the freezer and pantry and which can be quickly put together to feed a lot of people.

The winter squash, kale and bean soup I made uses frozen squash, which I roasted last year, pureed, and froze; frozen kale which I always keep on hand, purchasing them by the bagfuls at the grocery store when they’re in season (early Spring and then again in the Fall); canned, unsalted, no sugar added beans, which I keep in my pantry; and no salt, fat free vegetable broth which I also keep in my pantry. I mixed everything together in my crock pot with some herbs and let it cook all day. When evening came, we had a hearty soup for dinner which warmed both the heart and the tummy.

Winter Squash-Kale-Bean Soup

Ingredients:

9 cups thawed, frozen pureed cooked winter squash (equivalent to 6 of those 12 oz packages you can purchase in the freezer section of the grocery store)

1 cup frozen chopped kale (equivalent to half a 16 oz bag you can purchase in the frozen section of the grocery store)

One 16 oz can of no salt, no sugar added white or northern or cannellini beans, rinsed and drained

1/2 tsp dried thyme, crushed between your fingers before putting in

1 tsp onion powder

1/2 to 1 tsp salt

1/4 tsp black pepper

No salt, fat free vegetable broth (amount will depend on how thick or think you like your soup, between 1 to 3 cups)

Cooking Instructions:

In a crock pot (4 1/2 quart will work), mix the thawed squash with the frozen kale, the can of beans, the thyme, onion powder, salt and black pepper. Add the desired amount of vegetable broth and let it cook in the crock pot on low all day (6-8 hrs) or on high for half the day (3-4 hrs).


Appealing Appetites: Just the Same Chocolate Cake

chocolate-cake

“There can’t be any difference.”

One of the many heartbreaking moments for me as a mother of children on the autism spectrum was when my oldest started kindergarten. Several weeks into the year, I found my daughter in a corner crying. Apparently every day at recess since school had started, she sat alone on a swing because no one would play with her. As I gathered her into my lap, my own tears ran at her heartache. The autism meant she lacked the social skills needed to make friends, but it didn’t mean that she didn’t want or need friends nor that she couldn’t feel the hurt of not having any.

I arranged a meeting with the kindergarten teacher because I was a little surprised that at the age of five, students were already alienating other students. Isn’t everyone friends at the age of five? (Yes, I was naive. I was a young parent and didn’t know better yet!) When we met, I asked why no one was playing with my daughter, and the teacher said, “Well, Mrs. Castner, your daughter is a little… different.”

Different. If you look up the definition, you’ll see wonderful phrases like “not ordinary” and “distinct in nature” which appear to be good traits, but then you’ll continue reading to find “dissimilar”, “not identical”, “unusual”, “separate”. We live in a world where tension exists between sameness and difference. We encourage children to be themselves, to embrace what makes them unique… different… from everyone else while simultaneously wanting them to “fit in” and be like others around them… to be the same.

Too often the push toward sameness wins out over the desire to encourage individuality, and for my daughter, her difference meant children as young as five didn’t want to be her friend. She was too different, and therefore, they didn’t understand her. Without understanding, it can be difficult to draw into another’s experience.

Because I do understand, my heart ached again this past week when I received an email from a mother whose daughter is feeling “different” from her classmates because she has food allergies and can’t eat what others eat. We can ask as I did all those years ago, “What’s the big deal about being different?” The answer is that it IS a big deal because children at a young age don’t understand the difference and can react in negative ways. For this daughter, she felt she “wasn’t normal” because the other children wanted to know why she never ate cake at the birthday parties they attended and why her bread looked different at lunch.

The mother was reaching out because the girl was inviting classmates to her house for a birthday party, and she was anxious about the birthday cake. She didn’t want her birthday cake to be “different” because apparently children were asking her if there would be cake and whether it would taste the “same” as other birthday cakes.

I confess. I cried reading the email because it broke my heart to think of that much anxiety in a seven year old… all because of cake. I understood what was happening, though, because the fact is that many cakes which are gluten free and dairy free do have a different texture and different taste from “normal” cakes, and children know what they like and are often very picky about trying something “different”.

Fortunately, while the young girl in question couldn’t have gluten or dairy, she had no other food issues, so it was easy for me to create a chocolate cake “just like real chocolate cake” for her. The mother wanted it to be an “easy” cake which she could make with flour blends from her grocery store, so I used Bob’s Red Mill and Krusteaz blends which she could find at her store. I combined the two because, despite what you’ll read on the packages, a “simple substitution” of  just one of the blends makes for either a crumbly or a fallen cake. To achieve the “same” texture as regular cake, I needed to combine the two different types of flour blends. For the dairy, I used vanilla soy milk because it’s consistency matches milk in most cake recipes and the vanilla enhances the chocolate flavor. Instead of refined white sugar, I used coconut sugar which adds a subtle undertone to the chocolate as opposed to a sickening sweetness. Instead of butter, I added safflower oil which has a neutral taste but adds the fat needed to retain moisture in the cake. Instead of regular unsweetened cocoa powder, I used the Special Dark because it has a deeper chocolate flavor, and I added a cup of mini chocolate chips (allergy friendly) to give another level of chocolate taste.

We made the below cake for the French exchange student we had staying with us, and she never knew the “difference”. It was just as chocolately, just as fluffy, just as moist, just as tasty. I was confident that the little girl’s schoolmates would never suspect that it was actually “different”. *grin*

Just the Same Chocolate Cake

Ingredients:

2 cups coconut sugar

1 cup Krusteaz gluten free all purpose flour

1 cup Bob’s Red Mill all purpose baking flour (the one in the red package made from bean flours; not the rice blend)

1 cup Hershey’s Special Dark unsweetened cocoa powder (the one with the red lining; not the regular unsweetened cocoa powder)

2 tsp baking powder

1 1/2 tsp baking soda

1 tsp salt

2 eggs

1 1/2 cup vanilla soy milk

1/2 cup safflower oil

2 tsp gluten free vanilla

1 cup Enjoy Life mini chocolate chips

1 cup boiling water

2 tbsp apple cider vinegar

Baking Instructions:

  1. Preheat the oven to 350 degrees. Line three 9 inch cake pans with parchment paper.
  2. In a large bowl, combine the coconut sugar, the two flour blends, the cocoa powder, the baking powder, baking soda, and salt. Set aside.
  3. Mix together in another bowl, the eggs, soy milk, safflower oil and vanilla.
  4. Stir the chocolate chips into the dry ingredients. Pour the bowling water on top, and add the wet ingredients along with the vinegar. Whisk everything together until it’s well combined.
  5. Divide the batter evenly among the three cake pans.
  6. Bake in the oven for 20 minutes until the cakes are puffed and pulling away from the sides and toothpick inserted in the center comes out clean. (I had set the timer for 15 minutes, checked, and put them on for another 5.)
  7. Cool the cake layers in their pans for at least 10 to 15 minutes before removing them to a wire rack to cool completely. (I actually stacked them one on top of the other with the parchment paper in between the layers and put them onto a plate in the freezer for about 10 to 15 minutes to cool them faster!)
  8. Frost the layers and then the whole cake with your favorite frosting. (What is pictured above is a cinnamon frosting made with vegan butter, powdered sugar, cinnamon and soy milk.)


Recipe Revamping: Saltine Brickle

“Please, can you help me?”

I receive emails from various types of people. Folks who have toddlers with food allergies. Mature adults whose doctors have put them on restricted diets. People who have suddenly developed food allergies after years of eating anything they wanted. Diet conscious folks who want to eat healthier. What all these folks have in common, though, is that they’ve always been adults.

This week I received an email for the first time from a child who had stumbled upon my site. She is ten and apparently really likes saltine brickle, which she had tried at a friend’s house. Her mother, however, had told her it had too much fat and sugar and wasn’t good for her. Like many folks of her generation, she went online to see if there was a solution to her problem.

In her email to me, she wanted to know if I could “fix” the recipe so it wouldn’t have as much fat and sugar but still taste good.

I confess, I found her and her email just too cute! Of course, I had to do what I could to help her out. It turned out that she has both a nut and dairy allergy, so I needed to accommodate those in the revamping of the recipe.

When you google saltine brickle recipes, you’ll find that the recipes call for anywhere from 1 to 2 cups of butter, usually about 1 cup of sugar, and anywhere from 1 1/2 to 3 cups of semi-sweet chocolate chips. The first order of business became all that butter. I opted to cut the amount down to 1/2 cup, and for the dairy allergy I used vegan soy free butter. The second item to tackle was the sugar. I could have simply cut the amount, but since I don’t like to use sugar as a general rule, I chose to use agave and cut the amount down to only 1/4 cup of it. For the chocolate, I swapped dairy and nut free dark chocolate mini chips for the regular sized semi-sweet chocolate chips, and I reduced the amount to 1 cup. To make the dessert slightly “better” I used a whole grain cracker instead of the white flour saltines. I tried Market Basket whole grain saltines, Manischewitz whole grain matzo, and Van’s whole grain gluten free crackers. For the final change, I decided to add some protein to the dessert and sprinkled pumpkin seeds on top.

The final creations were all tasty and worth the effort, and the young girl wrote to tell me that her mom let her make my version because she, one, thought it was great that her daughter showed initiative, and two, because she agreed that the reduction in sugar and butter and the addition of whole grains and protein made them “better” for eating.

Saltine Brickle

Ingredients:

40 whole grain saltine sized crackers, your choice of wheat or gluten free (you want to make a 16 inch x 10 inch rectangle; if using the matzo crackers, you’ll obviously use less because they are larger crackers) 

1/2 cup vegan soy free butter

1/4 cup agave

1 cup allergy friendly dark chocolate mini chips

1/2 to 1 cup pumpkin seeds (I used the no salt added version but I tried both roasted and raw and liked both; if you have no allergies to nuts or peanuts, try using those if you don’t like pumpkin seeds; the amount to use depends on whether you just want a few seeds on each cracker or want the crackers to be covered with them.)

Baking Instructions:

  1. Preheat the oven to 425 degrees.  Line a rectangle 17 x 11 inch pan with aluminum foil. Generously grease the foil with your favorite method.
  2. Place the crackers on the foil lined pan to make a 16 x 10 inch rectangle.
  3. Melt the vegan butter in a small saucepan over low heat, stirring frequently (should take only about a minute). Add the agave.
  4. Carefully pour the butter mixture over the crackers so each cracker is covered.
  5. Bake the crackers in the oven for  4 minutes. Remove the pan and turn off the oven.
  6. Sprinkle the mini chocolate chips over the crackers and put the pan back in the turned off oven for 1 minute.
  7. Using a spatula, carefully spread the melted chocolate so all the crackers are covered.
  8. Sprinkle the pumpkin seeds over the top of the chocolate.
  9. Put the pan into the freezer for about 10 minutes until the chocolate has solidified.
  10. Break apart the brickle and enjoy!

Autumn Appetites: Spiced Apple Bundt Cake

apple-bundt

“Life is too short to not bake.”

To my great sadness, a friend and neighbor unexpectedly passed away. She had been fine but then wasn’t feeling well one day, discovered she had stage four pancreatic cancer, and died within two weeks of the diagnosis. The funeral was this past Friday, a week after her passing. As I dealt with the sorrow of losing her this weekend, I turned to those things which give me solace: my faith, family and friends, writing, and cooking. In their own way, each provides me comfort and renewal.

Fortunately for me, my husband is teaching a class on Sundays which I tend to bake for, so I had the perfect opportunity to create a recipe. Because a friend generously gave me tons and tons of my favorite Honey Crisp apples, I knew I wanted to make something apple-y. I wanted something a little special, though — something wonderful like my friend. A bundt cake came to mind.

In a previous post, talking about bundt cakes, I mentioned that they’re tasty, dense cakes which are pretty to serve because they retain the shape of their molded pans. Usually bundt cakes are filled with goodies like fruit and nuts and chocolate, so they’re even pretty once they’re cut into slices. Since I had the abundance of apples, I decided that a spiced apple bundt cake would be perfect.

The batter is very important to a bundt cake. I decided that I’d combine sorghum and millet flour with arrowroot starch for my gluten free blend with a little bit of xanthan gum. For the spices I opted for cardamom, cinnamon, nutmeg, ginger and cloves because they remind me of Autumn. With the sweetness of the apples, I didn’t really need to much for a sweetener so I chose to add Agave which would add mild sweetness as well as some liquid moisture to the cake. For the fat, I decided safflower oil would be best because of it’s light taste. To add some more spice to the cake, I mixed the apples with the same spices as the batter. Then to finish the cake, I drizzled a little mixture of cinnamon and powdered sugar mixed with flax milk on top of the cake. The result was both pretty and tasty.

Spiced Apple Bundt Cake

Ingredients:

3 cups of finely diced peeled and cored Honey Crisp apples, about 3 to 4 apples (My daughter and I liked the batter to apple ratio in the cake but my son and husband suggested that next time I increase the apple pieces to four cups so there would be “apple pieces in every bite”; I’ll let you decide what you’d prefer to do. *grin*)

1 tsp cinnamon

1/2 tsp cardamom

1 cup sorghum flour

1 cup millet flour

1 cup arrowroot starch (you can also use tapioca or potato starch if you’d prefer)

1 1/2 tsp xanthan gum

1 tsp salt

1 tsp ground cinnamon

1/2 tsp ground cardamom

1/2 tsp ground nutmeg

1/2 tsp ground ginger

1/4 tsp ground cloves

2 tsp baking powder

1/2 tsp baking soda

3/4 cup safflower oil (I like a drier cake which goes well with tea and coffee or glass of milk so this was perfect in my opinion, but I know some folks prefer a moister cake, so if you do, increase the oil to 1 cup)

1 cup agave

2 eggs

1 1/2 tsp gluten free vanilla

1 tbsp apple cider vinegar

Baking Instructions:

  1. Preheat the oven to 350 degrees and liberally grease a bundt pan with your preferred method and then dust it with your preferred flour. (I used vegan shortening and brown rice flour.)
  2. Mixed the peeled, diced apple pieces with the cinnamon and cardamom and set aside.
  3. Blend the sorghum and millet flours, arrowroot starch, xanthan cup, salt, cinnamon, cardamom, nutmeg, ginger, cloves, baking powder and baking soda. Set aside.
  4. Whisk together the oil, agave, eggs and vanilla.
  5. Add the dry ingredients to the wet with the apple cider vinegar and mix just until the dry ingredients are moistened.
  6. Carefully fold in the apple pieces until the apples are fully incorporated into the batter.
  7. Spoon the batter into the prepared bundt pan.
  8. Bake for 50 minutes until the cake is golden and pulling away from the sides and a toothpick inserted into the center comes out clean.
  9. Let the cake sit in the pan on a cooling rack for at 15 to 25 minutes.
  10. Turn the cake over onto the cooling rack to cool completely.
  11. The cake can be served as is or you can top it with a sprinkling of powdered sugar or a mixture of powdered sugar and cinnamon, or you can glaze it. I glazed it by mixing a couple tablespoons of powdered sugar with 1/2 tsp of cinnamon and just enough flax milk to make a drizzable glaze.
  12. Enjoy!


Autumn Appetites: Cinnamon Apple Strudel Muffins

apple-cinnamon-muffins

“Will you teach me to cook?”

A couple of months ago my son asked if I’d give him weekly cooking lessons because as he explained, “When I grow up I need to know how to make the two most important meals of the day:  breakfast and dessert!”

So, over the past several weeks he’s learned how to make pancakes, waffles, French toast, marble cake, brownies, and oatmeal crumb cake. This morning, since Autumn has officially begun, and my favorite apples, Honey Crisp, are finally in season, I thought I’d teach him how to make my version of an apple strudel.

Strudels are lovely recipes where dough is filled with yummy fruit, rolled and cooked. I have found them to be rather messy, though, and not easy to eat without a fork and knife. I do, however, love to make use of Honey Crisp apples during the Fall months because they are naturally sweet which means I don’t need to add any additional sweetener to them.

The recipe that follows is sort of a combination between an apple strudel and a cinnamon roll which is cooked in the shape of a muffin using muffin tins. I got the idea from a recipe by Nicole Hunn of Gluten Free on a Shoestring (http://glutenfreeonashoestring.com/). If your only issue is gluten, she is a good source to refer to for recipes. Since I, however, have multiple allergies, I’m always having to adjust her recipes to fit my particular needs. In this case, though, her idea of making cinnamon buns in a muffin tin appealed to me, and I adapted that method for my recipe, which it turns out even my eleven year old can easily make.

Making this recipe for a Saturday morning is lovely because while the forming of the muffin takes about 20 minutes, the last half of the time is them baking in the oven while you make something else to go with them, which in our case this morning was turkey breakfast sausage.

For the recipe, I created my own flour blend because I wanted the “breakfast” muffins to be fiber full and have some protein. I found over time that a combination of sorghum, millet, oat, brown rice and tapioca flour gives us the best taste and texture. I also opted to use coconut sugar because I stay away from refined white sugar. Folks who have coconut allergies, though, should go ahead and use sugar or some other sugar substitute. In addition, I chose flax milk for my liquid because I figure it doesn’t hurt to add more omega 3’s to our diet, but again, if folks are allergic or prefer some other milk, go for it.

Cinnamon Apple Strudel Muffins

Ingredients:

Filling:

Apple:

2 Honey Crisp apples

1/4 cup water

1/2 tsp cinnamon

Cinnamon:

1 cup coconut sugar

2 tablespoons cinnamon

1/4 cup vegan soy free butter (or regular if you’re not allergic and prefer)

Batter:

1 cup sorghum flour

1 cup millet flour

1 cup tapioca flour

3/4 cup brown rice flour

1/4 cup oat flour

2 tsp xanthan gum

2 1/2 teaspoon baking powder

1 1/2 tsp cinnamon

1/2 tsp nutmeg

1/4 tsp salt

1/2 cup coconut sugar (or sugar, if you’d prefer or are allergic)

1/4 cup plus 2 tablespoons of vegan soy free butter (or regular if you’re not allergic and prefer)

2 eggs

1 cup flax milk (or other type if you prefer or are allergic; I would’t recommend rice milk, though, because it’s too thin)

Topping:

1 tbsp vegan soy free butter

1 tbsp coconut sugar

1/2 tsp cinnamon

Baking Instructions:

  1. Preheat the oven to 350 degrees and grease a 12 muffin tin with your preferred method.
  2. Peel, core and chop the apples by cutting them into quarters, then slicing each quarter thinly into five or six slices, turning the slices on their sides and cutting them on the short ends into small strips. You’ll have a couple cups worth of matchstick width pieces of apples.
  3. Put the apple pieces into a shallow pan which allows the pieces to be one layer. Pour the water over the apples and sprinkle the cinnamon on top. Stir the apples to coat them well with the cinnamon and then saute the apples over medium-low heat. The water will come to a boil and then slowly dissipate. Stir occasionally until all the water is gone and the apples are soft. Usually this entire process only takes about five minutes. Turn the heat off and let the apples cool while you make the rest of the filling and the batter.
  4. Mix the coconut sugar with the cinnamon and set aside. Melt the vegan butter and set aside.
  5. Mix the sorghum, millet, tapioca, oat and brown rice flours with the xanthan gum, baking powder, cinnamon, nutmeg, salt and coconut sugar.
  6. For the next part, it works well if you have a mixer with a dough handle but if you don’t have a dough handle, you can mix the dough with spoon and then finish kneading everything in by hand: Add to the dry ingredients, the vegan butter, eggs and milk, incorporating them just until you have a ball of dough, if you’re using the mixer. If you’re doing it by hand, mix the ingredients into well incorporated and then knead on parchment paper sprinkled with flour until you have a soft, pliable ball of dough.
  7. Put the dough ball onto parchment paper sprinkled with flour (I use the brown rice flour but you can use any type you’d like). Lightly sprinkle the dough with flour and roll it into an 15 by 12 inch rectangle. I find it’s best to start in the center and slowly work your way outward in all four directions, occasionally shaping the dough with your hands into a rectangle shape. (This was the part my son found to be the most fun!)
  8.  Using a brush, brush the melted butter over the surface of the dough, leaving about a 1/4 inch on one of the short ends free of butter. It’ll seem like you have a lot of butter but be sure to use all of it on the top of the dough.
  9. Sprinkle the butter surface of the dough with the coconut sugar mixture, leaving that 1/4 inch on the short end free as before of anything.
  10. Carefully spread the apple slices evenly on top of the cinnamon covered dough so that they’re in an even single layer but mostly covering the surface with the exception of the 1/4 inch on the short end.
  11. Starting on the short end opposite the free 1/4 inch side, carefully tuck in the end and begin rolling the dough toward the uncovered end. You can use the parchment paper to help roll. With every roll of the dough, it helps to use your hands to tighten it along the entire edge before continuing with the rolling. If you are using the parchment paper and have sprinkled flour, the dough will easily roll off the paper. If you are finding that it does stick, use a spatula to gently unstick the dough from the paper before continuing with your rolling. (I have never had to do this, but just in case….)
  12. When you reach the end which is free of filling, gently seal the edge and use your hands to carefully shape the log so it’s evenly round along the entire log.
  13. Slice the log into 12 even pieces. I like to just lay a 12 inch ruler and mark off the 12 inches and then use a serrated knife to cut the pieces.
  14. Put the pieces into the greased muffin tins. You should find that they just fit into the tins. You may need to shape/squash them a bit on the sides to get them in if your dough is nice and puffy, but that’s okay.
  15. Bake in the preheated oven for 25 minutes. They’ll be puffed and golden brown. While the muffins are baking, mix the tablespoon of coconut sugar with the cinnamon. Set aside.
  16. Using a butter knive, gently go around the edges to release them from sticking. Let them cool about five minutes in the tins before removing them to a cooling rack. While they are cooling in the tins, divide the tablespoon of butter evenly on top of each of the 12 muffins and brush them until the butter is melted. Sprinkle the sugar/cinnamon mixture evenly on top of the muffins and let it melt into the butter.

Note: For the holidays, instead of using the cinnamon sugar on top, I make an icing to drizzle on top which is tofu cream cheese blended with agave and cinnamon. If you prefer to use sugar, you can mix powdered sugar with cinnamon and milk.


Happy Labor Day!: A Better Burger

OLYMPUS DIGITAL CAMERA

“Mom, they’re cooking like you!”

15 years ago on Labor Day, we hosted a barbecue for some associates of my husband whom we wanted to get to know better. One of the guests was a gentleman who cheffed for a local restaurant. We were only a few moments into enjoying the food when he exclaimed, “Oh my god! This is the best burger I have ever eaten.”

My husband replied, “Well, except for the ones you make, right?”

To our surprise, he said, “No, this is better than what I prepare at the restaurant.”

When he asked me later for my “secret”, I told him that I simply barbecue like my mother taught me — Korean-style: liberal amounts of green onions, garlic and ginger with reduced sodium soy sauce for tenderizing and a splash of sesame oil for taste and moisture.

Fast forward 15 years: We were at the store yesterday, shopping to once again barbecue today, and my son yells, “Mom, they’re cooking like you!”

Sure enough, in the prepared, ready to cook section of the market, the Labor Day weekend offerings were Korean-style burgers, chicken and kabobs. My son may have been surprised, but I wasn’t. Over the past eight years, I’ve noticed that many of the trendy cooking magazines and restaurants are incorporating more ethnic-fusion recipes into their repertoire. What people haven’t realized, though, is that those folks are simply catching up to how my mother and other Koreans in the United States have been cooking for over 40 years.

The difference, though, is that for some reason, the American “Korean” versions all seem to add sugar, which I simply don’t understand. It may be that the chefs believe Americans want their food sweet, but for my family, we stick to the way I’ve always made my burgers, with no sweetener added.

What’s nice about our Korean-style burgers is that it works for any type of burger, whether beef, pork, chicken, turkey, bean, or tofu. I’ve made them all, and always do the burgers get rave reviews.

What to know:

The Protein:

  1. Beef or pork: We don’t eat a lot of meat in general, maybe four times a year, if that. Overall, the consensus seems to be that eating too much meat isn’t good for you, healthwise. Sometimes, though, you do feel like a beef or pork burger, and in our case, if we do eat meat, we make sure the beef or pork is grass-fed and organic. Because we eat meat so infrequently, we figure it’s worth the additional cost for the splurge. If you want “healthier” burger, you should choose the leaner ground versions, but as a rule, burgers cook up moister if there is some amount of fat, so I often use the 85% lean version as opposed to the 93%.
  2. Turkey or chicken: If you’re going to choose ground turkey or chicken, the same rule applies as with the beef or pork. The leaner the turkey or chicken, the more likely that you’ll have a drier burger. It doesn’t mean you can’t use it, and I do, especially if we’re cooking for folks who need to watch their fat intake, but if your health is fine, an 85% lean version if fine to use over the 93%.
  3. Bean: If you are going to make a bean burger, I recommend starting with the canned versions. I know some folks don’t like canned foods, and as a general rule I don’t purchase many canned products. Canned beans, however, have the perfect consistency for burgers, and nowadays you can purchase varieties which have no salt and no sugar added to them. No matter which type of beans you choose for your burger, you’ll want to rinse them, drain them, and pat them dry before using them. Then it’s best to smash them with a fork over using a blender or processor. You want a “fresh” bean burger, not a “pasty” burger which is what you get with the traditional bean burger recipes.
  4. Tofu: Tofu burgers are really becoming vogue these days and there are many ways to make one. I prefer to use simply slice extra firm tofu and marinate them overnight in my mixture of green onions, ginger, garlic, soy sauce and sesame oil. If however, you prefer more of a “burger” style, you should use extra firm tofu which is well drained of all water and crumbled into a bowl and mixed with your other ingredients.

The Seasonings: For 16 oz of any type of protein, I usually chop up a whole lot of green onion. They’re usually sold by bunches at the store, and I use at least one whole bunch and usually two bunches. You may want less, depending on your tastes. Then I mix reduced sodium soy sauce, between ¼ to 1/3 cup with about 2 tsp of minced garlic, a tablespoon or two of minced ginger, and two to three teaspoons of sesame oil.

The Preparation: What’s important for all the burgers, is that you really don’t want to handle the protein more than necessary, so once you’ve put your protein into a bowl, you should mix all the seasonings together and add them at once to the protein. Then either using a spoon or your clean hands, only mix all the ingredient until the seasonings are more or less incorporated into the protein.

For meat or poultry burgers, you don’t need to add anything else. I gently grab about ½ cup worth of the meat mixture and loosely shaped the seasoned meat into patties. For the best cooking, you should make a little indent in the center of the burger, because your burger will then cook more evenly so the outer edge doesn’t cook before the inner, and your burger won’t puff up but stay uniform.

For bean and tofu burgers, you’ll find that you may need a binder. Not always, though, because sometimes your mixture clings enough to enough that nothing is needed. If you do need a binder, using an egg or tomato paste or either mixed with some bread crumbs works well. By bread crumbs, though, I don’t mean those masticated, fine crumbs you buy at the store. I mean taking some fresh bread slices and chopping them coarsely in your food processor. Trust me, you’ll taste the difference.

The Cooking: Okay, here’s my snobbery coming through: I think if you’re going to have a burger, of any type, you really ought to grill it. The taste is so much better. Only with grilling do you prevent the burger from steaming. If you must broil it in your oven, okay, but please don’t fry your burger in a pan. When the juices begin running out, your burgers will steam instead of achieving that nice crusty exterior and juicy center.

Summer Loving: Tomato Tarts

“It’s the best time of the year!”

If you have children, had children, or simply remember being a child, you know that this time of the year is filled with the rush of buying needed school supplies, the excitement (for the children) and exasperation (for the parents) of replacing worn or outgrown clothing and shoes, and either the sadness or the joy, depending on the type of children and parents, of going back to school.

I’m one of those parents who is always sad when the new school year begins because I prefer the lazy days of summer when the children and I don’t need to rush anywhere, can play games, and no one is stressed by homework and relational angst. So, when school resumes I need to find ways to cheer myself up, and fortunately for me, this is also the time of year when some of nature’s best gifts present themselves.

I’m talking about tomatoes. Large, fresh, sweet, home or local farm grown, deep red, yellow and even purple organic tomatoes. True fact about me: I only eat large tomatoes in August and September when I can get them fresh from the garden. I will not purchase store tomatoes which have yet to fully turn their color and have very little taste. Life’s too short to insult my taste buds.

So, when tomatoes are in season, I make as many different types of dishes as I can because I know it’ll be another year before I can enjoy their taste again. One of my family’s favorite dishes is tomato tarts. A simple crust, layers of lovely, tasty fresh tomatoes, and an egg custard. I recently made some tomato tarts using fresh tomatoes to serve at a brunch for my husband’s family forest, and they were an absolutely hit. Fortunately, I had made several of them so that when people went back for even thirds, we had enough!

Now, a warning: Yes, you can make these tarts with any tomatoes, but you have to trust me when I tell you that there’s nothing like the sweet taste of a freshly picked tomato to enhance these tarts. So, if you can, swing by your local farm and get a basket full. Your taste buds will thank you!

Tomato Tart

Ingredients:

1 1/2 cup your favorite flour (I use gluten free flours like garbanzo or fava bean or oat or sorghum but whole wheat works, too)

1/2 tsp ground onion powder

1/4 to 1/2 tsp salt (your taste preference)

1/2 tsp dried oregano

1/8 tsp black pepper

1/3 cup safflower oil

3 tbsp your favorite milk (cow, soy, flax, quinoa, rice, etc…)

3 eggs

1/2 cup your favorite milk (cow, soy, flax, quinoa, rice, etc…)

1/4 tsp black pepper

1/2 tsp dried oregano

Fresh tomatoes

salt, pepper and oregano

Cooking Instructions:

  1. Preheat the oven to 350 degrees.
  2. Mix the flour with the onion powder, salt, oregano and pepper.
  3. Whisk the safflower oil with the milk until it’s creamy. Pour into the flour mixture and stir with a fork until a dough ball forms.
  4. Press the crust into a 8 or 9 inch pie pan, using your clean hands to form an even crust along the bottom and sides of the pan. Set aside.
  5. Whisk the eggs with the milk, pepper and oregano. Set aside.
  6. Thinly slice the tomatoes, allowing some of the juices to drain out in a colander. Then layer the tomato slices in the prepared crust, sprinkling some salt, pepper and oregano on each layer before putting on the next.  How much you put in is up to you, but I like to layer them up to the top of the crust.
  7. Carefully pour the egg custard over the tomato layers. If you find that you’ve layered so many tomatoes that your egg custard doesn’t cover the tomatoes as you’d like, whisk another egg with a tablespoon of milk and add it.
  8. Bake in the preheated oven until the eggs are set. How long will vary on how thick your tomato layers are as well as which type of milk you ended up using.  I suggest you set the timer for 15 minutes and go from there. The longest it’s ever taken for me is 30 minutes.


Creative Cooking: Zucchini Chocolate Chip Cake

“Anyone who wants them can take them!”

Every summer my husband’s family descends upon the Adirondacks to help with the family forest which has been in existence now for 60 years. When we are up there in the mountains, we have no television, can barely tune into a radio station, can only access email if we go into the town to little one room library, and still have a landline in the house because cell phone coverage is spotty at best. (This is why I’ve written no posts in the past few weeks!)

What we do have here, though, is a lot of farms with wonderful vegetables, and I love going weekly to the farmers’ markets they have every day of the week in a different town. After a while, however, I laugh because folks in the area begin to want to rid themselves of the abundance of vegetables they have, and people will show up at our place with huge bags of vegetables, and when you go to places like church, zucchini will be sitting on the table with a sign, “Please take!”

As such, I’m always looking for ways to use up vegetables like zucchini, and recently my son asked me if I could make a zucchini chocolate chip cake. I hadn’t made one in a long while so I needed to create a recipe. I was out of eggs so I used bananas instead, and because I never use white refined sugar, I chose to use coconut sugar.  In place of regular flour I used gluten free blends and single types, and for flavoring I simply used cinnamon and vanilla, which is all I had in the house. In place of milk I used soy milk but any type will work.

What follows is what we made, and we declared it a success since the entire cake was eaten within two meals!

Zucchini Chocolate Chip Cake

Ingredients:

2 cups gluten free flour blend (I used a brown rice flour blend)

1/2 cup gluten free oat flour

1/2 cup sorghum flour

1 cup coconut sugar

1 tsp salt

2 tsp baking soda

1 tsp baking powder

2 tsp cinnamon

2 to 3 ripe bananas (you’ll need one cup’s worth of pureed bananas)

1 tbsp gluten free vanilla

1/2 cup safflower oil

1/2 cup soy milk (can use any type, though)

3 cups finely shredded zucchini

1 cup Enjoy Life mini chocolate chips

2 tbsp apple cider vinegar

Baking Instructions:

  1.  Preheat oven to 350 degrees. Line a 9 x 13 pan with parchment paper (or grease as you prefer).
  2. Mix the GF flour blend with the the oat flour, sorghum flour, salt, baking soda, baking powder, and cinnamon. Set aside.
  3. Puree the bananas so you have a cup’s worth.  Add the vanilla, oil and milk and mix well.
  4. Stir in the zucchini and chocolate chips.
  5. In a large bowl mix the dry ingredients with the wet, adding the vinegar.
  6. Pour into the prepared pan and bake in the oven until the cake is puffed and golden and a toothpick inserted in the center comes out clean.  Will take between 20 to 30 minutes, depending on your oven.