Cooking Techniques: Puddings

website pudding

Diaper boxes.

When my oldest was a toddler, she loved to play with other people’s toy kitchen sets. I wanted her to have one of her own, but all our money was going toward our first home and diapers.

One day I looked at the number of Costco diaper boxes piling up in the basement and realized just how sturdy those boxes actually were. I had a brainstorm. Maybe I could make a kitchen set using those boxes.

If you had asked me before that day whether I was capable of even thinking up such an idea, let alone following through with it, I would have said, “No way!” Growing up, my best friend was the artsy, creative one. I was the math and science nerd. I didn’t “do” crafts.

As life often proves, though, necessity can breed skill. My daughter loved to play “cook”, and I was going to make it happen for her. Using the diaper boxes, duct tape, and contact paper, I created a complete kitchen for her which included a stove, a fridge, and cabinets. I even added a diner style counter with a cash register to go with it.

That kitchen set lasted us for years, and my daughter loved it. And other people loved it, too. I got so many compliments on that set that, to this day, I am still amazed by what I accomplished.

I share this because recently folks have been telling me that they’re not capable of revamping their recipes like I do; but if I can create a kitchen set out of diaper boxes, folks can most definitely learn how to accommodate their food needs. And I’m going to help folks do it!

For the next several posts, I’m going to focus on technique, specifically the “how-to’s” of certain dishes with special reference to making them healthier and allergy friendly. For today’s post, we’ll look at puddings, because someone recently wanted to know how to make it.

Puddings are ridiculously simple, but people rarely make it homemade. They think it’ll take too much time or that they’ll mess it up. Neither is true. There are, however, some tips to keep in mind.

1. Make sure your recipe is a good one. Don’t just presume that because it is online or in a recipe book that it actually is correct. For some reason there are a lot online and in books that tell you to do things incorrectly like add the cornstarch by itself to the mixture, which leads me to point two.

2. Cornstarch (or another thickener like arrowroot or tapioca starch):  The key to pudding is how you thicken it. Cornstarch is the traditional thickener used, but it should never, ever be added to pudding by itself. Doing so will simply “gummy up” your pudding. Cornstarch is always to be mixed with your sugar (if you’re using it) and salt before adding it to your liquid or it needs to be mixed with liquid before adding it to the rest of your pudding mixture. The same should be kept in mind if you use arrowroot or tapioca starch.

Cornstarch also thickens best when your cooking temperature is even, so a stainless steel pan or enamel covered is best which leads us to point three.

3. Cooking Method: The best way to make pudding is to use a double boiler. I don’t own one so I simply put one pan on top of another. There are two ways of doing so: put a smaller pot filled halfway with water on the bottom and a slightly larger one on top or put water halfway in a pot that another pot will fit snugly into without touching the water below.

Whichever method you use, you want to bring your water to a boil before you begin making your pudding, because the heat from the boiled water is necessary for thickening your pudding.

When you do begin making your pudding, it’s important to stir the mixture well in the beginning so all ingredients are evenly mixed and there are no lumps.  Then, after your mixture has come to a boil, when you’ve added your thickener, it’s important to continually stir the mixture so it doesn’t burn on the bottom, which brings us to point four.

4. Patience: Pudding doesn’t actually take all that long, maybe fifteen minutes or so to completely cook, but when you’re standing over it, stirring constantly, fifteen minutes begins to feel like a long time. When it does, do not be tempted to try to speed things up or to stop stirring. Use the time to relax. Allow yourself the luxury of not being rushed and being able to reflect. Before you know it, the pudding will have thickened, and you’ll have a nice treat.

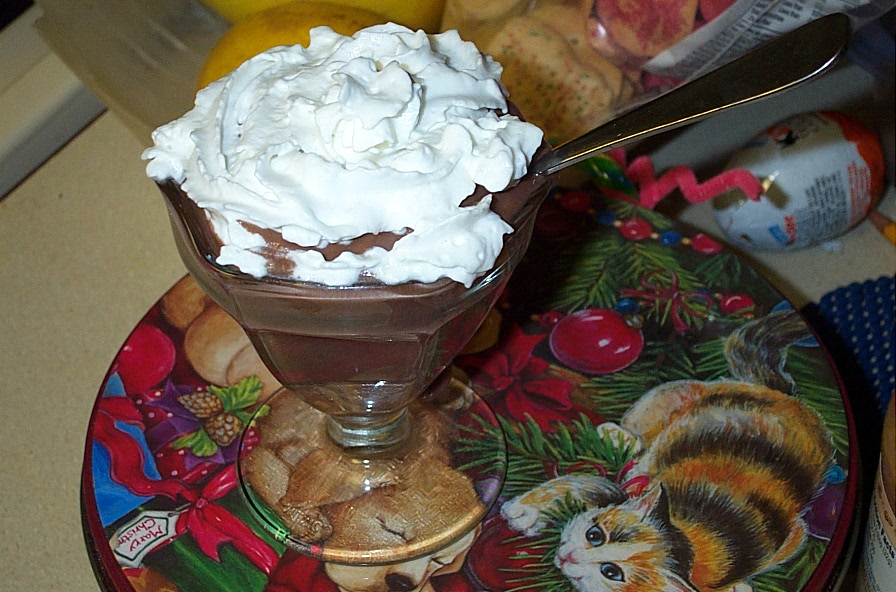
Okay, for a recipe: I have a chocolate recipe that is simple to make. If you are simply trying to lower your fat intake, use skim milk. The pudding won’t be as rich and thick, but it’ll still be delicious. If you have food allergies, I’ve successfully made this with flax milk, soy milk, almond milk, coconut milk, and rice milk. If you actually use sugar, then use 1/2 cup of sugar instead of the 1/4 Agave. You can also use 1/4 cup Stevia instead or 1/2 cup coconut sugar instead. If you want a really rich pudding, use soy or coconut creamer (or heavy cream if you don’t need to worry about milk allergies or fat intake.)

Chocolate Pudding

Ingredients:

1/4 cup Agave

1 3/4 cup “milk” (whichever type you want to use)

1/8 tsp salt

3 tbsp cornstarch

1/4 cup “milk”

1 oz unsweetened chocolate*

1 tsp vanilla

Cooking Instructions:

1. Bring water to a boil in a double boiler or makeshift boiler.

2. Mix together the agave, 1 3/4 cup milk, and salt. Set aside.

3.  Mix together the cornstarch and the remaining 1/4 cup milk. Set aside.

4. Stirring continually, melt the unsweetened chocolate.

5. Slowly, while continuing to stir, add the agave-milk mixture.

6. Bring the mixture to a boiling point. (Little bubbles will begin to appear at the top. You don’t need to continually stir here, but you’ll want to occasionally stir it until it begins to boil. Usually it’s less than five minutes to bring the chocolate liquid to a boil.)

7. When the mixture begins to boil, re-stir the cornstarch mixture and slowly pour it into the hot chocolate liquid, stirring continually.

8. Continue to stir the pudding until it begins to thicken.  (It’s okay to stop stirring for a few seconds at a time, but not for minutes, because once the pudding begins to thicken, it’ll thicken quickly. Usually it takes less than ten minutes for the cornstarch to thicken the pudding. You’ll know when it’s thickening because it’ll go from its liquid state to more of a solid.)

9. When the pudding thickens, remove it from the heat and stir in the vanilla until well blended.

10. Scrape the pudding into a shallow bowl and press a piece of plastic wrap directly against the top of the pudding. (This keeps that “skin” from “growing” on top of your pudding as it cools.)

11. Cool the pudding completely in the fridge before eating. If you put it into a shallow dish, you can usually eat the pudding within half an hour.

*Chocolate Note: If you don’t have unsweetened chocolate on hand, you can make your own.  Three tablespoons of unsweetened cocoa powder mixed with one tablespoon of shortening or oil is equivalent to one ounce of unsweetened chocolate.

You can also substitute an ounce of chocolate chips which is one tablespoon of chips. This will make for a sweeter pudding so if you don’t want it that sweet, simply reduce the agave by half.

If you like to use carob powder instead, 3 tablespoons of carob powder mixed with 2 tablespoons of water is equivalent to one ounce of unsweetened chocolate.

Also, if you don’t have allergies to it, you can use one of those pre-melted chocolate packages they make these days.

Finally, if you want, you can also just use chocolate flavored soy or rice or almond or coconut milk and skip the chocolate step and leave out the Agave.  I often use unsweetened chocolate soy milk with the Agave so I can control the amount of sweetener.

New Year’s Food Resolutions

website tempura

New Year’s Resolutions.

I was 12 years old when I made my first New Year’s resolution to be better behaved. That was the summer I spent two months grounded for recurring infractions. When I was 15 I decided to give up on boys. I had three different boyfriends before the year was out. At 18, I resolved to watch my weight better. I started college and gained 15 pounds. When my husband and I got married (in December), we decided (in January) that we’d finish grad school before starting a family. We became pregnant with our oldest despite three different forms of birth control, and I never attended grad school. After she was born, my husband and I resolved to give up making resolutions, and we’ve been faithful to that for almost 18 years.

For many people, the new year is a time for making changes to their lives, especially health-related ones. Studies, though, reveal that less than 10% of people always succeed in keeping their New Year’s resolutions. I believe it.

Interestingly enough, however, studies say that folks who continue to make New Year’s resolutions are 10 times more likely to succeed with their goals than those who don’t. So, I have to wonder….

Maybe resolutions aren’t such a bad thing.

How to keep them, however, requires making resolutions wisely, especially when it comes to food related ones.

Some thoughts I have, not as someone who’s actually made and kept resolutions, but as someone who’s had to make and keep lifestyle changes because life required it:

1. Don’t resolve to change everything: If you’re shooting for healthier eating, just resolve to do one thing better this year. Maybe you’ll try incorporating more vegetables into your diet. Or this could be the year you daily drink your eight glasses of hydrating fluids. Or how about simply adding a walk three times a week for half an hour each time.

2. Do resolve to try something different: Often we make resolutions about a habit we need to change by simply trying to stop the habit. When it comes to food, eating something healthier and different in place of what you’re trying to quit works much better. If you’re a chocoholic, try eating a piece of fruit when the craving hits or drink a glass of a fat-free “milk” that you’ve added dark cocoa powder to with a tiny bit of sweetener.  If you love sandwiches, try making an open-faced sandwich on one whole grain piece of bread. If you always take the elevator, take the stairs at least once each day.

3. Don’t go it alone: Friends and family are wonderful for this. If you’re going to start walking, ask a friend to if she wants to join you a couple times a week. If you’re starting to eat gluten free, don’t just cook for yourself – make it a family affair. If you know you won’t be able to resist that piece of chocolate, phone a friend and chat.

4. Do try to be fun and creative: If your resolution is to exercise and you’re doing so reluctantly, put on your favorite fast beat music and dance around your living room instead. If you don’t like vegetables, don’t eat them plain. Make tempura (recipe will follow below) or a stir fry where you experiment with different spices and herbs to see what flavors you like best. If you have to change your diet, find ways to “jazz” up the meal – peel your carrots into spirals (one of my kids’ favorites); stuff the zucchini with sauteed vegetables and herbs which you stir a little bit of real or tofu cream cheese into to make creamy; toast some gluten free bread crumbs with herbs and sprinkle it onto your fish.

5. Don’t set unrealistic expectations: If you need to lose weight, you’re generally not going to lose 30 lbs in six months. Shoot for ten lbs over 12 months, and you’ll be more likely to achieve your goal. If you’ve eaten white flour your whole life, it may take trying a few different types of whole grains before you find one that you actually like. If you always reach for junk food when you’re stressed, expect to slide occasionally, even if you’ve been doing well for a while.   

6. Do search out help: If you need to eat differently, read some magazines about allergy free or healthy eating to learn tips which can help you. If you want to exercise, ask your doctor the best way to begin. If you crave everything all the time, search online for tips for how to curb cravings.

7. Don’t be hard on yourself: Remember the statistics. If you fail at keeping your resolution, you won’t be the only one. And if you aren’t successful this time, it doesn’t mean you can’t be. Again, remember the studies – just make a new resolution, and you’ll improve your chances of success next time simply by continuing to make the resolutions.

So, now for that tempura. My children love my mother’s tempura, but of course, it’s made with wheat. I wanted to make something which could compete in taste and crispiness, and after a couple of different versions, I finally came upon one that is absolutely delicious and works well. The bonus: My children eat tons of veggies! And if you keep your heat high and use a heart healthy oil, it’s been shown that your veggies don’t absorb a lot of oil.

Tempura

Ingredients:

Heart healthy oil (I like to use Smart Balance for this)

Bob’s Red Mill Gluten Free Pie Crust (Make sure it’s the “pie crust” only mix, not the “biscuit and baking mix” or the gluten free “baking flour”)

ground black pepper

cold water

ice cubes

Quinoa flour

Veggies (broccoli, petite baby carrots, green beans, mushrooms, zucchini, etc…)

Cooking Instructions:

1. Heat your oil to about 375 degrees in a pan suited for doing so. (I actually own a fryer which the only two things I ever fry are tempura and mandu, which is a Korean dumpling.) 

2. Put some of the pie crust mix into a bowl. How much depends on how much you’re making. I always start with at least two cups.

3. Add some black pepper to taste. I usually use 1/2 tsp per 2 cups of crust mix.

4. Fill a large measuring cup half-filled with ice cubes and add cold water. Slowly add water and ice cubes to your flour mix, whisking as you do so, until the batter is just about to the consistency you want. (I test it by pulling up my whisk. If the batter easily flows off the whisk like water, it’s good.) You’ll have some unmelted ice cubes in the batter.  That’s perfect. Those will continue to melt and keep your batter cold while you turn your attention to the veggies.

5. Put some quinoa flour in a bowl and dip your veggies into the flour to coat them.  Shake off any excess.

6. Dip the floured veggies into the tempura batter and shake off any excess.

7. Put just enough veggies into your oil as the pan can accommodate. You don’t want to overfill the pan because the tempura batter will expand. You want to put the veggies in as quickly as you can and then cover the pan. Immediately put two minutes on your timer.

8. When two minutes are up, remove the veggies, making sure to lightly shake off any excess oil. Put the veggies into a pan lined with paper towels to absorb any excess oil.

9. Tempura is best eaten while still warm. Eat plain or with soy sauce or a sauce of your own choosing.

Handling Holidays: Serving the Meal

website serving meal

“Umm… did you just use my scoop?”

We were having a lovely gathering at our home of friends over the summer, complete with ice cream sundaes, when I realized that one of our guest’s children was using my scoop to get herself some ice cream.

For most folks, using another person’s scoop doesn’t seem like a big deal, but when you have a serious allergy to dairy and cross-contamination can potentially kill you, you tend to be a bit less friendly about “sharing”. Fortunately, I caught the “sharing” in action and was able to wash the scoop before using it for myself.

Holiday meals can be a bear when it comes to potential cross-contamination.  Even if you’ve planned ahead as I had that summer evening with a different scoop for my nondairy frozen dessert which was sitting off to the side of everyone else’s “real” ice cream, you never know when someone might accidentally upset your best laid plans.

So, what can you do?  Some suggestions:

1.  Definitely do plan ahead:  If you’re hosting, decide whether you’re going to avoid cross-contamination by simply making everything allergen friendly.  When I’m entertaining in my own home, I usually just make foods which I can eat which everyone else will enjoy, too.  Then I don’t need to worry.

If there are some foods, however, that you do want to make for your guests which you can’t eat or vice versa, then decide how many of those you’ll make and plan how you’ll separate them from the rest of the food.  Some options:

a. Put allergen free food in similar dishes and the other food in different dishes so you can point out to folks which are which.  I have round and rectangular dishes so it’s easy for folks to know which foods they should be careful to avoid contaminating.

b. Label the food.  Put little index cards in front of the food which tells folks what the dish is free of or contains.  The additional advantage to this is that if you have folks with a variety of allergies, they can see with a quick glance what they can and can’t eat.

c.  Put the food on different tables.  If you have available table space, put allergen free food on one table and the rest on another so folks can go to both tables separately to get their food.

2.  Educate:  Sometimes folks just don’t know how dangerous it can be for them to switch the serving spoons on you.  Take a minute to just explain that folks need to be careful to put the same spoon back into each dish because it would be a great service to your health for them to do so. I’ve found that folks are understanding once they know the potential consequences and take better care about how they serve themselves.

3.  If you’re going to someone else’s home for the holidays, be pro-active: Find out if the host is going to be making food you can eat, and if so, ask them if they could follow some of the above suggestions for your and the other guests’ benefit.

If you’re going to contribute a dish of your own, make sure to both label it and point out to folks at the dinner that it is a special dish made to be allergy friendly, and bring a serving utensil that is “different” to go with it. Maybe it’s an unusual color or a non-traditional size or one that matches the serving dish.  Give folks a way to recognize that that particular serving utensil needs to be used with your particular dish only.

4. Watch the children: In most cases, as with my summer gathering, it’s the little ones who don’t realize, because they are after all just little. So be sure to keep an eye on them. Enlist the help of the other adults to help serve the children and to watch the children who can serve themselves. At a certain age, the children can be told, too, about being careful, because if the food allergy is explained, children tend to be rather caring about not wanting to hurt anyone.

5. Practice avoidance in the absence of information:  Many times folks will bring a dish or purchase a dish and not know exactly what specific ingredients are, but they’ll tell you generally that it is something you can eat.  Don’t.  It’s as simple as that.   I’ve had times when folks have actually fished out an ingredient label from the trash for me and discovered that, yes, five of the six ingredients are fine, but there was that last ingredient that was deadly.

6. Be prepared:  Sometimes, because you’re in your own home or because you’re going to a trusted home which you’ve been to many times, you don’t necessarily think about keeping your Epi-Pen close by.  You just never know.  As with the little incident at my house over the summer, accidents happen.  Always be prepared and keep whatever you need, whether it’s the Epi-Pen or benadryl or the emergency phone number, close by within easy reach.  Better to be prepared than sorry.

Berry Oat Bars

These are favorite with folks I know.  I can’t make enough of them, they get eaten so quickly!

Ingredients:

2 cups gluten free whole grain oats

2 cups gluten free flour blend (I use garbanzo bean and brown rice flour)

1 tsp cinnamon

1/2 tsp salt

1/3 cup Truvia or coconut sugar

3/4 cup vegan “butter”

3 tbsp Agave divided

15 oz Polaner All Fruit with Fiber (your choice of flavor)

Baking Instructions:

1.  Line a 9 x 13 pan with parchment paper so there are “wings” hanging over the edges, and preheat the oven to 325 degrees.

2.  Mix together the oats, flour, cinnamon, salt and Truvia or coconut sugar in a large bowl.

3.  Put the “butter” into the oat mixture in pieces and use a pastry blender to cut the butter into the oat mixture until it’s crumbly and the butter is incorporated into the mixture.

4.  Remove about 1/3 of the mixture and put it aside for the topping.

5.  To the remaining 2/3 of the oat mixture, add 2 tbsp of Agave and mix it well.  Pat this into the bottom of the 9 x 13 pan to form a crust.

6.  Spread the Polaner All Fruit carefully over the crust.  (We’ve made raspberry, strawberry, apricot, blueberry, etc….) 

7.  Add the remaining 1 tbsp of Agave to the remaining 1/3 oat mixture and mix it up until the mixture is moist but still crumbly.  Evenly distribute the mixture over the top of the all fruit.  You will have open spots of jam showing.  This is fine.

8.  Bake in the preheated oven for about 30-40 minutes.  The oats will be golden brown and the jam bubbly.

9.  Remove from the oven and put the pan onto a wire cooling rack.  It’s very important that you allow the bars to completely cool.

10.  Once the bars are completely cooled, you can carefully remove them from the pan using the parchment paper and cut them into the desired size, or you can cut them directly in the pan and remove them one by one.

Handling Holidays: Truffles and Fudge

website fudge

“You’re a chink!”

I was sitting by myself at recess on my first day at a school in the United States when a older middle school, Caucasian boy welcomed me with those words. It was the aftermath of the the Vietnam War, and though the gene pool had actually given me more of my father’s Caucasian features than my mother’s Asian ones, folks back then were more cognizant of facial differences than today. (Today, no one believes me when I say I’m Korean. I have to show them pictures of my mom. So, times do change!)

Unfortunately for that gentleman, though I was  younger than he, I wasn’t so easily intimidated, and he didn’t expect my response. “Shows how much you know,” I said. “Chink is a derogatory term for Chinese people, not Korean. I believe you meant to call me a ‘Gook’, but instead you’ve only revealed just how ignorant you are. So, please just go away and leave me alone.” To his credit, he walked away as the crowd around him snickered.

My victory didn’t make me feel any better, though, about such a “welcome” to my “home” country and new school, and at the end of recess my new teacher, Mrs. Petruska found me sitting in the corner of the yard, crying. She didn’t ask me what was wrong, so I presumed she must have heard from one of the other students. Instead, she handed me a small piece of chocolate (this was long before the day of food allergy awareness), patted my back, and said,”Take your time eating this, and when you’re done, I’ll see you back at class.”

Now, some may wonder what sort of teacher would handle such a situation by giving a child a piece of chocolate, but whether you agree or disagree with her actions, I have to say that I learned that day that if savoring a piece of chocolate can make you feel better, than life is not going to end from whatever situation you feel devastated by.

And strangely enough, as I’ve grown into adulthood, the only time I even eat a piece of chocolate (allergen free variety, of course!) is when I need a reminder that I will survive whatever “mess” I’m currently dealing with in life, and the only time I make chocolate truffles and fudge is for the holidays – and it’s always for giving away.

Chocolate, though, is one of those ingredients that can be deadly if you’re severely allergic to dairy or nuts. Fortunately for me, however, Enjoy Life makes wonderful chips, chunks, and bars which are everything free, so I can continue to make, give away and enjoy chocolate truffles and fudge when I want – and so can you.

Chocolate Truffles

Ingredients:
1 cup Enjoy Life mini chocolate chips
2 tbsp Polaner’s all fruit of choice*
Cocoa powder/coconut flakes/chopped nuts/crushed candies/dried chopped fruit

Cooking Instructions:

1.  Melt the chocolate with the all-fruit over a double boiler, stirring constantly. (I put a small pan filled with water halfway on the burner and then stack a larger pan on top.)

2.  Pour the melted mixture into a shallow pan and cool in the fridge until the chocolate is solid enough to shape. (It needs to be a rollable, fudgy consistency, not hard.)

3.  Use a teaspoon sized amount of chocolate and roll into a ball. Roll the chocolate ball in cocoa or flaked coconut or chopped nuts (if you’re not allergic) or crushed candies or dried fruit and stored in a covered container in fridge.

4.  Serve at room temperature.

*Note: You can omit the all-fruit flavoring and just make the chocolate plain. You can also substitute flavoring like mint extract (use a small amount like 1/8 tsp first and taste; add in increments to the strength of flavor you want).

Chocolate Marshmallow Fudge

Ingredients:

3 cups Enjoy Life mini chocolate chips

Equivalent to 14 oz can of sweetened condensed milk*

1/8 tsp salt

2 tsp vanilla

3 cups mini marshmallows

2 tbsp melted vegan “butter”

Cooking Instructions:

1. Line a pan with aluminium foil or parchment paper or wax paper, leaving flaps overhanging on all four sides so you can pull out the fudge.

2.  Mix the chocolate chips with the sweetened condensed milk and the salt. Melt slowly over low heat, stirring constantly, until all the chips are melted.

3.  Stir in the melted “butter” and one cup of the marshmallows.  Stir until those have melted into the chocolate.

4.  Remove from the heat and add the vanilla and the remaining two cups of marshmallows.  Stir just until the marshmallows are incorporated but still firm.

5.  Scrape the fudge into the prepared pan with a rubber scraper and smooth the top of the fudge flat.

6.  Cool in the fridge for several hours until hardened.

7.  Use the flaps to remove the fudge from the pan, turn it over onto a cutting board, and peel away the foil or parchment paper or wax paper.

8. Cut the fudge into size and shape wanted and store in a container or individually wrapped in the fridge.

*If you don’t have milk allergies, use the canned sweetened condensed milk, but if you do:  You can also try making homemade sweetened condensed milk by mixing about 2 1/2 cups of your type of “milk” (rice, nut, coconut, soy) with 8 tbsp sugar or agave.  Stir well and simmer over low heat until the “milk” has reduced and thickened.  This will take a couple of hours.  Keep the heat low and stir frequently.  When it’s thickened, you can add 1/8 tsp of salt and/or 1/2 tsp vanilla, if you’d like. Put a clear plastic wrap up against the mixture before cooling in the fridge to prevent a “skin” from forming. When you need it, use the sweetened condensed milk to substitute for a 14 oz can.

Handling Holidays: The Main Entrees

website entrees

“But it’s bleeding!”

Imagine that you’re meeting your future spouse’s parents for the first time. They’ve invited you over for Easter at a cousin’s home and the cousin raises sheep. You’re already nervous because you really want his parents to like you. However, you now learn that, you who are a vegetarian, are about to be served lamb for Easter dinner. More so, the family has just had a lengthy conversation about the best way to cook lamb which apparently is to simply torch the outside a bit while leaving the lamb mostly rare.

You’re expecting the worst, but nothing prepares you for actual reality. When the lamb appears, you glance at the platter and see what looks to you like blood running in riverlets down the lamb’s sides. Your stomach, which has already been lurching horribly due to nerves, can’t take this unexpected sight, and you promptly run from the table and spend the next half an hour incredibly sick in the cousin’s bathroom, wondering if you’ve doomed your chances of ever impressing your future in-law’s.

I, unfortunately, don’t have to imagine the above scene, because I lived it. That experience, though, solidified a few things for me. One, I have never entertained without making sure that everyone who is coming will be comfortable with what I serve. Two, no new experiences where folks have made a dish I can’t eat has ever come close to topping that one, so I’ve been able to handle them with much more aplomb. And three, I’ve learned that when it comes to food, everyone’s tastes are different, and we have to be accepting of that.

So what do you do when you need to cook a main course that accommodates your health needs and is delicious for everyone who gathers at your table who may not need to watch what they eat?

1.  Plan ahead:  Don’t decide the day before what you want to try to make. If it’s something you’ve never made before, be sure to have a practice run, so you can learn what might be a potential glitch in the recipe. If it’s something you have made many times, be sure you have all the ingredients you need so you’re not running out at the last minute to purchase something you forgot.

2.  Forget the fat and focus on the cooking:  The mantra is that meat and chicken and turkey need the fat to taste good, but that’s not actually true. Whether your meat or turkey or chicken is dry and tasteless really depends on your cooking technique.

For meats and poultry, the key to seasoning is to do it everywhere.  Make a rub of herbs and spices and onions and garlic with just the tiniest bit of an oil like olive oil to create a paste and rub it everywhere.  For the meat, you can even put little slits into the meat and put seasoning into.  For the birds, use your hands to pull the skin away from the flesh and put the herbs in between the skin and breast as well as on top and inside the bird.  For inside, add an onion or garlic cloves or veggies like carrots and celery for even more flavor.

Cook the meats and poultry to maximize moisture.  Cook them on high heat for only 10 minutes to get the outside crisp immediately, then tent them with foil and cook on low heat for more even cooking. At the end you can cook them for another few minutes at high heat to finish them off with a nice brown crust or skin.  For folks who are extra wary, you can also use a reduced sodium, fat free stock to baste meats and birds during the cooking process.

Finally, let your meats and poultry rest after cooking.  If you let them sit for at least 15 to 20 minutes, all the juices which have been released will be reabsorbed into the meat and poultry, to allow for moister slices when you do cut them into pieces.

For tender cuts like a pork tenderloin or turkey tenderloin, just trust the meat. Once you season it with your herbs and spices, you can simply cook them at 350 for an hour, and they’ll taste great.  You choose to make a nice glaze to brush on instead, too.

For ham, you can omit the glazes that come packaged with the meat, and either cook it without or make your own less caloric version and just cook the ham according to instructions.

3. Make it yourself: If you’re making something like chicken cordon bleu, make your own bread crumbs. Whether you use 100% whole wheat bread or a gluten free millet bread, you’ll add more fiber to the crumbs which is good, and you can then season the bread crumbs as you’d like without all the salt. Contrary to thinking, it literally takes about two minutes to make your own crumbs.  A couple of tips:  For gluten free bread, use frozen slices.  For both breads, if the bread is already at room temperature, toast them on the lowest setting and cool before processing. If adding herbs and spices, throw them in with the slices you’re about to zoop in the processor, because that will meld the herbs and spiced into the crumbs.

If you’re supposed to use a certain type of bottled glaze or marinade, find a recipe that you like and modify to omit the salt and sugar and fat, using the tips I’ve put into past posts.

If the recipe calls for a bottled spice that includes salt, create your own mix, using herbs and spices from your cabinet which you combine with onion and/or garlic powder and black pepper.

4. Look for better options: If you’re making something like a stuffed, rolled pork tenderloin and the recipe calls for crumbled sausage, use a turkey variety. If you’re supposed to use cheese, find a lower sodium, reduced fat variety or a vegan substitute instead. If the recipe calls for ham and you really want to use ham, use half the amount and slice it into smaller pieces to distribute the taste throughout something like a cordon bleu. If you’re supposed to use meat to stuff a meat, try using sauteed vegetables instead. If butter is required, use a heart healthy and dairy free oil instead.

5. Think outside the box: Maybe this is the year you don’t make a chicken cordon bleu or ham for Christmas. Maybe you created a stunning whole wheat or gluten free roasted vegetable lasagna. Or maybe you make a spanikopita, only you use olive oil instead of butter and lower fat cheeses. Or maybe you try your hand at a vegan manicotti which used vegan cheeses and pureed cashews and is stuffed with butternut squash.

Chicken Cordon Bleu

(This is for four chicken breasts; we always double the recipe and use a 9 x 13 pan. If you aren’t allergic to dairy, you can use low fat real cheese!)

Ingredients: 

1/4 cup reduced sodium, fat free chicken broth

2 tsp minced garlic

1 tsp herbs of choice (oregano, thyme, basil, rosemary, etc…)

1/2 cup breadcrumbs (make your own!)

1 tbsp grated vegan Parmeson

1 tsp paprika

4 chicken breasts (smaller 4 to 6 ounce portion, not the huge ones!)

herbs of choice (oregano, basil, thyme, rosemary, etc…)

black pepper

4 thinly sliced pieces of fat free ham or turkey ham (the ultra thin deli style works well)

chopped fresh baby spinach

1/4 cup shredded vegan mozzarella

Cooking Instructions:

1. Lightly coat an 8 inch square pan with your choice of “grease”. (I usually brush a very light coat of olive oil.) Preheat the oven to 350 degrees.

2. Combine the broth with the garlic and herbs and microwave for 20 seconds until it’s warm.

3. Combine the bread crumbs with the Parmeson and paprika.

4. Pound the chicken breasts to a uniform thinness.  (We put the breast between parchment paper and pound them with the bottom of a heavy ice cream scoop.  If you have a meat mallet, that works, too. Recipes will often tell you to pound between saran wrap. Do what works for you.)

5. Sprinkle both sides of the chicken breasts with the herbs of your choice and black pepper.

6. Place one slice of the ham, some chopped baby spinach, and 1 tbsp of the mozzarella on top of each chicken breast and roll up the breasts in a jelly roll style.

7. Dip the rolled chicken breasts into the chicken broth and cover with the breadcrumb mixture.

8. Put the breasts into the baking pan, seam side down, and pour the remaining chicken broth over the chicken breasts evenly.

9. Bake for about 30 minutes until the juices from the chicken are clear and the chicken is golden brown.

10. You can serve immediately or cover them with foil to keep warm until it’s time to serve them.

Handling Holidays: Cakes and Tortes

KONICA MINOLTA DIGITAL CAMERA

“Why are the Christmas decorations up when it’s not even Halloween?”

My son and I had popped into BJ’s to pick up a couple of much needed bulk items. As we entered, we were greeted by twinkling lights, decorated trees, and gift wrapping.  Since it was still a week and  a half until Halloween, I could understand the reason for my son’s question.

What I didn’t know, though, was how much I should explain to an eight year old about the “pushing” aspect of the holidays — everyone trying to get us to think we need to purchase something, whether we need to or not.  For the most part, I don’t actually mind all the early decorating.  It’s pretty.

What boggles my mind is the onslaught of catalogs that begin to pile up in my mailbox. It wouldn’t be so bad if you received one for every company, but you don’t.  You receive multiple copies from October through December.

I usually simply recycle them all without looking at them.  One which my children love to pore over, though, is the Swiss Colony catalog with its different types of cakes and tortes and petit fours that they’re hoping we will purchase.

When it comes to the holidays, nothing says, “Celebrate!” like a cake.  And in many parts of the world, a torte is seen as special holiday food.  There are basically two types of tortes:  traditionally thought of torte which is made with little flour where nuts and jams take center stage in a layered extravaganza and the type of torte which is a multi-layered cake alternating cake with cream, frosting, ganache or jam.

Both types can wreak havoc with a healthy diet and/or an allergy sensitive one. Below, I’ll give you some tips for lightening cakes and substituting ingredients when necessary, but I’ll also share some thoughts for that latter type of torte (multi-layered cake alternating with filling), in case you’re thinking your holiday dinner ought to end with one.

For Healthier Cakes:

1.  Cut the amount of “filling” you use:  If your cake or torte calls for chocolate chips or dried fruit  or coconut flakes or nuts, use mini chocolate chips and/or process the dried fruit or coconut or nuts into smaller pieces. By doing so, you can distribute more of the filling throughout the cake or torte and can then cut the amount you’re using by a quarter or half without losing the flavor and texture.

2.  Swap out solid butter or shortening with coconut oil, which is actually a solid, not a liquid as the name implies.  It’s considered a healthier fat than butter and shortening.

3.  Substitute applesauce or pureed banana, pumpkin or prunes for up to half of the fat called for in a cake recipe.

4.  Swap out melted butter or vegetable oil for a heart healthy oil:  safflower oil, grapeseed oil, canola oil, a nut oil, Smart Balance, olive oil, etc….

5.  Substitute egg whites for the whole eggs.  Two egg whites equals one egg. You can also substitute ground flaxseed meal mixed with water for the eggs. 1 tbsp of meal mixed with 3 tbsp of water equals one egg.

6.  Swap out part of the flour in the recipe with a nut flour, coconut flour or soy flour.  You can substitute up to half of the flour with  a nut flour, about 1/4 of the flour with coconut flour, and up to 1/3 of the flour with soy flour.

7.  Swap the white flour for whole wheat.  100% whole wheat has a higher fiber content, but you can also use white whole wheat if you want something closer to white flour.  Since 100% whole wheat flour is denser than white, you should use about 1/4 cup less in your recipe.

8.  Use Agave or Stevia or Coconut sugar in place of the sugar in the recipe. For every cup of sugar use about half of any of these substitutes.  If you use the Agave and it’s simply a couple of tablespoons to 1/4 cup, don’t worry about it being a liquid.  If you’re using a cup or more, though, decrease any other liquid by at least 1/4 cup to 1/2 cup or increase a flour ingredient by 1/4 to 1/2 cup.

9.  Swap out any “whole” milk product (milk, yogurt, cream cheese, etc….) for a lower fat, lower sodium variety.

10.  Use date molasses instead of regular molasses.  You can use the same amount of date molasses as regular molasses.

For Allergy Friendly Cakes:

1.  Use gluten free flour instead of wheat.  Authentic Foods has a multi-flour blend that includes everything including the xanthan gum which works very well as a substitute.  You can also use your favorite flour blend and add 1/2 tsp of xanthan gum for every cup of flour your recipe needs.

2.  Substitute water, 100% fruit juice or your type of “milk” (soy, rice, almond, coconut, etc…) for any milk needed in a recipe.

3.  Swap out the heavy cream: You can substitute using coconut milk; or 3/4 cup of your type of milk with the addition of an extra 1/4 cup of your type of butter per cup of “cream” needed; or a type of yogurt you can eat; or pureed soft or silken tofu.

4.  Substitute vegan butter or coconut oil for any butter or shortening called for in a recipe.

5.  Use a recipe that calls for a liquid oil as opposed to butter so you can use safflower, canola, grapeseed, walnut, pumpkin, etc… oils instead.

6.  Substitute vanilla soy milk for evaporated milk.  1 1/2 cups is equal to those 12 oz cans usually used.

7.  Make your own dairy free sweetened condensed milk.  This recipe only works for a cake that is going to be baked:  Beat 2 eggs until thick.  Add 1 cup brown sugar and mix well.  Add 1 tsp vanilla and mix well.  Add 2 tbsp of a flour and beat for one minute.  Add 1/2 tsp baking powder and 1/4 tsp salt. Beat for another minute.  Set aside until you need to add it to your recipe. This is equivalent to one 14 oz can of sweetened condensed milk.

You can also try making homemade sweetened condensed milk by mixing about 2 1/2 cups of your type of “milk” (rice, nut, coconut, soy) with 8 tbsp sugar or agave.  Stir well and simmer over low heat until the “milk” has reduced and thickened.  This will take a couple of hours.  Keep the heat low and stir frequently.  When it’s thickened, you can add 1/8 tsp of salt and/or 1/2 tsp vanilla, if you’d like.  Put a clear plastic wrap up against the mixture before cooling in the fridge to prevent a “skin” from forming.

8.  Make a dairy free whipped cream.  Chill a can of full fat coconut milk overnight. Turn the can upside down and drained out the liquid.  Put the cold cream into a cold mixing bowl and whip into it’s light and fluffy.

9.  Substitute eggs with 1 tbsp ground flaxseed meal mixed with 3 tbsp water for every egg needed in the recipe.  Simply mix up the meal with the water and let it sit for at least five minutes to thicken to an egglike consistency.  Or if you are allergic to flaxseed, you can substitute 1/4 cup applesauce for every egg needed in the cake recipe and add 1 tsp of baking soda with 1 tbsp of vinegar to the cake recipe.

10.  Use Tofutti sour cream and cream cheese instead of the dairy versions.

11.  Substitute the dairy chocolate in chocolate cakes or fillings with Enjoy Life chocolate bars and/or chocolate chips.  Or use unsweetened cocoa powder instead of the chocolate.  Three tbsp of cocoa powder plus one tbsp of a fat (oil or “butter”) is equivalent to one ounce of unsweetened chocolate. One tbsp of cocoa powder plus two teaspoons of a fat (oil or “butter) plus one tbsp of sugar is equivalent to one ounce of semi-sweet baking chocolate.

12.  Replace nuts in a cake recipe with chopped dried fruit or coconut flakes or chocolate chips.

Allergy Friendly Torte

1.  Decide what type of torte you’d like to make:  chocolate mint (chocolate cake with mint filling); raspberry (white cake with raspberry jam filling); pumpkin spice (pumpkin cake with spiced filling); lemon (yellow cake with lemony curd filling); etc….  The options are actually endless.

2.  Make your cake:  Find a recipe that you really like and make your substitutions as needed.  Most torte recipes will tell you to bake one or two layers and then cut them.  I suggest instead that you bake thinner layers.

Line your cake pans with parchment paper and pour one cup of batter into each pan and bake for 10 minutes in a preheated 350 degree oven.  Let the cakes cool for a couple of minutes, then turn them over onto a wire cooling rack to cool, removing the parchment paper immediately from the cakes.

If you only own two cake pans or your oven will only fit two 8 or 9 inch pans at a time,  after you bake the first two cake layers and turn them over onto a wire cooling rack, put the cake pans into the freezer for a couple of minutes to cool them.  Then reline them with your previously used parchment paper and fill them with one cup of batter each again and repeat.

I usually find that a basic cake batter recipe for a two layer cake will make six of the one cup layers.  Let all the layers completely cool.

3.  Make your filling:  If you’re simply going to use jam, scoop out whichever jam you are going to use (I like to use Polaner All Fruit which has no added sugar) and whip it up in a bowl to a nice spreadable consistency. Similarly do the same if you are using a store bought lemon or fruit curd or fruit butter.

A recipe for your own lemon curd:  Heat 1/3 cup of lemon juice in a pan until it’s warm, but not boiling.  Whisk two whole eggs and one egg yolk with 1/2 cup of sugar.  Then while you’re constantly stirring, very slowly pour the hot lemon juice into the egg mixture.  Pour all of the mixture back into your pan and cook for about two to three minutes, stirring constantly.  Remove the pan from the heat and stir in 2 tbsp of “butter” which has been cut up into small pieces.  Add 1 tbsp of cream or cream substitute, 1/4 tsp vanilla and 1/8 tsp salt.  If you want the curd to be smoother, push it through a mesh strainer.  Wrap the curd with plastic wrap, pressing the wrap directly onto the curd surface.  Let it cool in the fridge until needed.

If you are making an allergy friendly cream filling: A nice versatile recipe I like to use is as follows:  Overnight, put two 14 oz cans of coconut milk into the fridge. When you’re ready to use them the next day, turn the cans upside down and open them.  Pour out the coconut water and scoop the “cream” into a cold mixing bowl (I put the bowl into my freezer for about ten minutes, along with the mixing tool.) Whip the cream until it’s nice and thick.

For a chocolate cream, add 1/3 cup special dark unsweetened cocoa powder, 1/2 cup coconut sugar, and 2 tsp vanilla.  To make it minty, reduce the vanilla to 1 tsp and add 2 tsp mint extract.  For a spice cream, add 1/2 cup coconut sugar and 2 tsp cinnamon or a mixture of cinnamon, ginger, cloves, nutmeg, etc….  For just a plain sweetened cream, just add 1/2 cup of coconut sugar and 1 tsp vanilla.

While the cream is being whipped, put 2 tbsp of cold water into a bowl. Gently sprinkle 2 tsp of unflavored gelatin over the cold water.  Let it sit for two minutes. Carefully pour 1/4 cup of boiling water over the gelatin and whisk until its completely dissolved. Let it cool for a couple of minutes. Then add it to the whipped cream.  You can either cool it in the fridge for two hours and then stir it and spread it over your layers or you can spread it directly onto your layers immediately and let the entire cake cool for two hours in the fridge.

4.  Layer your torte:  I find that the best way to layer the cake is to use a springform pan that fits your cake.  Put down one of the cake layers on the bottom of the pan, layer your filling, and then keep repeating until you reach the top layer of cake.  Cover and let the cake chill.  When you’re ready to top the torte, release the springform pan and clean up the sides with a metal spatula.

5. Top your torte:  After your torte is cooled, you can frost it with your favorite frosting or cover it with a ganache or top it with melted chocolate.

Elana’s Pantry has some nice allergy friendly frosting recipes if you’re trying to also avoid using sugar.  If you have no problems with powdered sugar, then use a recipe you like and just substitute as necessary for ingredients like butter and spread the frosting over your cooled torte.

For a ganache:  If you aren’t allergic to dairy, heat in a pan over low heat 1 cup of cream, 1 cup of sugar, and 1/4 tsp salt, stirring frequently until it begins to simmer.  Pour the hot mixture over 10 ounces of small pieces of chocolate.  Whisk until smooth.  Add 1 tsp vanilla and 1 stick of butter.  Cover and refrigerate for about an hour until it’s cool but spreadable.  Spread carefully over your cooled torte.

If you need to substitute, you can use Enjoy life chocolate, and/or water or your type of “milk” (this will just make it  bit thinner and have less of a “shine”) and/or 1/2 cup of Agave and/or your type of butter.

You can also make another type of ganache where you melt one ounce of your type of butter with two fluid ounces of your type of milk per four ounces of chocolate, cool, and then whip until thick.

For a hard chocolate topping:  Fill a small pan halfway with water.  Put a larger pan on top of the smaller pan and turn the heat to medium low.  Melt 2/3 of a 10 ounce bag of Enjoy Life mini chocolate chips, keeping the other 1/3 nearby.  Be sure to stir constantly.  Once the chips are melted, remove them from the heat and quickly stir in the remaining 1/3 of the chocolate chips until all the chips are melted.  Working quickly, pour the melted chocolate over the cooled torte, and use a cake spatula to spread the chocolate over the top and around the sides.

You can use regular chocolate if you’re not allergic to dairy.

If you use the chocolate as a topping, you’ll need to remove the torte from the fridge about an hour before you’re going to serve it so it can soften a bit. Then run your knife under hot water before slicing the torte.

Handling Holidays: Pies

website pies

“As American as apple pie.”

As the story goes, the Pennsylvania Dutch invented the two crusted fruit pie as we know it today, and apparently being able to have pies regularly with your meals was seen as a status symbol.  Whether this is all true or not, I don’t know, but I do know that my husband would rather have a pie than a birthday cake; that my members of my extended family would think Thanksgiving had gone horribly wrong if no pies were present; that figures say 700 million dollars in pies are sold every year in the U.S.; and that students everywhere are thrilled to celebrate Pi Day with pies of every type every year.

Ironically, though, pies, which are made with “good for you” ingredients like fruit and vegetables, are full of fat, sodium, and allergy triggers like wheat, nuts, and dairy.

Fortunately, when it comes to desserts, however, pies are probably the easiest to adapt for healthier eating or for an allergy restricted diet.  They usually don’t require very exact ratios of ingredients, and because you don’t need to make anything “rise”, you can pretty much substitute any ingredient with another without worry of disastrous results.

Healthier Pies

If you simply need to eat healthier, here are a few easy fixes to try:

For Crusts:

1.  Swap the white flour in the crust for whole wheat.  100% whole wheat has a higher fiber content, but you can also use white whole wheat if you want something closer to white flour.  Since 100% whole wheat flour is denser than white, you should use about 1/4 cup less in your recipe.

2.  Swap out the butter or shortening with coconut oil, which is actually a solid, not a liquid as the name implies.  It’s considered a healthier fat than butter and shortening.

3.  Make a crust using a liquid healthy oil as opposed to a solid fat.  A general recipe:  1 1/3 cup flour, 1/2 tsp salt, 1/3 cup oil, 3 tbsp “milk”.  I have used safflower oil, grapeseed oil, canola oil, etc… and almond milk, soy milk, and rice milk — all to success.

4. Substitute part of the flour in the recipe with a nut flour, coconut flour or soy flour.  You can substitute up to half of the flour with  a nut flour, about 1/4 of the flour with coconut flour, and up to 1/3 of the flour with soy flour.

For Fillings:

1.  Use Agave or Stevia or Coconut sugar in place of the sugar in the recipe.  For every cup of sugar use about half of any of these substitutes.  If you use the Agave and it’s simply a couple of tablespoons to 1/4 cup, don’t worry about it being a liquid.  If you’re using a cup or more, though, decrease any other liquid by at least 1/4 cup to 1/2 cup or increase a flour ingredient by 1/4 to 1/2 cup.

2.  Swap out any “whole” milk product (milk, yogurt, cream cheese, etc….) for a lower fat, lower sodium variety.

3.  Substitute egg whites for any whole eggs.  If you’re worried about the texture of a certain type of pie like pecan pie, use half whole eggs and half egg whites.

4.  Use date molasses instead of regular molasses.  You can use the same amount of date molasses as regular molasses.

Allergen Friendly Pies

If you need to substitute traditional ingredients, here are a few things you can try:

For Pie Crusts:

1.  Make a gluten free crust instead of a wheat flour type.  There are tons of recipes online you can follow.  Companies like Bob’s Red Mill also have their own pie crust mixes which you just add water to and roll out.  HINT:  These always need slightly more water than the instructions indicate, though, and you’re best rolling them out between wax paper.

2.  Substitute water or your type of “milk” (soy, rice, almond, coconut, etc…) for any milk in a crust recipe.

3.  Substitute vegan butter or coconut oil for any butter called for in a recipe.

4.  Use a recipe that calls for a liquid oil as opposed to butter so you can use safflower, canola, grapeseed, walnut, pumpkin, etc… oils instead.   A general recipe:  1 1/3 cup flour, 1/2 tsp salt, 1/3 cup oil, 3 tbsp “milk”.

For Fillings:

1.  Substitute vanilla soy milk for evaporated milk.  1 1/2 cups is equal to those 12 oz cans usually called for in a pumpkin pie recipe.

2.  Substitute vegan butter or a liquid oil or coconut oil for any butter called for in a recipe.  If you’re making a fruit pie that calls for “dotting with butter”, you can just omit the butter altogether and still have a tasty pie.

3.  Use a gluten free flour like garbanzo bean instead of a wheat flour.

4.  Make your own dairy free sweetened condensed milk.  This recipe only works for a pie that is going to be baked:  Beat 2 eggs until thick.  Add 1 cup brown sugar and mix well.  Add 1 tsp vanilla and mix well.  Add 2 tbsp of a flour and beat for one minute.  Add 1/2 tsp baking powder and 1/4 tsp salt.  Beat for another minute.  Set aside until you need to add it to your recipe.  This is equivalent to one 14 oz can of sweetened condensed milk.

You can also try making homemade sweetened condensed milk by mixing about 2 1/2 cups of your type of “milk” (rice, nut, coconut, soy) with 8 tbsp sugar or agave.  Stir well and simmer over low heat until the “milk” has reduced and thickened.  This will take a couple of hours.  Keep the heat low and stir frequently.  When it’s thickened, you can add 1/8 tsp of salt and/or 1/2 tsp vanilla, if you’d like.  Put a clear plastic wrap up against the mixture before cooling in the fridge to prevent a “skin” from forming.

5.  Use a frozen non-dairy dessert to replace the vanilla ice cream as a topping.

6.  Make a dairy free whipped cream.  Chill a can of full fat coconut milk overnight.  Turn the can upside down and drained out the liquid.  Put the cold cream into a cold mixing bowl and whip into it’s light and fluffy.

7.  Make a soy cream:  Mix one pint soy creamer, 1/2 cup soy sour cream, 1/4 cup Agave, 2 tablespoons cornstarch, and 1/4 teaspoon salt.  Cook over low heat until it thickens, stirring constantly.  Remove from the heat and add 2 teaspoons vanilla.  Scrape into a heat safe bowl and press plastic wrap directly against the cream to prevent a “skin” from forming.  Cool in the fridge.  Before serving, whisk the cream to make it lighter and fluffier.

8.  Substitute eggs with 1 tbsp ground flaxseed meal mixed with 3 tbsp water for every egg needed in the recipe.  Simply mix up the meal with the water and let it sit for at least five minutes to thicken to an egglike consistency.

Crustless Dairy Free Gluten Free Pumpkin Pie

Ingredients:

2 cups cooked, pureed pumpkin or 1 15 oz can of pumpkin

1 1/2 cup vanilla soy milk (or milk of your choice: evaporated milk, rice, almond, coconut)

1/2 cup liquid egg whites (or two whole eggs or 2 tbsp flaxseed meal mixed with 6 tbsp water)*

1/2 cup Agave

1/2 cup garbanzo bean flour (or other gluten free or wheat flour of choice)

1 tsp ground cinnamon

1 tsp dried orange  peel

1 tsp gluten free baking powder

1/2 tsp ground ginger

1/2 tsp ground nutmeg

1/4 tsp ground cloves

1/8 tsp salt

1/2 cup gluten free whole grain rolled oats

1/2 tsp ground cinnamon

1 tbsp Agave

1 tbsp melted vegan butter or oil such as grapeseed

Baking Instructions:

1.  Preheat an oven to 350 degrees.  Lightly grease a 9.5 or 10 inch pie pan with your preferred method.

2.  Mix the pumpkin with the soy milk, egg whites, and Agave.

3.  Mix the garbanzo bean flour with the cinnamon, orange peel, baking powder, ginger, nutmeg, cloves, orange peel, and salt.

4.  Mix the dry ingredients into the pumpkin mixture and pour into the prepare pie pan.

5.  Mix the rolled oats with the cinnamon.  Add the Agave and melted “butter” or oil, and combine well to make an oat topping.

6.  Use clean hands to evenly top the pumpkin mixture with clumps of the oat topping.

7.  Bake in the preheated oven for about 50 minutes.  The pie will be puffed and golden.

8.  Cool for 15 minutes on a wire cooling rack.  Then put into the fridge to cool completely.

* If you like your pumpkin pie denser, simply whisk in the egg whites with the rest of the liquid ingredients.

If you prefer a lighter, creamier version, though, whip the egg whites with 1/8 tsp of cream of tartar until they’re stiff. Mix the wet and dry ingredients together, and then gently fold the egg whites into the batter until they’re fully incorporated.

To fold egg whites:  Used a large curved spatula and be sure to put your batter into a large bowl.  Gently scoop your egg whites on top of the batter.  Then go along the curve of the bowl along the bottom of the batter with your spatula to gradually get some of the batter.  Scoop the batter gently into the center of the egg whites.  Then scoop your spatula back up toward the top of the batter and start all over again.  Essentially you’re just really, really gently incorporating the batter into the egg whites.

The American Love: The Chocolate Chip Cookie

website cookie

“But I want chocolate chip cookies!”

Growing up, my life was a collision of two worlds, even when it came to food.  On the one side was the traditional daily Korean fare of rice, fish and vegetables for all three meals.  On the other side was the American eating of the 1970’s – cheese in a can on Ritz crackers, Chef Boyardee, and Nestle Toll House cookies.

Even my non-baking, non-sweet eating Korean mother baked Nestle Toll House cookies on occasion.  It was what everyone did and still does.  Biting into a fresh from the oven chocolate chip cookie is high on the list as one of many people’s little joy’s in life. Chocolate chip cookies even became the state cookie of Massachusetts in 1997.

Go out to eat at a restaurant, and you’ll find chocolate chip cookies in some form worked into a dessert.  Go grocery shopping, and you’ll see 101 variations of the chocolate chip cookie with a handful of sugar cookies, macaroons, and oatmeal raisin cookies on the periphery.  Buy ice cream, and you’ll find the chocolate chip cookie ice cream sandwich, the chocolate chip cookie dough ice cream, and broken up chocolate chip cookies to use as a topping.  You can even purchase chocolate chip cookie scented candles, soaps, air fresheners, and hand sanitizers.

Americans have a love affair with chocolate chip cookies.  And when dietary restrictions or allergies limit your ability to have dairy, wheat, sugar, nuts, soy, and/or sugar and fats, you can suddenly find yourself living a life without one of your food loves.

The good news for most folks these days is that you can get just about any type of chocolate chip cookie you need:  fat free, sugar free, gluten free, dairy free, you name it, it’s out there.  Unfortunately, they don’t always quite “hit the spot” for whatever reason.  Many that I’ve tried just simply have a strange aftertaste that I can’t quite get over.  Others are too pasty or way too hard.  Sometimes it’s just not “right”, meaning it’s not what you expected out of your chocolate chip cookie.  And even when you do find a type that you like, sometimes you just want a homemade, fresh from the oven chocolate chip cookie.

Until very recently, I never tried making a chocolate chip cookie at home, though. Why be disappointed?  But the other day, my middle daughter said that she wanted to make cookies, and she wanted them to be chocolate chip.  What was a mother to do?  I bit the bullet and worked out a recipe for my daughter.  Because that’s what a good mommy does, right?

So, below is a recipe that my daughter and I concocted for chocolate chip cookies which are dairy free, soy free, nut/peanut free, gluten free, and made with a heart healthy fat and little refined sugar.  We decided we wanted them to be like the bigger, chunkier cookies you buy fresh from the bakery, and I have to tell you that the group we served them to the evening we baked couldn’t believe they had none of the above ingredients.  I hope you enjoy them, too.

Oatmeal Chocolate Chip Cookies

Ingredients:

3 1/2 cups gluten free whole grain oats (quick cooking or regular, either is fine)

2 cups gluten free flour blend (we used Bob Red Mill’s which was garbanzo bean flour and brown rice flour mixed)

1 cup coconut sugar (we used the Madhava brand found at the grocery store)

1/2 cup gluten free ground flaxseed meal

1/2 cup tapioca starch

1 tbsp xanthan gum

2 tsp baking soda

2 tsp cinnamon

1 tsp sea salt

2 to 3 cups Enjoy Life allergen free mini chocolate chips*

1 1/2 cup safflower oil

3/4 cup unsweetened applesauce

1/2 cup Agave

1 tbsp gluten free vanilla

Baking Instructions:

1.  Preheat the oven to 325 degrees and prepare your cookie sheets with parchment paper.

2.  Grind the oats in a food processor to make 3 cups of oatmeal flour.   Measure the 3 cups into a large bowl.

3.  Add the gluten free flour blend, coconut sugar, flaxseed meal, tapioca starch, xanthan gum, baking soda, cinnamon, and salt.

4.  Stir in the mini chocolate chips.  Set aside.

5.  Blend together the oil, applesauce, agave and vanilla.

6.  Make a hole in the center of the dry ingredients and pour in the wet ingredients.  Mix the batter until all ingredients are well mixed together.  (Note:  With gluten free batter, the chips will seem like they aren’t incorporating well.  When you form the cookies, you can just use your fingers to make sure the chips are in the dough.)

7.  To form the cookies, take two level tablespoons of cookie batter and roll them with clean hands into balls.  Place them on a cookie sheet with enough space to flatten the cookie with a fork in a crisscross pattern.

8.  When your cookie sheet is full, bake the cookies in the preheated oven for 8 minutes.  Turn the cookie sheet around and bake for another 8 minutes.  The cookies will be nicely browned.

9.  Cool on the cookie sheet for at least two minutes before moving the cookies to a wire cooling rack.  Cool completely.

10.  Enjoy!  Makes 36 large cookies.  You can always choose to make one tablespoon sized cookies, but you should then reduce the cooking time by a couple of minutes or so.  (Note:  We discovered that these were absolutely great for making a homemade nondairy frozen dessert “ice cream” and chocolate chip cookie sandwich!)

*My son likes a “more cookie to chips” ratio, so 2 cups of chocolate chips is good for his batter, but my daughters prefer a “more chips to cookie” ratio, so they put 3 cups in their batter.

When You’re Out of What You Need

DIGITAL CAMERA

“What do you mean we’re out of baking powder?”

My younger two children and I were busy, baking a variety of quick breads for a luncheon we were hosting the next day.  Their favorites were on tap:  chocolate chip date bread, pumpkin, a gluten free banana bread, and a lemon poppy seed.

The kitchen held the evidence of our hard work:  flour scattered on the counter top and kitchen stools – courtesy of my son; millimeter tabs of butter sticking to the kitchen aid and measuring spoons – my daughter’s workmanship; and measuring cups and ingredients cloistered in the center – my attempt at providing some measure of organization and neatness to the mess.

All had been going well with two of the four breads in the oven and our attentions turned toward the last two breads when my daughter said, “We’re out of baking powder.”

“What you do mean we’re out of baking powder?  When did we run out of baking powder?”

“I used the last bit in the pumpkin bread.”

“So, why didn’t you tell me BEFORE we started making the banana bread?”

“I dunno.”

That last statement, of course, was presented with the traditional shrug and vacant expression we moms have come to associate with such an explanation from our children.

Fortunately for my daughter, I know a trick or two, and we were able to finish preparing the last two breads despite running out of baking powder.

The same experience

Chances are that you’ve had a similar experience sometime in your life of cooking. You’re halfway into a recipe and suddenly realize you’re all out of a key ingredient. Sometimes you haven’t begun cooking but would really like to make something which requires an ingredient you don’t currently have in the house.

What can you do?

Do you have to stop cooking or forget making that particular recipe?  The answer is usually, “No,” because chances are good that you actually have what is necessary to substitute for most key recipe ingredients. If you google the ingredient you’re missing, you’ll find a whole host of online recommendations for substitutes, but a few of the more common culprits are listed below.

Common Culprits

1.  You’ve run out of baking powder:  People tend to always have baking soda in the house because we use it for more than just cooking.  If you run out of baking powder you can make your own.  For each teaspoon of baking powder you need, simply add to your recipe 1/4 tsp of baking soda plus any ONE of the following: 1/2 tsp cream of tartar OR 1/2 cup buttermilk or yogurt OR 1/4 cup molasses.  I usually determine which ingredient I’ll use by what I have in the house and which might taste better in the recipe.

2.  The recipe calls for buttermilk which you don’t buy:  Whenever a recipe calls for buttermilk, you can make your own.  Simply add 1 tablespoon of vinegar or lemon juice to 1 cup of your type of milk (cow, soy, rice, etc…) and let it sit for five minutes.  It’ll thicken up, and you can simply stir and use whatever amount you need for your recipe.  You can also mix 3/4 cup of yogurt with 1/4 cup of milk or 3/4 cup sour cream with 1/4 cup milk.  Again you can choose simply by what you have in stock or by which you’d think would taste best in your recipe.

3.  You’re baking, and you’re completely out of eggs:  No worries.  1 tablespoon of ground flaxseed mixed with 3 tablespoons of water is equivalent to one egg.  If you don’t have ground flaxseed on hand, 1/4 cup of a pureed fruit or vegetable like applesauce or pumpkin will substitute as an egg binder.  If the egg is acting as a leavener in your recipe (like for a cake), you can replace the egg by adding an extra 1 tsp of baking soda to your dry ingredients and mixing in 1 tablespoon of vinegar as the last ingredient to the batter.

4.  The recipe wants you to use milk but you’re out:  If it’s a baking recipe like a cake or cookies, you can always use another liquid like fruit juice or even water.  If you’re making something like a soup that uses milk simply as a liquid, you can substitute a vegetable or chicken broth or water seasoned with herbs.  If you’re making a dish that uses milk to make it creamy and thick, you can substitute cooked pureed vegetables in an equal amount.  If you’re baking something that needs the milk to give it density and thickness, substitute yogurt or sour cream, but reduce your fat (butter, oil, etc…) by about 1/4 cup.

5.  You need sour cream but you never buy it:  You can substitute yogurt which you’re more likely to have but for every cup of sour cream you’ll use 1 cup of yogurt mixed with 1 tablespoon of flour.  You can also substitute using 3/4 cup of a homemade buttermilk and adding about 1/3 cup of a solid fat (butter) to your recipe.

6.  You’re completely out of yogurt:  Substitute one cup of sour cream or homemade buttermilk or pureed cottage cheese for every cup of yogurt needed.

7.  You don’t buy cottage cheese or ricotta cheese for dietary/allergy reasons: Simply substitute pureed tofu in equal amounts.

8.  The recipe wants you to use molasses or honey instead of sugar which is all you have or vice versa:  1 cup of molasses is equal to 3/4 cup of sugar and 1 cup of honey is equal to 1 1/4 cup of sugar.  What’s important to remember is that molasses and honey are wet ingredients verses the dry ingredient sugar.  So, if you’re adding molasses or honey instead of sugar, reduce another liquid ingredient by at least a 1/4 cup. If you’re substituting sugar, make sure to increase the liquid by at least a 1/4 cup.  For all three you can always substitute half the amount of Agave remembering to reduce the liquid by 1/2 a cup if you’re using the Agave for the dry sugar.  You can also use 1/2 the amount of Truvia for sugar.  If you substitute Truvia for the molasses or honey, be sure to increase your liquids to adapt for the loss in wet ingredients.

9.  Your recipe calls for tomato sauce and you only have tomato paste:  3/4 cup of tomato paste mixed with 1 cup of water will give you about 2 cups of a tomato “sauce”.  FYI:  If you only have tomato sauce and need tomato “juice” in your recipe, 1/2 cup of tomato sauce mixed with 1/2 cup of water is equivalent to 1 cup of tomato juice.

10.  Your recipe wants you to use a certain type of meat, vegetable, bean or whatever and you only have another type:  Go head!  Substitute!  Use what you have.  Just be sure that what you’re using is comparable. For example, salmon, halibut and tuna are all fish with similar texture, thickness and cooking time, while cod and haddock cook similarly, as does flounder, tilapia and catfish. For vegetables, substitute one root vegetable for another (carrots, turnips, potatos, etc…), a flower vegetable for another (broccoli, cauliflower, brussel sprouts, etc…) and make sure everything is cut to the same shape and size and thickness so your cooking times will stay the same.

A recipe

Since I’ve had a couple of requests now for how I make apple pie and apple crips, I’m going to share those below.

Apple Pie or Apple Crisp

Apple Filling:

Ingredients:

10 cups peeled, cored, sliced apples*

1/4 cup Agave

1 tablespoon lemon juice

2 tsp favorite spices**

Cooking Instructions:

1.  Put apples into a pan which allows them to be evenly distributed and cooked.

2.  Mix agave with lemon juice and spices and pour over the apples.

3.  Cook the apples over medium-low heat, stirring occasionally until the apples begin to soften and release some of their juices.  Usually about 15 to 20 minutes. They’ll lose that “raw” look and take on a slightly darker hue.

4.  Drain the apples, keeping the liquid and returning the liquid to the original cooking pan.  Cook the liquid down over medium-low heat until it’s reduced by about half.

5.  Mix the reduced liquid back in with the apples and set aside.

* Use apples which are good, crisp, sweet eating apples like honey crisp, juno gold, gala, braeburn, etc… which don’t need a lot of sweetening.  Regular pies and crisp tend to call for baking apples which are blander and that’s why the recipes call for two cups of sugar!  FYI:  A regular fist size apple will yield about one cup of apple slices.  The newer gigantic sized apples are usually about two cups.

(NOTE:  If you only have Macs or Empires or green apples, you can still use them, but since they are dry apples, you’ll notice that the liquid actually gets absorbed as they soften.  No worries.  Just skip steps 4 and 5.  Mac/Empire apples will soften more quickly than the crisp, eating apples.  Green apples will take longer.)

** I vary the spices.  Sometimes I just use cinnamon and nutmeg.  Other times I use ginger and cardamom.  Occasionally I use all four mixed together. Experiment to see what flavors you like.

For Apple Pie:

1.  I use Bob’s Red Mill gluten free baking and biscuit mix recipe for pie crust, only I add 1 1/2 tsp cinnamon and 1/2 nutmeg to the dry mix before adding the water. My two tips if you’re going to use that pie mix, though:  The dough usually needs a bit more water than they say, and to roll out the dough, put your dough between two pieces of wax paper.  It’ll roll out nicely and you can easily pull it off when you put the dough into the pan or as the top crust.

2.  After you’ve put your bottom crust into your pie pan, give the apples a good mix before layering them carefully one on top of each other in circle in the pie crust. Be sure to pour off any leftover liquid over the top of the apples when you’re done layering them.

3.  Cover the apples with your top crust and fold your edges in whatever manner you prefer (pinching, forking, free-style).

4. Melt a tablespoon of vegan butter and mix it with 1 tsp agave and 1/2 tsp cinnamon.  Brush the crust with the mixture, put in steam slits, and cover the pie edges with an edge cover or with aluminum foil.

5.  Bake for 35 to 40 minutes in a preheated 375 degree oven until the crust is browned and the apples are bubbling.

For Apple Crisp:

1.  Mix the apples and liquid one last time before placing into a 9 x 13 pan.

2.  Combine 2 cups gluten free whole grain rolled oats with 1/2 cup gluten free flour like garbanzo bean flour, 1 tsp cinnamon, 1/2 tsp nutmeg, and 1/2 tsp ginger.

3.  Cut in with a pastry blender 1/2 cup vegan butter to form a crumbly mixture.

4.  Add 1/4 cup agave and mix well until the dry crumbs are damp.

5.  Using your clean hands, crumble the oat mixture evenly over the apples.

6.  Bake for 15-20 minutes in a preheated 350 degree oven until the topping is browned and the apples are bubbling.

Going Uphill: The Possible Obstacles

website obstacles

“I’m sorry but I can’t make it up the hill.”

One cold, crisp December morning a professional hairdresser and make-up artist turned my everyday cute self into a beautiful cover bride.  Snow had swept in the evening before, leaving the countryside picture perfect white.  Unfortunately, the snowplows, dirt and salt had left the parking lots and roads grimy and filthy.

Residual light snow fell onto the umbrella my maid of honor carried over my head while faithful bridesmaids valiantly tried to hold up my dress above the filth and grime as we slowly and carefully stepped to the limousine.   The driver assured me that the roads were clear, and we were on our way to the moment I had been planning for the past six months.

My husband-to-be was waiting at the church with the family and friends who represented the first twenty-two years and twenty-three years of both our lives. In less than an hour our new lives together would begin.  Or so I thought.

“Ma’am, I’m sorry but the main road up to the church is closed because of ice.  I’ll have to go around.”  The road “around” unfortunately was closed as well.  As was the third route option.  We could see the church sitting at the top of the hill, its steeple standing tall in the middle of the swirling snow, but we could not get to it.

Would my wedding be thwarted by the mercilessness of nature?  Would I break my leg if I got out and walked up the icy road?  Maybe getting married in December wasn’t such a great idea after all.

In the end, we made it to the church half an hour later as the sun broke through the clouds and melted away some of the offending ice, but for a moment, it had seemed as if the obstacle might be too great to overcome.

We can have the same overwhelming feeling when it comes to changing our eating habits to fit a food allergy or a healthier diet as obstacles we hadn’t anticipated loom before us.

The Obstacles

For most folks the biggest obstacle is price.  Allergen free foods are more expensive than regularly processed items.  Fruits, vegetables, whole grains, and other fresh produce cost more than white flour goods and boxed and canned foods.  As well, some people find it difficult to find resources which might help them with their new lifestyle while others discover that it’s not easy to create or revamp their own recipes for healthier or allergen free cooking.  Add on that suddenly folks have to “educate” their friends and family about their allergies or dietary restrictions with not always the best responses, and it can seem like one might not be able to make the changes after all.

The Helps

Cost:  When everything you make has to be gluten, dairy, nut, sugar and occasionally egg free at the same time, cooking can become a bit expensive. There are ways to cut back on costs, though.

1.  Many “regular” foods ARE gluten, dairy, nut, egg, etc… free.  Sometimes we get caught in the mindset that everything we buy has to be “special”, but that’s not the case.  You just need to read the labels, but you’ll be surprised by the number of items you find you can still eat.

2.  Whole is better than parts.  If you’re eating healthier and purchasing more fruits and vegetables, don’t buy the separately packaged, pre-washed, cut up varieties.  They always cost more.  Purchase the whole lettuce head.  Buy the loose vegetables and not the ones already on the foam trays.  Get a whole melon and not the halves.

3.  Buy when there are sales.  Most of the grocery stores in my area will have a sale on different allergen free items at least weekly, so I stock up when the prices are good.  You can also find sales online.  Comparison shop between the brand companies and Amazon.

4.  Frozen is good.  Fruits and vegetables which are frozen are cheaper than fresh.  While you definitely want to get fresh when it’s in season, you don’t want to when it’s not.  It’s too expensive.  Go with the frozen and read my post on the “frozen chosen” to learn all you can do with them.

5.  Buy in bulk.  Places like BJ’s and Costco’s now have many allergen free items in stock for purchase at better prices.  At the supermarket, an 11.5 oz of Agave costs me between $4 and $5.  At BJ’s I can buy a 48 oz container for $6.99.  Also, online, if you purchase more, often the price is less per unit and you ultimately save on shipping and handling, too.  For veggies and fruit:  If there’s a good price on something you regularly eat, you can purchase it and freeze them for later use.

6.  Shop at discount places.  In my area Ocean State Job Lot is a wonderful place for picking up gluten free items with good expiration dates for a cheaper price than I’d find it at the store or online.  I don’t make a special trip to the Job Lot but if I’m passing by, I stop in and stock up.  Look around for stores in your area that provide the same option.

7.  Shop with friends.  If you have friends who have similar allergy or health issues, purchase even larger quantities of needed items, together and split the costs.  I’ve found this helpful, because sometimes a friend wants a little of something while I want a lot or vice versa, and we can take the proportional amounts that we each want while saving some money.

Resources:  The biggest question I always get is “Where do I start?”  The nice thing about today’s age is that resources abound online so you don’t even have to spend money purchasing books.  You can get help for free.  Google any food allergy and numerous sites will pop up.  Type in “healthy” before whatever recipe you want, and you’ll get a “bazillion” hits.  Because it is “numerous”, though, ask around.  Friends can tell you what sites have been helpful to them.  Once you are at a site, see what other sites are linked to that one.  People are very open about sharing site they “like”.  If you do want a book, Google your particular allergy and see what pops up.  Read the reviews, and you’ll find that people are very vocal about whether a book works or not.

Recipes:  If you find that you’re simply are not cut out for revamping or creating your own recipes, don’t worry.  There are plenty of people out there who have recipes you can simply follow.  Those sites and books you found will always have recipes you can use, and you’ll find allergen free recipes for just about anything under the sun you want to create.  And if following recipes isn’t your thing, either, you still don’t need to stress, because there are many, many products on the market, both online and in stores.  I personally don’t make my own pie crusts from complete scratch.  Bob’s Red Mill has a wonderful gluten free baking and biscuit mix which makes a great pie crust, so I use it.  I add my own little touches, a little cinnamon and spice added, a bit of vegan butter brushed on the top, etc…, but I’m using a store bought product.  No one says you have to do it all yourself, especially when there are plenty of options out there for you to use.

Education:  This is usually the most difficult obstacle, more than even the cost. Too often the obstacle are well-meaning friends and family who simply don’t understand.

1.  “But I only used a little.”  Sometimes folks don’t seem to understand that “a little bit” can be deadly for someone with a food allergy.  In these cases, it’s important to be patient and to take the time to gently explain that a little bit can trigger a reaction which could lead to death.  Don’t be dramatic, but matter of fact.  In time, people usually begin to get it.  If you’re eating healthier for a health issue, simply explain that you really can’t eat certain foods because of your health.

2.  “But I can cook for you.”  Sometimes folks turn down your offer to bring something you know you can eat.  They’ve invited you and don’t want you to have to go through any effort.  Occasionally, they’re actually hurt that you want to bring something, as if there won’t be anything they’ve made you can eat.  In these cases, you need to be honest and simply explain that it’s no reflection upon them, but you’ve learned to be careful because you’ve had bad experiences in the past.  Usually people understand when you explain it that way.

3. “But I’ve read that you can be misdiagnosed with an allergy.”  Sometimes people don’t believe you have an allergy.  With all the information out there about “sensitivities” verses “intolerances” verse “allergies”, it’s easy to be confused.  People aren’t trying to call you a liar.  They’re genuinely concerned that your whole life may be changing when it doesn’t need to be.  Simply tell folks that you’re aware of the differences and can assure them that you do indeed have a confirmed allergy.  If you’re firm, in time people accept the truth.

4.  “But don’t you want to eat it.”  Sometimes people just can’t understand how you can resist eating foods which are so tempting.  They’re not intentionally trying to make you feel badly.  They just think they’d have less self-control if they were in your place.  This is another time when you can simply be honest.  Yes, you’re tempted, but you know it could have terrible consequences – anaphylactic shock, another heart attack, whatever….  People usually do get it eventually.

5.  “But what’s left for you to eat.”  This one may only apply to folks like myself who are allergic to multiple foods, but sometimes people just can’t take it in.  They think you’re somehow going to be deprived.  If this is the case, you simply need to tell them all the wonderful foods you’re still able to eat, or better yet show them.  Below is a recipe for a chicken piccata that I serve to guests which is not only delicious but easy to make.

Chicken Piccata

Ingredients:

1/2 cup Gluten Free Flour*

1 tsp dried oregano

1/2 tsp black pepper

1/2 tsp dried thyme leaves

1/2 tsp dried basil

1/4 tsp ground onion powder

1/4 tsp ground garlic powder

10 chicken cutlets**

2 tsp olive oil

1/2 cup vegan friendly white wine***

1 cup low sodium, fat free gluten free chicken broth

1/4 cup lemon juice

2 tsp minced garlic

2 tbsp vegan soy free “butter”

Cooking Instructions:

1.  Mix the flour with the oregano, pepper, thyme, basil, onion powder and garlic powder.

2.  Coat both sides of the chicken cutlets with the flour, making sure to shake off any excess and stack them on a plate.

3.  Heat 2 tsp of olive oil in a large skillet over medium heat and add the chicken cutlets.

4.  Brown the cutlets one minute on each side and place back onto your plate.

5.  Deglaze your pan with the white wine and cook until the wine is almost gone.

6.  Mix the chicken broth with the lemon juice and garlic.  Add to the wine in the pan.

7.  Add the cutlets back into the pan and cook for one to two minutes on each side until the chicken is cooked through.

8.  Remove the cutlets to a warming dish, and add the “butter” to the sauce left in the pan.

9.  Cook the sauce until it’s reduced a bit and thicker.  Pour over the chicken.

* I like to use a garbanzo bean flour, but you can use whatever type you prefer.  If you have no wheat or gluten issues, use 100% whole wheat flour.

** I rarely actually buy cutlets because they’re more expensive.  I keep frozen chicken breast in the freezer which I defrost only partially, then cut into half both lengthwise and widthwise so I have cutlet sized chicken.  (Because the chicken breasts they sell these days are so large, you can do this.  If you buy normal sized chicken breasts, you should only cut them widthwise so you don’t have tiny portions.)

*** If you go to vegnews.com or barnivore.com, you can find lists of wines not contaminated with casein.

Food Allergies and Store Bought Products

website brownies

“It’s not fair.”

My son is at that age – you know the one – where everything is “unfair”.  If he doesn’t get what he wants, “It’s unfair.”  If things don’t go as planned, “It’s unfair.” If his older sisters get to do something he’s too young to do, “It’s unfair.”  If people around him have something he doesn’t, “It’s unfair.”

And unfortunately for him, “it’s unfair” that he doesn’t have very sympathetic parents or older sisters.

“Sorry, life’s not always fair, kiddo,” is what he gets from his father.

“Life’s not fair; get used to it,” is what his oldest sister says.

“I learned life isn’t fair; you need to learn it, too,” is what his other sister tells him.

And from his mother, the poor child gets, “Where in the world did you ever get the notion that life is supposed to be fair?  No matter what they tell you in school, life is not about fairness.  It’d be nice if it was, but it’s not.  So, get over it.”

Ideally, we’d live in a world that is “fair”, meaning that all the rules would be consistent without any universal partialities and obstacles to life.  It’s not the case, however, and quite frankly, I think “it’s unfair” that there are people like myself who are allergic to so many foods that it prevents us from being able to enjoy eating whatever we want when we want.

Just because it is unfair, though, doesn’t mean we have no options.  The question I get most frequently from folks is “What is out there for me to eat in terms of store bought items?”And the answer is “plenty”.

Just to name a few:

1.  Gluten Free Breads:  Udi’s, Kinnikinnick, Whole Foods, Rudi’s, Food for Life, EnerG, and Glutino all make breads which are you can choose from.  Try different brands.  Try different varieties of bread from the same company.  You may find that you like a variety of the brands.  You may find you only like one type of bread from one company.  You will, however, find something that you do like.  I can tell you that if you’re looking for a bread that tastes like a “regular” bread, that Rudi’s multigrain bread is one that even my children will eat.

2.  Dairy Free Yogurts:  Trader Joe’s, Silk, and So Delicious are actual dairy free yogurts that I’ve tried.  You have to be careful, because even yogurts that are “soy” still might have dairy in them, so for example, O’Soy yogurts are not dairy free, though they are “mostly” free of dairy.  But there are others besides the three above like Whole Soy and Co, Wildwood, Ricera, and Amande.  If you used to be a “regular” yogurt eater, you may have to try a bunch to find one that has the consistency and taste you like.  I prefer the So Delicious brands myself.

3.  Almost everything free Chocolate:  Enjoy Life, Chocolate Gelt, Premium Chocolatiers, Amanda’s Own Confections, Divvies, and Sweet Williams are just a few companies that make chocolates which are dairy free, nut free, egg free, soy free, gluten free, and peanut free for those of us who have too many allergies to count.  I’m eternally grateful to all these companies!  I do tend to buy the Enjoy Life products, though, because their products are readily available in most grocery stores these days for reasonable prices (as compared to other brands like them, not as compared to “regular” chocolate).

4.  Store bought Cookies:  Lucy’s, Pamela’s, Kinnikinnick, Enjoy Life, Schars, Barbara’s, and Home Free are some companies that make “everything free” cookies.  I really like the Home Free double chocolate cookies and Pamela’s ginger cookies.  I tend to prefer a crisper cookie, though.  If you prefer a soft cookie, Enjoy Life makes those, but I personally find them rather pasty.  Mi-Del, Glutino, and Tate’s makes gluten free cookies which aren’t necessarily dairy, egg, or nut free.

5.  Dairy Free Gluten Free Pizza:  Amy’s Kitchen and Bold Organics makes dairy free and gluten free pizzas.  Tofutti’s makes a vegan pizza.  My favorite is Amy’s Kitchen rice crust dairy free pizza.  It tastes almost like “real” frozen pizza.

6.  Dairy Free “Milk” Products:  Earth Balance, Shedd’s, Olivio, Nutive, and Silk all make dairy free “butters”, “milks” and creamers whether it’s using soybeans, almonds, coconut, rice or other ingredients.  Daiya, Go Veggie, Toffuti, and Follow Your Heart make cheese which is actually dairy free.  You have to be careful, because as with the yogurts, a lot of the “shreds” do have casein in them even though they may not have “milk” in them.  So be sure to read labels if you find a brand that’s not one of the above.

7.  Non-dairy frozen desserts:  Rice Dreams, Luna and Larry’s, So Delicious, Tofutti, Double Rainbow, Almond Dream, and Purely Decadent all make “ice creams” which are dairy and/or gluten free and/or soy free.  Tofutti also makes “ice cream” sandwiches and other novelty desserts.  What’s great these days is that I can find most of these brands at grocery stores in our area!     

8.  Store bought canned/processed foods:  If you have food allergies, you’re a label reader. You have to be because your life is at stake.  If you go to http://www.eatallergyfree.com/index.html?c=Main.GetPreparedFoods though you can find a list of soups, snacks, crackers, cookies, etc… with specific notes about certain “regular” store bought foods which tend to be gluten, dairy, nut, egg, shellfish, etc… free.  While you don’t want to give up reading labels for yourself, it’s helpful to know where you can begin your search, though, for foods you can most likely eat from the store.

9. Cereals:  If you like a nice bowl of cereal in the morning that’s a brand you know, General Mills makes a gluten free Chex, Kellogg’s makes Rice Crispies, and Post makes Fruity and Cocoa Pebbles.  If you don’t mind trying other brands, Enjoy Life, Nature’s Path, Arrowhead Mills, Kashi, and Glutino all have some gluten free cereals.

Dairy Free Gluten Free Soy Free Brownies

Ingredients:

1/2 cup Gluten Free flour mix

1/3 cup Hershey’s special dark unsweetened cocoa powder

1/4 tsp gluten free baking powder

1/4 tsp salt

1 cup Enjoy Life allergen free mini chocolate chips

1/2 cup Earth Balance Soy Free “butter” or coconut oil, melted and cooled

1/2 cup Agave or 1 cup coconut sugar

1 tsp gluten free vanilla

2 eggs or 2 tbsp ground flaxseed mixed with 6 tbsp water

Baking Instructions:

1.  Preheat the oven to 350 degrees.  Line a 7 x 11 pan with If You Care parchment paper.  (You can use an 8 x 8 or 9 x 9, too.  Just remember that it will affect the thickness and therefore, maybe your baking time.)

2.  Mix the flour, cocoa powder, baking powder, and salt well with a whisk until there are no clumps of the gluten free flour.

3.  Stir in the chocolate chips.  Set aside.

4.  Mix the butter or coconut oil, agave or coconut sugar, vanilla, and eggs or flaxseed mixture. until well blended.

5.  Stir the dry ingredients into the wet and combine until they are well mixed.

6.  Spread the batter into the prepared pan and bake for 20-25 minutes.  The brownies will be pulling away from the sides and mostly firm to the touch.

When It All Goes Wrong: What To Do

website wrong

“Aaaack!  He kissed me!”

I was in the fourth grade when I had the misfortune to become the object of someone’s obsession.  His name was Roger, and he was a slightly overweight, buck-toothed, Polynesian boy whose father was in the military with mine.

For a reason known only to himself, he decided he wanted to kiss me.  So, for seven months, my recesses were spent running away from Roger.  As soon as I stepped onto the playground, he would be after me.  Fortunately, I could outrun him, and I managed to evade him for seven long months.

Then came that fateful day in April which I’ll never forget.  Roger was absent! After a morning of long division and grammar, I joyfully ran to the playground monkey bars with my friends.  Finally, I could just sit and relax and play without worrying about Roger.

And that’s when it happened.  Unbeknownst to me, Roger was not absent for the day but only missing the morning for a doctor’s appointment.  So, there I was, sitting at the top of the monkey bars, happily chatting away with my friends, unaware that the stalker was stalking his prey.

Suddenly my friends screamed, and I turned around, which was the wrong move to make.  Before I knew it, Roger had laid a wet, sticky, yucky kiss right on my cheek! “Aaaack!  He kissed me!” I yelled, and to this day, I believe a guardian angel must have been looking out for me, because I quite literally jumped off the top of those monkey bars, about eight feet off the ground; landed squarely on my feet at the bottom; and took off running to the girls room, which is where my teacher found me fifteen minutes later, still desperately washing my cheek with soap and hot water, with just as hot, wet tears steaming down my face.

The irony is that once Roger had been able to kiss me, he left me completely alone. The chase was done, and he was no longer interested.  I was too young at the time to give this particular life lesson any significance other than that I was finally free and able to relax for the last two months of fourth grade recess, which I gratefully did.

Sometimes, we get just as caught off guard when we’re cooking.  We’ve mastered the tricks of substituting key ingredients to match our food restrictions, and we’ve created many a recipe with much success.  But then it happens:  We’re baking or cooking something for company or the family, and the recipe just does not work; and the question is, “What do I do now?”

1.  Don’t panic:  99% of the time, whatever you’ve created is still salvageable.  Usually the problem with what you’ve cooked is either a taste issue or a texture one.  In either case, there are remedies.

2.  If it’s a texture issue, cover it:  If it’s a baked good, make a fruit compote where you saute some fruit with Agave and spices and serve it over slices of the cupcakes, cake or cookies.  If it’s an entree or vegetable item, sprinkle the type of cheese you can eat over it and warm it in the oven to melt the cheese.  Or make a sauce that complements the dish and pour it over the entree or vegetables.  The fruit or melted cheese or the sauce will help to cover the texture issue.

3.  If a baked good’s taste is not what you’d like, drizzle it:  If a cake or cupcakes or cookies aren’t quite to your liking, nothing works better than a good drizzle.  Melt some allergen free chocolate, thin it with your type of milk product, and drizzle it over the cake or cupcake or cookies.  Or if you can use powdered sugar, make a glaze of your liking with powdered sugar, a liquid to thin it, and flavoring of your choice — vanilla, orange, mint, etc….  Or use a cream cheese that you can eat where you melt it in the microwave with your type of milk to a drizzling consistency.  A good drizzle covers a multitude of taste imperfections.

4.   If it’s both a taste and texture issue, disguise it:  If you’ve made something that is falling apart or has a texture that is too soft or too thick or too anything, turn it into a crumbled or cut up mixture that can become a part of something else. For example, a cake that you crumble or cut up can become a layer in a parfait or trifle of fruit, yogurt or pudding, and cake or you can layer it with ice cream or frozen nondairy dessert to make a terrine.  Vegetables or meat can easily become a part of a stew, stroganoff, soup, or layered pasta or other type of casserole.  Once you layer the food in with other things, the taste and texture issues become a non-issue.

5.  If something you’ve cooked doesn’t taste good, doctor it:  Generally if you don’t like how something tastes, you usually have a sense of what is wrong.  It might be too salty or too sweet or too bland or different spices are competing with one another or one spice is too overwhelming.  In any of these cases, you can remedy the situation.

If it’s too salty:  Add more of the solid (vegetables, pasta, meat, beans, etc…) or liquid (broth, water, juice, milk, etc…) ingredients to balance out the ratio.  Or use a dash of something sweet like honey, Agave, maple or brown rice syrup, etc… to counter the salt.

If it’s too sweet:  Add an acid like lemon juice or balsamic vinegar.  Or if it’s a dish that will work to do so, add some salt or more pepper or a spice that works with the dish like cayenne or cumin.

If it’s too bland:  Add something sweet, salty or spicy to jazz it up.  Or use lemon juice or balsamic vinegar, in small amounts like a teaspoon at a time, to bring out the other flavors more.  Or invest in oils like truffle oil which a small drizzling of on top of a dish goes a long way toward adding deep flavor.

If it’s too spicy:  Cut the heat with something sweet like honey or Agave or molasses or with something fatty like your type of butter or peanut butter.  Or if it’s a dish that you can mix rice or pasta into to spread the spice out more evenly, do that.

If one spice is overwhelming:  Add a little more of a complementing ingredient. For example, spices like nutmeg, cloves, coriander, anise, ginger, etc… can be “diluted” with the addition of more fruit.  Herbs like basil, dill, oregano, bay leaves, etc… can be evened out with more vegetables.  Garlic, onions, chives, etc… can benefit from more beans or chicken or meat.

If flavors are competing with one another:  Decide which flavor you want and add more of that one.  Or add more ingredients until the flavor are dulled.  Or add a sweetener or something salty or an acid like vinegar to help the flavor meld more with one another.

The below are muffins which I’ve never, ever had any issues, so you won’t need to apply any of the above “fixes”!

Gluten Free Cranberry Chip Pumpkin Muffins

Ingredients:

3 1/2 cups Authentic Foods Gluten Free Multi-Blend Flour Mix

1 tbsp gluten free baking powder

2 tsp ground cinnamon

1 tsp baking soda

1/2 tsp salt

1/2 tsp ground ginger

1/2 tsp ground nutmeg

1/2 tsp ground cloves

2 cups finely chopped dried cranberries*

1 cup Enjoy Life Allergen Free mini chocolate chips**

2 cups pureed pumpkin or one 15 oz can pumpkin

1 cup liquid egg whites

1 cup Agave

2/3 cup safflower oil

1/2 cup soy milk (or whatever type you prefer or need)

Baking Instructions:

1.  Preheat the oven to 350 degrees, and line 24 muffin tins with If You Care Baking Liners (or another type if you prefer or simply grease the cups).

2.  Mix the flour, baking powder, cinnamon, baking soda, salt, ginger, nutmeg and cloves with a whisk until the flour is light and airy, not heavy.

3.  Stir in the cranberries and mini chocolate chips.

4.  Mix the pumpkin, egg whites, Agave, oil, and milk.

5.  Stir dry ingredients into the wet ingredients and blend until well combined.

6.  Evenly divide the batter among the muffin tins.  The cups will be 3/4 full.

7.  Bake for 20-25 minutes until a toothpick inserted in the center comes out clean.  Muffins will be puffed up and golden brown.

* Make sure the cranberries are finely chopped, because large cranberries in this muffin will mess up the texture of the muffin since you’re using gluten free flour.  I generally use my food processor to just chop them up, but you can always use a pastry knife or simply chop them up by hand.

** Make sure they are mini chocolate chips to help with the texture of the muffins.  You can also reverse the ratio and have one cup of the cranberries and two cups of the mini chocolate chips, which is how my children prefer it.